用UGUI简单实现Inventory案例
用UGUI简单实现Inventory案例
先贴上效果图
具体实现
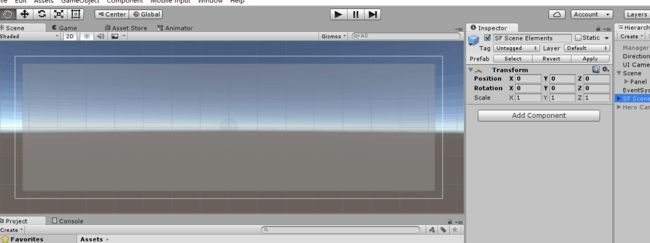
一:新建一个unity场景,新建画布如下

将canvas改名为Scene,系统会自动生成一个EventSystem
在Scene下面新建一个子UI对象Panel(画布)如图

这样画布就建好了
但是整个UI还需要一个UI摄像机,新建摄像机重命名为UIcamera
挂载在Scene上的EventCamera
注意Scene的RenderMode要设置成World Space
UIcamera的组件如下图

二:构建背景
新建一个空对象重命名为SF Scene Elements,reset一下
然后在SF下新建一个摄像机,一个空对象还有一个粒子系统
关于摄像机,这是一个对于背景的摄像机,和上面的UI摄像机在不同层级上共同完成我们看到的界面,注意对比摄像机上layer的设置,以及相应的Camera mask,main摄像机设置如图:

关于新建的空对象是用来放背景图片的
将空对象重命名为Background,然后添加Sprite Rendera组件,
在Sprite一项选择我们的背景如图

粒子系统是为了营造更好的3D效果,用unity默认的就好,注意例子系统的位置
点一下运行,现在的效果如图
可以看到效果比较朦胧,是因为UI画布遮挡着背景
然后有雪花飘着,十分有立体感
三:构建人物模型
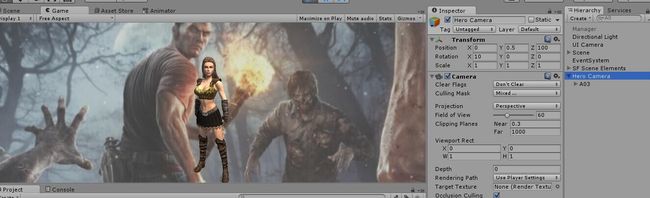
新建一个摄像机命名为Hero Camera,
将其clear flag设为dont clear;
layer设为0,culing musk 除去UI,如图

然后在camer下面放入我们的预设体,这里放入我在asset商店下载的一个模型A03如图
然后给A03添加一个animation,自己录制一个Idle动画,或者自己导入一个人物模型的动画都可以
现在点运行的效果图如下:
现在基本已经构建好场景了
四:完善UGUI界面
回到最开始Scene里,现在我们首先要添加物品栏
考虑到物品栏点击会有行为
所以想到用UI Button
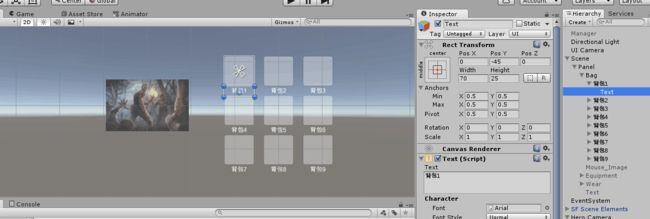
现在panel下新建一个新的panel,重命名为Bag(作为物品栏的容器)
然后在Bag里新建一个Grid layout(格子)组件
设置好格子的间隔以及大小如图,详细具体看unity宝典
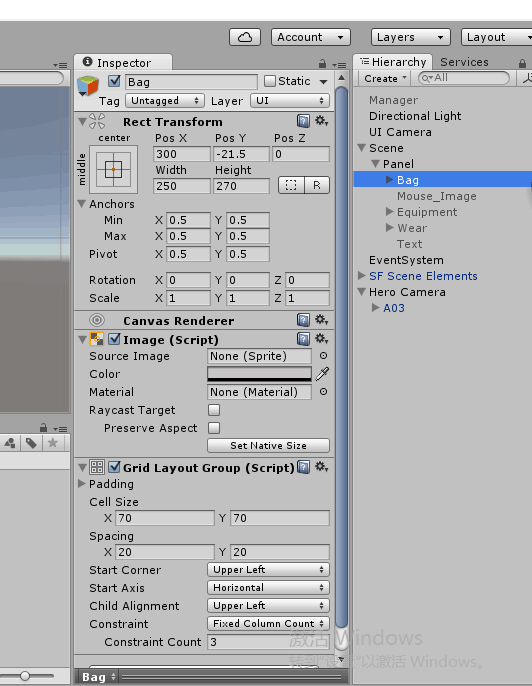
然后就可以在bag下新建button作为一个个格子
如图新建9个button,然后在button下自带的text填上相应的背包
装备栏也同理,新建一个画布,名为Equipment,
挂上格子组件,新建button子对象,如图
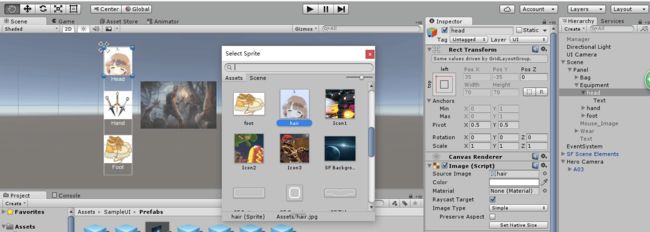
这里就可以在button的Image组件下的sourse Image,添加自己喜欢的贴图,这里的贴图必须是UI精灵
格子做好了,留意到最终效果还有个绿色的button和一个text
新建一个button,重命名为wear,修改text和image的color如图
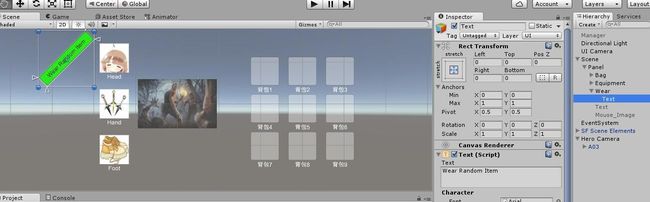
再新建一个text,如图
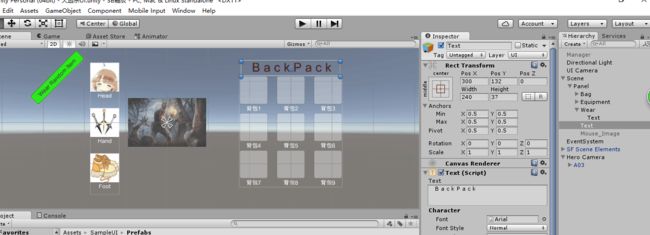
这里的text添加了一个shadow组件,给文字上了阴影,看起来更美观
现在点运行的效果图如下:

整个project到这里基本已经布好局了,接下来是一些UI行为的实现
五:画布随鼠标旋转
新建一个c#脚本TiltWindow
using UnityEngine;

public class TiltWindow : MonoBehaviour
{
    public Vector2 range = new Vector2(5f, 3f);

    Transform mTrans;
    Quaternion mStart;
    Vector2 mRot = Vector2.zero;

    void Start ()
    {
        mTrans = transform;
        mStart = mTrans.localRotation;
    }

    void Update ()
    {
        Vector3 pos = Input.mousePosition;

        float halfWidth = Screen.width * 0.5f;
        float halfHeight = Screen.height * 0.5f;
        float x = Mathf.Clamp((pos.x - halfWidth) / halfWidth, -1f, 1f);
        float y = Mathf.Clamp((pos.y - halfHeight) / halfHeight, -1f, 1f);
        mRot = Vector2.Lerp(mRot, new Vector2(x, y), Time.deltaTime * 5f);

        mTrans.localRotation = mStart * Quaternion.Euler(-mRot.y * range.y, mRot.x * range.x, 0f);
    }
}
在panel上挂载该代码即可
六:物品拖拽
这个实现起来,主要思路就是,当鼠标点击button,如果button上有贴图,那么贴图跟着鼠标位置移动,并且,button上的贴图变为默认(空物品状态),如果点击的时候,button处于空物品状态,并且鼠标上有贴图,那么,鼠标上贴图贴在UIbutton上。
对应的UML图如下
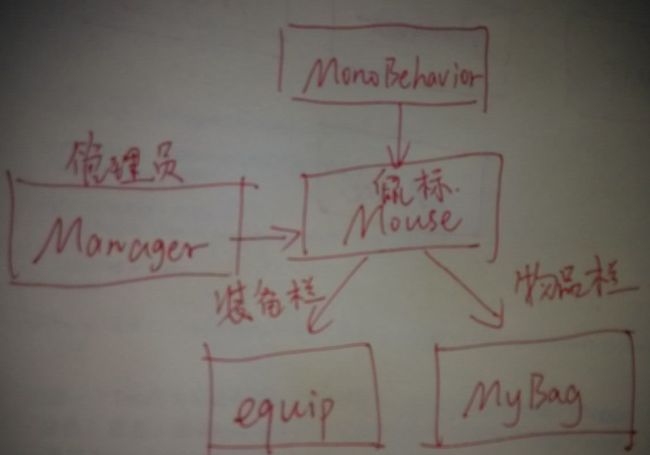
新建一个Mouse代码如下,挂在到一个新的空对象maneger上
using UnityEngine;
using System.Collections;
using Game_Manager;

namespace Game_Manager {

    public class Game_Scene_Manager : System.Object {
        private static Game_Scene_Manager _instance;
        private static Mouse_Image _Mouse;
        private int IsHair = 0;
        private int IsWeapon = 0;
        private int IsFoot = 0;

        public static Game_Scene_Manager GetInstance() {
            if (_instance == null) {
                _instance = new Game_Scene_Manager();
            }
            return _instance;
        }

        public void SetMouse(Mouse_Image _mouse) {
            if (_Mouse == null) {
                _Mouse = _mouse;
            }
        }

        public Mouse_Image GetMouse() {
            return _Mouse;
        }

        public void GenAll() {
            IsFoot = 1;
            IsHair = 1;
            IsWeapon = 1;
        }

        public int GetHair() { return IsHair; }
        public int GetWeapon() { return IsWeapon; }
        public int GetFoot() { return IsFoot; }

        public void SetHair(int a) { IsHair = a; }
        public void SetWeapon(int a) { IsWeapon = a; }
        public void SetFoot(int a) { IsFoot = a; }
    }

}

public class Mouse : MonoBehaviour {
    // Use this for initialization
    void Start () {

    }

    // Update is called once per frame
    void Update () {

    }
}
在新建代码equip如下,挂载到装备栏上的每一个button
using UnityEngine;
using System.Collections;
using UnityEngine.UI;
using Game_Manager;

public class equip : MonoBehaviour {

    private Game_Scene_Manager gsm;
    private Image equip_image;
    public int mouse_type;
    public Sprite weapon;
    public Sprite UISprite;
    public Color weapon_color;
    public Color UISprite_color;

    void Awake()
    {
        gsm = Game_Scene_Manager.GetInstance();
        equip_image = GetComponent();
    }

    public void On_equip_Button() {
        int MouseType = gsm.GetMouse().GetMouseType();
        if (equip_image.sprite == weapon && (MouseType == 0 || MouseType == mouse_type))
        {
            equip_image.sprite = UISprite;
            equip_image.color = UISprite_color;
            gsm.GetMouse().SetMouseType(mouse_type);
        }
        else
        {
            if (MouseType == mouse_type) {
                equip_image.sprite = weapon;
                equip_image.color = weapon_color;
                gsm.GetMouse().SetMouseType(0);
            }
        }
    }

    // Use this for initialization
    void Start () {

    }

    // Update is called once per frame
    void Update () {
        if (mouse_type == 1 && gsm.GetHair() == 1)
        {
            gsm.SetHair(0);
            equip_image.sprite = weapon;
            equip_image.color = weapon_color;
        } else if (mouse_type == 2 && gsm.GetWeapon() == 1)
        {
            gsm.SetWeapon(0);
            equip_image.sprite = weapon;
            equip_image.color = weapon_color;
        } else if (mouse_type == 3 && gsm.GetFoot() == 1)
        {
            gsm.SetFoot(0);
            equip_image.sprite = weapon;
            equip_image.color = weapon_color;
        }
    }
}
注意要修改对应的public变量如下图,不同的button是不同的。

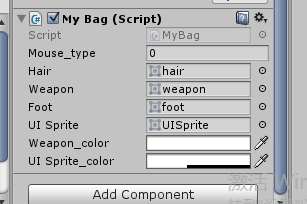
再新建脚本MyBag如下,挂载到物品栏每个button上
using UnityEngine;
using System.Collections;
using UnityEngine.UI;
using Game_Manager;

public class MyBag : MonoBehaviour {
    private Game_Scene_Manager gsm;
    private Image bag_image;
    public int mouse_type = 0;
    public Sprite hair;
    public Sprite weapon;
    public Sprite foot;
    public Sprite UISprite;
    public Color weapon_color;
    public Color UISprite_color;

    void Awake()
    {
        gsm = Game_Scene_Manager.GetInstance();
        bag_image = GetComponent();
    }

    public void On_equip_Button()
    {
        int MouseType = gsm.GetMouse().GetMouseType();
        if (bag_image.sprite != UISprite && (MouseType == 0 || MouseType == mouse_type))
        {
            bag_image.sprite = UISprite;
            bag_image.color = UISprite_color;
            gsm.GetMouse().SetMouseType(mouse_type);
            mouse_type = 0;
        }
        else
        {
            if (MouseType == 1) bag_image.sprite = hair;
            else if (MouseType == 2) bag_image.sprite = weapon;
            else if (MouseType == 3) bag_image.sprite = foot;
            mouse_type = MouseType;
            bag_image.color = weapon_color;
            gsm.GetMouse().SetMouseType(0);
        }
    }
}
这里同样要修改相应public变量如图,读者自己举一反三
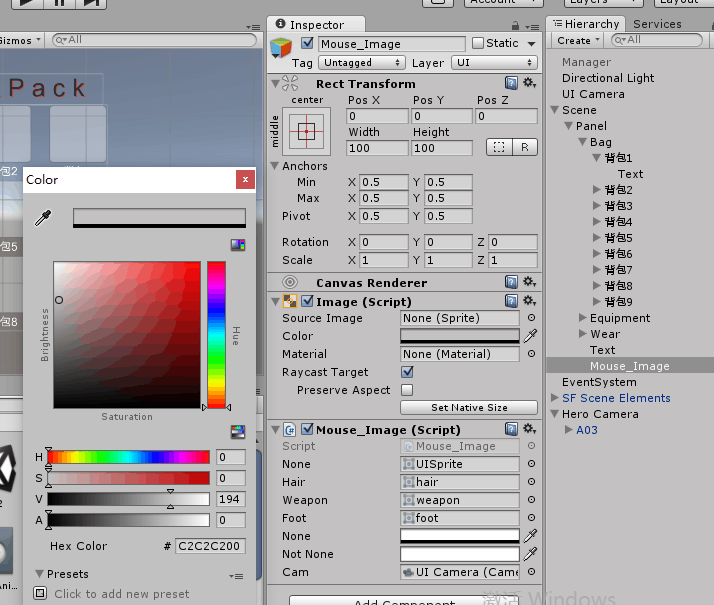
最后新建脚本Mouse_Image, 挂载到新建的UI Image上
using UnityEngine;
using System.Collections;
using Game_Manager;
using UnityEngine.UI;

public class Mouse_Image : MonoBehaviour {

    private Game_Scene_Manager gsm;
    private Image mouse_image;
    private int mouse_type = 0;
    public Sprite none;
    public Sprite hair;
    public Sprite weapon;
    public Sprite foot;
    public Color None;
    public Color NotNone;
    public Camera cam;

    void Awake() {
        gsm = Game_Scene_Manager.GetInstance();
        gsm.SetMouse(this);
        mouse_image = GetComponent();
    }

    public int GetMouseType() {
        return mouse_type;
    }

    public void SetMouseType(int Mouse_type) {
        mouse_type = Mouse_type;
    }

    void Update () {
        if (mouse_type == 0)
        {
            mouse_image.sprite = none;
            mouse_image.color = None;
        }
        else
        {
            mouse_image.color = NotNone;
            if (mouse_type == 1) mouse_image.sprite = hair;
            else if (mouse_type == 2) mouse_image.sprite = weapon;
            else if (mouse_type == 3) mouse_image.sprite = foot;
        }
        transform.position = new Vector3 (Input.mousePosition.x-425, Input.mousePosition.y-165, 0);
    }
}
这里新建的Image子对象,要注意设置初始的color,透明度为0.
再点运行,看下效果:
就差绿色button的生成装备没有实现了
七:生成物品
思路大概就是,点击按钮,告诉maneger,我要生成装备,然后maneger告诉装备栏,你们给我生成装备。
所以新建一个代码GenThing 如下 挂载到wear button上
using UnityEngine;
using System.Collections;
using Game_Manager;
using UnityEngine.UI;

public class GenThings : MonoBehaviour {

    private Game_Scene_Manager gsm;

    public void On_Press_GT() {
        gsm.GenAll();
    }

    void Awake() {
        gsm = Game_Scene_Manager.GetInstance();
    }
}
然后在wear的Onclick上选择Wear本身,function选择对应的On_GT

到这里,最后点运行,一个简单的demo就大功告成了。
再看一下最终的效果图:
虽然由于最近的时间问题,还有些小遗憾没解决,
像对象穿上相应的装备,还有装备的随机属性。
希望有兴趣的小伙伴,留下你们宝贵的想法~~~
谢谢大家!