Nacos(二)-Nacos Spring Cloud-注册中心
上一篇记录了下载安装nacos
- Nacos(一)-下载安装
本篇记录使用nacos作为注册中心,并注册服务提供者、服务消费者进行调用演示。
一、项目介绍
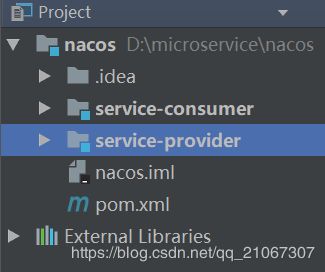
本次创建一个项目nacos,其中包含两个Module:
二、服务提供者
在service-provider引入相关依赖、配置服务信息及nacos地址、在主类上添加服务发现注解、创建一个普通接口:
1、添加依赖
pom.xml
<properties>
		<java.version>1.8java.version>
		<spring-cloud.version>Finchley.SR2spring-cloud.version>
	properties>

	<dependencyManagement>
		<dependencies>
			<dependency>
				<groupId>org.springframework.cloudgroupId>
				<artifactId>spring-cloud-dependenciesartifactId>
				<version>${spring-cloud.version}version>
				<type>pomtype>
				<scope>importscope>
			dependency>
		dependencies>
	dependencyManagement>

	<dependencies>
		<dependency>
			<groupId>org.springframework.bootgroupId>
			<artifactId>spring-boot-starter-webartifactId>
		dependency>

		<dependency>
			<groupId>org.springframework.cloudgroupId>
			<artifactId>spring-cloud-starter-alibaba-nacos-discoveryartifactId>
			<version>0.9.0.RELEASEversion>
		dependency>

		<dependency>
			<groupId>org.projectlombokgroupId>
			<artifactId>lombokartifactId>
			<optional>trueoptional>
		dependency>

		<dependency>
			<groupId>org.springframework.bootgroupId>
			<artifactId>spring-boot-starter-testartifactId>
			<scope>testscope>
		dependency>
	dependencies>
主要包含:
- SpringCloud配置
- alibaba-nacos-discovery
2、添加配置
application.properties
spring.application.name=service-provider
server.port=30201

spring.cloud.nacos.discovery.server-addr=192.168.1.125:8848
3、添加服务发现注解
在主类添加@EnableDiscoveryClient
@SpringBootApplication
@EnableDiscoveryClient
public class ServiceProviderApplication {

	public static void main(String[] args) {
		SpringApplication.run(ServiceProviderApplication.class, args);
	}
}
4、编写接口
@Slf4j
@RestController
@RequestMapping("user")
public class UserController {

    @RequestMapping("sayHello")
    public String sayHello(@RequestParam("userName") String userName){
        log.info(userName + ",hello nacos");
        return userName + ",hello nacos";
    }
}
接口很简单,就是接受用户名参数,进行打印并返回信息
三、服务消费者
在service-provider引入相关依赖、配置服务信息及nacos地址、在主类上添加服务发现注解、调用服务提供者接口:(大体跟提供者一样)
1、添加依赖
pom.xml
<properties>
		<java.version>1.8java.version>
		<spring-cloud.version>Finchley.SR2spring-cloud.version>
	properties>

	<dependencyManagement>
		<dependencies>
			<dependency>
				<groupId>org.springframework.cloudgroupId>
				<artifactId>spring-cloud-dependenciesartifactId>
				<version>${spring-cloud.version}version>
				<type>pomtype>
				<scope>importscope>
			dependency>
		dependencies>
	dependencyManagement>

	<dependencies>
		<dependency>
			<groupId>org.springframework.bootgroupId>
			<artifactId>spring-boot-starter-webartifactId>
		dependency>

		<dependency>
			<groupId>org.springframework.cloudgroupId>
			<artifactId>spring-cloud-starter-alibaba-nacos-discoveryartifactId>
			<version>0.9.0.RELEASEversion>
		dependency>

		<dependency>
			<groupId>org.springframework.bootgroupId>
			<artifactId>spring-boot-starter-testartifactId>
			<scope>testscope>
		dependency>
	dependencies>
主要包含:
- SpringCloud配置
- alibaba-nacos-discovery
2、添加配置
application.properties
spring.application.name=service-consumer
server.port=30300

spring.cloud.nacos.discovery.server-addr=192.168.1.125:8848
3、添加服务发现注解
在主类添加@EnableDiscoveryClient,并添加RestTemplate bean,用于请求调用
@SpringBootApplication
@EnableDiscoveryClient
public class ServiceConsumerApplication {

	public static void main(String[] args) {
		SpringApplication.run(ServiceConsumerApplication.class, args);
	}

	@LoadBalanced
	@Bean
	public RestTemplate restTemplate() {
		return new RestTemplate();
	}
}
4、编写接口
@RestController
@RequestMapping()
public class LeaderController {

    @Resource(name = "restTemplate")
    private RestTemplate restTemplate;

    @RequestMapping("sayHello")
    public String sayHello(@RequestParam("userName") String userName){
        return restTemplate.getForObject("http://service-provider/user/sayHello?userName=" + userName, String.class);
    }
}
接口方法调用服务提供者方法
四、启动并验证
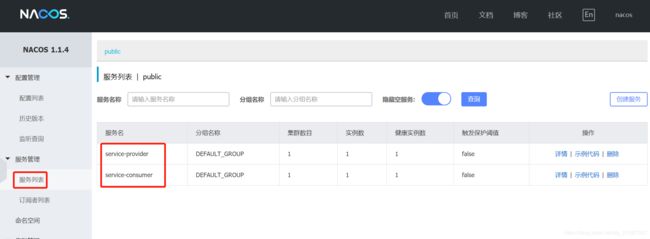
1、查看服务列表
分别启动服务提供者、服务消费者,打开nacos页面查看服务列表

2、访问消费者接口
五、测试负载均衡
在配置RestTemplate bean时添加了@LoadBalanced注解,因此可以启动两个服务提供者,多次访问服务消费者进行验证:
1、启动两个服务提供者
启动两个service-provider,端口分别为30200、30201
点击nacos页面服务列表->service-provider->详情:

2、访问并验证
访问四次接口,观看两个提供者服务日志:


可以看到两个服务各打印两次日志,表示是轮询方式负载均衡
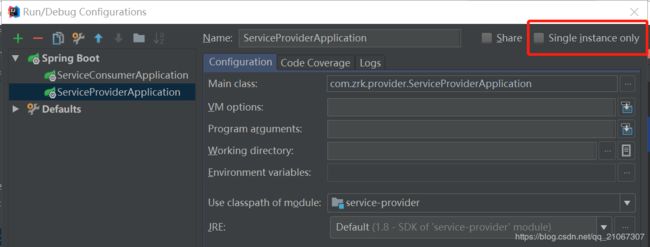
注:如果使用idea可能每个服务只能启动一个实例,需要关闭单实例模式:


将single instance only前面对勾去掉即可
项目完整代码:https://github.com/zrk333/nacos
六、参考链接
- Nacos Spring Cloud 快速开始
- Spring Cloud Alibaba基础教程:使用Nacos实现服务注册与发现
- 如何在IDEA启动多个Spring Boot工程实例

