Spring boot 的两种打包方式(war,jar)及启动方式
一 如果我们打包成jar包不管是window还是linux启动方式都是一样的
1、在pom.xml修改
    com.xxx
	demo
	0.0.1-SNAPSHOT
	jar
	demo
	Demo project for Spring Boot
2、springboot内置不用引入也行引入也不报错
  org.springframework.boot
  spring-boot-starter-tomcat
3、注意最下面的build这块一定要配置否则打jar的时候会说找不 到主类
				org.springframework.boot
				spring-boot-maven-plugin

					true
					com.xxx.xxxApplication
4、在配置文件配置一下路径
#项目属性配置
server.context-path=/demo
server.port=8080
5、需要新建一个类ServletInitializer继承SpringBootServletInitializer 重写configure方法,这是为了打包springboot项目用的。
package com.xxx;

import org.springframework.boot.builder.SpringApplicationBuilder;
import org.springframework.boot.web.support.SpringBootServletInitializer;

public class ServletInitializer extends SpringBootServletInitializer {

	@Override
	protected SpringApplicationBuilder configure(SpringApplicationBuilder application) {
		return application.sources(xxxApplication.class);
	}

}
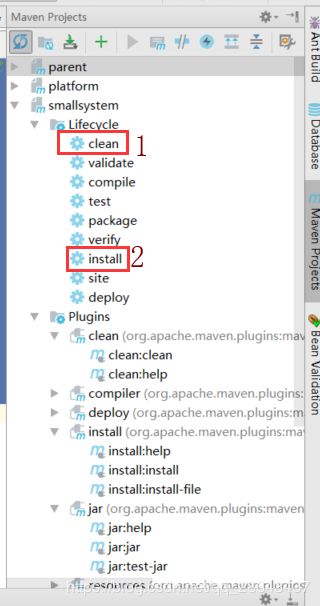
6、打包我用的idea
7、直接运行window还是linux启动方式都是一样的然后到这个jar的根目录下执行java -jar demo.jar
二 、打包成war包,如果我们需要把我们的项目像以前部署项目一样部署到外部tomcat
1、在pom.xml修改
    com.xxx
	demo
	0.0.1-SNAPSHOT
	war
	demo
	Demo project for Spring Boot
2、排除内置tomcat
			org.springframework.boot
			spring-boot-starter-tomcat
			provided
3、build
				org.springframework.boot
				spring-boot-maven-plugin

					true
4、需要新建一个类ServletInitializer继承SpringBootServletInitializer 重写configure方法,这是为了打包springboot项目用的。
package com.xxx;

import org.springframework.boot.builder.SpringApplicationBuilder;
import org.springframework.boot.web.support.SpringBootServletInitializer;

public class ServletInitializer extends SpringBootServletInitializer {

	@Override
	protected SpringApplicationBuilder configure(SpringApplicationBuilder application) {
		return application.sources(xxxApplication.class);
	}

}
5、打包方法和上面一样
6、然后把war包放到外部tomcat/webapp里面就行了
springboot 主张的就是前后端分离jar包给符合现在的趋势
