SSM实现简单的CRUD之Web层
前言
本篇文章主要来讲解Web层,主要介绍前端交互设计、Restful:url满足Restful设计规范、Spring MVC、bootstrap+jquery这四个方面的开发。
Restful接口设计学习
CRUD API URL 设计
| 请求类型 | url | 说明 |
|---|---|---|
| DELETE | /emp/{ids} | 删除某一个员工信息 |
| PUT | /emp/{empId} | 修改员工信息 |
| GET | /emp/{id} | 查询员工信息 |
| GET | checkuser | 用户名是否重复 |
| GET | /depts | 所有部门 |
| POST | /emp | 员工保存 |
| POST | /emp | 所有员工(所携带参数不一样) |
一定记得在web.xml文件中加入以下配置:
<filter>
        <filter-name>HiddenHttpMethodFilterfilter-name>
        <filter-class>org.springframework.web.filter.HiddenHttpMethodFilterfilter-class>
filter>
<filter-mapping>
    <filter-name>HiddenHttpMethodFilterfilter-name>
    <url-pattern>/url-pattern>
filter-mapping>
接下来基于上述资源接口来开始我们对Spring MVC框架的使用。
整合配置Spring MVC框架
在这我不做说明可以到我的这篇文章看如何配置http://blog.csdn.net/qq_33524158/article/details/78360268
Controller开发
在开发Controller之前先注意一点 因为整个crud我们是全程基于ajax,所以先创建一个在cn.hfbin.crud包下创建dto包,用来存放放回的数据。新建一个Msg类,内容如下:
package cn.hfbin.crud.dto;

import java.util.HashMap;
import java.util.Map;

/**
 * 通用的返回的类
 *
 * @author hfbin
 *
 */
public class Msg {
    //状态码   100-成功    200-失败
    private int code;
    //提示信息
    private String msg;

    //用户要返回给浏览器的数据
    private Map extend = new HashMap();

    public static Msg success(){
        Msg result = new Msg();
        result.setCode(100);
        result.setMsg("处理成功!");
        return result;
    }

    public static Msg fail(){
        Msg result = new Msg();
        result.setCode(200);
        result.setMsg("处理失败!");
        return result;
    }

    public Msg add(String key,Object value){
        this.getExtend().put(key, value);
        return this;
    }

    public int getCode() {
        return code;
    }

    public void setCode(int code) {
        this.code = code;
    }

    public String getMsg() {
        return msg;
    }

    public void setMsg(String msg) {
        this.msg = msg;
    }

    public Map getExtend() {
        return extend;
    }

    public void setExtend(Map extend) {
        this.extend = extend;
    }


}
Controller中的每一个方法都对应我们系统中的一个资源URL,其设计应该遵循Restful接口的设计风格。在cn.hfbin.crud包下创建一个controller包用于放web层Controller开发的代码,在该包下创建一个EmployeeController.java,内容如下:
package cn.hfbin.crud.controller;


import cn.hfbin.crud.bean.Employee;
import cn.hfbin.crud.dto.Msg;
import cn.hfbin.crud.service.EmployeeService;
import com.github.pagehelper.PageHelper;
import com.github.pagehelper.PageInfo;
import org.springframework.beans.factory.annotation.Autowired;
import org.springframework.stereotype.Controller;
import org.springframework.ui.Model;
import org.springframework.validation.BindingResult;
import org.springframework.validation.FieldError;
import org.springframework.web.bind.annotation.*;

import javax.servlet.http.HttpServletRequest;
import javax.validation.Valid;
import java.util.ArrayList;
import java.util.HashMap;
import java.util.List;
import java.util.Map;

/**
 * 处理员工CRUD请求
 */
@Controller
public class EmployeeController {

    @Autowired
    EmployeeService employeeService;
    /**
     * 单个批量二合一
     * 批量删除:1-2-3
     * 单个删除:1
     *
     * @param ids
     * @return
     */
    @ResponseBody
    @RequestMapping(value="/emp/{ids}",method=RequestMethod.DELETE)
    public Msg deleteEmp(@PathVariable("ids")String ids){
        //批量删除
        if(ids.contains("-")){
            List del_ids = new ArrayList();
            String[] str_ids = ids.split("-");
            //组装id的集合
            for (String string : str_ids) {
                del_ids.add(Integer.parseInt(string));
            }
            employeeService.deleteBatch(del_ids);
        }else{
            Integer id = Integer.parseInt(ids);
            employeeService.deleteEmp(id);
        }
        return Msg.success();
    }

    /**
     * 如果直接发送ajax=PUT形式的请求
     * 封装的数据
     * Employee
     * [empId=1014, empName=null, gender=null, email=null, dId=null]
     *
     * 问题:
     * 请求体中有数据;
     * 但是Employee对象封装不上;
     * update tbl_emp  where emp_id = 1014;
     *
     * 原因:
     * Tomcat:
     *      1、将请求体中的数据,封装一个map。
     *      2、request.getParameter("empName")就会从这个map中取值。
     *      3、SpringMVC封装POJO对象的时候。
     *              会把POJO中每个属性的值,request.getParamter("email");
     * AJAX发送PUT请求引发的血案:
     *      PUT请求,请求体中的数据,request.getParameter("empName")拿不到
     *      Tomcat一看是PUT不会封装请求体中的数据为map,只有POST形式的请求才封装请求体为map
     * org.apache.catalina.connector.Request--parseParameters() (3111);
     *
     * protected String parseBodyMethods = "POST";
     * if( !getConnector().isParseBodyMethod(getMethod()) ) {
                success = true;
                return;
            }
     *
     *
     * 解决方案;
     * 我们要能支持直接发送PUT之类的请求还要封装请求体中的数据
     * 1、配置上HttpPutFormContentFilter;
     * 2、他的作用;将请求体中的数据解析包装成一个map。
     * 3、request被重新包装,request.getParameter()被重写,就会从自己封装的map中取数据
     * 员工更新方法
     * @param employee
     * @return
     */
    @ResponseBody
    @RequestMapping(value="/emp/{empId}",method=RequestMethod.PUT)
    public Msg saveEmp(Employee employee,HttpServletRequest request){
        System.out.println("请求体中的值:"+request.getParameter("gender"));
        System.out.println("将要更新的员工数据:"+employee);
        employeeService.updateEmp(employee);
        return Msg.success();
    }

    /**
     * 根据id查询员工
     * @param id
     * @return
     */
    @RequestMapping(value="/emp/{id}",method=RequestMethod.GET)
    @ResponseBody
    public Msg getEmp(@PathVariable("id")Integer id){

        Employee employee = employeeService.getEmp(id);
        return Msg.success().add("emp", employee);
    }
    /**
     * 检查用户名是否可用
     * @param empName
     * @return
     */
    @ResponseBody
    @RequestMapping("/checkuser")
    public Msg checkuser(@RequestParam("empName")String empName){
        //先判断用户名是否是合法的表达式;
        String regx = "(^[a-zA-Z0-9_-]{6,16}$)|(^[\u2E80-\u9FFF]{2,5})";
        if(!empName.matches(regx)){
            return Msg.fail().add("va_msg", "用户名必须是6-16位数字和字母的组合或者2-5位中文");
        }

        //数据库用户名重复校验
        boolean b = employeeService.checkUser(empName);
        if(b){
            return Msg.success();
        }else{
            return Msg.fail().add("va_msg", "用户名不可用");
        }
    }


    /**
     * 员工保存
     * 1、支持JSR303校验
     * 2、导入Hibernate-Validator
     *
     *
     * @return
     */
    @RequestMapping(value="/emp",method=RequestMethod.POST)
    @ResponseBody
    public Msg saveEmp(@Valid Employee employee,BindingResult result){
        if(result.hasErrors()){
            //校验失败,应该返回失败,在模态框中显示校验失败的错误信息
            Map map = new HashMap();
            List errors = result.getFieldErrors();
            for (FieldError fieldError : errors) {
                System.out.println("错误的字段名:"+fieldError.getField());
                System.out.println("错误信息:"+fieldError.getDefaultMessage());
                map.put(fieldError.getField(), fieldError.getDefaultMessage());
            }
            return Msg.fail().add("errorFields", map);
        }else{
            employeeService.saveEmp(employee);
            return Msg.success();
        }

    }

    /**
     * 导入jackson包。
     * @param pn
     * @return
     */
    @RequestMapping("/emps")
    @ResponseBody
    public Msg getEmpsWithJson(
            @RequestParam(value = "pn", defaultValue = "1") Integer pn) {
        // 这不是一个分页查询
        // 引入PageHelper分页插件
        // 在查询之前只需要调用,传入页码,以及每页的大小
        PageHelper.startPage(pn, 10);
        // startPage后面紧跟的这个查询就是一个分页查询
        List emps = employeeService.getAll();
        // 使用pageInfo包装查询后的结果,只需要将pageInfo交给页面就行了。
        // 封装了详细的分页信息,包括有我们查询出来的数据,传入连续显示的页数
        PageInfo page = new PageInfo(emps, 5);
        return Msg.success().add("pageInfo", page);
    }

}
在这不做过多的说明每一行代码都有注释
下面说明一下这三个注解代表什么
@ResponseBody 返回json数据
@RequestMapping(“”) 请求路径
@RequestParam 请求参数
DepartmentController.java 这个Controller就做一个部门查询很简单,代码如下:
package cn.hfbin.crud.service;

import cn.hfbin.crud.bean.Department;
import cn.hfbin.crud.dao.DepartmentMapper;
import org.springframework.beans.factory.annotation.Autowired;
import org.springframework.stereotype.Service;

import java.util.List;

@Service
public class DepartmentService {

    @Autowired
    private DepartmentMapper departmentMapper;

    //获取所有部门
    public List getDepts() {
        // TODO Auto-generated method stub
        List list = departmentMapper.selectByExample(null);
        return list;
    }

}
到此,Controller的开发任务完成,接下来进行我们的页面开发。
页面开发
页面由前端工程师完成,这里直接拷贝我github上源代码中jsp的代码(webapp包下的所有资源)即可。
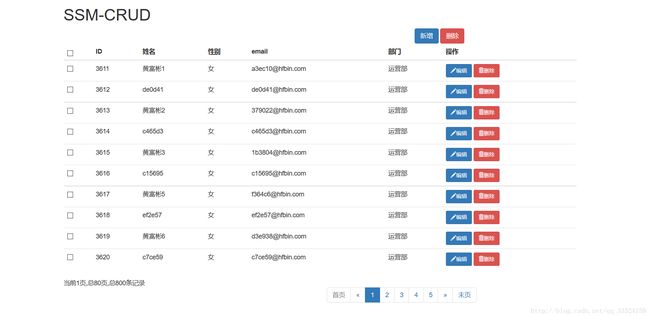
然后运行Tomcat服务器,在浏览器中输入http://localhost:8080/emps,即可访问我们的秒杀列表页面:
在这附上js的逻辑代码:
