Vuejs实战基础篇和进阶篇(前12章)学完之后,做的小练习(表格curd和tab页切换)
一、项目结构

说明:用vue-cli搭建项目,components目录放组件,router目录放路由页面,
Vuex目录里面放各个模块的vuex信息(共享的数据和操作数据的方法)
二、最终效果:
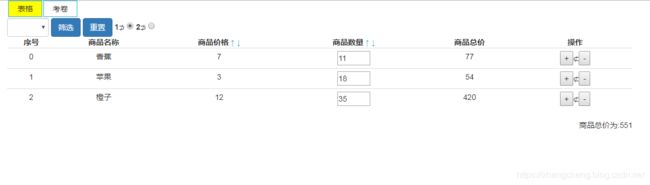


说明:最终效果是多个tab页切换,表格tab也可以操作表格数据(增删改查和排序,筛选),
考卷页面可以上下翻页和提交答案还有答案验证。
三、各个页面说明:
(1)、Vuex目录:
<1>、index.js
const state={
    shopList:[
      {shopName:'香蕉',shopPrice:7,shopNum:11,state:0},
      {shopName:'苹果',shopPrice:3,shopNum:18,state:0},
      {shopName:'橙子',shopPrice:12,shopNum:35,state:0}
    ],
    titleList:[
      {text:'序号',type:'rowNum'},
      {text:'商品名称',type:'shopName'},
      {text:'商品价格',type:'shopPrice',isSort:true},
      {text:'商品数量',type:'shopNum',isSort:true},
      {text:'商品总价',type:'shopTotal'},
      {text:'操作',type:'caozuo'}
    ],
    quesnaireList:[
        {id:1,testTitle:"您的性别是?",preserve:"sex",quesnaireType:"radio",quesnaireValue:['男','女','保留']},
        {id:2,testTitle:"您的爱好是?",preserve:"hobby",quesnaireType:"checkbox",quesnaireValue:['篮球','足球','游泳']},
        {id:3,testTitle:"您的简介?",preserve:"introduc",quesnaireType:"textarea",quesnaireValue:''}
      ],
    currentPage:1,
    sex:"",
    hobby:[],
    introduc:"",
    selected:'',
    radioValue:1
};

const mutations={
  setRadioValue(state,args){
    state.radioValue=args;
  },
  setSelectedVal(state,args){
    state.selected=args;
  },
  setSex(state,args){
    state.sex=args;
  },
  setHobby(state,args){
    state.hobby=args;
  },
  setIntroduc(state,args){
    state.introduc=args;
  },
  setCurrentPage(state,args){
    state.currentPage+=args;
  },
  setShopList(state,args){
    if (args=='seach'){
      state.shopList.map(item=> {
        item.shopName == state.selected ?
          item.state=0 : item.state=1
      });
    };
    if (args=='rest'){
      state.shopList.map(item=>item.state=0);
    };
  },
  sortShopList(state,args){
    state.shopList.sort((a,b)=>{
      return args.sortOrder=='asc'?a[args.type]-b[args.type]:b[args.type]-a[args.type];
    });
  }
};

export default {
  state,
  mutations
};
说明:主要声明了需要用到的共享数据和数据操作方法。
(2)、modules.js
import Vue from 'vue';
import Vuex from 'Vuex';
Vue.use(Vuex);

import mytableVuex from './Vuex/myTable/index.js';

export default new Vuex.Store({
  modules:{
    mytableVuex:mytableVuex
  }
});
说明:整合各个模块的vuex仓库(vuex总配置)
(3)、main.js
// The Vue build version to load with the `import` command
// (runtime-only or standalone) has been set in webpack.base.conf with an alias.
import Vue from 'vue';
import App from './App.vue';
import VueRouter from 'vue-router';
import $ from 'jquery';
import '../static/bootstrap-3.3.7-dist/css/bootstrap.css';
import '../static/bootstrap-3.3.7-dist/js/bootstrap.min';
import store from './modules.js';
Vue.use(VueRouter);
Vue.config.productionTip = false
const Routers=[
{
path:'/index',
component:(resolve)=>require(['./router/view/pageMyTable.vue'],resolve)
},{
path:'/about',
name:'about',
component:(resolve)=>require(['./router/view/about.vue'],resolve)
},{
path:'*',
redirect:'/index'
}
]
const RouterConfig={
mode:'history',
base:__dirname,
routes:Routers
}
const router=new VueRouter(RouterConfig);
new Vue({
el:"#app",
components:{App},
template: '(4)、App.vue
说明:整个程序的主组件,在这里挂载路由视图
(5)、components目录:
<1>、table组件:myTable.vue
<2> 、筛选按钮组件:myScreen.vue
⊅
⊅
<3>、myTab.vue:选项卡组件
{{nav.lable}}
<4>、myPane.vue:选项组件
<5>、myTest.vue:考试页面组件
<6>、myBth.vue:考试页面按钮组件
(6)、router目录:
<1>、 pageMyTable.vue:整合所有组件(访问后路由视图就加载这个组件)
考试问卷
{{props.id}}.{{props.testTitle}}
<2>、 about.vue:表格组件双击就进入这个路由视图(主要是练习一下路由转发传参,没什么用场)
{{name}}
{{this.$route.params.shopName}}
以上就是根据vue.js实在前12章的知识点做出的demo,基本上书上涵盖的知识点都用上了。