springboot整和activeMq
一、首先准备activeMq服务
1、从官网下载http://activemq.apache.org/
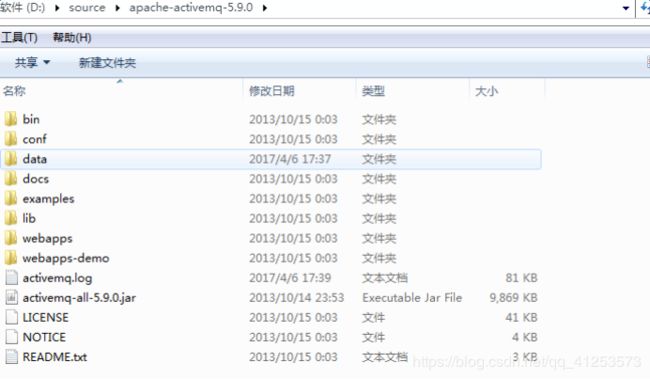
2、下载解压得到如下目录结构
3、目录说明:
bin存放的是脚本文件
conf存放的是基本配置文件
data存放的是日志文件
docs存放的是说明文档
examples存放的是简单的实例
lib存放的是activemq所需jar包
webapps用于存放项目的目录
4、启动
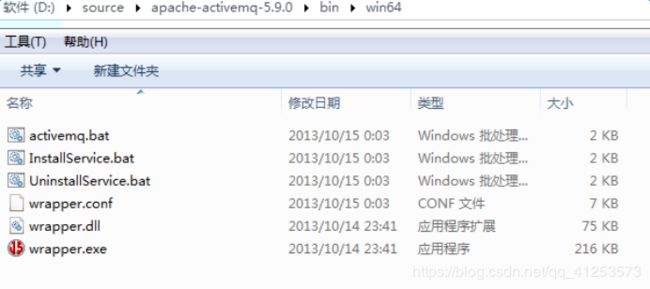
进入bin目录,发现有win32和win64两个文件夹,这2个文件夹分别对应windows32位和windows64位操作系统的启动脚本,自己根据自己电脑操作系统进入对应目录去启动就好

 其中activemq.bat便是启动脚本,双击启动
5、web监控界面
ActiveMQ提供一个用于监控ActiveMQ的admin应用,默认8161端口,启动ActiveMQ服务后在浏览器地址栏输入:http://localhost:8161/admin要求输入用户名密码,默认用户名密码为admin、admin,这个用户名密码是在conf/users.properties中配置的。队列监控如下图

二、整合到springboot里
1、pom
<?xml version="1.0" encoding="UTF-8"?>
<project xmlns="http://maven.apache.org/POM/4.0.0"
	xmlns:xsi="http://www.w3.org/2001/XMLSchema-instance"
	xsi:schemaLocation="http://maven.apache.org/POM/4.0.0 https://maven.apache.org/xsd/maven-4.0.0.xsd">
	<modelVersion>4.0.0</modelVersion>
	<parent>
		<groupId>org.springframework.boot</groupId>
		<artifactId>spring-boot-starter-parent</artifactId>
		<version>2.2.6.RELEASE</version>
		<relativePath /> <!-- lookup parent from repository -->
	</parent>
	<groupId>com.example</groupId>
	<artifactId>springb-activemq</artifactId>
	<version>0.0.1-SNAPSHOT</version>
	<name>springb-activemq</name>
	<description>activemq</description>

	<properties>
		<java.version>1.8</java.version>
	</properties>

	<dependencies>
		<dependency>
			<groupId>org.springframework.boot</groupId>
			<artifactId>spring-boot-starter</artifactId>
		</dependency>
		<dependency>
			<groupId>org.springframework.boot</groupId>
			<artifactId>spring-boot-starter-activemq</artifactId>
		</dependency>

		<!-- 连接池 -->
		<dependency>
		  	<groupId>org.messaginghub</groupId>
		  	<artifactId>pooled-jms</artifactId>
		</dependency>

		<dependency>
			<groupId>org.springframework.boot</groupId>
			<artifactId>spring-boot-starter-web</artifactId>
		</dependency>

		<dependency>
			<groupId>org.springframework.boot</groupId>
			<artifactId>spring-boot-starter-test</artifactId>
			<scope>test</scope>
			<exclusions>
				<exclusion>
					<groupId>org.junit.vintage</groupId>
					<artifactId>junit-vintage-engine</artifactId>
				</exclusion>
			</exclusions>
		</dependency>
	</dependencies>

	<build>
		<plugins>
			<plugin>
				<groupId>org.springframework.boot</groupId>
				<artifactId>spring-boot-maven-plugin</artifactId>
			</plugin>
		</plugins>
	</build>

</project>
2、启动类。这里的bean注入是默认注册一个队列叫test,下面还有一种不用这样注册的方式
package com.example;

import org.apache.activemq.command.ActiveMQQueue;
import org.springframework.boot.SpringApplication;
import org.springframework.boot.autoconfigure.SpringBootApplication;
import org.springframework.context.annotation.Bean;
import org.springframework.context.annotation.ComponentScan;
import org.springframework.jms.annotation.EnableJms;
import org.springframework.scheduling.annotation.EnableScheduling;

@SpringBootApplication
@ComponentScan("com.example")//扫描对应的包,纳入spring管理
@EnableJms//扫描标注了@EnableScheduling的类
@EnableScheduling//注册定时任务
public class SpringbActivemqApplication {

	public static void main(String[] args) {
		SpringApplication.run(SpringbActivemqApplication.class, args);
	}

	@Bean
	public ActiveMQQueue queue() {
		return new ActiveMQQueue("test");
	}

}
3、生产者
package com.example.test;

import org.springframework.beans.factory.annotation.Autowired;
import org.springframework.jms.core.JmsMessagingTemplate;
import org.springframework.scheduling.annotation.EnableScheduling;
import org.springframework.scheduling.annotation.Scheduled;
import org.springframework.stereotype.Component;

import javax.jms.Queue;

@Component
@EnableScheduling
public class MqProducer {

    @Autowired
    private JmsMessagingTemplate jmsMessagingTemplate;

    @Autowired
    private Queue queue;

    @Scheduled(fixedRate = 2000)
    public void send() {
    	System.out.println("执行");
    	//默认使用启动类注册的队列
        this.jmsMessagingTemplate.convertAndSend(this.queue, "hello,activeMQ");
    }

    @Scheduled(fixedRate = 2000)
    public void send2() {
    	System.out.println("执行");
    	//自动创建使用这里输入的队列名
        this.jmsMessagingTemplate.convertAndSend("test22", "hello,activeMQ22");
    }
}
4、消费者
package com.example.test;

import org.springframework.jms.annotation.JmsListener;
import org.springframework.stereotype.Component;

@Component
public class MqConsumer {

	/**
     * 客户端消费
     * @param consumer
     */
    @JmsListener(destination = "test")
    public void receiveQueue(String consumer) {
        System.out.println(consumer+"消息已经消费了");
    }

    /**
     * 客户端消费
     * @param consumer
     */
    @JmsListener(destination = "test22")
    public void receiveQueue2(String consumer) {
        System.out.println(consumer+"消息已经消费了");
    }

}
5、配置文件
spring.activemq.broker-url=tcp://localhost:61616
spring.activemq.in-memory=false
#true表示使用连接池
spring.activemq.pool.enabled=false
#连接池最大连接数
spring.activemq.pool.max-connections=5
#空闲的连接过期时间,默认为30秒
spring.activemq.pool.idle-timeout=30000
#强制的连接过期时间,与idleTimeout的区别在于:idleTimeout是在连接空闲一段时间失效,而expiryTimeout不管当前连接的情况,只要达到指定时间就失效。默认为0,never
spring.activemq.pool.expiry-timeout=0
我这里测试的时候,遇到很坑的一个事,只要在配置文件里使用了连接池,就报错:
Caused by: org.springframework.beans.factory.UnsatisfiedDependencyException: Error creating bean with name 'queueMQProducer':
Unsatisfied dependency expressed through field 'jmsMessagingTemplate'; nested exception is org.springframework.beans.factory.NoSuchBeanDefinitionException:
No qualifying bean of type 'org.springframework.jms.core.JmsMessagingTemplate' available: expected at least 1 bean which qualifies as autowire candidate.
Dependency annotations: {@org.springframework.beans.factory.annotation.Autowired(required=true)}
改成false或者直接不用连接池就不报错,百度基本都说是因为有空格,但我十分确定我没有空格,最后再找到问题,是需要springboot不同的版本导入不同的依赖包
2.1++版本的springboot,引入如下的连接池包
<dependency>
  	<groupId>org.messaginghub</groupId>
  	<artifactId>pooled-jms</artifactId>
</dependency>
2.0+版本的springboot引入如下的连接池包
<dependency>
   <groupId>org.apache.activemq</groupId>
   <artifactId>activemq-pool</artifactId>
</dependency>