vue-admin-template入门详解(后端springboot+sprngsecurity+jwt+redis)
文章目录
- vscode插件
- clone 项目
- 配置跨域
- 后端接口
- 前后端分离登陆
- 前后端分离登陆二
- 总结
vscode插件

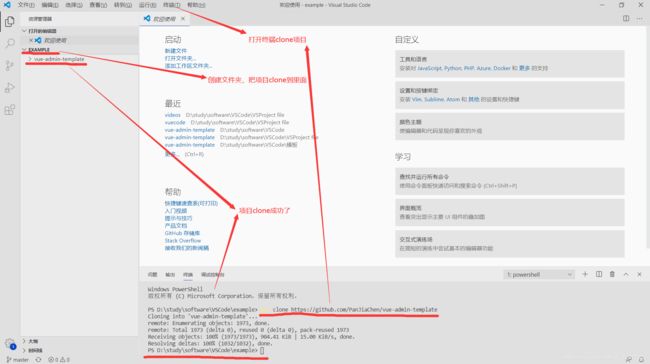
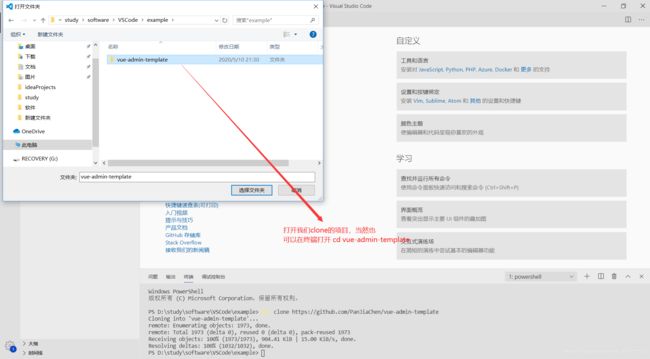
clone 项目
地址:https://github.com/PanJiaChen/vue-admin-template
我们这里不讲vue-element-admin,讲的是vue-admin-template


配置跨域
跨域配置分为两种,一种是cors方式在 vue-config.js 配置 proxy 代理,另外一种是通过 nginx 配置反向代理,这里我们用第一种,第二种 nginx 我还不会

Proxy
  proxy: {
      '/api': {
        target: process.env.VUE_APP_BASE_API, // 你请求的第三方接口
        changeOrigin: true, // 在本地会创建一个虚拟服务端,然后发送请求的数据,并同时接收请求的数据,这样服务端和服务端进行数据的交互就不会有跨域问题
        pathRewrite: {
          // 路径重写,
          '^/api': '' // 替换target中的请求地址
        }
      }
    }

# just a flag
ENV = 'development'

# base api
# VUE_APP_BASE_API = '/dev-api'
VUE_APP_BASE_API = 'http://localhost:8080'
# npm 启动端口号
port = 9528

# vue-cli uses the VUE_CLI_BABEL_TRANSPILE_MODULES environment variable,
# to control whether the babel-plugin-dynamic-import-node plugin is enabled.
# It only does one thing by converting all import() to require().
# This configuration can significantly increase the speed of hot updates,
# when you have a large number of pages.
# Detail:  https://github.com/vuejs/vue-cli/blob/dev/packages/@vue/babel-preset-app/index.js

VUE_CLI_BABEL_TRANSPILE_MODULES = true
跨域配置完了
后端接口
我们这里的后端是java,使用的框架是springboot+springsecurity+jwt+redis

如果你的后台跟我一样,继续往下看,登陆的时候可能会出现一个问题
参考博客: https://blog.csdn.net/qq_42977003/article/details/106016161
前后端分离登陆
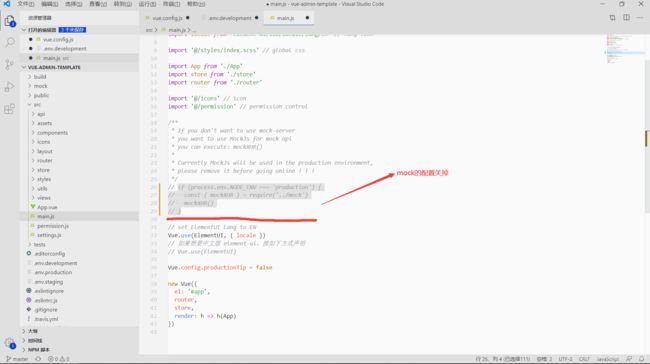
因为之前我写请求的时候是直接把请求写在页面里面,请求和响应都是在一起,但是 vue-admin-template 对axios做了封装,例如我们这里的登陆请求是写在store里面的,页面调store的登陆,store调api的登陆请求,同时还有对请求和响应的拦截
request.js


import axios from 'axios'
import { MessageBox, Message } from 'element-ui'
import store from '@/store'
import { getToken } from '@/utils/auth'

// create an axios instance
const service = axios.create({
  baseURL: process.env.VUE_APP_BASE_API, // url = base url + request url
  // withCredentials: true, // send cookies when cross-domain requests
  timeout: 5000 // request timeout
})

// request interceptor
service.interceptors.request.use(
  config => {
    // do something before request is sent

    if (store.getters.token) {
      // let each request carry token
      // ['X-Token'] is a custom headers key
      // please modify it according to the actual situation
      // config.headers['X-Token'] = getToken()
      config.headers['Authorization'] = 'Bearer ' + getToken()
    }
    return config
  },
  error => {
    // do something with request error
    console.log(error) // for debug
    return Promise.reject(error)
  }
)

// response interceptor
service.interceptors.response.use(
  /**
   * If you want to get http information such as headers or status
   * Please return  response => response
  */

  /**
   * Determine the request status by custom code
   * Here is just an example
   * You can also judge the status by HTTP Status Code
   */
  response => {
    const res = response.data

    // if the custom code is not 20000, it is judged as an error.
    if (res.code !== 203) {

      if (res.code === 202) {
        Message({
          message: res.message || 'Error',
          type: 'error',
          duration: 5 * 1000
        })
      }

      if (res.code === 201) {
        Message({
          message: res.message || 'Error',
          type: 'error',
          duration: 5 * 1000
        })
      }

      if (res.code === 204) {
        Message({
          message: res.message || 'Error',
          type: 'error',
          duration: 5 * 1000
        })
      }

      // 50008: Illegal token; 50012: Other clients logged in; 50014: Token expired;
      if (res.code === 205) {
        // to re-login
        MessageBox.confirm('You have been logged out, you can cancel to stay on this page, or log in again', 'Confirm logout', {
          confirmButtonText: 'Re-Login',
          cancelButtonText: 'Cancel',
          type: 'warning'
        }).then(() => {
          store.dispatch('user/resetToken').then(() => {
            location.reload()
          })
        })
      }
      return Promise.reject(new Error(res.message || 'Error'))
    } else {
      return res
    }
  },
  error => {
    console.log('err' + error) // for debug
    Message({
      message: error.message,
      type: 'error',
      duration: 5 * 1000
    })
    return Promise.reject(error)
  }
)
export default service
api的user.js

stored下的mosdules下的user.js
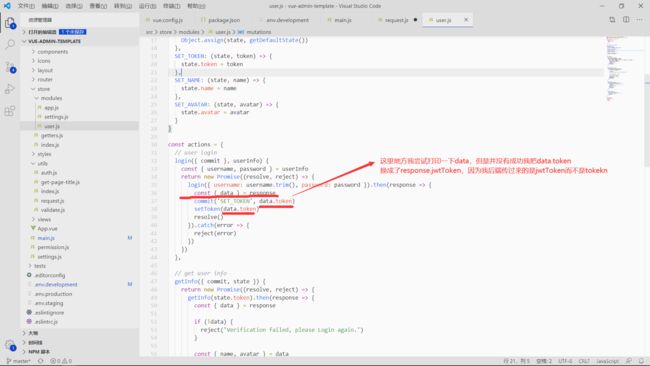
view下的login下的index.vue

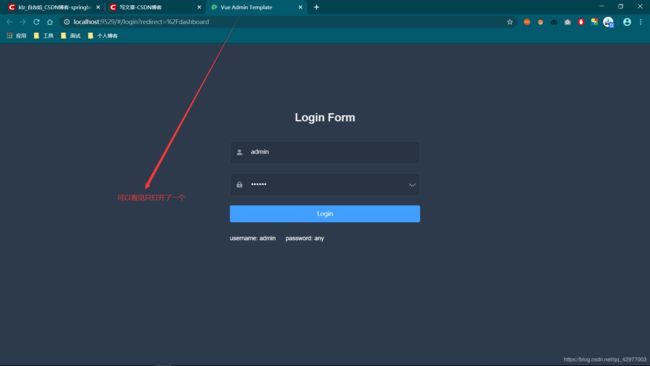
基本上登陆要的东西都准备好了测试看看

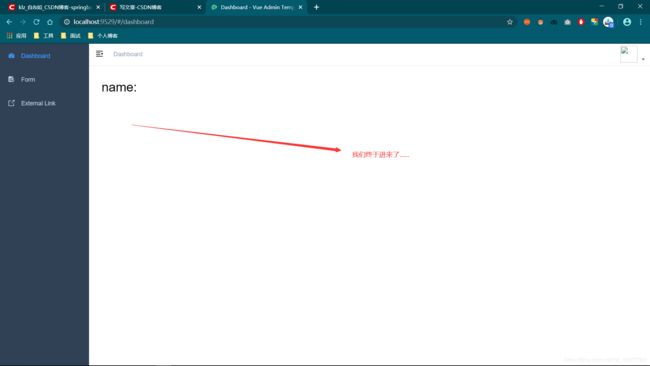
看到这张图,不难发现一套流程虽然执行下来了,但是页面没跳转,又出现10个vue warn,心态炸了,我在网上找原因,没找到,如果有大佬知道怎么回事可以在下面评论区说一下!
前后端分离登陆二
之后用了另外一种方式在这里就要感谢一下知乎的一个作者了
博客地址: https://zhuanlan.zhihu.com/p/36148502
我们修改的是store下的modules下的user.js
import { login } from '@/api/user'
import { getToken, setToken } from '@/utils/auth'
const user = {

  state: {
    token: getToken(),
    name: '',
    avatar: ''
  },

  mutations: {
    SET_TOKEN: (state, token) => {
      state.token = token
    },
    SET_NAME: (state, name) => {
      state.name = name
    },
    SET_AVATAR: (state, avatar) => {
      state.avatar = avatar
    }
  },

  actions: {
    // 登录
    Login({ commit }, userInfo) {
      return new Promise((resolve, reject) => {
        login(userInfo)
          .then(response => {
            console.log('store')
            const tokenValue = response.jwtToken
            setToken(tokenValue)
            commit('SET_TOKEN', tokenValue)
            resolve()
          })
          .catch(error => {
            reject(error)
          })
      })
    }
  }
}
export default user
views下的login下的index.vue请求

    handleLogin() {
      const _this = this
      _this.$refs.loginForm.validate(valid => {
        if (valid) {
          _this.loading = true
          _this.$store
            .dispatch('Login', this.loginForm)
            .then(() => {
              _this.loading = false
              console.log('login')
              _this.$router.push({ path: this.redirect || '/' })
            })
            .catch((msg) => {
              _this.loading = false
            })
        } else {
          console.log('error submit!!')
          return false
        }
      })
    }

总结
到这我们就告一段落,希望对您有帮助