springboot国际化配置中英文切换
1、新建项目
第一步新建springboot项目,勾选web依赖,或者后面进入在pom.xml中加入也可以。
<project xmlns="http://maven.apache.org/POM/4.0.0" xmlns:xsi="http://www.w3.org/2001/XMLSchema-instance"
         xsi:schemaLocation="http://maven.apache.org/POM/4.0.0 https://maven.apache.org/xsd/maven-4.0.0.xsd">
    <modelVersion>4.0.0modelVersion>
    <parent>
        <groupId>org.springframework.bootgroupId>
        <artifactId>spring-boot-starter-parentartifactId>
        <version>2.2.4.RELEASEversion>
        <relativePath/>
    parent>
    <groupId>com.jfgroupId>
    <artifactId>locale-lanuageartifactId>
    <version>0.0.1-SNAPSHOTversion>
    <name>locale-lanuagename>
    <description>Demo project for Spring Bootdescription>

    <properties>
        <java.version>1.8java.version>
    properties>

    <dependencies>
        <dependency>
            <groupId>org.springframework.bootgroupId>
            <artifactId>spring-boot-starter-webartifactId>
        dependency>

        <dependency>
            <groupId>org.springframework.bootgroupId>
            <artifactId>spring-boot-starter-thymeleafartifactId>
        dependency>

        <dependency>
            <groupId>org.springframework.bootgroupId>
            <artifactId>spring-boot-starter-testartifactId>
            <scope>testscope>
            <exclusions>
                <exclusion>
                    <groupId>org.junit.vintagegroupId>
                    <artifactId>junit-vintage-engineartifactId>
                exclusion>
            exclusions>
        dependency>
    dependencies>

    <build>
        <plugins>
            <plugin>
                <groupId>org.springframework.bootgroupId>
                <artifactId>spring-boot-maven-pluginartifactId>
            plugin>
        plugins>
    build>

project>
3、在templates中写入一个html页面,以login.html为例。
在Controller写入访问的控制器
package com.jf.Controller;

import org.springframework.stereotype.Controller;
import org.springframework.web.bind.annotation.RequestMapping;

@Controller
public class UserController {

    @RequestMapping("/login")
    public String login(){
        return "login";
    }
}
启动项目保证login能访问.。
在pom.xml中要加上thymeleaf依赖,
<dependency>
            <groupId>org.springframework.bootgroupId>
            <artifactId>spring-boot-starter-thymeleafartifactId>
dependency>
4、在resources中新建文件夹i18n,在其中新建login.properties,在新建login_zh_CN.properties,
这时候目录会自动多一个Resource Bundle'login',说明IDEA识别了此配置文件

然后右键此文件夹,就可以有自动添加的窗口出来,当然也可以手动添加login_en_US.properties


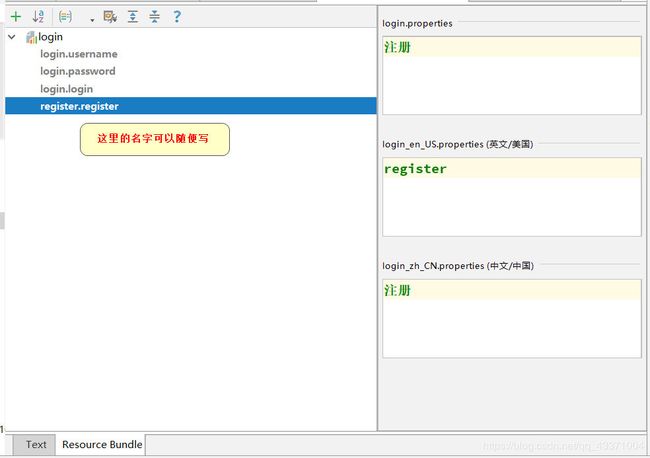
然后要对每一个需要中英文转换的文字都要一一配置。这里有一个可视化的页面,点击左下角的Resource Bundle就可以。

添加要转换的属性的中英文对照
命名没有什么规范
例如下面的login.username,这里表示的是login页面的username的替换品,你也可以写为A.B都行,为了方便阅读而已。

将这些写好后,
在配置文件application.properties或yaml中加入
spring.messages.basename=i18n.login
5、进入login.html页面
修改一些内容
首先加入头文件
然后利用thymeleaf语法,添加中英文变化的属性,在属性前面加入th:,内容用#{}
例如:
<label for="username">用户名label><label for="username" th:text="#{login.username}">用户名label>
添加中英文切换的按钮,th:href="@{/login(language='zh_CN')},thymeleaf语法中,urk要用@{},所以以上语法的意思是访问login,并带上一个参数language='zh_CN'
完整的login.html
<html lang="en" xmlns:th="http://www.thymeleaf.org">
<head>
    <meta charset="UTF-8">
    <title>Titletitle>
head>
<body>
<div  id="login" >
    <form >
        <div >
            <label for="username" th:text="#{login.username}">用户名label>
            <input type="text"  name="username"   id="username" >
        div>
        <div >
            <label for="password" th:text="#{login.password}">密码label>
            <input type="password"  name="password"   id="password" >
        div>

        <div>
            <button type="submit"   th:text="#{login.login}">登录button>
        div>
        <div>
            <a href="register.html" th:text="#{register.register}">注册a>
            <a th:href="@{/login(language='zh_CN')}">中文a>
            <a th:href="@{/login(language='en_US')}">Englisha>
        div>
    form>
div>


body>
html>
6、现在情况下,启动项目,点击中文英文切换的时候,还是没有效果,只是浏览器地址栏上可以看到有参数传递了。
接下来自己写一个国际化解析器,实现LocaleResolver接口
package com.jf.config;

import org.springframework.stereotype.Component;
import org.springframework.web.servlet.LocaleResolver;

import javax.servlet.http.HttpServletRequest;
import javax.servlet.http.HttpServletResponse;
import java.util.Locale;


public class MyLocaleRelover implements LocaleResolver {
    @Override
    public Locale resolveLocale(HttpServletRequest httpServletRequest) {
        String language = httpServletRequest.getParameter("language");
        Locale locale = Locale.getDefault();
        System.out.println(language);
        if (!(language==null||"".equals(language))){
            String[] split = language.split("_");
            locale = new Locale(split[0], split[1]);
        }

        return locale;
    }

    @Override
    public void setLocale(HttpServletRequest httpServletRequest, HttpServletResponse httpServletResponse, Locale locale) {

    }
}
7、写好了国际化解析器后,现在需要将他加入到spring中
现在要自己扩展springMVC,
新建config包,新建MyMvcResolver实现WebMvcConfigurer接口,写上注解@Configuration
package com.jf.config;

import org.springframework.context.annotation.Bean;
import org.springframework.context.annotation.Configuration;
import org.springframework.web.servlet.LocaleResolver;
import org.springframework.web.servlet.config.annotation.WebMvcConfigurer;

//扩展springMVC
@Configuration
public class MyMvcResolver implements WebMvcConfigurer {

    @Bean
    public LocaleResolver localeResolver(){
        return new MyLocaleRelover();
    }

}
8、然后就ok了,启动项目访问一下。
默认的访问

点击中文后:可以看到地址栏有参数传递

点击英文后

9、源码扩展
首先找到这个类WebMvcAutoConfiguration(webmvc自动配置类)

在其中ctrl+f搜索localeRelover地区解析


