自己动手,使用Spring Initializr从零开始搭建Spring Cloud项目
新建Project
这里使用的开发工具是IDEA,JDK版本1.8。
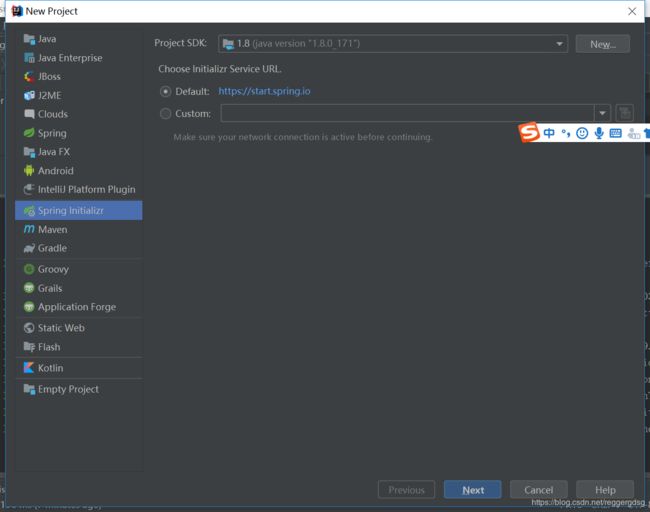
打开IDEA开发工具,File -> New -> Project
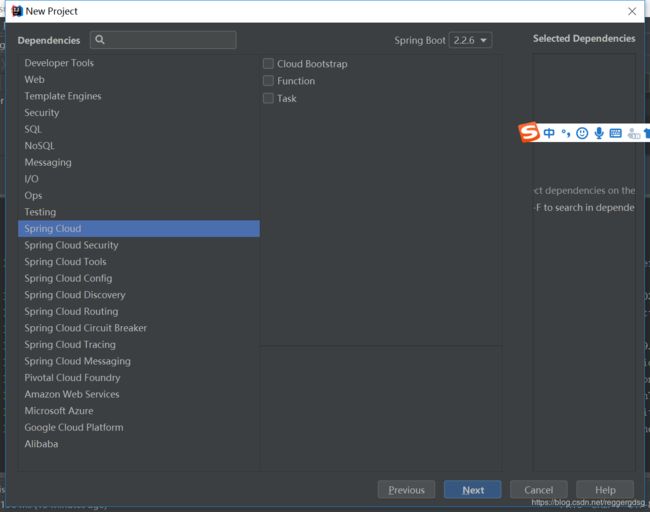
然后一步步往下设置,然后到这一步,选择Spring Cloud
OK,继续一路往下,点finish,Spring Cloud项目创建完成。
设置编译器版本,选择jdk版本等
这里我使用的是JDK 1.8,当前主流的版本。具体操作不再赘述,网上一搜一大把,照着做就行了。
新建微服务启动类Application.class
注意这2个注解,一定要加上:@EnableDiscoveryClient和@SpringBootApplication
package com.yangcq.learning.hantang;

import org.springframework.boot.SpringApplication;
import org.springframework.boot.autoconfigure.SpringBootApplication;
import org.springframework.cloud.client.discovery.EnableDiscoveryClient;

@EnableDiscoveryClient
@SpringBootApplication
public class HantangApplication {

    public static void main(String[] args) {

        SpringApplication.run(HantangApplication.class, args);
    }

}
配置文件Application.properties
#服务名称
spring.application.name=hantang

#设置日志级别
logging.level.root=info

#对外提供服务端口号
server.port=8088

#eureka-client注册地址
eureka.client.serviceUrl.defaultZone=http://localhost:1111/eureka/

#是否向eureka-server注册
eureka.client.registerWithEureka=false
新建Controller
这里的注解和入参的定义很关键,请看仔细了,直接上代码。
为了方便跟踪,打印一行日志。
package com.yangcq.learning.hantang.controller;

import com.yangcq.learning.hantang.HantangApplication;
import com.yangcq.learning.hantang.service.CommonService;
import org.apache.commons.logging.Log;
import org.apache.commons.logging.LogFactory;
import org.springframework.beans.factory.annotation.Autowired;
import org.springframework.web.bind.annotation.*;

@RestController
@RequestMapping(value = "/interface/hantang/common")
public class CommonController {

    private static final Log log = LogFactory.getLog(HantangApplication.class);

    @Autowired
    private CommonService commonService;

    @RequestMapping(value = "/list/{var}", method = RequestMethod.GET)
    public String getInventoryList(@PathVariable String var) {

        log.info("请求入参 var:" + var);
        commonService.commonTest();
        return "汉唐气象";
    }
}
新建service
CommonService接口package com.yangcq.learning.hantang.service;
public interface CommonService {
/**
* service方法
*/
void commonTest();
}
CommonServiceImpl实现类,注意,一定要加上@Service注解,注入Spring IOC容器package com.yangcq.learning.hantang.service.impl;
import com.yangcq.learning.hantang.service.CommonService;
import org.apache.commons.logging.Log;
import org.apache.commons.logging.LogFactory;
import org.springframework.stereotype.Service;
@Service
public class CommonServiceImpl implements CommonService {
private static final Log log = LogFactory.getLog(CommonServiceImpl.class);
@Override
public void commonTest() {
// 业务逻辑一般放在service中
log.info("进入service commonTest");
}
}
项目整体文件结构
OK,看一下项目整体结构
至此,一个Spring Cloud项目就算搭建完成了。接下来我们启动项目,访问看是否正常。
注意,这里我对banner进行了个性化定制,使用汉字“中”取代了“SPRING”。
这个挺简单,大家可以一试,只需要在resource下,新建一个banner.txt文件,然后把你自定义的banner设计,复制进去即可。
项目启动阶段,会去读取这个banner.txt文件,这个名字是固定的,不能更改,详情可以参考SpringApplication.class源码。
控制台完整启动日志如下:
D:\JDK64\jdk1.8\bin\java.exe -XX:TieredStopAtLevel=1
              ___
              |||
              |||
              |||
              |||
       +++++++|||+++++++
       +      |||      +
       +      |||      +
       +++++++|||+++++++
              |||
              |||
              |||
              |||
              vvv
2020-04-02 16:23:58.530  INFO 68876 --- [           main] c.y.learning.hantang.HantangApplication  : No active profile set, falling back to default profiles: default
2020-04-02 16:23:58.962  INFO 68876 --- [           main] o.s.cloud.context.scope.GenericScope     : BeanFactory id=fe5609f5-cb29-3873-8849-003765dbeeef
2020-04-02 16:23:59.226  INFO 68876 --- [           main] o.s.b.w.embedded.tomcat.TomcatWebServer  : Tomcat initialized with port(s): 8088 (http)
2020-04-02 16:23:59.236  INFO 68876 --- [           main] o.apache.catalina.core.StandardService   : Starting service [Tomcat]
2020-04-02 16:23:59.236  INFO 68876 --- [           main] org.apache.catalina.core.StandardEngine  : Starting Servlet engine: [Apache Tomcat/9.0.33]
2020-04-02 16:23:59.538  INFO 68876 --- [           main] o.a.c.c.C.[Tomcat].[localhost].[/]       : Initializing Spring embedded WebApplicationContext
2020-04-02 16:23:59.538  INFO 68876 --- [           main] o.s.web.context.ContextLoader            : Root WebApplicationContext: initialization completed in 992 ms
2020-04-02 16:23:59.716  INFO 68876 --- [           main] o.s.s.concurrent.ThreadPoolTaskExecutor  : Initializing ExecutorService 'applicationTaskExecutor'
2020-04-02 16:24:00.298  INFO 68876 --- [           main] o.s.b.w.embedded.tomcat.TomcatWebServer  : Tomcat started on port(s): 8088 (http) with context path ''
2020-04-02 16:24:00.702  INFO 68876 --- [           main] c.y.learning.hantang.HantangApplication  : Started HantangApplication in 3.422 seconds (JVM running for 4.388)
项目启动完成后,访问:http://localhost:8088/interface/hantang/common/list/%E6%B1%89
注意,我这里入参是中文:汉,所以显示的是对应的unicode编码
来看最终的效果:
控制台日志如下:
2020-04-02 17:01:18.938  INFO 68876 --- [nio-8088-exec-2] o.a.c.c.C.[Tomcat].[localhost].[/]       : Initializing Spring DispatcherServlet 'dispatcherServlet'
2020-04-02 17:01:18.938  INFO 68876 --- [nio-8088-exec-2] o.s.web.servlet.DispatcherServlet        : Initializing Servlet 'dispatcherServlet'
2020-04-02 17:01:18.945  INFO 68876 --- [nio-8088-exec-2] o.s.web.servlet.DispatcherServlet        : Completed initialization in 7 ms
2020-04-02 17:01:18.973  INFO 68876 --- [nio-8088-exec-2] c.y.learning.hantang.HantangApplication  : 请求入参 var:汉
2020-04-02 17:01:18.973  INFO 68876 --- [nio-8088-exec-2] c.y.l.h.service.impl.CommonServiceImpl   : 进入service commonTest
使用Spring Initializr从零开始搭建Spring Cloud项目,就这么愉快的结束了。后续,我会基于这个项目,进行Spring Cloud项目的
扩展,逐渐丰富这个项目,敬请期待。


