RxJava+Retrofit+OkHttp3+Dagger2+MVP构建Android项目简单例子
以前的项目都是用的很老的MVC来做的,当然我觉得MVC在维护方面是比MVP强的,网络请求框架是用的严大神的NoHttp,个人这个网络请求框架是非常nb的,有机会看到这博客的可以去GitHub上搜一下,非常好用。最近有点时间就开始去接触最近非常流行的Android开发组合RxJava+Retrofit+OkHttp3+Dagger2+MVP,因为刚上手,所以不是很熟,都是在学习别人的东西,基本上从别人的项目中剥离出来的,在这对那些高手表示感谢。
一、用RxJava+Retrofit+OkHttp3封装成网络请求框架:
1、OkHttp3工具类封装,在okhttp中设置缓存目录、请求拦截器,响应拦截器,代码如下:
public class OkHttpUtil {

    private static OkHttpClient mOkHttpClient;

    //设置缓存目录
    private static final File cacheDirectory = new File(MyApplication.getMyApplication().getCacheDir().getAbsolutePath(), "httpCache");

    private static Cache cache = new Cache(cacheDirectory, 10 * 1024 * 1024);

    //请求拦截
    private static RequestInterceptor requestInterceptor = new RequestInterceptor();

    //响应拦截
    private static ResponseInterceptor responseInterceptor = new ResponseInterceptor();


    public static OkHttpClient getOkHttpClient() {
        if (null == mOkHttpClient) {
            mOkHttpClient = new OkHttpClient.Builder()
                    .cookieJar(CookieJar.NO_COOKIES)
                    .connectTimeout(10, TimeUnit.SECONDS)
                    .readTimeout(30, TimeUnit.SECONDS)
                    .writeTimeout(30, TimeUnit.SECONDS)
                    .addInterceptor(responseInterceptor)
                    .addInterceptor(new HttpLoggingInterceptor(new HttpLoggingInterceptor.Logger() {
                        @Override
                        public void log(String message) {
                            Log.i("http", message);
                        }
                    }).setLevel(HttpLoggingInterceptor.Level.BODY))
                    .cache(cache)
                    .build();
        }
        return mOkHttpClient;
    }
}
在代码中有请求拦截器RequestInterceptor和响应拦截器ResponseInterceptor,一般的请求都需要带上请求头和一些公共的请求参数以及Cookie的管理,这些配置都是在请求拦截器中配置,而响应拦截器一般对返回的参数进行一定格式化,便于处理数据,具体见源码。这里还用okhttp中的日志拦截,这个非常厉害HttpLoggingInterceptor,可以打印出所有http请求的信息,再也不用跟你的后台小哥争论了,有详细日志有真相。
2、Retrofit工具类封装,Retrofit之所以牛逼是他可以跟RxJava完美的结合,无缝!!!具体代码如下
public abstract class RetrofitUtil {
    //服务路径
    private static final String Url = "http://hzqb.sftsdg.com/YMF_Webs/";
    private static Retrofit mRetrofit;
    private static OkHttpClient mOkHttpClient;

    //获取Retrofit对象

    protected static Retrofit getRetrofit(){
        if (null == mRetrofit){
            if (null == mOkHttpClient){
                mOkHttpClient = OkHttpUtil.getOkHttpClient();
            }
            mRetrofit = new Retrofit.Builder()
                    .baseUrl(Url)
                    .addConverterFactory(GsonConverterFactory.create())
                    .addCallAdapterFactory(RxJavaCallAdapterFactory.create())
                    .client(mOkHttpClient)
                    .build();
        }
        return mRetrofit;
    }
}
这里是将Retrofit与OkHttp完美结合,因为Retrofit需要传入一个Request Client,此时用OkHttp再合适不过了,同时,还可以用GsonConverterFactory来自动解析数据。需要注意的是,此处的url必须要以“/”结尾,不然会抛异常
3、获取将OkHttpClient和Retrofit结合好Retrofit对象,此处,Retrofit.create()返回一个泛型,完美结合RxJava,代码如下:
public class RequestEngine {

    private static Retrofit mRetrofit;
    //private static RequestEngine instance;

    public RequestEngine() {
        mRetrofit = RetrofitUtil.getRetrofit();
    }

    /*public static RequestEngine getInstance() {
        if (instance == null) {
            synchronized (RequestEngine.class) {
                if (null == instance) {
                    instance = new RequestEngine();
                }
            }
        }
        return instance;
    }*/

    //返回一个泛型
    public  T getServer(Class server) {
        return mRetrofit.create(server);
    }

}
代码片中注释的是用一般的方法引入的封装好的Retrofit,此处把代码注释掉是因为用到了注解Dagger2,
4、用Retrofit写请求方法,返回的是Observable泛型,代码如下:
public interface RequestApi {

    @FormUrlEncoded
    @POST("login/u.php")
    Observable> login(@Field("username") String username, @Field("password") String password, @Field("app") String type);

}
至于Retrofit一般用法还是挺简单的,简单介绍下,在retrofit中通过一个Java接口作为http请求的api接口
get请求:在方法上使用@Get注解来标志该方法为get请求,在方法中的参数需要用@Query来注释,如:
@GET("search/repositories")
Call queryRetrofitByGetCall(@Query("q")String owner,
                                      @Query("since")String time,
                                      @Query("page")int page,
                                      @Query("per_page")int per_Page);
Post请求:使用@FormUrlEncoded和@POST注解来发送表单数据。使用 @Field注解和参数来指定每个表单项的Key,value为参数的值。需要注意的是必须要使用@FormUrlEncoded来注解,因为post是以表单方式来请求的,如:
@FormUrlEncoded
@POST("user/edit")
Call updateUser(@Field("first_name") String first, @Field("last_name") String last) ;5、封装请求方法,代码如下:
public class RequestMethod {

    private RequestApi RequestApi;
    @Inject
    RequestEngine requestEngine;

    public RequestMethod() {
        //此处也可以用注解来做,
       // this.RequestApi = RequestEngine.getInstance().getServer(RequestApi.class);
        //用注解的方式
        DaggerLoginComponent.builder().loginModel(new LoginModule()).build().inject(this);
        RequestApi = requestEngine.getServer(RequestApi.class);
    }

    //该方法不能获取去到baseBean中的result和msg的值
    public void loginRequest(String userName, String password, String type, HttpSubscriber subscriber){
        RequestApi.login(userName,password,type)
                .compose(RxHelper.handleResult())
                .subscribe(subscriber);
    }

    //取到所有的解析后的json数据
    public void loginRequestWithBaseBean(String userName, String password, String type, HttpSubscriber> subscriber){
        RequestApi.login(userName,password,type)
                .compose(RxHelper.>schedulersThread())
                .subscribe(subscriber);
    }

}
在该类中获取RequestEngine使用的注解的方式来做的,代码里面有注释,在请求方法中,封装了HttpSubscriber,这个是继承Subscriber类,用来处理RxJava接受数据,以及网络请求加载框,网络请求异常处理类,代码如下:
public abstract class HttpSubscriber extends Subscriber {

    private Context context;
    private boolean isShowDialog;
    private ProgressDialog progressDialog;

    public HttpSubscriber(Context context, boolean isShowDialog) {
        this.context = context;
        this.isShowDialog = isShowDialog;
    }

    @Override
    public void onStart() {
        super.onStart();
        if (!isNetWorking(context)) {
            onError("网络不可用");
            onFinish();
            if (!isUnsubscribed()) {
                unsubscribe();
            }
        } else {
            if (progressDialog == null && isShowDialog) {
                progressDialog = new ProgressDialog(context);
                progressDialog.setMessage("正在加载...");
                progressDialog.show();
            }
        }
    }

    @Override
    public void onCompleted() {
        onFinish();
        if (!isUnsubscribed()) {
            unsubscribe();
        }
        if (progressDialog != null && isShowDialog) {
            progressDialog.dismiss();
            progressDialog = null;
        }
    }

    /**
     * onCompleted和onError是互斥的,队列中调用了其中一个,就不应该再调用另一个。也是事件序列中的最后一个
     *
     */

    @Override
    public void onError(Throwable e) {
        onFinish();
        if (!isNetWorking(context)) {
            onError("网络不可用");
        } else if (e instanceof SocketTimeoutException) {
            onError("服务器响应超时");
        } else if (e instanceof ConnectException) {
            onError("服务器请求超时");
        } else if (e instanceof HttpException) {
            onError("服务器异常");
        } else {
            onError("未知异常:"+e.getMessage());
        }
        if (progressDialog != null && isShowDialog) {
            progressDialog.dismiss();
            progressDialog = null;
        }
    }

    @Override
    public void onNext(T t) {
        onSuccess(t);
    }

    public abstract void onSuccess(T t);

    public abstract void onError(String msg);

    public abstract void onFinish();

    /**
     * 网络监测
     *
     * @param context
     * @return
     */
    public static boolean isNetWorking(Context context) {
        boolean flag = checkNet(context);
        if (!flag) {

            Toast.makeText(context, "当前设备网络异常,请检查后再重试!", Toast.LENGTH_SHORT).show();
        }
        return flag;
    }

    private static boolean checkNet(Context context) {

        if (context != null) {
            ConnectivityManager mConnectivityManager = (ConnectivityManager) context
                    .getSystemService(Context.CONNECTIVITY_SERVICE);
            NetworkInfo mNetworkInfo = mConnectivityManager
                    .getActiveNetworkInfo();
            if (mNetworkInfo != null) {
                return mNetworkInfo.isAvailable();
            }
        }
        return false;
    }
}
在这个demo中使用的Rxjava1.0的,所以重写了onStart() 方法,在该方法中处理一些请求前工作,需要注意的是,改方法是在子线程运行的,但是在这里弹出加载框肯定是有问题的,别慌,RxJava可以指定线程来处理订阅结果的,这里我们指定在AndroidSchedulers.mainThread()这个线程中。可以看到,在请求方法中(5)我们用到了compose操作符,这个操作符强大是因为,他能解决一般Rxjava普通写法打断链式结构,这个操作符需要传入一个Transformers,Transformer实际上就是一个Func1,换言之就是:可以通过它将一种类型的Observable转换成另一种类型的Observable,在代码中,封装了一个RxHelper类,代码如下:
public class RxHelper {

    /**
     * 处理http请求返回的结果,result_code,当返回成功的时候将data剥离出来,返回给subscriber
     *
     * @param
     * @return
     */
    public static  Observable.Transformer, T> handleResult() {
        return new Observable.Transformer, T>() {
            @Override
            public Observable call(Observable> baseBeanObservable) {
                return baseBeanObservable.flatMap(new Func1, Observable>() {
                    @Override
                    public Observable call(BaseBean tBaseBean) {
                        if ("1".equals(tBaseBean.getResult())) {
                            //返回成功
                            return addData(tBaseBean.getData());
                        } else {
                            //返回失败
                            return Observable.error(new Exception(tBaseBean.getMsg()));
                        }
                    }
                }).subscribeOn(Schedulers.io()).observeOn(AndroidSchedulers.mainThread());
            }
        };
    }

    /**
     * 将服务端返回的数据加入subscriber
     *
     * @param data
     * @param
     * @return
     */

    private static  Observable addData(final T data) {
        return Observable.create(new Observable.OnSubscribe() {
            @Override
            public void call(Subscribersuper T> subscriber) {
                try {
                    subscriber.onNext(data);
                    subscriber.onCompleted();
                } catch (Exception e) {
                    subscriber.onError(e);
                }
            }
        });
    }

    /**
     * rxJava线程转换,在io线程中发起请求,回调给主线程
     *
     * @param
     * @return
     */

    public static  Observable.Transformer schedulersThread() {
        return new Observable.Transformer() {
            @Override
            public Observable call(Observable tObservable) {
                return tObservable
                        .subscribeOn(Schedulers.io())
                        .unsubscribeOn(Schedulers.io())
                        .observeOn(AndroidSchedulers.mainThread());
            }
        };
    }
}
与RxJava结合使用我们一般会封装一个BaseBean来处理返回数据,这里我们使用登录方法类做例子:
public class BaseBean implements Serializable {
    private String result;
    private String msg;
    private T data;

    public String getResult() {
        return result;
    }

    public void setResult(String result) {
        this.result = result;
    }

    public String getMsg() {
        return msg;
    }

    public void setMsg(String msg) {
        this.msg = msg;
    }

    public T getData() {
        return data;
    }

    public void setData(T data) {
        this.data = data;
    }

    @Override
    public String toString() {
        return "BaseBean{" +
                "result='" + result + '\'' +
                ", msg='" + msg + '\'' +
                ", data=" + data +
                '}';
    }
result,msg分别是你后台返回的请求状态码,我们是result=1是代表请求成功,然后msg就会返回成功的Message,而泛型T就是返回的你需要的具体数据,一般是一个Object,或者里面还嵌套了数组。
登录返回的数据的bean如下:
public class LoginInfo extends BaseBean{
   private String token;
    private String type;
    private String is_allow_create;

    public String getIs_allow_create() {
        return is_allow_create;
    }

    public void setIs_allow_create(String is_allow_create) {
        this.is_allow_create = is_allow_create;
    }

    public String getToken() {
        return token;
    }

    public void setToken(String token) {
        this.token = token;
    }

    public String getType() {
        return type;
    }

    public void setType(String type) {
        this.type = type;
    }

    @Override
    public String toString() {
        return "LoginInfo{" +
                "token='" + token + '\'' +
                ", type='" + type + '\'' +
                ", is_allow_create='" + is_allow_create + '\'' +
                '}';
    }
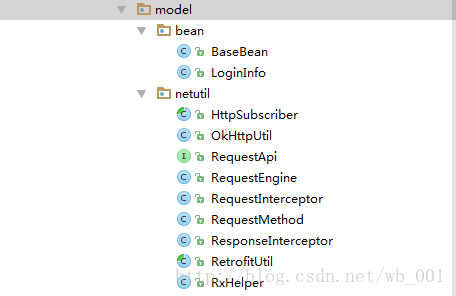
到此为止,网络层封装完毕,但是此处有一个带解决的问题就是RxJava的生命周期问题,如果不与Activity和Fragment生命中期绑定来判定是否要取消订阅,会出现两个问题,第一,内存泄漏;第二,有可能会导致View抛异常而崩溃App,但是这个情况出现的几率较小,现在网络上的这些框架很少人加入了生命周期管理,在这里,我也不知道怎么加入到这个工程里面。如果有大神,可以告诉我怎么加入生命周期管理,当然是要嵌入到这个工程里面后的代码,不是要告诉方法,哈哈哈,彩笔一般都这样!附上网络层的结构图:

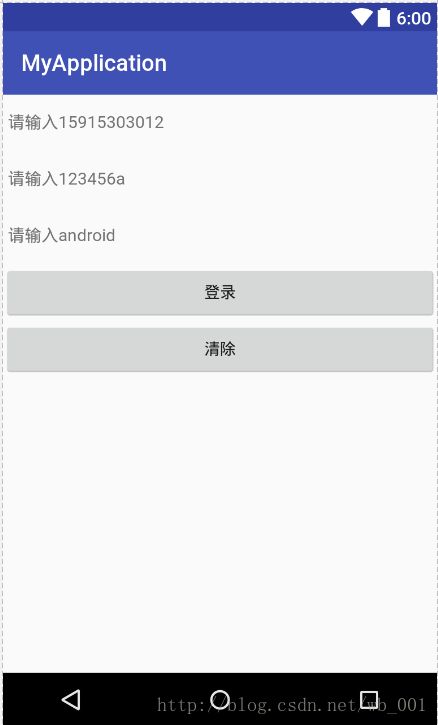
接下来,以登录的例子来写MVP模式以及Dagger2,界面如图:

1、分析,这个界面有两个功能,一个是登录,一个是清除,所以我们写一个接口,里面两个方法,分别是commit()和clear(),代码如下:
/**
 * @author: wangbo
 * @description:    提交,清除逻辑接口
 * @date: 2017-08-08   11:02
 */
public interface IMainActivityPresenter {
    void commit(Context context,boolean isShowProgress,List editTexts, TextView msg, RequestMethod requestMethod);
    void clear(List editTexts);
}
然后在写这个接口的实现类,重载这两个方法,在方法里面处理具体的逻辑,代码如下:
/**
 * @author: wangbo
 * @description: 处理界面逻辑
 * @date: 2017-08-08   11:04
 */
public class MainActivityImpl implements IMainActivityPresenter {
    @Override
    public void commit(Context context, boolean isShowProgress, List editTexts, final TextView msg, RequestMethod requestMethod) {
        String tel = editTexts.get(0).getText().toString();
        String psw = editTexts.get(1).getText().toString();
        String type = editTexts.get(2).getText().toString();
        requestMethod.loginRequestWithBaseBean(tel, psw, type, new HttpSubscriber>(context, isShowProgress) {
            @Override
            public void onSuccess(BaseBean loginInfoBaseBean) {
                msg.setText(loginInfoBaseBean.toString());
            }

            @Override
            public void onError(String msg) {

            }

            @Override
            public void onFinish() {

            }
        });
    }

    @Override
    public void clear(List editTexts) {
        for (EditText editText : editTexts) {
            editText.setText("");
        }
    }
}
2、写个在MainActiviy中处理View的逻辑接口,有,初始化,View的初始化,清除,提交,这些行为,代码如下:
/**
 * @author: wangbo
 * @description:    view动作接口
 * @date: 2017-08-08   11:13
 */
public interface IMainActivityView {
    void init();

    void intView();

    void commit();

    void clear();

}
3、在MainActivity中实现IMainActivityView 这个接口,看到重载方法:
public class MainActivity extends AppCompatActivity implements IMainActivityView, View.OnClickListener {
    /**
     * 通过@Inject来声明依赖对象,注意,被注解的字段不能用private和protected修饰
     */
    @Inject
    IMainActivityPresenter mainActivityPresenter;
    @Inject
    RequestMethod requestMethod;
    private List editTexts;
    private TextView textView;
    private Button commit, clear;

    @Override
    protected void onCreate(Bundle savedInstanceState) {
        super.onCreate(savedInstanceState);
        setContentView(R.layout.activity_main);
        init();
        intView();
    }

    @Override
    public void init() {
        /**
         * 编写完Component和Module和Dagger2并不会自动创建对应的类,此时需要我们手动点击开发工具的Rebuild后,
         * 自动生成DaggerLoginComponent,通过生成的DaggerLoginComponent类来创建LoginModule实例
         * Component所需要的Module类是通过系统自动生成的Module类类名首字母小写对应的方法来实例化的
         */
        DaggerLoginComponent.builder().loginModel(new LoginModule()).build().inject(this);
        editTexts = new ArrayList<>();
    }

    @Override
    public void intView() {
        editTexts.add((EditText) findViewById(R.id.tel));
        editTexts.add((EditText) findViewById(R.id.psw));
        editTexts.add((EditText) findViewById(R.id.type));
        textView = (TextView) findViewById(R.id.tv_msg);
        commit = (Button) findViewById(R.id.commit);
        commit.setOnClickListener(this);
        clear = (Button) findViewById(R.id.clear);
        clear.setOnClickListener(this);

    }

    @Override
    public void commit() {
        mainActivityPresenter.commit(MainActivity.this, true, editTexts, textView, requestMethod);
    }

    @Override
    public void clear() {
        mainActivityPresenter.clear(editTexts);
    }

    @Override
    public void onClick(View view) {
        switch (view.getId()) {
            case R.id.commit:
                commit();
                break;
            case R.id.clear:
                clear();
                break;
        }
    }
} 在这里总结下我的MVP的写法:首先分析界面中有哪些功能,把这些功能写成接口,在接口的方法中传入所需要的参数,然后写一个该接口的实现类,实现这个接口,在重写的方法中写这个功能的具体逻辑,然后再为了简化Activity中的代码,美化结构,在一个处理Activity中所有总逻辑的接口,比如,初始化类,初始化view,Activity中涉及的view的动作的接口,让Activity去实现这个接口,最后,在Activity中传入逻辑处理的接口,即IMainActivityPresenter,实例化该接口是通过new它的实现类来完成的。说到实例化类,这里就引入了Dagger2,依赖注入的方式来传递对象,避免在使用对象的过程中去new对象,具体如下:
1、写一个在该工程中索要使用的Module类,这个类中是提供你工程中要用的对象,具体代码如下,用法说明见代码注释:
/**
 * @author: wangbo
 * @description: 声明Module
 * @date: 2017-08-08   14:05
 */

/**
 * @ Module申明该类是Module类
 * @ Provides声明Module类中哪些方法是用来提供依赖对象,当Component类需要依赖对象时,他就会根据返回值的类型来在有@Provides注解的方法中选择调用哪个方法
 * @ Singleton的作用就是声明单例模式,^-^以后再也不用写单例模式了
 * @ Singleton的单利模式还以通过自定义注解来实现,这样做的目的就是方法查看该类的作用域
 * 如: @ Scope
 *      @ Retention(RetentionPolicy.RUNTIME)
 *      public @interface PerActivity {}
 *   此处的@Singleton可以用 @PerActivity来代替,可以清楚的看到这是作用字Activity,则能与Fragment区别
 */

@Module
public class LoginModule {

    @Singleton
    @Provides
    IMainActivityPresenter mainActivity(){
        return new MainActivityImpl();
    }

    @Singleton
    @Provides
    RequestMethod requestMethod(){
        return new RequestMethod();
    }

    @Singleton
    @Provides
    RequestEngine requestEngine(){
        return new RequestEngine();
    }
}
2、写一个Component,这个类是一个中间桥接类,她的作用是将你要使用的对象,通过Component来注入到你的对象需求方,具体代码如下,详细说明见代码注释:
/**
 * @author: wangbo
 * @description: 声明Component
 * @date: 2017-08-08   14:08
 */

/**
 * 当@module中声明了单例模式Singleton的时候在Component中也需要声明
 * @ Component注解有两个属性,modules和dependencies这两个属性的类型都是Class数组,modules的作用就是声明该Component含有哪几个Module,当Component需要某个依赖对象时,就会通过这些Module类中对应的方法获取依赖对象
 * inject方法就是将module中对应方法取出的对象通过Component来把依赖需求方(MainActivity、RequestMethod)所需要的对象注入到依赖需求方
 */
@Singleton
@Component(modules = LoginModule.class)
public interface LoginComponent {
    void inject(MainActivity mainActivity);
    void inject(RequestMethod requestMethod);
}
Component接口中有两个inject方法,这个方法就是将LoginModule.class注入到MainActivity 和RequestMethod 中。
3、在你所需要用到这两个对象的地方用@Inject注解来标识该对象,注意,使用注解的字段不能用private和protected修饰,然后rebuild工程,生成DaggerLoginComponent对象,调用
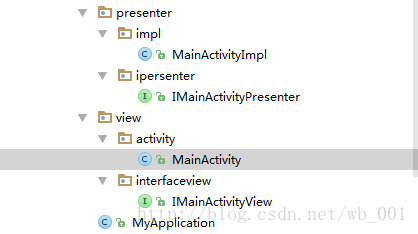
DaggerLoginComponent.builder().loginModel(new LoginModule()).build().inject(this);方法实例化Module。然后注解的类不需要new就可以直接用了。ok,到此结束,工程结构图如下:

4、Dagger2的引入方法:
a、在工程跟目录下的build.gradle下面的dependencies下添加:
classpath 'com.neenbedankt.gradle.plugins:android-apt:1.8'
b、在app目录下的build.gradle下添加插件:
apply plugin: 'com.neenbedankt.android-apt'
c、引入依赖:
  //引入dagger2
    compile 'com.google.dagger:dagger:2.6'
    apt 'com.google.dagger:dagger-compiler:2.6'
    //java注解
    provided 'org.glassfish:javax.annotation:10.0-b28'
最后,这个工程所用的其他项目依赖:
    compile 'io.reactivex:rxandroid:1.1.0'
    compile 'io.reactivex:rxjava:1.1.0'
    compile 'com.squareup.retrofit2:retrofit:2.3.0'
    compile 'com.squareup.retrofit2:converter-gson:2.3.0'
    compile 'com.squareup.retrofit2:adapter-rxjava:2.3.0'
    compile 'com.squareup.okhttp3:okhttp:3.8.1'
    compile 'com.squareup.okhttp3:logging-interceptor:3.8.1'
附上工程的项目源码:
项目源码
最后,完了。本人也是刚学这些东西,并不能透彻的理解,如果有什么问题,欢迎指正。一起学习。
最后感谢这些大神:
谢谢大神1(网络框架封装)
谢谢大神2(Dagge2基础)
