1.数据库准备
部门tbl_dept
员工tbl_emp
建立员工和部门的外键
2.在IDEA创建SSM项目环境
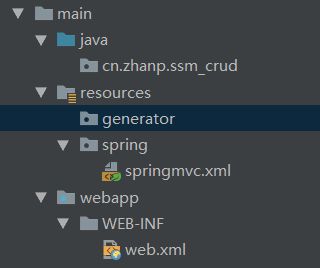
2.1配置Web模块
最上面的图是错误示范,注意!!! 在Tomcat配置了项目路径,就不需要再webapp这里配置项目路径,不然是找不到这里面的资源的!!!!!!!
2.2 引入Maven的SSM相关依赖
                org.apache.maven.plugins
                maven-compiler-plugin
                2.3.2

                    1.8
                    1.8
                    UTF-8


                org.mybatis.generator
                mybatis-generator-maven-plugin
                1.3.2

                    true
                    true


                        src/main/resources/generator/generatorConfig.xml


                        mysql
                        mysql-connector-java
                        ${mysql.version}


        UTF-8

        3.2.8
        1.2.2
        5.1.32


            org.springframework
            spring-webmvc
            3.2.17.RELEASE


            org.springframework
            spring-tx
            3.2.17.RELEASE


            org.springframework
            spring-jdbc
            3.2.1.RELEASE


            org.springframework
            spring-aspects
            3.1.0.RELEASE


            javax.servlet
            jstl
            1.2


            javax.servlet
            javax.servlet-api
            3.0.1


            c3p0
            c3p0
            0.9.1.2


            mysql
            mysql-connector-java
            ${mysql.version}


            org.mybatis
            mybatis
            ${mybatis.version}


            org.mybatis
            mybatis-spring
            ${mybatis.spring.version}


            org.slf4j
            slf4j-api
            1.7.25


            org.slf4j
            slf4j-log4j12
            1.7.25


            log4j
            log4j
            1.2.17


            junit
            junit
            4.9
注意1:spring的相关依赖版本要一致,不然maven加载其他相关依赖的时候,会有不同版本的相同依赖也会加载进来,很可能会冲突。而且从maven仓库又下载就会很慢。
注意2: 当你在spring配置文件中死活都不出来某个标签的时候,很可能你在maven里导错包,首先需要重新导入正确的依赖。然后把这个xml上面错误的xsd约束删除掉,就可以了。
applicationContext-service.xml
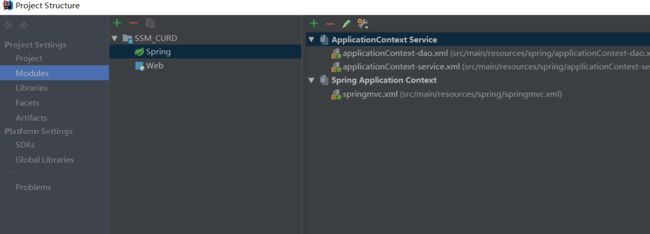
注意点3:当你在IDEA中无法识别另外一个如applicationContext-dao中的数据源的引用bean时,应该在IDEA的spring Module中把spring配置文件都添加进去,同一个applicationContext就可以识别了
2.3 部署到Tomcat
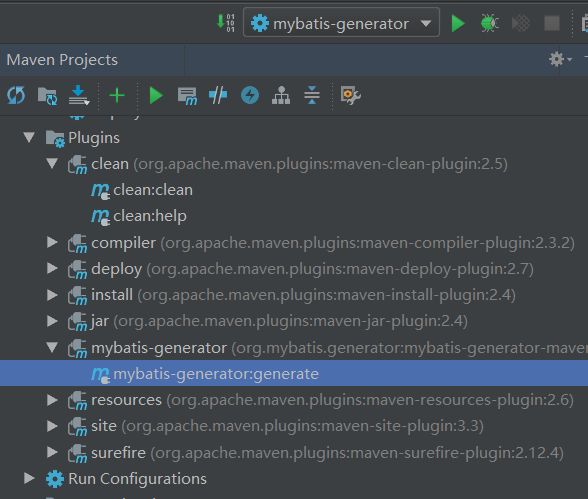
2.4 配置MBG插件,逆向工程
                org.mybatis.generator
                mybatis-generator-maven-plugin
                1.3.2

                    true
                    true
                    src/main/resources/generator/generatorConfig.xml


                        mysql
                        mysql-connector-java
                        ${mysql.version}
2.5 编写SSM各层的配置文件和数据库文件以及日志文件
springmvc.xml
        contextConfigLocation
        classpath:


        org.springframework.web.context.ContextLoaderListener


        dispatcherServlet
        org.springframework.web.servlet.DispatcherServlet


            contextConfigLocation
            classpath:

        1


        dispatcherServlet
        /
总结:别忘了监听器,不配置监听器,根本就没人去帮你加载那几个配置文件
mybatis-config.xml
applicationContext-dao.xml
总结:sqlSessionTemplate,用于注册一些特殊的sqlSession
    public SqlSessionTemplate(SqlSessionFactory sqlSessionFactory, ExecutorType executorType) {
        this(sqlSessionFactory, executorType, new MyBatisExceptionTranslator(sqlSessionFactory.getConfiguration().getEnvironment().getDataSource(), true));
    }
总结2: error-------通配符的匹配很全面, 但无法找到元素 'aop:config' 的声明。
解决:依旧是把xsd依赖重新写入(一定要注意mvc和aop这些的xsd约束引入是否正确)
总结3: 提示Error creating bean with name 'org.springframework.cache.interceptor.CacheInterceptor
又是xsd依赖引入错误
2.6 把依赖添加入到Artifact中
3.Spring单元测试模拟数据测试mapper
总结:
    org.apache.tomcat
    tomcat-el-api
    8.5.24
    provided


    org.apache.tomcat
    tomcat-jasper-el
    8.5.24
    provided
4. 配置pageHelper,实现分页
参考官方文档:https://github.com/pagehelper/Mybatis-PageHelper/blob/master/wikis/zh/HowToUse.md
mybatis-config.xml
            com.github.pagehelper
            pagehelper
            5.1.2
5. 分页的后台代码
    @RequestMapping(value = "/emps",method = {RequestMethod.GET,RequestMethod.POST})
    public ModelAndView getEmps(@RequestParam(value = "pn",defaultValue = "1") Integer page_num){

//        实现分页,默认大小一页显示5条
        PageHelper.startPage(page_num, 5);

        List list = employeeService.getAllWithDept();

//        用pageInfo去包装查询后的结果,第二种构造器,第二参数为,连续显示的页数(以当前页为中心,1,2,3,4,5这样)
        PageInfo pageInfo = new PageInfo<>(list,5);


        ModelAndView modelAndView = new ModelAndView();
        modelAndView.setViewName("empList");

        modelAndView.addObject("pageInfo",pageInfo);

        return modelAndView;
    }
总计:
在controller的方法里 要有一个@RequestParam(value="",defaultValue="") xxx
要求从前端传入第几页pageNumber, 又或者传两个,一个是页码,一个是每页的数目size,
因为我们很可能会首页就跳转到这里查看,所以很可能没携带页码参数,所以设置一个默认值
defaultValue,这样就可以实现了。
PageHelper.startPage(page_num, 5);
用静态方法去让mybatis设置的pageHelper的拦截器对紧跟着的第一个select()方法进行分页,并设置size
PageInfo pageInfo = new PageInfo<>(list,5);
用pageInfo 来包装查询后的结果,这样可以把结果包装进pageInfo对象中,
并且第二个参数是navigatepageNums: 是以当前分页为基数,计算导航页码的个数
举个例子:
比如当前页码为1,那么navigatepageNums五个,就是1,2,3,4,5。
当前页码为5,那么navigatepageNums五个,就是3,4,5,6,7 尽可能地以5为中心展开分页导航
并且能够获取相关分页的其他参数,比如total啊,判断是不是首页啊,有没有上一页,下一页啊这些方法。
//PageInfo包含了非常全面的分页属性
assertEquals(1, page.getPageNum());
assertEquals(10, page.getPageSize());
assertEquals(1, page.getStartRow());
assertEquals(10, page.getEndRow());
assertEquals(183, page.getTotal());
assertEquals(19, page.getPages());
assertEquals(1, page.getFirstPage());
assertEquals(8, page.getLastPage());
assertEquals(true, page.isFirstPage());
assertEquals(false, page.isLastPage());
assertEquals(false, page.isHasPreviousPage());
assertEquals(true, page.isHasNextPage());
6. bootstrap后台界面显示
总结的小问题:一开始不出现字体图标,为什么呢?
答:因为我只在项目中引入了bootstrap的css和js,而字体图标虽然是以class来标识,但是底层实现是要根据
fonts来匹配图标文件的,后缀为这种:
所以要引入bootstrap的fonts文件,并且和js文件夹在同等级目录结构
注意:SpringMVC静态文件的配置,一定要配置过滤器,不要拦截这个
        dispatcherServlet
        org.springframework.web.servlet.DispatcherServlet


            contextConfigLocation
            classpath*:spring/springmvc.xml

        1


        dispatcherServlet
        /


         default
         *.js
         *.css
         /assets/*"
         /images/*
         /static/*
作用:在web.xml文件中经常看到这样的配置default,这个配置的作用是:对客户端请求的静态资源如图片、JS文件等的请求交由默认的servlet进行处理,也就是不经过DispatcherServlet的拦截
#
empName
gender
email
deptName
操作
${page.empId}
${page.empName}
${page.gender}
${page.email}
${page.department.deptName}
当前总记录数:${pageInfo.total}
7.统一JSON 响应类的编写
前提:
- 为什么要JSON?因为可以针对不同的前端,不管是浏览器,小程序,安卓移动端等等,都可以通过JSON
数据来达到数据交互的效果。而不用拘泥于以前的浏览器页面Html和jsp这些。
- 有了JSON,就可以在实际项目中快速分工。后端传JSON数据,前端通过Ajax向后端提供的接口获取JSON数据,解析JSON数据,渲染进页面中,即可完成交互。而不需要像以前那样,通过JSP等后端模板引擎,来在服务端渲染。造成前后端的开发耦合。
//    要导入jackson包,SpringMVC的ResponseBody才能起作用

    @RequestMapping(value = "/emps",method = {RequestMethod.GET,RequestMethod.POST})
    @ResponseBody
    public Msg getEmpsWithJson(@RequestParam(value = "pn",defaultValue = "1") Integer page_num){
        //        实现分页,默认大小一页显示5条
        PageHelper.startPage(page_num, 5);

        List list = employeeService.getAllWithDept();

//        用pageInfo去包装查询后的结果,第二种构造器,第二参数为,连续显示的页数(以当前页为中心,1,2,3,4,5这样)
        PageInfo pageInfo = new PageInfo<>(list,5);

//        封装进JSON 响应类
        Msg msg = Msg.success().add("pageInfo", pageInfo);

        return msg;
    }
public class Msg {
private int code; //代码
private String msg; //信息
//用户要返回给浏览器的数据,最好用一个map对象,前端可以直接取出这个map['key']这样的方式来取出需要的数据
//而且设置为Map的好处,通过返回Msg对象,可以进行链式添加,map中有多个键值对,可以传多个对象
private Map extend = new HashMap<>();
//返回Msg对象,进行链式操作
public static Msg success(){
Msg msg = new Msg();
msg.setCode(200);
msg.setMsg("处理成功");
return msg;
}
public static Msg fail(){
Msg msg = new Msg();
msg.setCode(500);
msg.setMsg("处理失败");
return msg;
}
//添加要返回的主体数据(先通过success和fail,拿到Msg,就可以进行链式操作了)
public Msg add(String key,Object value){
this.getExtend().put(key,value);
return this;
}
//此处省略getter,setter 8.用vue重构Jquery拼接的前端分离页面
window.baseURL = "http://localhost:8080/ssm_crud/"

$(document).ready(function () {
    window.empList = new Vue({
        el:"#empList",
        data:{
            emps:[]
        },
        method:{

        },
        created(){
            window.getEmpsIndex();
            // this.$forceUpdate() ;
        }

    })
})

function getEmpsIndex() {
    console.log(baseURL+"emps");
    $.get(baseURL+"emps",
        {
            pn:1
        },
        function (result) {
            //一定要加上设置为window.xxx  ,不然他就是一个新的引用,而不是上面的vue对象
            window.empList.emps = result.extend.pageInfo.list;
        });
}
总结:
为了让页面一开始就触发函数,获取首页数据,需要用到vue的生命周期函数
而且需要注意到JS的作用域,如果写成empList.emps = result.extend.pageInfo.list;
而不是window.empList.emps,那么JS就会新建一个empList对象,这样vue对象实际上没有获取到值。
这也是我以前用的方法,用window,保证操作的是同一个vue对象。
上面的方法的原因其实是:我忘记了ES5的特性,因为在里面的那个function函数中,this已经指向了全局变量window, 而不是当前的vue实例了,所以设置不了data值。
要用let self = this来保存this的引用,又或者用ES6的箭头函数
        methods:{
            getEmps:function (pn) {
                $.get(baseURL+"emps",
                    {
                        pn:pn
                    },
                    function (result) {
                        console.log(this);  //查看可知这个this又指向了window对象

                        self.emps = result.extend.pageInfo.list;
                        self.pageInfo = result.extend.pageInfo;

                        console.log("pages"+self.pageInfo.pages);   //测试
                        console.log("pn"+pn);
                    });
            }
        }
SSM_CRUD
#
empName
gender
email
deptName
操作
{{emp.empId}}
{{emp.empName}}
{{emp.gender}}
{{emp.email}}
{{emp.department.deptName}}
当前总记录数:{{pageInfo.total}}
实现选中当前分页,当前分页高亮加深的效果。
{{pageNum}}
总结 : 动态class的语法一定要加{}
9. 添加员工
简介:通过以模态框的方式来编写 添加员工的界面。 在点击新增按钮后,让模态框显示。
怎么做出来的:通过bootstrap官方文档,拉取组件样式和 模态框model 的JS插件来完成这个界面。
细节:部门名称:是以下拉菜单的形式,所以要ajax获取部门数据。
总结:
因为有些我不用完全的form表单提交的方式,比如部门数据,是用的ul配li,所以在JS里面获取前端的所有表单数据,然后再手动submit上去校验。也不难,用下JQuery获取值和DOM结点即可
需要注意的技巧是:
获取单选按钮选中后的value值,用$('input[name="gender"]:checked').attr('value');
获取下拉菜单(但又不是select这种写法)选中的值,view层的
- 绑定事件
选择部门下拉菜单我是以按钮的形式
配合JS
              //获取选择的部门id
              getSelectedDept:function (dept_id,dept_name) {
                  this.selected_dept_id = dept_id;
                  //按钮提示的回显
                  $("#dedt_btn").text(dept_name);
                  console.log(this.selected_dept_id)
              },
  ```
界面代码:
            //切换模态框的显示
            add_emp_toggle:function () {
                this.getDepts();
                $("#add_emp").modal({
                    //设置 点击除模态框以外的其他地方,不会让模态框消失掉
                    backdrop:"static"
                });
            },
            //获取部门信息
            getDepts:function () {
                let self = this;
                $.get(baseURL+"depts",
                    function (result) {
                        self.depts = result.extend.depts;
                    })
                },
            //获取选择的部门id
            getSelectedDept:function (dept_id,dept_name) {
                this.selected_dept_id = dept_id;
                //按钮提示的回显
                $("#dedt_btn").text(dept_name);
                console.log(this.selected_dept_id)
            },
            //增加员工 提交
            add_emp_submit:function () {
                let empName = $('#inputName').val();
                let gender = $('input[name="gender"]:checked').attr('value');
                let email = $('#inputEmail').val();
                let dId = this.selected_dept_id;

                console.log(empName)
                console.log(gender)
                console.log(email)
                console.log(dId)

                $.post(baseURL+"/emps/add",
                    {
                        empName:empName,
                        gender:gender,
                        email:email,
                        dId:dId
                    },
                    function (result) {
                        if(result.code==200){
                            //重新获取第一页数据,刷新页面
                            window.getEmpsIndex();
                            $("#add_emp").modal('hide');
                        }
                    })
            }
添加员工 提交数据后 回显最后一页的实现:
                    //这个是添加员工的提交后的 回调函数
                    function (result) {
                        if(result.code==200){
                            //获取最后一页数据,刷新页面
                            let lastPage = result.extend.lastPage;
                            console.log("lastPage:"+lastPage)
                            self.getEmps(lastPage);
                            $("#add_emp").modal('hide');
                        }
                    })
//要拿到最后一页
@Override
public int getLastPage(int size) {
EmployeeExample employeeExample = new EmployeeExample();
EmployeeExample.Criteria criteria = employeeExample.createCriteria();
criteria.andEmpIdIsNotNull();
int num = employeeMapper.countByExample(employeeExample);
if(num%size==0){
return num/size;
}else{
return num/size+1;
}
} @RequestMapping(value = "/emps/add",method = RequestMethod.POST)
@ResponseBody
public Msg addEmp(Employee employee){
employeeService.addEmployee(employee);
//要拿到最后一页
//总员工数
int lastPage = employeeService.getLastPage(5);
return Msg.success().add("lastPage",lastPage);
}9.1 添加员工的校验状态
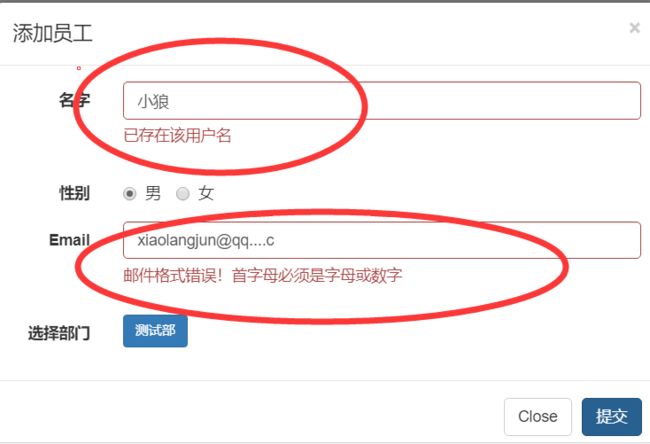
名字和邮箱的校验和前端显示
前端校验页面的用法
bootstrap摘录:
A block of help text that breaks onto a new line and may extend beyond one line.
            //模态框显示的事件中
            add_emp_toggle:function () {
                this.getDepts();
                $("#add_emp").modal({
                    //点击背景不删除
                    backdrop:"static"
                });

                /**
                 * 前端JQuery校验
                 * 1.用户名交给后端检查校验正则表达式,再查看是否重名
                 * 2.其他的前端校验正则即可
                 */
                $("#inputName").focusout(function () {
                    let self = this;
                    let name = $(this).val();
                    $.post(baseURL+"namechecked",{
                            empName:name
                        },
                        function (result) {
                            //因为修改的时候,是添加样式,所以可能重复has-success和has-error一起,是不正确的
                            $(self).parent().removeClass("has-success has-error");
                            $(self).next().text("");
                            if(result.code==200){

                                window.empList.vali_name = true;
                                //说明成功,正则匹配,且用户名可用
                                $(self).parent().addClass("has-success");
                                let msg = result.extend.message;
                                $(self).next().text(msg);

                            }else{
                                window.empList.vali_name = false;

                                //说明不成功,正则不匹配或者用户名不可用,要拿出错误信息,添加相关样式,以及不许提交
                                console.log($(this));
                                $(self).parent().addClass("has-error");
                                let msg = result.extend.message;
                                $(self).next().text(msg);
                            }
                        });
                });

                //正则表达式判断其他表单参数
                $("#inputEmail").focusout(function () {
                    $(this).parent().removeClass("has-success has-error");
                    $(this).next().text("");
                    let email = $(this).val();
                    let regx = /^[a-zA-Z0-9_.-]+@[a-zA-Z0-9-]+(\.[a-zA-Z0-9-]+)*\.[a-zA-Z0-9]{2,6}$/

                    // 长度不限,可以使用英文(包括大小写)、数字、点号、下划线、减号,首字母必须是字母或数字;
                    console.log(regx.test(email));
                    if(regx.test(email)){
                        window.empList.vali_email = true;

                        //符合
                        //1. 给父元素添加bootstrap 校验成功样式
                        $(this).parent().addClass("has-success")

                    }else{
                        window.empList.vali_email = false;
                        //不符合
                        // 1. 给父元素添加bootstrap 校验错误样式
                        $(this).parent().addClass("has-error");
                        // 2. 在其下面添加span的提示内容
                        $(this).next().text("邮件格式错误!首字母必须是字母或数字");
                    }
                });
            },
@RequestMapping(value = "/namechecked",method = RequestMethod.POST)
@ResponseBody
public Msg nameChecked(@RequestParam(value = "empName",required = true) String name){
//1. 先正则 2. 后判断是否重复
String regx = "^[[[\u4e00-\u9fa5]a-zA-Z0-9]+[-|a-zA-Z0-9._]$]{2,7}";
if(name.matches(regx)){
boolean nameChecked = employeeService.getNameChecked(name);
if(nameChecked){
Msg msg = Msg.success().add("message", "用户名可用");
return msg;
}else{
Msg msg = Msg.fail().add("message", "用户名不可用");
return msg;
}
}else{
Msg msg = Msg.fail().add("message", "请填写2-7位中文或者数字或英文");
return msg;
}
}选择部门和提交表单时候的校验
            //获取选择的部门id
            getSelectedDept:function (dept_id,dept_name) {
                this.selected_dept_id = dept_id;
                //按钮的回显
                $("#dedt_btn").text(dept_name);

                //删掉span提示信息
                $("#dept_span").text('');
                console.log(this.selected_dept_id)
            },
            //增加员工 提交
            add_emp_submit:function () {
                let self = this;

                let empName = $('#inputName').val();
                let gender = $('input[name="gender"]:checked').attr('value');
                let email = $('#inputEmail').val();
                let dId = this.selected_dept_id;

                if(self.selected_dept_id==''){
                    $("#dedt_btn").next().css("color","red");
                    $("#dedt_btn").next().text("请选择部门");
                    self.vali_dept = false;
                }else{
                    self.vali_dept = true;
                    //全都校验成功,才可以提交
                    if(self.vali_name&&self.vali_dept&&self.vali_email){
                        $.post(baseURL+"emps/add",
                            {
                                empName:empName,
                                gender:gender,
                                email:email,
                                dId:dId
                            },
                            function (result) {
                                if(result.code==200){
                                    //获取最后一页数据,刷新页面
                                    let lastPage = result.extend.lastPage;
                                    console.log("lastPage:"+lastPage)
                                    self.getEmps(lastPage);
                                    $("#add_emp").modal('hide');

                                    //清空表单数据
                                    $("#add_emp_form")[0].reset();
                                    $("#add_emp_form").find("*").removeClass("has-error has-success");
                                    $("#add_emp_form").find(".help-block").text('');
                                    //清空校验状态位
                                    self.vali_name = false;
                                    self.vali_dept = false;
                                    self.vali_email = false;
                                    //清空选中的部门
                                    self.selected_dept_id = "";
                                    $("#dedt_btn").text("选择部门");
                                }
                            })
                    }else{
                        alert("请正确填写表单中的信息,再提交");
                    }
                    //提交表单

                }
                // console.log(empName)
                // console.log(gender)
                // console.log(email)
                // console.log(dId)


            }
总结:校验页面的编写
用正则(前后端都可以,用后端进行重名校验
通过后端或者前端校验结束后拿到提示信息,根据匹配情况给前端页面设置样式(比如success,error)以及
span里的提示信息
然后还要注意当重新聚焦到(通过聚焦focusOut()判断正则和重名)的时候,要注意先清空success,error的class样式,还有清空span里的提示信息
我是通过标志位判断每个表单参数是否匹配,都匹配了才可以提交Ajax请求提交表单。
记住:提交完表单后,要在回调函数里清空表单的数据,以及前端界面的一些校验提示的样式和提示信息。
还要清空我设置的校验标志位,以及这里的下拉菜单选中的部门id
9.2JSR303后端校验
防君子,不防小人的前端JS校验,要通过后端的校验来保证表单参数的正确性。这个时候JSR303应运而生!
            org.hibernate.validator
            hibernate-validator
            6.0.13.Final
这里要注意点:如果使用Tomcat7及以下的版本,那么validator和Tomcat lib中的EL表达式语法是不匹配的。会提示找不到Class EL....之类的异常
解决方法:下载
往tomcat的lib中添加了el-api-3.0.0的jar包
public class Employee {
    private Integer empId;

    @Pattern(regexp = "^[[[\\u4e00-\\u9fa5]a-zA-Z0-9]+[-|a-zA-Z0-9._]$]{2,7}",message = "请填写2-7位中文或者数字或英文")
    private String empName;

    private String gender;

    @Pattern(regexp = "^[a-zA-Z0-9_.-]+@[a-zA-Z0-9-]+(\\.[a-zA-Z0-9-]+)*\\.[a-zA-Z0-9]{2,6}$",message = "邮件格式错误!首字母必须是字母或数字")
    private String email;
@RequestMapping(value = "/emps/add",method = RequestMethod.POST)
@ResponseBody
public Msg addEmp(@Valid Employee employee, BindingResult result) {
HashMap map = new HashMap<>();
//正则校验有误
if (result.hasErrors()) {
List errors = result.getFieldErrors();
for (FieldError error : errors) {
map.put(error.getField(), error.getDefaultMessage());
}
return Msg.fail().add("errorFields", map);
}
//重名校验有误
String empName = employee.getEmpName();
boolean nameChecked = employeeService.getNameChecked(empName);
if (!nameChecked) {
map.put("empNameDuplicated", "已存在该用户名");
return Msg.fail().add("errorFields", map);
} else {
//校验正确
employeeService.addEmployee(employee);
//要拿到最后一页
//总员工数
int lastPage = employeeService.getLastPage(5);
return Msg.success().add("lastPage", lastPage);
}
} 如何拿到返回的后端校验返回的信息,去做其他的处理
            //增加员工 提交
            add_emp_submit:function () {
                let self = this;

                let empName = $('#inputName').val();
                let gender = $('input[name="gender"]:checked').attr('value');
                let email = $('#inputEmail').val();
                let dId = this.selected_dept_id;

                if(self.selected_dept_id==''){
                    $("#dedt_btn").next().css("color","red");
                    $("#dedt_btn").next().text("请选择部门");
                    self.vali_dept = false;
                }else{
                    //全都校验成功,才可以提交
                    if(self.vali_name&&self.vali_dept&&self.vali_email){
                        $.post(baseURL+"emps/add",
                            {
                                empName:empName,
                                gender:gender,
                                email:email,
                                dId:dId
                            },
                            function (result) {
                                //先进入后端校验,防君子,不防小人,所以需要后端JSR303校验
                                if(result.code==500){
                                    //后端校验,有误
                                    let error_emp_name = result.extend.errorFields.empName;
                                    let error_emp_email = result.extend.errorFields.email;
                                    let error_emp_name_duplicated = result.extend.errorFields.empNameDuplicated;

                                    //说明这个数据校验有误
                                    if(error_emp_name!=undefined){
                                        $("#inputName").parent().addClass("has-error");
                                        $("#inputName").next().text(error_emp_name);
                                    }
                                    if(error_emp_email!=undefined){
                                        $("#inputEmail").parent().addClass("has-error");
                                        $("#inputEmail").next().text(error_emp_email);
                                    }
                                    if(error_emp_name_duplicated!=undefined){
                                        $("#inputName").parent().addClass("has-error");
                                        $("#inputName").next().text(error_emp_name_duplicated);
                                    }
                                } else if(result.code==200){
                                        //获取最后一页数据,刷新页面
                                        let lastPage = result.extend.lastPage;
                                        console.log("lastPage:"+lastPage)
                                        self.getEmps(lastPage);
                                        $("#add_emp").modal('hide');

                                        //清空表单数据
                                        $("#add_emp_form")[0].reset();
                                        $("#add_emp_form").find("*").removeClass("has-error has-success");
                                        $("#add_emp_form").find(".help-block").text('');
                                        //清空校验状态位
                                        self.vali_name = false;
                                        self.vali_dept = false;
                                        self.vali_email = false;
                                        //清空选中的部门
                                        self.selected_dept_id = "";
                                        $("#dedt_btn").text("选择部门");
                                    }
                            })
                    }else{
                        alert("请正确填写表单中的信息,再提交");
                    }
10. 修改员工
10.1 模态框
总结:我上面的添加员工 那个下拉菜单有问题,,,是自己写的,而不是用select组件,所以浪费了很多时间获取数据和绑定事件。下面对修改框做了调整
10.2 修改员工的JS
把校验函数封装一下,代码复用。增加,修改都可以用。通过传入相应的选择器即可。
            //封装前端校验邮件函数,通过传入相应的(输入框的)选择器
            validate_email:function(ele){
                //正则表达式判断其他表单参数
                $(ele).focusout(function () {
                    $(ele).parent().removeClass("has-success has-error");
                    $(ele).next().text("");
                    let email = $(ele).val();
                    let regx = /^[a-zA-Z0-9_.-]+@[a-zA-Z0-9-]+(\.[a-zA-Z0-9-]+)*\.[a-zA-Z0-9]{2,6}$/

                    // 长度不限,可以使用英文(包括大小写)、数字、点号、下划线、减号,首字母必须是字母或数字;
                    console.log(regx.test(email));
                    if(regx.test(email)){
                        window.empList.vali_email = true;

                        //符合
                        //1. 给父元素添加bootstrap 校验成功样式
                        $(ele).parent().addClass("has-success")

                    }else{
                        window.empList.vali_email = false;
                        //不符合
                        // 1. 给父元素添加bootstrap 校验错误样式
                        $(ele).parent().addClass("has-error");
                        // 2. 在其下面添加span的提示内容
                        $(ele).next().text("邮件格式错误!首字母必须是字母或数字");
                    }
                });
},模态框的显示:包含了修改员工的信息的回显,以及表单校验,和模态框显示
            //修改模态框的显示
            updateEmp:function(empId){
                let self = this;
                //获取该员工的信息
                $.get(baseURL+"emps/"+empId,
                    function (result) {
                        self.emp = result.extend.emp;
                        let gender = result.extend.emp.gender;
                        let dId = result.extend.emp.dId;
                        console.log("gender:"+gender)
                        //给下拉菜单赋值
                        $("#update_emp select").val(dId);

                        //要把empId传递到修改模态框的提交
                        $("#update_emp_button").attr("edit-id",empId);
                    });

                //获取部门数据
                this.getDepts();

                //显示模态框
                $("#update_emp_modal").modal({
                    backdrop:"static"
                });

                //表单校验
                this.validate_email("#update_Email");
            },
提交修改员工表单: 前后端遵循Restful API风格,修改用put请求
            update_emp_submit:function(pageNum){
                let empId = $("#update_emp_button").attr("edit-id");
                let self = this;

                //邮件格式符合
                if(self.vali_email){

                    $.ajax({
                        url:baseURL+"emps/"+empId,
                        type:"PUT",
                        data:$("#update_emp_form").serialize(),
                        success:function (result) {
                            if(result.code==200){
                                //修改成功
                                //跳转到修改的员工的本页
                                self.getEmps(pageNum);

                                //清掉表单数据以及状态位
                                self.vali_email = false;
                                $("#update_emp_modal").find('*').removeClass("has-success has-error");
                                $("#update_emp_modal .help-block").text("");
                                $("#update_emp_modal").modal('hide');

                            }else{
                                //后端校验邮件。。。没必要啊
                            }
                        }
                    });
                }else{
                    //邮件有误,不得更新
                    alert("请正确填写邮件!")
                }
            },
10.3 Restful API对put请求的使用
首先引入一些能支持Restful API的过滤器,比如通过携前端提交表单时带_method参数可以把表面上为POST请求转换处理成Rest风格的put或delete
        hiddenHttpMethodFilter
        org.springframework.web.filter.HiddenHttpMethodFilter


        hiddenHttpMethodFilter
        /*
因为Tomcat对于前端提交的表单,内部的实现是:将POST请求的报文,把请求体里的参数封装成一个map。
然后request.getParam("")就是从map里获取键值对。而通过查看Tomcat的源码可知:
    /**
     * Comma-separated list of HTTP methods that will be parsed according
     * to POST-style rules for application/x-www-form-urlencoded request bodies.
     */
    protected String parseBodyMethods = "POST";
//当Tomcat判断不是POST请求,直接返回,不会对请求体进行处理。
//所以request.getParam()根本获取不到参数
if( !getConnector().isParseBodyMethod(getMethod()) ) {
success = true;
return;
}所以需要一个转换器,以过滤器的方式来增强request对象,让这个转换器替Tomcat识别put请求,并完成put请求报文的封装。让增强后的request调用getParameter()后能获取表单数据。
        HttpMethodPutFilter
        org.springframework.web.filter.HttpPutFormContentFilter


        HttpMethodPutFilter
        /*
控制器:
    //获取某一位员工的信息
    @RequestMapping(value = "/emps/{empId}",method = RequestMethod.GET)
    @ResponseBody
    public Msg getEmp(@PathVariable(value = "empId") int empId){
        Employee emp = employeeService.getEmp(empId);
        return Msg.success().add("emp",emp);
    }

    //修改一位员工的信息
    @RequestMapping(value = "/emps/{empId}",method = RequestMethod.PUT)
    @ResponseBody
    public Msg updateEmp(@PathVariable(value = "empId") int empId, Employee employee){
        employeeService.updateEmp(empId,employee);
        return Msg.success();
    }
11. 删除员工
//    删除一位员工
    @RequestMapping(value = "/emps/{empId}",method = RequestMethod.DELETE)
    @ResponseBody
    public Msg deleteEmp(@PathVariable(value = "empId") int empId){
        employeeService.deleteEmp(empId);
        return Msg.success();
} //删除单个员工
del_emp:function (empId,empName) {
let self = this;
if(confirm("你确认删除【"+empName+"】吗?"))
$.ajax({
url:baseURL+"emps/"+empId,
type:"DELETE",
success:function (result) {
if(result.code==200){
//删除成功
self.getEmps(self.pageInfo.pageNum);
}
}
});
}12.批量删除
JS批量删除
            //批量删除
            del_emp_batch:function () {
                let self = this;

                let checkAll = $("#selectAll").prop("checked");
                //可以删除二合一。 多个用-相连接,后端再分离出每个要删除的员工Id
                let empIds = new Array();

                if(checkAll){
                    for(let i=0;i
全选,非全选:
//全选和全不选
selectAll:function () {
    let checkAll = $("#selectAll").prop("checked");
    if(checkAll){
        //为该页多选框也选中
        $("input[name='del_emp']").prop("checked",true);
    }else{
        $("input[name='del_emp']").prop("checked",false);
    }
},

//选中某一个,当该页所有的都被选中,则全选框自动变checked
selectOne:function (empName,empId) {
    let checkAll = $("input[name=del_emp]:checked").length == $("input[name=del_emp]").length;
    if(checkAll){
        $("#selectAll").prop("checked",true);
    }else{
        $("#selectAll").prop("checked",false);
    }
},
JQuery相关语法
上面这段代码用到了input集合的索引,有用到了input集合的dom对象,可以通过该对象,拿到其对应的属性如:name,value等;
$.each()方法
- 该方法处理一维数组,代码如下:
$.each(["aaa","bbb","ccc"],function(index,value){
     alert(i+"..."+value);
});
控制器:
//批量删除按钮触发的
@RequestMapping(value = "/emps/{empIds}",method = RequestMethod.DELETE)
@ResponseBody
public Msg deleteEmp(@PathVariable(value = "empIds") String empIds){
    if(empIds.contains("-")){
        ArrayList ids = new ArrayList<>();

        String[] split = empIds.split("-");
        for(String empId:split){
            int id = Integer.parseInt(empId);
            ids.add(id);
            employeeService.deleteEmpList(ids);
        }
    }else{
        employeeService.deleteEmp(Integer.parseInt(empIds));

    }
    return Msg.success();
}
总结:多个id用-连接起来,而不是封装成数组直接传过去,让Springmvc做参数绑定。记住这种技巧。
13.文件上传
总结:
要在spring配置多媒体解析器
因为MultipartResolver依赖于Apache的这个jar包
            commons-fileupload
            commons-fileupload
            1.3.3
spring注册Bean
@Controller
public class FileController {

    @RequestMapping(value = "/file",method = RequestMethod.POST)
    public String uploadFile(@RequestParam(value = "file") MultipartFile multipartFile, Model model, HttpServletRequest request){

        String basePath = "E:/";

        if(multipartFile!=null&&!multipartFile.isEmpty()){
            //1.获取原始文件名
            String originalFilename = multipartFile.getOriginalFilename();

            //2.获取前缀
            String originalFilenamePrefix = originalFilename.substring(0, originalFilename.lastIndexOf('.'));

            //3.封装新的文件名  名字+时间戳
            String newFileName = originalFilenamePrefix + new Date().getTime()
                    + originalFilename.substring(originalFilename.lastIndexOf('.'));

            //4. 打开文件流
            File file = new File(basePath+newFileName);

            //5. 保存文件
            try {
                multipartFile.transferTo(file);
                model.addAttribute("fileName",originalFilename);

            } catch (IOException e) {
                e.printStackTrace();
                System.out.println("上传失败");
            }
        }
        return "upload/uploadSuc";
    }
14. 拦截器(登陆认证)
拦截器实现的原理:
- 实现HandlerInterceptor接口。编写拦截器
- 配置拦截器和HandlerMapping的映射关系
- 编写控制器
public class LoginInteceptor implements HandlerInterceptor {

    /**
     * 这个方法 是在 进入Handler方法之前执行的
     * 应用:在这里进行身份认证,身份权限认证等等 不过要放行(登陆页面的url)
     */
    @Override
    public boolean preHandle(HttpServletRequest httpServletRequest, HttpServletResponse httpServletResponse, Object o) throws Exception {
        //1. 如果是登陆页面,放行
        String requestURI = httpServletRequest.getRequestURI();
        if(requestURI.contains("login") || requestURI.contains("toLogin")){
            return true;
        }else{
            HttpSession session = httpServletRequest.getSession();
            String username = (String)session.getAttribute("username");
            if(username!=null){
                return true;
            }else{
//                回到登陆页面
                httpServletResponse.sendRedirect(httpServletRequest.getContextPath()+"/toLogin");
                return false;
            }
        }


    }

    /**
     * 这个方法 是在Handler方法之后,返回ModelAndView之前执行的
     * 应用: 公用的一些数据模型(ModelAndView)可以在这里设置,比如导航菜单
     */

    @Override
    public void postHandle(HttpServletRequest httpServletRequest, HttpServletResponse httpServletResponse, Object o, ModelAndView modelAndView) throws Exception {

    }

    /**
     * 这个方法是在 Handler执行完成后执行
     * 应用: 捕捉异常把
     */

    @Override
    public void afterCompletion(HttpServletRequest httpServletRequest, HttpServletResponse httpServletResponse, Object o, Exception e) throws Exception {

    }


