在上一篇,我们介绍了weblogic集群的部署和session的复制,如何将请求负载均衡到这个三个服务器上呢?
这里提供两种方式:(1)weblogic自带的proxy代理 (2) nginx实现负载均衡
一、通过proxy实现负载均衡
1、创建proxy_server服务
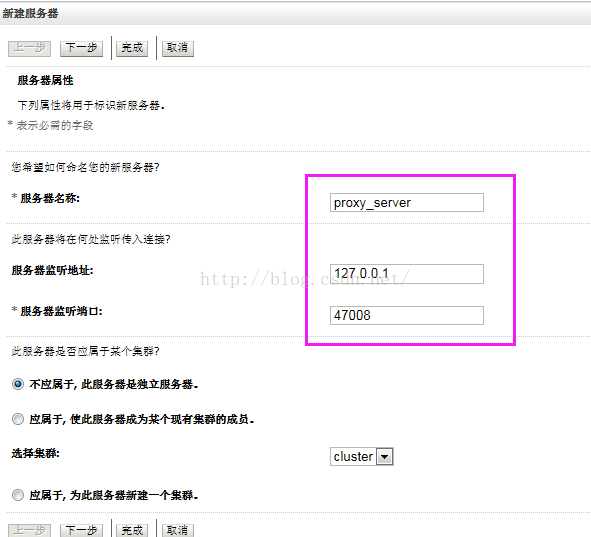
创建完成后,proxy_server关联计算机machine,这样可以通过节点管理器启动该服务.
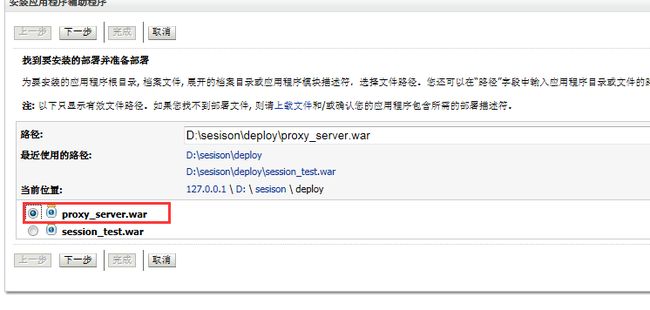
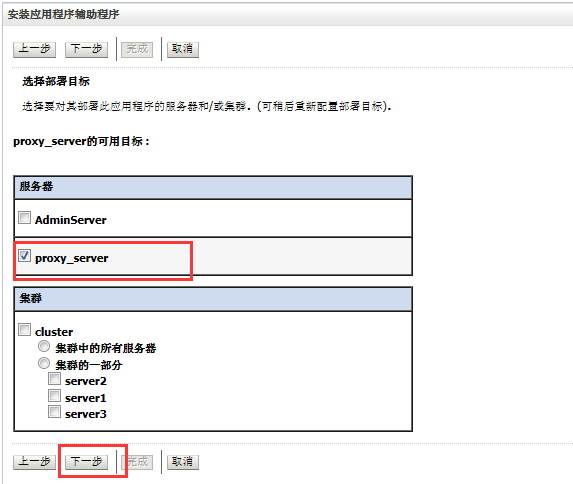
2、创建proxy_server应用
proxy_server应用很简单,就一个web.xml和一个weblogic.xml
web.xml
HttpClusterServlet会将请求负载分发到127.0.0.1:47001|127.0.0.1:47002|127.0.0.1:47003上.
  proxy_server


      session_test
      weblogic.servlet.proxy.HttpClusterServlet

          WebLogicCluster
          127.0.0.1:47001|127.0.0.1:47002|127.0.0.1:47003


        session_test
        /session_test


        session_test
        /


        session_test
        *.jsp


      session_test
      *.htm


      session_test
      *.html
	/


		/*
		GBK
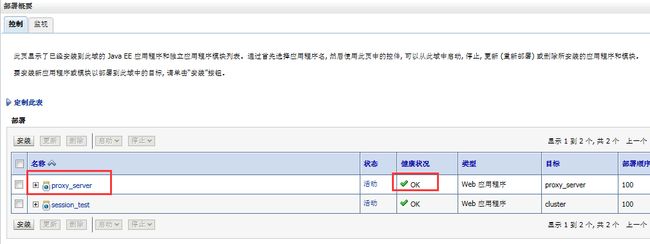
部署完成后如下所示:
3、 测试负载均衡
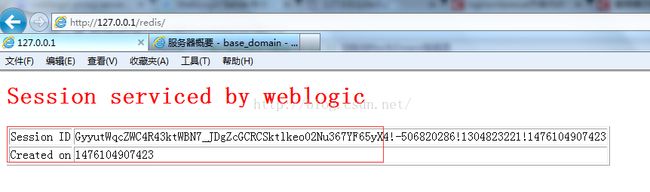
当服务都启动之后,浏览器输入http://127.0.0.1:47008/redis/
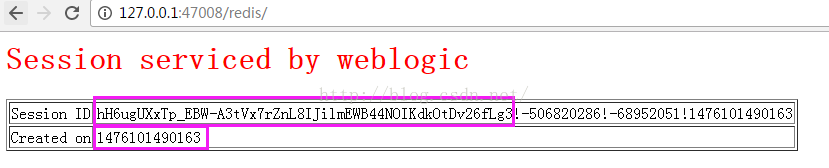
然后刷新浏览器

可以发现,session的创建时间和第一个感叹号之前的值也没有变化,说明:session得到了复制,每次请求被分发到其中的某一个server上,降低了服务器的压力.
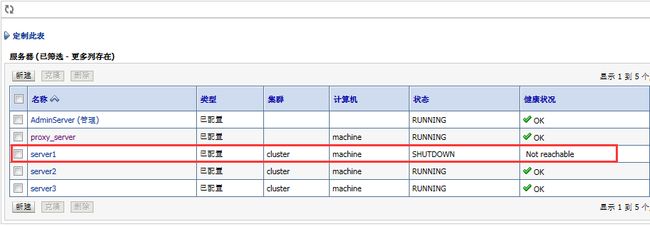
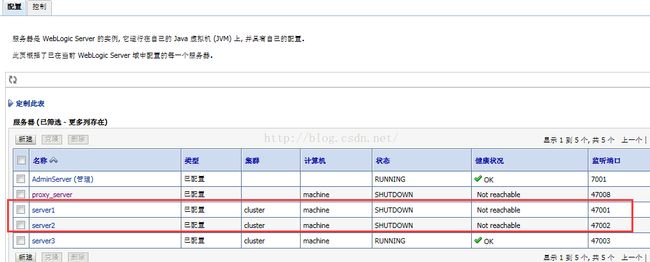
当我们把托管服务server1关闭时
我们再次刷新浏览器时,

由上图可以发现,session并没有发生变化(只是感叹号之后的值变化了),而且后来每次刷新时感叹号之间的值
506820286和68952051来回调换位置而已.
这也表示服务器只有2个了.
由以上几点,我们验证了weblogic的负载均衡.
二、通过Nginx实现负载均衡
还记得我的另篇博文中写的关于nginx+tomcat实现的负载均衡么, nginx+tomcat负载均衡和session复制,原理其实差不多. 只需要更改下其中的IP地址就可以了.
    #weblogic的三个服务
    upstream mysite {
      server 127.0.0.1:47001 weight=5;
      server 127.0.0.1:47002 weight=5;
      server 127.0.0.1:47003 weight=5;
}#user nobody;
worker_processes 1;
#error_log logs/error.log;
#error_log logs/error.log notice;
#error_log logs/error.log info;
#pid logs/nginx.pid;
events {
worker_connections 1024;
}
http {
include mime.types;
default_type application/octet-stream;
#log_format main '$remote_addr - $remote_user [$time_local] "$request" '
# '$status $body_bytes_sent "$http_referer" '
# '"$http_user_agent" "$http_x_forwarded_for"';
#access_log logs/access.log main;
sendfile on;
#tcp_nopush on;
#keepalive_timeout 0;
keepalive_timeout 10;
#gzip on;
#weblogic的三个服务
upstream mysite {
server 127.0.0.1:47001 weight=5;
server 127.0.0.1:47002 weight=5;
server 127.0.0.1:47003 weight=5;
}
server {
listen 80;
server_name localhost;
#charset koi8-r;
#access_log logs/host.access.log main;
location / {
root html;
index index.html index.htm;
proxy_pass http://mysite;
#添加如下3个配置后,当一台server宕机,切换速度会很快,此时配置是1秒
proxy_connect_timeout 1;
proxy_send_timeout 1;
proxy_read_timeout 1;
}
#error_page 404 /404.html;
# redirect server error pages to the static page /50x.html
#
error_page 500 502 503 504 /50x.html;
location = /50x.html {
root html;
}
# proxy the PHP scripts to Apache listening on 127.0.0.1:80
#
#location ~ \.php$ {
# proxy_pass http://127.0.0.1;
#}
# pass the PHP scripts to FastCGI server listening on 127.0.0.1:9000
#
#location ~ \.php$ {
# root html;
# fastcgi_pass 127.0.0.1:9000;
# fastcgi_index index.php;
# fastcgi_param SCRIPT_FILENAME /scripts$fastcgi_script_name;
# include fastcgi_params;
#}
# deny access to .htaccess files, if Apache's document root
# concurs with nginx's one
#
#location ~ /\.ht {
# deny all;
#}
}
# another virtual host using mix of IP-, name-, and port-based configuration
#
#server {
# listen 8000;
# listen somename:8080;
# server_name somename alias another.alias;
# location / {
# root html;
# index index.html index.htm;
# }
#}
# HTTPS server
#
#server {
# listen 443 ssl;
# server_name localhost;
# ssl_certificate cert.pem;
# ssl_certificate_key cert.key;
# ssl_session_cache shared:SSL:1m;
# ssl_session_timeout 5m;
# ssl_ciphers HIGH:!aNULL:!MD5;
# ssl_prefer_server_ciphers on;
# location / {
# root html;
# index index.html index.htm;
# }
#}
}
启动nginx,浏览器输入http://127.0.0.1/redis/
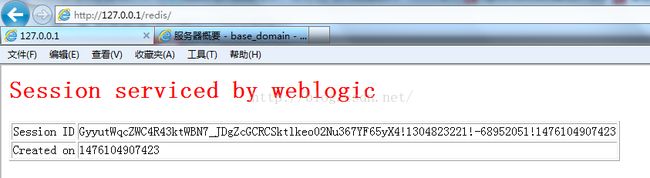
刷新浏览器后,session创建时间和那个值(你懂的)也不会变.
如果将server1 和server2 都关闭后,会怎么样呢?
我们再次刷新浏览器,而且每次刷新后Session ID 整体的值都不会变化,因为我们只有一个服务了,不会把请求切换到其他服务上.
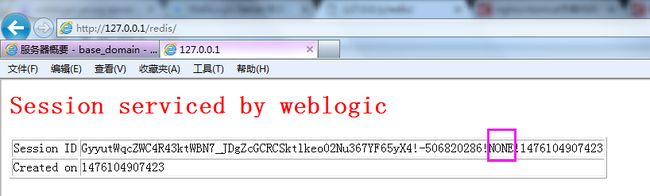
由上图可以发现,session的创建时间并没有变化,但是第2个感叹号后的值变成了NONE,由此我们想到了什么呢?是不是代表这个值表示某个服务的ID值呢?(具体答案大家可以百度自行寻找答案,想必对weblogic 的sessionID值构成有更深刻的认识.)