python脚本编写测试用例
目录
1.定位页面元素:
1.1 xpath查看页面元素
1.1.1 用元素的text文本属性
1.1.2 用contains关键字查找元素
1.1.3 用starts-with关键字查找元素
1.1.4 如何找父节点语法
1.1.5如何找前面的平级节点语法
1.1.6 如何找后面的平级节点语法
1.2 css选择器查找元素
2.编写测试用例的心历路程
2.1初识自动化
2.2 了解自动化(unittest单元测试框架)
2.2.1 unittest单元测试框架它的四个重要组成部分
2.2.2 HTML测试报告
2.3 在执行过程中遇到的一些问题以及解决方法:
1.定位页面元素:
webdriver提供了八种页面元素定位的方法:
find_element_by_id()
find_element_by_name()
find_element_by_class_name()
find_element_by_tag_name()
find_element_by_link_text()
find_element_by_partial_link_text()
find_element_by_xpath()
find_element_by_css_selector()
1.1 xpath查看页面元素
语法://tag[attribute='value']
注意:绝对路径、相对路径
注意:"/"和"//"的区别:
- "/":元素是上一级节点的子节点中的一个,不能跳级
- "//":下级任何子节点或者任何嵌套子节点中的一个,可以跳级
路径里面不能用*,要写明标签名
1.1.1 用元素的text文本属性
eg: //a[text()='忘记密码']
1.1.2 用contains关键字查找元素
//tag[contains(attribute,'value')]
eg: //a[contains(text(),'忘记密码')]
//input[contains(@class,'ipt') and contains(@placeholder,'手机号')]
1.1.3 用starts-with关键字查找元素
//tag[starts-with(attribute,'value')]
1.1.4 如何找父节点语法
xpath-to-some-element//parent::
eg: //a[text()='免费课程']//parent::li
1.1.5如何找前面的平级节点语法
xpath-to-some-element//preceding-sibling::
1.1.6 如何找后面的平级节点语法
xpath-to-some-element//following-sibling::
1.2 css选择器查找元素
基本语法:tag[attribute='value']
#代表的是id.代表的是class ;
追加类:.class.class
通配符查找:"^"代表以什么文本开始;"$"代表以什么文本结尾;"*"代表包含什么文本语法:
语法:tag[attribute
查找子节点">"
2.编写测试用例的心历路程
-
2.1初识自动化
自动化测试它包括线性测试、模块化驱动测试、数字驱动测试、关键字驱动测试这几种测试;
- 线性测试:模拟用户完整的操作场景来编写的测试用例;
- 模块化驱动测试:把重复的模块封装成独立公共的模块,使用的时候调用就行;
###将登陆和退出封装然后调用
from selenium import webdriver
def login():
    driver.find_element_by_name("username").clear()
    driver.find_element_by_name("username").send_keys(username[0])
    driver.find_element_by_name("password").clear()
    driver.find_element_by_name("password").send_keys(password[0])
    driver.find_element_by_name("login").click()
def logout():
    driver.quit()
driver=webdriver.Chrome()
driver.implicitly_wait(10)
driver.get("http:\\localhost:8580\\jforum-2.6.2\\forums\\list.page")
login()#调用登录模块
logout()#调用退出模块
###把登陆退出封装到一个类中,单独存储为一个脚本jforum_public.py class login(): #登陆 def user_login(self,driver): driver.find_element_by_name("username").clear() driver.find_element_by_name("username").send_keys(username[0]) driver.find_element_by_name("password").clear() driver.find_element_by_name("password").send_keys(password[0]) driver.find_element_by_name("login").click() #退出 def user_logout(self,driver): driver.quit() ###调用函数 from selenium import webdriver from jforum_public import login###调用jforum_public文件的类 driver=webdriver.Chrome() driver.implicitly_wait(10) driver.get("http:\\localhost:8580\\jforum-2.6.2\\forums\\list.page") #调用登陆 login(). user_login(driver) #调用退出 login(). user_logout(driver)两种方式都可,第二种更易于维护。
- 数字驱动测试:数据的参数化,输入的数据多我们可以通过读取外部的一些文档来进行数据录入(Excel、xml、HTML、TXT、CSV等)点击获取读取方式:读取方式
- 关键字驱动测试:把数据换成关键字,通过借助一些工具,像selenium IDE
-
2.2 了解自动化(unittest单元测试框架)
2.2.1 unittest单元测试框架它的四个重要组成部分
TestCase:一个测试用例
TestSuite:测试用例集
TestRunner:测试的执行
TestFixture:测试环境的搭建与销毁
- 执行过程中可以添加断言来判断测试得到的实际结果与预期的结果是否一致;
#定义一个质数的函数
def is_prime(n):
    if n<=1:
        return False
    for i in range(2,n):
        if n%i==0:
            return False
        print(i)
        return True
import unittest
class Test(unittest.TestCase):
    def setUp(self):
        print("test_start")
    def test_isprime(self):
        self.assertTrue(is_prime(7),msg="no")
    def tearDown(self):
        print("over")
if __name__=="__main__":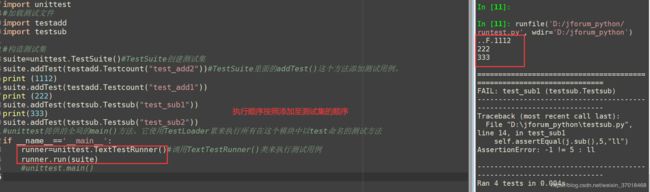
unittest.main()- 可以通过discover()方法自动执行指定目录下的所有的以“test”开头的用例
#测试discover()方式自动执行 #定义测试用例的目录 test_dir="D:\\jforum_python" #查找以test开头的用例 discover=unittest.defaultTestLoader.discover(test_dir,pattern="test*.py") if __name__=='__main__': runner=unittest.TextTestRunner() runner.run(discover) - 可以添加装饰器
unittest.skip(reason)#无条件跳过
unittest.skipIf(condition,reason)#如果条件为真跳过;
unittest.skipUnless(condition,reason)#除非条件为真
unittest.expectedFailure()#不管结果统一失败
所有的测试用例编写都有setUp()和tearDown()这两个函数;
①setUp()它是用于测试用例执行前的初始化工作;
②tearDown()它是用于测试用例执行完成之后的善后工作,与前面的setUp()相呼应;
**********************************************************************
(一些学习的思路过程:单个函数-进行测试-测试用例-一个起始结尾----------------多个函数-分开测试-多个测试用例-两个一样的起始结尾---------------考虑合并开始结尾,封装成一个类-----------------当前是对所有要测试的函数、功能都写在同一个python脚本中,这样管理不方便,所以现在需要针对每一个功能、函数简历自己的脚本;)
**********************************************************************
很重要:执行测试用例有两种方法如下 ,两种用例执行的方式的不同:
if __name__=='__main__':
unittest.main():
if __name__=='__main__':
runner=unittest.TextTestRunner()
runner.run(suite)
python文件有作为模块被使用(import导入使用)和直接使用两种方式:
__name__在python中是模块的内置属性,就是一个.python的调用方式;
__main__被直接使用;
if __name__=='__main__':
	unittest.main():
#按照ASCII编码的顺序来执行
2.2.2 HTML测试报告
测试执行完成后自动生成测试报告,并自动发送邮件(目前学会发送带附件和HTML格式两种邮件的格式)
import smtplib
from email.mime.text import MIMEText
from email.header import Header
from email.mime.multipart import MIMEMultipart
#发送邮箱服务器
smtpserver='smtp.qq.com'
#发送邮箱用户/密码
user='[email protected]'
password='xxx'#这里填写的是授权码而非QQ的密码
#发送邮箱
sender='[email protected]'
#接收邮箱
receiver='[email protected]'
#发送邮件主题
subject='python email test'
#发送附件
sendfile=open("D:\\xxxresult.html",'rb').read()
att=MIMEText(sendfile,'base64','utf-8')
att["Content-Type"]='application/octet-stream'
att["Content-Disposition"]='attachment;filename="2020-04-15 19-57-25result.html"'
msgRoot=MIMEMultipart('related')
msgRoot['subject']=subject
msgRoot.attach(att)
#连接发送邮件
smtp=smtplib.SMTP()
smtp.connect(smtpserver)
smtp.login(user,password)
smtp.sendmail(sender,receiver,msgRoot.as_string())
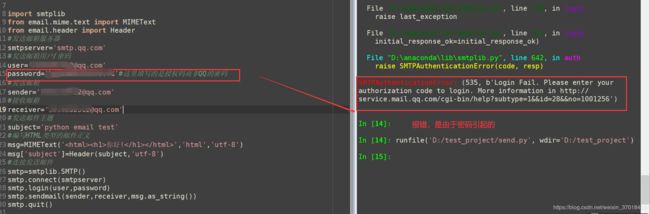
smtp.quit()import smtplib
from email.mime.text import MIMEText
from email.header import Header
#发送邮箱服务器
smtpserver='smtp.qq.com'
#发送邮箱用户/密码
user='[email protected]'
password='xxx'#这里填写的是授权码而非QQ的密码
#发送邮箱
sender='[email protected]'
#接收邮箱
receiver='[email protected]'
#发送邮件主题
subject='python email test'
#编写HTML类型的邮件正文
msg=MIMEText('你好!
','html','utf-8')
msg['subject']=Header(subject,'utf-8')
#连接发送邮件
smtp=smtplib.SMTP()
smtp.connect(smtpserver)
smtp.login(user,password)
smtp.sendmail(sender,receiver,msg.as_string())
smtp.quit()
2.3 在执行过程中遇到的一些问题以及解决方法:
1.抛出异常这块一直报错。except NoSuchElementException,e:
解决方法 如下:

2.出现错误:SMTPAuthenticationError: (535, b'Login Fail. Please enter your authorization code to login. More information in http://service.mail.qq.com/cgi-bin/help?subtype=1&&id=28&&no=1001256')