Zabbix+分布式数据库TiDB实现监控
文章目录
- 官网下载并安装:
- TiDB架构
- 配置TIDB
- zabbix安装
- 将TiDB集成到zabbix中去
- 问题总结
- 1.关于tidb的数据库授权的问题,需要用update host;
- 2.关联zabbix和tidb出问题
官网下载并安装:
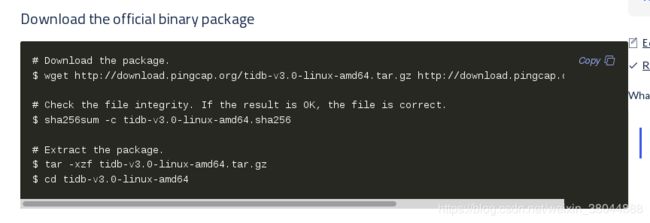
下好之后(可以直接下到虚拟机),scp发送到虚拟机,进行加密检测、解压拆包:
[root@server1 ~]# sha256sum -c tidb-v3.0-linux-amd64.sha256
tidb-v3.0-linux-amd64.tar.gz: OK


[root@server1 ~]# tar -xzf tidb-v3.0-linux-amd64.tar.gz
[root@server1 ~]# cd tidb-v3.0-linux-amd64
[root@server1 tidb-v3.0-linux-amd64]# ls
bin
[root@server1 tidb-v3.0-linux-amd64]# cd bin/
[root@server1 bin]# ls
binlogctl  etcdctl  pd-recover  pump    tidb-ctl     tikv-ctl
drainer    pd-ctl   pd-server   reparo  tidb-server  tikv-server
TiDB架构
开始之前,我们的目的是用TiDB代替mysql,用于存储我们的zabbix_server的所有配置。但由于Tidb是一个分布式的数据库,所以我们先看看官网,熟悉以下架构,然后找到我们需要的安装和配置,不需要的就没必要。以下为官网信息:
TiDB Server 负责接收 SQL 请求,处理 SQL 相关的逻辑,并通过 PD 找到存储计算所需数据的 TiKV 地址,与 TiKV 交互获取数据,最终返回结果。TiDB Server 是无状态的,其本身并不存储数据,只负责计算
Placement Driver (简称 PD) 是整个集群的管理模块,其主要工作有三个:一是存储集群的元信息(某个 Key 存储在哪个 TiKV 节点);二是对 TiKV 集群进行调度和负载均衡(如数据的迁移、Raft group leader 的迁移等);三是分配全局唯一且递增的事务 ID。
TiKV Server 负责存储数据,从外部看 TiKV 是一个分布式的提供事务的 Key-Value 存储引擎。
所以我们这里的目标是用tidb存储zabbix_server的数据,所以只需要单个节点即可,并不需要分布式,所以将这三个部署到同一个结点上应该就可以。
以后我也可以完成分布式的部署。
配置TIDB
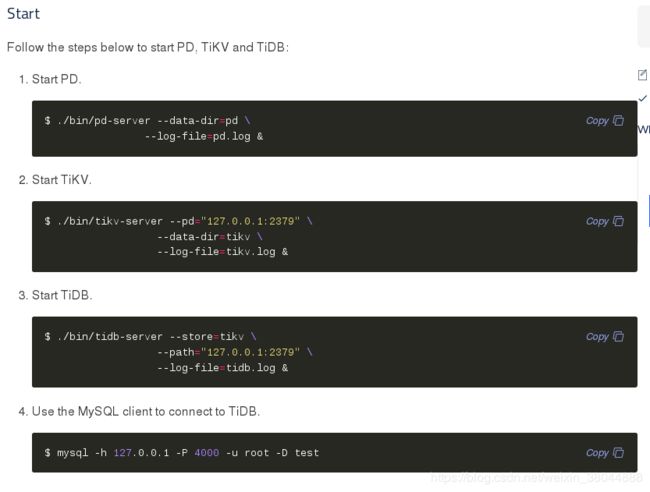
官网这里很详细的介绍了流程:

这里后台开启这几个进程以及相关配置:
这里要注意,tidb-server的默认的事务提交是5000条,而我们后面的加载zabbix-server的create.sql.gz事务提交超过5000,所以需要修改其配置。
可以直接去tidb的github找其配置文件,复制内容到本地的/root/tidb-v3.0-linux-amd64/config.toml(这个是自己创建的,名字位置随意),启动tidb-server的时候直接以配置文件的方式加载。
这里是tidb-server配置文件的github地址:https://github.com/pingcap/tidb/blob/master/config/config.toml.example
注意: 需要修改第152行的参数stmt-count-limit,就是他限制了我们的事务提交数

我这里修改5000为1024000就可以了。同时,我直接在此配置文件中修改了端口4000为3306,为了启动mysql方便:

[root@server1 tidb-v3.0-linux-amd64]# ./bin/pd-server --data-dir=pd --log-file=pd.log &
[1] 1416
[root@server1 tidb-v3.0-linux-amd64]# ./bin/tikv-server --pd="127.0.0.1:2379" \
>                   --data-dir=tikv \
>                   --log-file=tikv.log &
[2] 1425
[root@server1 tidb-v3.0-linux-amd64]# ./bin/tidb-server --store=tikv \
>                   --path="127.0.0.1:2379" \
>                   --log-file=tidb.log
>                   --config="/root/tidb-v3.0-linux-amd64/config.toml"&
[3] 1491
安装mariadb,用于登陆数据库:
yum install -y mariadb
测试:
[root@server1 tidb-v3.0-linux-amd64]#  mysql -h 127.0.0.1 -u root
Welcome to the MariaDB monitor.  Commands end with ; or \g.
Your MySQL connection id is 1
Server version: 5.7.25-TiDB-v3.0.1 MySQL Community Server (Apache License 2.0)

Copyright (c) 2000, 2017, Oracle, MariaDB Corporation Ab and others.

Type 'help;' or '\h' for help. Type '\c' to clear the current input statement.

MySQL [test]>
我们知道TIDB端口是3306,查一下是否启动:
[root@server1 tidb-v3.0-linux-amd64]# netstat  -tnlp | grep 3306
tcp6       0      0 :::3306                 :::*                    LISTEN      3614/./bin/tidb-ser
成功!这里单机版的TiDB就部署成功了!
然后就是与zabbix关联。
这里我们先对tidb 创建一个zabbix数据库、zabbix用户并授权:
[root@server1 zabbix-server-mysql-4.0.5]# mysql -uzabbix -h 127.0.0.1 -pwestos
Welcome to the MariaDB monitor.  Commands end with ; or \g.
Your MySQL connection id is 7
Server version: 5.7.25-TiDB-v3.0.1 MySQL Community Server (Apache License 2.0)

Copyright (c) 2000, 2017, Oracle, MariaDB Corporation Ab and others.

Type 'help;' or '\h' for help. Type '\c' to clear the current input statement.

MySQL [(none)]> drop database zabbix;
Query OK, 0 rows affected (4.49 sec)

MySQL [(none)]> create  database zabbix;
Query OK, 0 rows affected (0.17 sec)


MySQL [(none)]> CREATE USER 'zabbix'@'127.0.0.1' IDENTIFIED BY 'westos';
Query OK, 1 row affected (0.10 sec)

MySQL [mysql]> Grant all privileges on zabbix.* to 'zabbix'@'%';
Query OK, 0 rows affected (0.10 sec)
注意:这里如果授权不成功,看我另一篇博客,看是否报错一样,一样的话按照我的操作去做即可。
处理ERROR 1105博客地址:https://blog.csdn.net/weixin_38044888/article/details/98199219
zabbix安装
zabbix安装我不用赘述,
zcat create.sql.gz | mysql -uzabbix -h 127.0.0.1 -pwestos zabbix
到这一步,写入数据库的时候,需要耐心等待。出现报错可以联系我。
将TiDB集成到zabbix中去
vim /etc/zabbix/zabbix_server.conf
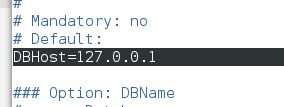
注意:这里要修改默认的DB的ip和DB的密码,ip不能是localhost,一定要是ip地址,否则回报错。
[root@server1 zabbix-server-mysql-4.0.5]# systemctl restart zabbix-server.service
[root@server1 zabbix-server-mysql-4.0.5]# vim /var/log/zabbix/zabbix_server.log
[root@server1 zabbix-server-mysql-4.0.5]# ps aux
接着就是配置前端zabbix-web和zabbix-agent:
注意:7.5的虚拟机安装zabbix-web时需要解决php依赖性,建议yum源使用阿里云。
yum install -y zabbix-web-mysql.noarch
 yum install -y zabbix-agent
systemctl start httpd
 yum install -y zabbix-agent
至此,基本ok了。后面就是打开浏览器登陆虚拟机ip进行web配置,需要注意一点,就是配置时DB的的ip不要使用localhost,需要使用ip,如:127.0.0.1。

至此,完美结束!
问题总结
1.关于tidb的数据库授权的问题,需要用update host;
https://blog.csdn.net/weixin_38044888/article/details/98199219
2.关联zabbix和tidb出问题
也就是说,对zabbix前端创建数据库倒入到这个TIDB的时候出现问题,这个需要修改tidb-server的默认事务提交数,上面已经说明了。


