CentOs 安装FastDfs Nginx 配合nginx image_filter缩略图
最近在用tornado写项目,需要一个文件存储服务,刚好fdfs_tornado库支持异步上传,安装fastdfs部署踩坑无数,特此记录!
服务器版本:CentOS Linux release 7.7.1908
第一步:下载所需安装包:
链接:https://pan.baidu.com/s/1oNPxkth8cioA6RBMqLhgsg
提取码:z55f
将安装压缩包都解压到 /usr/local 下:
tar -zxvf libfastcommon-1.0.7.tar.gz -C /usr/local/
tar -zxvf fastdfs-5.05.tar.gz -C /usr/local/
tar -zxvf nginx-1.8.0.tar.gz -C /usr/local/
tar -zxvf fastdfs-nginx-module_v1.16.tar.gz -C /usr/local/
第二步:安装依赖
1. yum install -y gcc gcc-c++
2. yum install -y perl
3. yum install -y libevent

4.安装 libfastcommon:  libfastcommon 没有 yum 源,通过上传的安装包进行编译与安装

   4.1 cd /usr/local/libfastcommon-1.0.7/
   4.2 ./make.sh && ./make.sh install

   libfastcommon 安装好后会在 /usr/lib64 目录下生成  libfastcommon.so 库文件
   查看:ls /usr/lib64   | grep libfastcommon.so

   由于 FastDFS 程序引用 usr/lib 目录所以需要将 /usr/lib64 下的库文件拷贝至 /usr/lib 下
   4.3 cp /usr/lib64/libfastcommon.so /usr/lib
第三步:安装tracker
1. cd /usr/local/fastdfs-5.05/

2. ./make.sh && ./make.sh install

3. 安装成功将安装目录下的 conf 下的文件拷贝到 /etc/fdfs/ 下
    cp conf/* /etc/fdfs/
第四步:配置和启动tracker
1.切换到 /etc/fdfs 目录下

    cd /etc/fdfs

2.修改 tracker.conf

    vim tracker.conf

    base_path = /home/fastdfs   # 可自己修改路径,但下边保持一致(路径一)
    http.server_port = 80  #  可自定义

3.创建 /home/fastdfs 目录
    mkdir -p /home/fastdfs  # (路径一)

4.启动 tracker
    /usr/bin/fdfs_trackerd /etc/fdfs/tracker.conf restart

PS:启动成功后,在 /home/fastdfs/ 目录下生成两个目录, 一个是数据,一个是日志

查看:ll /home/fastdfs/
    drwxr-xr-x. 3 root root 262 2月  28 18:15 data
    drwxr-xr-x. 2 root root  46 2月  28 15:20 logs
第五步:配置和启动 storage
1.切换到 /etc/fdfs 目录下
     cd /etc/fdfs

2.修改  storage.conf
    vim storage.conf
     修改配置项:
    base_path = /home/fastdfs  # (路径一)
    store_path0 = /home/fdfs_storage   # 实际存储文件的位置(路径二)
    tracker_server = 127.0.0.1:22122 (根据实际情况改,不能是127.0.0.1)
    http.server_port = 88  # 不同于tracker

3.创建 /home/fdfs_storage 目录
    mkdir -p /home/fdfs_storage

4.启动 storage
    /usr/bin/fdfs_storaged /etc/fdfs/storage.conf restart


查看:ls /home/fdfs_storage/data    (路径一下)
PS:启动成功后,在 /home/fdfs_storage/data 目录下生成以下显示目录(若没有以下内容则查看/home/fastdfs/logs日志)
00  0C  18  24  30  3C  48  54  60  6C  78  84  90  9C  A8  B4  C0  CC  D8  E4  F0  FC
01  0D  19  25  31  3D  49  55  61  6D  79  85  91  9D  A9  B5  C1  CD  D9  E5  F1  FD
02  0E  1A  26  32  3E  4A  56  62  6E  7A  86  92  9E  AA  B6  C2  CE  DA  E6  F2  FE
03  0F  1B  27  33  3F  4B  57  63  6F  7B  87  93  9F  AB  B7  C3  CF  DB  E7  F3  FF
04  10  1C  28  34  40  4C  58  64  70  7C  88  94  A0  AC  B8  C4  D0  DC  E8  F4
05  11  1D  29  35  41  4D  59  65  71  7D  89  95  A1  AD  B9  C5  D1  DD  E9  F5
06  12  1E  2A  36  42  4E  5A  66  72  7E  8A  96  A2  AE  BA  C6  D2  DE  EA  F6
07  13  1F  2B  37  43  4F  5B  67  73  7F  8B  97  A3  AF  BB  C7  D3  DF  EB  F7
08  14  20  2C  38  44  50  5C  68  74  80  8C  98  A4  B0  BC  C8  D4  E0  EC  F8
09  15  21  2D  39  45  51  5D  69  75  81  8D  99  A5  B1  BD  C9  D5  E1  ED  F9
0A  16  22  2E  3A  46  52  5E  6A  76  82  8E  9A  A6  B2  BE  CA  D6  E2  EE  FA
0B  17  23  2F  3B  47  53  5F  6B  77  83  8F  9B  A7  B3  BF  CB  D7  E3  EF  FB
第六步:使用客户端测试FastDFS上传文件
1.切换到 /etc/fdfs 目录下
    cd /etc/fdfs

2.修改 client.conf
    vim client.conf
    修改配置项:
     base_path = /home/fastdfs   (路径一)
     tracker_server = 127.0.0.1:22122 (根据实际情况改)

3.拷贝一张图片 test.jpg 到Centos服务器上的 /tmp 目录下
     进行上传测试

    /usr/bin/fdfs_test /etc/fdfs/client.conf upload /tmp/test.jpg

由于现在还没有和nginx整合无法使用http下载
第七步:FastDFS 和Nginx结合使用
1.切换到 /usr/local/fastdfs-nginx-module/src 目录下
    cd /usr/local/fastdfs-nginx-module/src/

2.修改config文件
    vim config
    将文件原有内容中的所有 (/usr/local/ 路径改为 /usr/)
    修改后:
       CORE_INCS="$CORE_INCS /usr/include/fastdfs /usr/include/fastcommon/"
       CORE_LIBS="$CORE_LIBS -L/usr/lib -lfastcommon -lfdfsclient"

3.复制当前目录下的 mod_fastdfs.conf 文件到 /etc/fdfs/ 目录下

     cp mod_fastdfs.conf /etc/fdfs/

4.切换到 /etc/fdfs 目录,修改 mod_fastdfs.conf 文件
     vim mod_fastdfs.conf
     修改以下配置项:
        base_path=/home/fastdfs
        tracker_server=x.x.x.x:22122(根据实际情况改)
        url_have_group_name=true #url中包含group名称
        store_path0=/home/fdfs_storage #指定文件存储路径(上面配置的store路径)

5.将 /usr/lib64 目录下的 libfdfsclient.so 文件拷贝至 /usr/lib 目录下
      cp /usr/lib64/libfdfsclient.so /usr/lib
第八步:Nginx安装
1. 安装nginx依赖库
    yum install pcre
    yum install pcre-devel
    yum install zlib
    yum install zlib-devel
    yum install openssl
    yum install openssl-devel

2. 进入Nginx解压文件
    cd /usr/local/nginx-1.8.0
    执行配置:
    ./configure \
    --prefix=/usr/local/nginx \
    --pid-path=/var/run/nginx/nginx.pid \
    --lock-path=/var/lock/nginx.lock \
    --error-log-path=/var/log/nginx/error.log \
    --http-log-path=/var/log/nginx/access.log \
    --with-http_gzip_static_module \
    --http-client-body-temp-path=/var/temp/nginx/client \
    --http-proxy-temp-path=/var/temp/nginx/proxy \
    --http-fastcgi-temp-path=/var/temp/nginx/fastcgi \
    --http-uwsgi-temp-path=/var/temp/nginx/uwsgi \
    --http-scgi-temp-path=/var/temp/nginx/scgi \
    --add-module=/usr/local/fastdfs-nginx-module/src
    注意:上边将临时文件目录指定为/var/temp/nginx,需要在/var下创建temp及nginx目录;
3. 编译安装
    make && make install
4. 拷贝配置文件
    cd /usr/local/fastdfs-5.05/conf/
    cp http.conf mime.types /etc/fdfs/
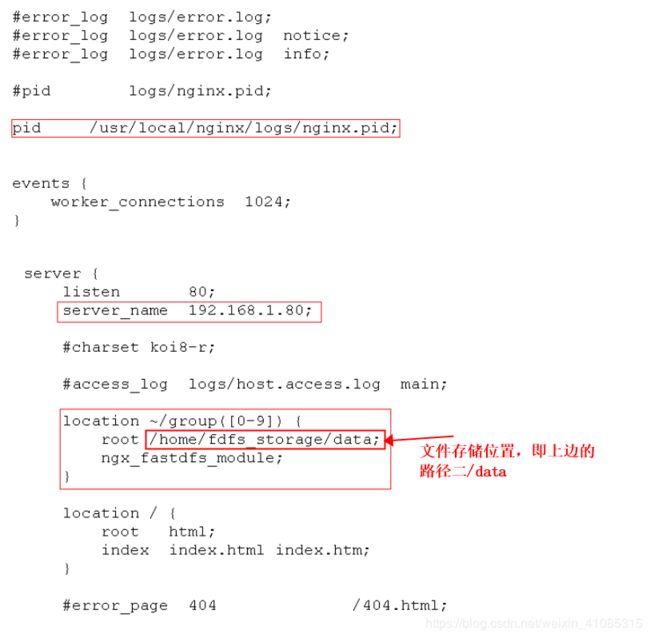
5. 修改nginx配置文件
    mkdir /usr/local/nginx/logs # 创建logs目录
    cd /usr/local/nginx/conf/
    vim nginx.conf
    修改内容如下图:
6. 启动nginx:
    /usr/local/nginx/sbin/nginx  # 无报错即使好事
7. 开放端口
    放通防火墙80(nginx)、22122(tracker)、23000(storage)端口

    firewall-cmd --zone=public --add-port=80/tcp --permanent
    firewall-cmd --zone=public --add-port=22122/tcp --permanent
    firewall-cmd --zone=public --add-port=23000/tcp --permanent
    firewall-cmd --reload
 到此就可以在浏览器查看上边上传的测试图片了:
      http://192.168.1.8:80/group1/M00/00/00/wKgBCF5Y4XOAAm2rAAAVxdVbKkY839_big.jpg
nginx配置:
第九步:Fastdfs 和 Nginx开机自启动配置
1.编辑 /etc/rc.d/rc.local 文件,增加启动项

    vim /etc/rc.d/rc.local

    # fastdfs start
    /usr/bin/fdfs_trackerd /etc/fdfs/tracker.conf restart
    /usr/bin/fdfs_storaged /etc/fdfs/storage.conf restart

    # nginx start
    /usr/local/nginx/sbin/nginx

2.给rc.local 文件增加可执行的权限

    chmod +x /etc/rc.d/rc.local
使用nginx image_filter实现图片裁剪
上边已经安装了nginx,并且添加了fastdfs模块,如果要增加新的包,需要重新make
1. 查看已安装配置:/usr/local/nginx/sbin/nginx -V
configure arguments: --prefix=/usr/local/nginx --pid-path=/var/run/nginx/nginx.pid --lock-path=/var/lock/nginx.lock --error-log-path=/var/log/nginx/error.log --http-log-path=/var/log/nginx/access.log --with-http_gzip_static_module --http-client-body-temp-path=/var/temp/nginx/client --http-proxy-temp-path=/var/temp/nginx/proxy --http-fastcgi-temp-path=/var/temp/nginx/fastcgi --http-uwsgi-temp-path=/var/temp/nginx/uwsgi --http-scgi-temp-path=/var/temp/nginx/scgi --add-module=/usr/local/fastdfs-nginx-module/src
2. 复制 以上配置:添加image_filter模块:--with-http_ssl_module --with-http_stub_status_module --with-http_realip_module --with-http_image_filter_module
3. 执行 cd /usr/local/nginx-1.8.0进入nginx解压包,注意不是安装包:
4. .configure --prefix=/usr/local/nginx --pid-path=/var/run/nginx/nginx.pid --lock-path=/var/lock/nginx.lock --error-log-path=/var/log/nginx/error.log --http-log-path=/var/log/nginx/access.log --with-http_gzip_static_module --http-client-body-temp-path=/var/temp/nginx/client --http-proxy-temp-path=/var/temp/nginx/proxy --http-fastcgi-temp-path=/var/temp/nginx/fastcgi --http-uwsgi-temp-path=/var/temp/nginx/uwsgi --http-scgi-temp-path=/var/temp/nginx/scgi --add-module=/usr/local/fastdfs-nginx-module/src --with-http_ssl_module --with-http_stub_status_module --with-http_realip_module --with-http_image_filter_module
4. make ,(仅make就可以,不需要make install )
5. 使用objs/nginx 替换/usr/local/nginx/sbin/下的启动文件:(就是重新编译了配置信息,生成了新的启动文件)
完整的nginx配置:
worker_processes  1;
# 日志位置,方便排错
error_log  /usr/local/nginx/logs/error.log;


events {
    worker_connections  4096;
}


http {
    include       mime.types;
    default_type  application/octet-stream;


    sendfile        on;

    keepalive_timeout  65;
	#使用supervisor管理的多实例
    upstream chats {
         server 192.168.50.4:8001;
         server 192.168.50.4:8002;
         server 192.168.50.4:8003;
         server 192.168.50.4:8004;
     }

    server {
        listen       80;
        server_name  192.168.50.4; # 服务器地址
		# 访问缩放图片
		location ~*group([0-9])/(.*)\.(jpg|gif|png|jpeg|webp)!$ {
			ngx_fastdfs_module;
			image_filter size;
			set $width      $arg_w;
			set $height     $arg_h;
			set $rotate     $arg_r;
			rewrite ~*group([0-9])/(.*)\.(jpg|gif|png) group1/$2.$3 break;
			image_filter resize $width $height;
			image_filter rotate $rotate;
			image_filter_buffer 100M;
			image_filter_jpeg_quality 75;
			}
		# 访问原图
		location ~/group([0-9]) {
			root /home/fdfs_storage/data;
			ngx_fastdfs_module;
		}
		# 转发其他请求
        location / {
            root   html;
			proxy_pass http://chats;
            index  index.html index.htm;
        }

        error_page   500 502 503 504  /50x.html;
        location = /50x.html {
            root   html;
        }

    }


}
6. 重启测试,确保fafs服务正常
测试:
访问原图:http://192.168.50.4/group1/M00/00/00/wKgyBF6WqRyAZagUAAeLckB27sg375.jpg
访问裁剪图:http://192.168.50.4/group1/M00/00/00/wKgyBF6WqRyAZagUAAeLckB27sg375.jpg!?w=400&h=200
如果希望高和宽自适应,则另一个传‘-’:
例如高度自适应:http://192.168.50.4/group1/M00/00/00/wKgyBF6WqRyAZagUAAeLckB27sg375.jpg!?w=400&h=-
说明:我这里使用的'!标识请求的是缩略图,可以自己替换'
PS:nginx 基本命令:
1. 首先利用配置文件启动nginx。

命令: nginx -c /usr/local/nginx/conf/nginx.conf

重启服务: service nginx restart


2. 快速停止或关闭Nginx:nginx -s stop


3. 正常停止或关闭Nginx:nginx -s quit


4. 配置文件修改重装载命令:nginx -s reload

如果执行命令出错,先添加nginx服务:参考文章:https://www.cnblogs.com/ansibee/p/8087476.html

