运维工具介绍及pxe环境的实现
运维工具:
- 系统安装(物理机、虚拟机)--> 程序安装、配置、服务启动 --> 批量操作(批量运行命令) --> 程序发布
-
程序发布
- 不能影响用户体验
- 系统不能停机
- 不能导致系统故障或造成系统完全不可用
灰度发布模型
通过调度器将线上的一批服务器(maintanance)标记为down模式--> 关闭相应的服务--> 部署新版本的应用程序至目标位置 --> 启动相关应用 --> 调度服务主机上线
/webapps/shop shop-1.1 shop-1.2 shop-1.2.1 -
自动化灰度发布:脚本、发布平台
灰度发布:
- 基于主机
- 基于用户
系统安装
OS provisioning:PXE, Cobbler, Cloud
Configuartion: puppet, saltstack
Command and Control: Fabric, Ansible
监控工具: 不允许没有被监控的系统上线
- 监控数据采集
- 用户行为日志
- 服务器性能
- 运行数据报告
- 监控管理
- 异常报告
- 失效转移
- 自动优雅降级
PXE and Cobbler
PXE: preboot execute environment,预启动执行环境
DHCP: dynamic host configuration protocol 提供地址池
- C/S 架构
Client: 86/udp
Server: 67/udp
bootp --> dhcp(租约)- Client: dhcpdiscover
- Server: dhcpoffer
- Client: dhcprequest
- Server: dhcpack
所有这些通信过程都是广播形式发送。另外,
DHCP服务的配置
安装yum install dhcp ,现在在服务器上部署两张网卡,使用eth1配置一个单独网段ifconfig eth1 10.0.10.1/24 up,然后复制示例文件/usr/share/doc/dhcp-4.2.5/dhcpd.conf.example 到工作目录/etc/dhcp/dhcp.conf
cp /usr/share/doc/dhcp-4.2.5/dhcpd.conf.example /etc/dhcp/dhcp.conf
对配置文件/etc/dhcp/dhcp.conf的说明
-
option domain-name "chengtai.me";# 这一项作用指,在ping www时,自动会补齐www.chengtai.me -
option domain-name-servers 223.5.5.5, 223.6.6.6;# 指明DNS服务器 -
default-lease-time 43200;# 默认租约期限 -
max-lease-time 86400;# 最大租约期限 -
log-facility local7;# 指明日志发送给哪个facility来记录 -
subnet 10.0.10.0 netmask 255.255.255.0 {}# 指明一个子网 -
range IP_Start IP_End;# 指明地址池范围 -
option router IP;# 默认分配的网关地址
DHCP指定一个子网:
subnet 10.0.10.0 netmask 255.255.255.0 {
    range 10.0.10.21 10.0.10.50;
    option routers 10.0.10.1;
    next-server 10.0.10.1;  # 告诉tftp服务器ip地址
    filename "pxelinux.0";  # 指明客户端获得地址后,向tftp服务器请求加载的第一个文件
}
/var/lib/dhcpd/dhcpd.leases 这个文件是租约日志,可以查看到分配的信息。
为某一个服务器做保留地址,注意此固定地址是要在地址池范围外的:
host ftpserver {
    hardware ethernet 00:0c:29:f0:98:f3;
    fixed-address 10.0.10.51;
}
下面是/etc/dhcp/dhcpd.conf文件的完整配置信息:
option domain-name "ataime.com";
option domain-name-servers 223.5.5.5, 223.6.6.6;

default-lease-time 43200;
max-lease-time 86400;

log-facility local7;

subnet 10.0.10.0 netmask 255.255.255.0 {
  range 10.0.10.21 10.0.10.50;
  option routers 10.0.10.1;
  next-server 10.0.10.1;
  filename "pxelinux.0";
}

host ftpserver {
    hardware ethernet 00:0c:29:f0:98:f3;
    fixed-address 10.0.10.51;
}
TFTP服务器部署
首先安装程序yum install tftp tftp-server xinetd,首先手动启动超级守护进程systemctl start xinetd.service,并确保其开机自动启动,再手动启动tftp服务systemctl start tftp.service,并确保其开机自启动。
正常启动后,会有个 69/utp 的端口监听,就说明启动正常。
安装后的/var/lib/tftpboot 为tftp向客户端提供文件的默位置。
此时要向其提供几个文件,pxelinux.0文件要通过安装yum install syslinux,路径为/usr/share/syslinux/pxelinux.0,然后复制到/var/lib/tftpboot目录:
cp /usr/share/syslinux/pxelinux.0 /var/lib/tftpboot/
接着,继续复制内核文件,这个可以从光盘、网络镜像位置获得:
mkdir /media/cdrom
mount -r /dev/cdrom /media/cdrom/
cp /media/cdrom/images/pxeboot/{vmlinuz,initrd.img} /var/lib/tftpboot/
cp /usr/share/syslinux/{chain.c32,mboot.c32,menu.c32,memdisk,pxelinux.0} /var/lib/tftpboot/
mkdir /var/lib/tftpboot/pxelinux.cfg
vim /var/lib/tftpboot/pxelinux.cfg/default
# --- default start ---
default menu.c32
prompt 5
timeout 30
MENU TITLE CentOS 7 PXE Menu        # 全局菜单

LABEL linux
MENU LABEL Install CentOS 7 x86_64      # 内容子菜单
KERNEL vmlinuz
APPEND initrd=initrd.img inst.repo=http://10.0.10.1/centos7 ks=http://10.0.10.1/centos7.cfg
# --- default end ---
web服务部署
yum install httpd
mkdir /var/www/html/centos7
mount --bind /media/cdrom/ /var/www/html/centos7/
systemctl start httpd.service
此时正常情况下访问http://10.0.10.1/centos7/ 是可以正常打开光盘页面的。
创建kickstart文件
执行yum install system-config-kickstart安装system-config-kickstart, 用来生成配置ks.cfg文件,注意,运行system-config-kickstart之前,系统必须有Gnome GUI,内容示例如下,可根据需要进行调整:
cat /var/www/html/centos7.cfg
# Install OS instead of upgrade
install
# Use text mode install
text
# Run the Setup Agent on first boot
firstboot --disable
selinux --permissive
firewall --disabled
ignoredisk --only-use=sda
# Keyboard layouts
keyboard --vckeymap=us --xlayouts='us'
# System language
lang en_US.UTF-8
# Reboot after installation
reboot
# Network information
network  --bootproto=dhcp
network  --hostname=localhost.localdomain
# Root password
rootpw --iscrypted $1$Z1GZTMst$y2qT0MIz6pZ1CZHjdKfid.
# System timezone
timezone Asia/Shanghai
# Use network installation
url --url="http://10.0.10.1/centos7"
# System bootloader configuration
bootloader --location=mbr --boot-drive=sda
# Clear the Master Boot Record
zerombr
# Partition clearing information
clearpart --all --initlabel

#part /boot --asprimary --fstype="xfs" --size=512
#part swap --fstype="swap" --size=2048
part / --fstype="ext4" --size=20240

%packages
@core
kexec-tools

%end
修改权限:
chmod 644 /var/www/html/centos7.cfg
确保对应服务都是启动状态:
[root@localhost ~]# systemctl start dhcpd.service
[root@localhost ~]# systemctl start tftp.socket
[root@localhost ~]# systemctl start httpd.service
另外需要注意,在操作过程中遇到的几个坑:
: 1、客户端内存太小,推荐2G及以上内存,不然会有各种报错;
2、kickstart文件由于读权限没有配置,导致无法工作;
3、确保防火墙、SELinux没有拦截。
Cobbler
声明:下面Cobbler配置与上面PXE配置中,IP和对应路径有变化,具体请按实际生产过程中修改。
cobbler 是pxe 的二次封装,由Python语言开发,运行流程图:
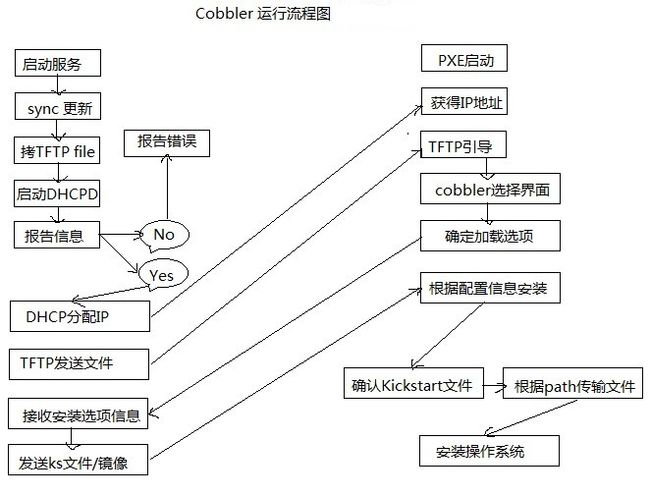
Cobbler :多安装数的PXE环境,是PXE的高级封装。
PXE: yum repository, (vmlinuz+initrd.img) Distribution
: 单个系统安装:
1、特定系统:(pxeboot)vmlinuz, initrd.img
2、特定系统安装源:yum repositroy
Profile结构:结合kickstart文件设定特定环境
- CentOS 6 web: CentOS 6 pxeboot + CentOS 6 yum repo + kickstart_WEB
- CentOS 6 database: CentOS 6 pxeboot + CentOS 6 yum repo + kickstart_DB
- CentOS 5: CentOS 5 pxeboot + CentOS 5 yum repo
Cobbler三个核心组件:
- repository:
- mirror
- import
- distribution (distro)
- profile
安装Cobbler (fedora epel 源)
两个程序包:cobbler、cobbler-web
其中cobbler-web通过web页面图形化进行配置(WEB GUI)。
yum install cobbler cobbler-web pykickstart debmirror
yum install dhcp tftp-server httpd syslinux
架设上面的都已经部署好,现在把/var/lib/tftpboot/目录下所有文件移动到另一位置,因为此目录下的文件全部由cobbler自己来生成。
mkdir /root/pxeboot
mv /var/lib/tftpboot/* /root/pxeboot/
这时再编辑vim /etc/dhcp/dhcpd.conf,注释一行next-server 172.16.1.20;如:
[root@localhost ~]# cat /etc/dhcp/dhcpd.conf
#
# DHCP Server Configuration file.
#   see /usr/share/doc/dhcp*/dhcpd.conf.example
#   see dhcpd.conf(5) man page
#
option domain-name "chengtai.me";
option domain-name-servers 223.5.5.5,223.6.6.6;

default-lease-time 3600;
max-lease-time 7200;

log-facility local7;

subnet 172.16.0.0 netmask 255.255.0.0 {
    range 172.16.1.70 172.16.1.90;
    option routers 172.16.1.20;
    filename "pxelinux.0";
    #next-server 172.16.1.20;
}
修改后重启dhcpd服务:
systemctl restart dhcpd.service
systemctl start cobblerd.service
此时通过执行cobbler check, 进行检查修改,cobbler 配置文件:
server: 172.16.1.20
next_server: 176.16.1.20
修改生成密码串:
[root@localhost ~]# openssl passwd -1 -salt `openssl rand -hex 4`
Password:
$1$d4011774$lW9sSQgNOBV57VVZ3Anax.
注意:修改的过程这里不再说明,直到执行cobbler check,显示只剩下面几项应该就没有问题了:
[root@localhost ~]# cobbler check
The following are potential configuration items that you may want to fix:

1 : SELinux is enabled. Please review the following wiki page for details on ensuring cobbler works correctly in your SELinux environment:
    https://github.com/cobbler/cobbler/wiki/Selinux
2 : some network boot-loaders are missing from /var/lib/cobbler/loaders, you may run 'cobbler get-loaders' to download them, or, if you only want to handle x86/x86_64 netbooting, you may ensure that you have installed a *recent* version of the syslinux package installed and can ignore this message entirely.  Files in this directory, should you want to support all architectures, should include pxelinux.0, menu.c32, elilo.efi, and yaboot. The 'cobbler get-loaders' command is the easiest way to resolve these requirements.
3 : The default password used by the sample templates for newly installed machines (default_password_crypted in /etc/cobbler/settings) is still set to 'cobbler' and shouldbe changed, try: "openssl passwd -1 -salt 'random-phrase-here' 'your-password-here'" to generate new one
4 : fencing tools were not found, and are required to use the (optional) power management features. install cman or fence-agents to use them

Restart cobblerd and then run 'cobbler sync' to apply changes.
执行完成后一定要执行cobbler sync,这样,将配置信息会生成到/var/lib/tftpboot/目录下。
此时,cobbler服务已经配置完成,下面使用cobbler命令进行管理。
部署核心组件
现在导入光盘镜像:
[root@localhost ~]# cobbler import --name="CentOS-7-x86_64" --path=/media/cdrom
再制作对应的kickstart文件至/var/lib/cobbler/kickstarts目录,例如/var/lib/cobbler/kickstarts/centos7.cfg。然后再添加profile:
[root@localhost ~]# cobbler distro list
   CentOS-7-x86_64
[root@localhost ~]# cobbler profile add --name="CentOS-7-x86_64-web" --distro=CentOS-7-x86_64 --kickstart=/var/lib/cobbler/kickstarts/centos7.cfg
[root@localhost ~]# cobbler profile list
   CentOS-7-x86_64
   CentOS-7-x86_64-web
其中--distro= 参数一定要是cobbler distro list的执行结果。
所有操作完成后,一定要执行cobbler sync进行同步操作。
部署Cobbler-web
[root@localhost ~]# yum -y install cobbler-web
[root@localhost ~]# cp /etc/cobbler/modules.conf{,.bak}
[root@localhost ~]# vim /etc/cobbler/modules.conf
[root@localhost ~]# htdigest /etc/cobbler/users.digest "Cobbler" cobbler
Adding password for cblradmin in realm Cobbler.
New password:
Re-type new password:
[root@localhost ~]# systemctl restart cobblerd.service
[root@localhost ~]# systemctl restart httpd.service
提示:
: "Cobbler":Rename提示信息
cobbler : 这个是用户名
/etc/cobbler/users.digest :帐号文件
最后重启cobblerd服务,通过http(s)://YOUR_COBBLERD_IP/cobbler_web访问即可。在cobbler-web-2.8.0-4.el7.noarch这个版本上,要通过https协议访问,用http协议访问提示403报错。

这样可以通过图形界面来管理。
下面需要特别注意的几点:
- dhcp服务定义filename
filename "pxelinux.0" - /etc/cobbler/settings
manage_dhcp: 0
manage_tftpd: 0 - 使用
cobbler import可直接导致光盘中安装树,会自动生成响应的distro及profile,生产的profile会使用默认的ks文件/var/lib/cobbler/kickstarts/default.ks文件。 - 可自定义
kickstart文件,而后新建profile - cobbler_web 2.6 中开始使用htdigest 的认证方式,添加用户:
htdigest /etc/cobbler/users.dige "Cobbler" cobbler
至此,所有部署完成。