Java集合详解--什么是Map
引言
在很久很久以前,讲过Set的实现原理,讲到Set就是Map的马甲,那么今天我们就来看看Map是如何实现的(本文都基于JDK1.8的版本)
什么是Map
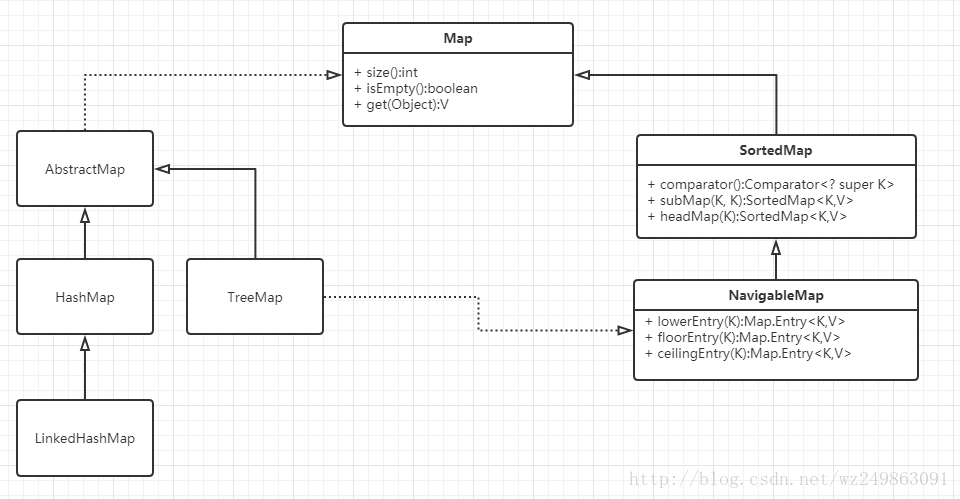
Map和Collection有关的几个map的关系图
- Map的定义
java.util
public interface Map
An object that maps keys to values. A map cannot contain duplicate keys; each key can map to at most one value.
This interface takes the place of the Dictionary class, which was a totally abstract class rather than an interface.
The Map interface provides three collection views, which allow a map's contents to be viewed as a set of keys, collection of values, or set of key-value mappings. The order of a map is defined as the order in which the iterators on the map's collection views return their elements. Some map implementations, like the TreeMap class, make specific guarantees as to their order; others, like the HashMap class, do not.
Map的三个特点
1.包含键值对
2.键唯一
3.键对应的值唯一
Map还提供了3个集合视图,分别是一组键值对,一组键,一组值
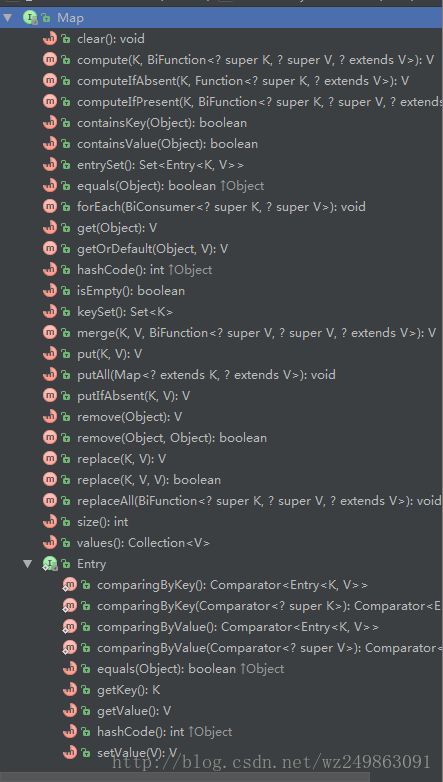
- Map有哪些方法
源码分析
HashMap
先来看看常量
/**
 * The default initial capacity - MUST be a power of two.
 */
static final int DEFAULT_INITIAL_CAPACITY = 1 << 4; // aka 16

/**
 * The maximum capacity, used if a higher value is implicitly specified
 * by either of the constructors with arguments.
 * MUST be a power of two <= 1<<30.
 */
static final int MAXIMUM_CAPACITY = 1 << 30;

/**
 * The load factor used when none specified in constructor.
 */
static final float DEFAULT_LOAD_FACTOR = 0.75f;

/**
 * The bin count threshold for using a tree rather than list for a
 * bin.  Bins are converted to trees when adding an element to a
 * bin with at least this many nodes. The value must be greater
 * than 2 and should be at least 8 to mesh with assumptions in
 * tree removal about conversion back to plain bins upon
 * shrinkage.
 */
static final int TREEIFY_THRESHOLD = 8;

/**
 * The bin count threshold for untreeifying a (split) bin during a
 * resize operation. Should be less than TREEIFY_THRESHOLD, and at
 * most 6 to mesh with shrinkage detection under removal.
 */
static final int UNTREEIFY_THRESHOLD = 6;

/**
 * The smallest table capacity for which bins may be treeified.
 * (Otherwise the table is resized if too many nodes in a bin.)
 * Should be at least 4 * TREEIFY_THRESHOLD to avoid conflicts
 * between resizing and treeification thresholds.
 */
static final int MIN_TREEIFY_CAPACITY = 64;

如果不指定初值的话,列表的长度就为16,默认加载因子为0.75,
再来看看成员变量
/**
 * The table, initialized on first use, and resized as
 * necessary. When allocated, length is always a power of two.
 * (We also tolerate length zero in some operations to allow
 * bootstrapping mechanics that are currently not needed.)
 */
transient Node[] table;
这个就是列表

/**
 * Holds cached entrySet(). Note that AbstractMap fields are used
 * for keySet() and values().
 */
transient Set> entrySet;
这个是用于缓存节点

/**
 * The number of key-value mappings contained in this map.
 */
transient int size;
已经用于的节点数量

/**
 * The number of times this HashMap has been structurally modified
 * Structural modifications are those that change the number of mappings in
 * the HashMap or otherwise modify its internal structure (e.g.,
 * rehash).  This field is used to make iterators on Collection-views of
 * the HashMap fail-fast.  (See ConcurrentModificationException).
 */
transient int modCount;
这个是修改的次数

/**
 * The next size value at which to resize (capacity * load factor).
 *
 * @serial
 */
// (The javadoc description is true upon serialization.
// Additionally, if the table array has not been allocated, this
// field holds the initial array capacity, or zero signifying
// DEFAULT_INITIAL_CAPACITY.)
int threshold;
极限值,如果节点数大于这个值就需要扩容了,这个值的计算方式是capacity * load factor

/**
 * The load factor for the hash table.
 *
 * @serial
 */
final float loadFactor;
加载因子,决定了节点数值大于当前总数的一定百分比时,扩容
接下来的是构造函数
public HashMap(int initialCapacity, float loadFactor) {
    if (initialCapacity < 0)
        throw new IllegalArgumentException("Illegal initial capacity: " +
                                           initialCapacity);
    if (initialCapacity > MAXIMUM_CAPACITY)
        initialCapacity = MAXIMUM_CAPACITY;
    if (loadFactor <= 0 || Float.isNaN(loadFactor))
        throw new IllegalArgumentException("Illegal load factor: " +
                                           loadFactor);
    this.loadFactor = loadFactor;
    this.threshold = tableSizeFor(initialCapacity);
}

public HashMap(int initialCapacity) {
    this(initialCapacity, DEFAULT_LOAD_FACTOR);
}

public HashMap() {
    this.loadFactor = DEFAULT_LOAD_FACTOR; // all other fields defaulted
}

如果了解当前数据的量的话,建议规定HashMap的大小,减少扩容次数,提高性能

public HashMap(Map m) {
    this.loadFactor = DEFAULT_LOAD_FACTOR;
    putMapEntries(m, false);
}
这个是从已有的Map中生成一个新的Map,属于深拷贝
接下来看下get的实现
public V get(Object key) {
    Node e;
    return (e = getNode(hash(key), key)) == null ? null : e.value;
}

final Node getNode(int hash, Object key) {
    Node[] tab; Node first, e; int n; K k;
//首先看看列表是否为空
    if ((tab = table) != null && (n = tab.length) > 0 &&
        (first = tab[(n - 1) & hash]) != null) {
//不为空的话,碰碰运气,检查下第一个是不是我们要找到的
//判断条件是hash值一致,并且key一致
        if (first.hash == hash && // always check first node
            ((k = first.key) == key || (key != null && key.equals(k))))
            return first;
        if ((e = first.next) != null) {
            if (first instanceof TreeNode)
                return ((TreeNode)first).getTreeNode(hash, key);
            do {
//根据下面介绍的哈希冲突解决方法,了解到每个数据项都是一个链表,因此需要遍历这个链表去找到我们需要的key那项
                if (e.hash == hash &&
                    ((k = e.key) == key || (key != null && key.equals(k))))
                    return e;
            } while ((e = e.next) != null);
        }
    }
    return null;
}
顺便提下,解决哈希冲突的常见4种方法,1.开放地址,简单说就是如果当前当前坑被占了,就继续找下个坑 2.拉链法,也就是JDK中选择实现HashMap的方法,数组的每个项又是一个链表,如果哈希后发现当前地址有数据了,就挂在这个链表的最后 3.再哈希 选择多种哈希方法,一个不行再换下一个,知道有坑为止 4.建立公共溢出 就把所有溢出的数据都放在溢出表里
说完get,那就看看put
public V put(K key, V value) {
    return putVal(hash(key), key, value, false, true);
}

final V putVal(int hash, K key, V value, boolean onlyIfAbsent,
               boolean evict) {
    Node[] tab; Node p; int n, i;
//首先还是先检查列表是否为空,为空的话就调用reszie()新建一个
    if ((tab = table) == null || (n = tab.length) == 0)
        n = (tab = resize()).length;
//根据哈希方法找到列表中的位置,看看是否为空,为空就把这个坑给占上
    if ((p = tab[i = (n - 1) & hash]) == null)
        tab[i] = newNode(hash, key, value, null);
    else {
        Node e; K k;
//如果坑被占了,先看看是不是和key一致,一致的话直接把value替换了就行了,都是自己人
        if (p.hash == hash &&
            ((k = p.key) == key || (key != null && key.equals(k))))
            e = p;
        else if (p instanceof TreeNode)
            e = ((TreeNode)p).putTreeVal(this, tab, hash, key, value);
        else {
            for (int binCount = 0; ; ++binCount) {
//再找找链表里有没有数据项和key一致,不一致的话就找到链表的尾部
                if ((e = p.next) == null) {
//在尾部插入一个新的数据项
                    p.next = newNode(hash, key, value, null);
                    if (binCount >= TREEIFY_THRESHOLD - 1) // -1 for 1st
                        treeifyBin(tab, hash);
                    break;
                }
//一致的话先让p和e指向同一个数据项
                if (e.hash == hash &&
                    ((k = e.key) == key || (key != null && key.equals(k))))
                    break;
                p = e;
            }
        }
//检查e是否为空,不为空的话表示key所对应的数据项已经存在了
        if (e != null) { // existing mapping for key
            V oldValue = e.value;
//这时候就需要判断下onlyIfAbsent开关,如果为true表示不需要更新已有数据项的值了,false才更新
            if (!onlyIfAbsent || oldValue == null)
                e.value = value;
            afterNodeAccess(e);
            return oldValue;
        }
    }
//这个在后面介绍
    ++modCount;
    if (++size > threshold)
        resize();
    afterNodeInsertion(evict);
    return null;
}
增删改查,还差一个删没讲
public V remove(Object key) {
    Node e;
    return (e = removeNode(hash(key), key, null, false, true)) == null ?
        null : e.value;
}

final Node removeNode(int hash, Object key, Object value,
                           boolean matchValue, boolean movable) {
    Node[] tab; Node p; int n, index;
//老套路,先检查列表是否为空
    if ((tab = table) != null && (n = tab.length) > 0 &&
        (p = tab[index = (n - 1) & hash]) != null) {
        Node node = null, e; K k; V v;
//检查第一项
        if (p.hash == hash &&
            ((k = p.key) == key || (key != null && key.equals(k))))
            node = p;
        else if ((e = p.next) != null) {
            if (p instanceof TreeNode)
                node = ((TreeNode)p).getTreeNode(hash, key);
            else {
//遍历列表
                do {
                    if (e.hash == hash &&
                        ((k = e.key) == key ||
                         (key != null && key.equals(k)))) {
                        node = e;
                        break;
                    }
                    p = e;
                } while ((e = e.next) != null);
            }
        }
//如果找到对应项
        if (node != null && (!matchValue || (v = node.value) == value ||
                             (value != null && value.equals(v)))) {
            if (node instanceof TreeNode)
                ((TreeNode)node).removeTreeNode(this, tab, movable);
//改变前后指针,删除该项
            else if (node == p)
                tab[index] = node.next;
            else
                p.next = node.next;
            ++modCount;
            --size;
            afterNodeRemoval(node);
            return node;
        }
    }
    return null;
}
再来看看最核心的方法,如何计算得到hash code
static final int hash(Object key) {
    int h;
    return (key == null) ? 0 : (h = key.hashCode()) ^ (h >>> 16);
}
看懂这个方法首先需要明白^和>>>这个两个运算符号
^这个符号叫做异或运算符,两个操作数的位中,相同则结果为0,不同则结果为1
比如2^5=7 因为0010^0101=0111
>>>这个符号叫做无符号右移,忽略符号位,空位都以0补齐
比如5>>>2 0101>>>2等于0001=1,5>>> 0101>>>1 0010=2
再来看下hash这个方法,先取key的hashcode,这个是个native的方法,然后再与右移16位的值取异或。
举个例子
int h = "hello".hashCode();
System.out.println("result1 : "+ h);
System.out.println("result2 : "+ (h>>>16));
System.out.println("result3 : "+ (h^(h>>>16)));

结果为
result1 : 99162322
result2 : 1513
result3 : 99163451
最后再讲下之前提到的modCount的作用。
可以看到modeCount在put,get,remove这些值中被修改。然后在AbstractSet的几个子类KeySet和Values中的foreach中被用来比较
public final void forEach(Consumersuper V> action) {
    Node[] tab;
    if (action == null)
        throw new NullPointerException();
    if (size > 0 && (tab = table) != null) {
        int mc = modCount;
        for (int i = 0; i < tab.length; ++i) {
            for (Node e = tab[i]; e != null; e = e.next)
                action.accept(e.value);
        }
        if (modCount != mc)
            throw new ConcurrentModificationException();
    }
}
在循环之前先记录modCount的值,如果循环结束之后这个值被改变了说明HashMap内部结构发生了变化,线程不安全了,就抛出异常,从而实现“fast-fail”机制
LinkedHashMap
从名字就可以看出LinkedHashMap继承于HashMap,它相比于HashMap内部多维护了一个双向列表,目的就是保证输入顺序和输出顺序一致,带来的劣势也很明显,性能的消耗大大提升。
首先先来看下相比于HashMap增加的几个成员变量
static class Entry<K,V> extends HashMap.Node<K,V> {
//增加了前面和后面的节点记录,从而实现双向链表
    Entry before, after;
    Entry(int hash, K key, V value, Node next) {
        super(hash, key, value, next);
    }
}

//这个就是双向链表的头部
transient LinkedHashMap.Entry head;
//尾部
transient LinkedHashMap.Entry tail;
//双向链表中元素排序规则的标志位。
//accessOrder为false,表示按插入顺序排序
//accessOrder为true,表示按访问顺序排序
final boolean accessOrder;
接着看下增删改查几个操作
不知道还记不记得在上面HashMap中讲到的put操作中调用了一个方法叫newNode
它在LinkedHashMap中被重写了
Node newNode(int hash, K key, V value, Node e) {
    LinkedHashMap.Entry p =
        new LinkedHashMap.Entry(hash, key, value, e);
    linkNodeLast(p);
    return p;
}

private void linkNodeLast(LinkedHashMap.Entry p) {
    LinkedHashMap.Entry last = tail;
    tail = p;
//如果tail为null代表是个空链表,那就把head,tail都指向p
    if (last == null)
        head = p;
    else {
//把之前最后的节点last的after指向新的tail(P)
        p.before = last;
//把P的before指向之前的last,这样P就成功挂到链表的尾部了
        last.after = p;
    }
}
在生成一个新节点的时候,不光把它放到数组中,还把它放到双向链表的尾部。
看完了增,改再来看看查
public V get(Object key) {
    Node e;
//首先调用在HashMap中介绍过的getNode方法获得key对应的节点
    if ((e = getNode(hash(key), key)) == null)
        return null;
//如果按照访问顺序排序的话,那就调用afterNodeAccess方法排个序
    if (accessOrder)
        afterNodeAccess(e);
    return e.value;
}
再看看3个HashMap中的空方法,在LinkedHashMap中如何实现
//首先是在上面get中被调用的afterNodeAccess
void afterNodeAccess(Node e) { // move node to last
    LinkedHashMap.Entry last;
//首先确认下该节点是不是已经处于尾部了,如果处于尾部就没必要动它了
    if (accessOrder && (last = tail) != e) {
//新建3个临时节点,p就是e,b是e的前面节点,a是e的后面节点
        LinkedHashMap.Entry p =
            (LinkedHashMap.Entry)e, b = p.before, a = p.after;
        p.after = null;
//如果e节点前面没有节点了,那就代表e处于head位置,现在要把它删掉,所以head指向他后面的a
        if (b == null)
            head = a;
        else
//否则就把它前面的节点b的after指向a
            b.after = a;
//同样,如果e后面有节点,那就把后面节点a的before指向b,这样e就成功脱离链表了
        if (a != null)
            a.before = b;
        else
            last = b;
        if (last == null)
            head = p;
        else {
            p.before = last;
            last.after = p;
        }
//把p挪到链表尾部,这样就完成了按访问顺序排序了
        tail = p;
        ++modCount;
    }
}

//这个是在remove中调用,把e节点从双向链表中删除
void afterNodeRemoval(Node e) { // unlink
    LinkedHashMap.Entry p =
        (LinkedHashMap.Entry)e, b = p.before, a = p.after;
    p.before = p.after = null;
    if (b == null)
        head = a;
    else
        b.after = a;
    if (a == null)
        tail = b;
    else
        a.before = b;
}

//这个是在putVal中被调用,根据removeEldestEntry结果决定是否要删除最老的节点
//这个也LRU的实现核心方法,默认返回的是false,覆盖这个方法,写入逻辑就能实现LRU
void afterNodeInsertion(boolean evict) { // possibly remove eldest
    LinkedHashMap.Entry first;
    if (evict && (first = head) != null && removeEldestEntry(first)) {
        K key = first.key;
        removeNode(hash(key), key, null, false, true);
    }
}
到这基本就明白了LinkedHashMap特点和如何实现
在Android中LRU就是LinkedHashMap的简单包装类,有兴趣的可以看下
TreeMap

分析TreeMap之前,首先先来了解下NavigableMap和SortedMap这个两个接口
SortedMap从名字就可以看出,在Map的基础上增加了排序的功能。它要求key与key之间是可以相互比较的,从而达到排序的目的。怎么样才能比较呢?在之前的Set中提到了comparator.实现了内部排序,这儿,就通过comparator来实现排序。而NavigableMap是继承于SortedMap,目前只有TreeMap和ConcurrentNavigableMap两种实现方式。它本质上添加了搜索选项到接口,主要为红黑树服务。先来了解下它新增的几个方法
 /**
     * 返回小于key的最大值的结点
     */
    Map.Entry lowerEntry(K key);

    /**
     * 返回小于key的最大值结点的key
     */
    K lowerKey(K key);

    /**
     * 返回小于等于key的最大值结点
     */
    Map.Entry floorEntry(K key);

    /**
     * 返回小于等于key的最大结点的key
     */
    K floorKey(K key);

    /**
     * 返回大于等于key的最小结点
     */
    Map.Entry ceilingEntry(K key);

    /**
     * 返回大于等于key的最小结点的key
     */
    K ceilingKey(K key);

    /**
     * 返回大于key的最小结点
     */
    Map.Entry higherEntry(K key);

    /**
     * 返回大于key的最小结点的key
     */
    K higherKey(K key);

    /**
     * 返回最小key结点
     */
    Map.Entry firstEntry();

    /**
     * 返回最大key结点
     */
    Map.Entry lastEntry();

    /**
     * 删除最小key结点
     */
    Map.Entry pollFirstEntry();

    /**
     *删除最大key结点
     */
    Map.Entry pollLastEntry();

    /**
     * 获取相反顺序的map
     *
     */
    NavigableMap descendingMap();

    /**
     * 返回key的升序迭代器
     */
    NavigableSet navigableKeySet();

    /**
     * 返回key的降序迭代器
     */
    NavigableSet descendingKeySet();

    /**
     * 子map
     */
    NavigableMap subMap(K fromKey, boolean fromInclusive,
                             K toKey,   boolean toInclusive);

    /**
     * 小于等于toKey的map
     */
    NavigableMap headMap(K toKey, boolean inclusive);

    /**
     * 大于等于key的map
     */
    NavigableMap tailMap(K fromKey, boolean inclusive);
然后我们来看看TreeMap的实现
首先,TreeMap其实就是一颗红黑树
R-B Tree是一种二叉查找树,所有符合二叉查找树的特点, 对于树中的每一个节点,如果它有左子树,则左子树中所有节点的值不大于该节点值;如果它有右子树,则右子树中所有节点的值不小于该节点的值
它本身又有几个独特的特性
每个节点要么是红的,要么是黑的。
根节点是黑的。
每个叶节点(叶节点即指树尾端NIL指针或NULL节点)是黑的。
如果一个节点是红的,那么它的两个儿子都是黑的。
对于任一节点而言,其到叶节点树尾端NIL指针的每一条路径都包含相同数目的黑节点。
有了这些理论知识,我们再来看看TreeMap的源码
先看看节点的数据结构
private static final boolean RED   = false;
private static final boolean BLACK = true;

static final class Entry<K,V> implements Map.Entry<K,V> {
    //键
    K key;
    //值
    V value;
    //左子树
    Entry left;
    //右子树
    Entry right;
    //父节点
    Entry parent;
    //节点颜色
    boolean color = BLACK;
然后是查
public boolean containsKey(Object key) {
    return getEntry(key) != null;
}

final Entry getEntry(Object key) {
    // Offload comparator-based version for sake of performance
    //如果比较器不为空
    if (comparator != null)
    //就用比较器去查找
        return getEntryUsingComparator(key);
    if (key == null)
        throw new NullPointerException();
    @SuppressWarnings("unchecked")
        Comparablesuper K> k = (Comparablesuper K>) key;
    Entry p = root;
    while (p != null) {
        //这里采用的是内部排序的比较方式,仅仅是比较方式不同
        int cmp = k.compareTo(p.key);
        if (cmp < 0)
            p = p.left;
        else if (cmp > 0)
            p = p.right;
        else
            return p;
    }
    return null;
}

final Entry getEntryUsingComparator(Object key) {
    @SuppressWarnings("unchecked")
        K k = (K) key;
    Comparatorsuper K> cpr = comparator;
    if (cpr != null) {
        Entry p = root;
        //遍历整颗树,可以看到采用的是先序遍历,中左右的顺序
        while (p != null) {
            int cmp = cpr.compare(k, p.key);
            if (cmp < 0)
                p = p.left;
            else if (cmp > 0)
                p = p.right;
            else
                return p;
        }
    }
    return null;
}
再来看看增
之前讲定义的时候就提到过,R-B Tree有一些特殊的性质,所以再插入新的节点后,仍需要保持这些性质,需要动态平衡
public V put(K key, V value) {
    Entry t = root;
    //如果根节点为空,是一颗空数的话,就把这个节点当做根节点
    //颜色是黑色的
    if (t == null) {
        compare(key, key); // type (and possibly null) check

        root = new Entry<>(key, value, null);
        size = 1;
        modCount++;
        return null;
    }
    int cmp;
    Entry parent;
    // split comparator and comparable paths
    //这里就是二叉查找树插入逻辑,小的插左边,大的插右边
    Comparator super K> cpr = comparator;
    if (cpr != null) {
        do {
            parent = t;
            cmp = cpr.compare(key, t.key);
            if (cmp < 0)
                t = t.left;
            else if (cmp > 0)
                t = t.right;
            else
                return t.setValue(value);
        } while (t != null);
    }
    else {
        if (key == null)
            throw new NullPointerException();
        @SuppressWarnings("unchecked")
            Comparable super K> k = (Comparable super K>) key;
        do {
            parent = t;
            cmp = k.compareTo(t.key);
            if (cmp < 0)
                t = t.left;
            else if (cmp > 0)
                t = t.right;
            else
                return t.setValue(value);
        } while (t != null);
    }
    Entry e = new Entry<>(key, value, parent);
    if (cmp < 0)
        parent.left = e;
    else
        parent.right = e;
    //这里就是动态平衡的逻辑了
    fixAfterInsertion(e);
    size++;
    modCount++;
    return null;
}
分析源码前,先补充点理论知识
插入有5种不同情况
1) 情况1:插入的是根节点。
原树是空树,此情况只会违反性质2。
对策:直接把此节点涂为黑色。
2) 情况2:插入的节点的父节点是黑色。
此不会违反性质2和性质4,红黑树没有被破坏。
对策:什么也不做。
3) 情况3:当前节点的父节点是红色且祖父节点的另一个子节点(叔叔节点)是红色。
此时父节点的父节点一定存在,否则插入前就已不是红黑树。与此同时,又分为父节点是祖父节点的左子还是右子,对于对称性,我们只要解开一个方向就可以了。 在此,我们只考虑父节点为祖父左子的情况。 同时,还可以分为当前节点是其父节点的左子还是右子,但是处理方式是一样的。我们将此归为同一类。
对策:将当前节点的父节点和叔叔节点涂黑,祖父节点涂红,把当前节点指向祖父节点,从新的当前节点重新开始算法。
情况4:当前节点的父节点是红色,叔叔节点是黑色,当前节点是其父节点的右子
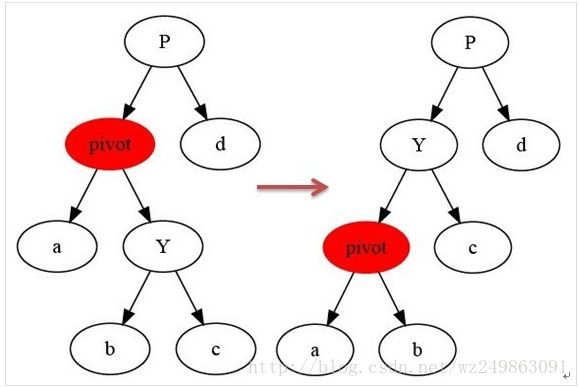
对策:当前节点的父节点做为新的当前节点,以新当前节点为支点左旋。
情况5:当前节点的父节点是红色,叔叔节点是黑色,当前节点是其父节点的左子
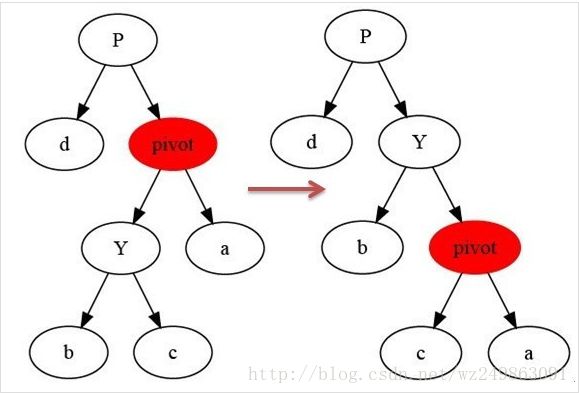
解法:父节点变为黑色,祖父节点变为红色,在祖父节点为支点右旋
private void fixAfterInsertion(Entry x) {
    //默认插入的是红色
    x.color = RED;
    //如果插入的父节点也是红色的
    while (x != null && x != root && x.parent.color == RED) {
        //如果父节点是祖父节点的左节点
        if (parentOf(x) == leftOf(parentOf(parentOf(x)))) {
            Entry y = rightOf(parentOf(parentOf(x)));
            //如果祖父节点的右节点是红色,符合情况3
            //就把祖父涂红,父节点和叔父节点涂黑
            if (colorOf(y) == RED) {
                setColor(parentOf(x), BLACK);
                setColor(y, BLACK);
                setColor(parentOf(parentOf(x)), RED);
                x = parentOf(parentOf(x));
            } else {
                //如果叔父节点是黑色,自己是父节点的右子数,符合情况4
                if (x == rightOf(parentOf(x))) {
                    x = parentOf(x);
                    //对父节点进行左旋转,下面有图说明
                    rotateLeft(x);
                }
                setColor(parentOf(x), BLACK);
                setColor(parentOf(parentOf(x)), RED);
                rotateRight(parentOf(parentOf(x)));
            }
        } else {
            //对称处理,如果父节点是祖父节点的右节点
            Entry y = leftOf(parentOf(parentOf(x)));
            //情况3
            if (colorOf(y) == RED) {
                setColor(parentOf(x), BLACK);
                setColor(y, BLACK);
                setColor(parentOf(parentOf(x)), RED);
                x = parentOf(parentOf(x));
            } else {
                //情况5
                if (x == leftOf(parentOf(x))) {
                    x = parentOf(x);
                    rotateRight(x);
                }
                setColor(parentOf(x), BLACK);
                setColor(parentOf(parentOf(x)), RED);
                rotateLeft(parentOf(parentOf(x)));
            }
        }
    }
    root.color = BLACK;
}
左旋转
右旋转
再来看下删除操作
//首先还是要保证删除后,还是一个二叉查找树
private void deleteEntry(Entry<K,V> p) {
    modCount++;
    size--;

    // If strictly internal, copy successor's element to p and then make p
    // point to successor.
    //如果要删除的节点有2个子树,那是最麻烦的情况了
    //需要从左子树找一个最大的节点或者从右子树找一个最小的节点来代替要删除的节点
    if (p.left != null && p.right != null) {
    //这个就是寻找替代节点的方法
        Entry<K,V> s = successor(p);
        p.key = s.key;
        p.value = s.value;
        p = s;
    } // p has 2 children

    // Start fixup at replacement node, if it exists.
    //左子树存在就取左子树,否则取右子树
    Entry<K,V> replacement = (p.left != null ? p.left : p.right);

    if (replacement != null) {
        // Link replacement to parent
        replacement.parent = p.parent;
        if (p.parent == null)
            root = replacement;
        else if (p == p.parent.left)
            p.parent.left  = replacement;
        else
            p.parent.right = replacement;

        // Null out links so they are OK to use by fixAfterDeletion.
        p.left = p.right = p.parent = null;

        // Fix replacement
        if (p.color == BLACK)
            fixAfterDeletion(replacement);
    } else if (p.parent == null) { // return if we are the only node.
        root = null;
    } else { //  No children. Use self as phantom replacement and unlink.
        if (p.color == BLACK)
            fixAfterDeletion(p);

        if (p.parent != null) {
            if (p == p.parent.left)
                p.parent.left = null;
            else if (p == p.parent.right)
                p.parent.right = null;
            p.parent = null;
        }
    }
}
这里和增加一样需要动态调整,同样有几种不同的情况
情况1:当前节点是红+黑色
解法,直接把当前节点染成黑色,结束。此时红黑树性质全部恢复。
情况2:当前节点是黑+黑且是根节点
解法:什么都不做,结束
情况3:当前节点是黑+黑且兄弟节点为红色(此时父节点和兄弟节点的子节点分为黑)。
解法:把父节点染成红色,把兄弟节点染成黑色,之后重新进入算法(我们只讨论当前节点是其父节点左孩子时的情况)。此变换后原红黑树性质5不变,而把问题转化为兄弟节点为黑色的情况(注:变化前,原本就未违反性质5,只是为了把问题转化为兄弟节点为黑色的情况)。
情况4:当前节点是黑加黑且兄弟是黑色且兄弟节点的两个子节点全为黑色。
解法:把当前节点和兄弟节点中抽取一重黑色追加到父节点上,把父节点当成新的当前节点,重新进入算法。(此变换后性质5不变)
情况5:当前节点颜色是黑+黑,兄弟节点是黑色,兄弟的左子是红色,右子是黑色。。
解法:把兄弟节点染红,兄弟左子节点染黑,之后再在兄弟节点为支点解右旋,之后重新进入算法。此是把当前的情况转化为情况6,而性质5得以保持。
情况6:当前节点颜色是黑-黑色,它的兄弟节点是黑色,但是兄弟节点的右子是红色,兄弟节点左子的颜色任意。
解法:把兄弟节点染成当前节点父节点的颜色,把当前节点父节点染成黑色,兄弟节点右子染成黑色,之后以当前节点的父节点为支点进行左旋,此时算法结束,红黑树所有性质调整正确。
可以对应着看下
private void fixAfterDeletion(Entry x) {
    while (x != root && colorOf(x) == BLACK) {
        if (x == leftOf(parentOf(x))) {
            Entry sib = rightOf(parentOf(x));

            if (colorOf(sib) == RED) {
                setColor(sib, BLACK);
                setColor(parentOf(x), RED);
                rotateLeft(parentOf(x));
                sib = rightOf(parentOf(x));
            }

            if (colorOf(leftOf(sib))  == BLACK &&
                colorOf(rightOf(sib)) == BLACK) {
                setColor(sib, RED);
                x = parentOf(x);
            } else {
                if (colorOf(rightOf(sib)) == BLACK) {
                    setColor(leftOf(sib), BLACK);
                    setColor(sib, RED);
                    rotateRight(sib);
                    sib = rightOf(parentOf(x));
                }
                setColor(sib, colorOf(parentOf(x)));
                setColor(parentOf(x), BLACK);
                setColor(rightOf(sib), BLACK);
                rotateLeft(parentOf(x));
                x = root;
            }
        } else { // symmetric
            Entry sib = leftOf(parentOf(x));

            if (colorOf(sib) == RED) {
                setColor(sib, BLACK);
                setColor(parentOf(x), RED);
                rotateRight(parentOf(x));
                sib = leftOf(parentOf(x));
            }

            if (colorOf(rightOf(sib)) == BLACK &&
                colorOf(leftOf(sib)) == BLACK) {
                setColor(sib, RED);
                x = parentOf(x);
            } else {
                if (colorOf(leftOf(sib)) == BLACK) {
                    setColor(rightOf(sib), BLACK);
                    setColor(sib, RED);
                    rotateLeft(sib);
                    sib = leftOf(parentOf(x));
                }
                setColor(sib, colorOf(parentOf(x)));
                setColor(parentOf(x), BLACK);
                setColor(leftOf(sib), BLACK);
                rotateRight(parentOf(x));
                x = root;
            }
        }
    }

    setColor(x, BLACK);
}
最后挑一个NavigableMap的导航方法看看,分析下如何实现
//获取一个大于Key节点的最小节点
// 若不存在(即TreeMap中所有节点的键都比key小),就返回null
final Entry getCeilingEntry(K key) {
    Entry p = root;
    //从根节点开始遍历
    while (p != null) {
        int cmp = compare(key, p.key);
        //如果比key大,一直往左找
        if (cmp < 0) {
            if (p.left != null)
                p = p.left;
            else
                return p;
        } else if (cmp > 0) {
            //如果比key小,就往右找
            if (p.right != null) {
                p = p.right;
            } else {
                //一直找到一个节点它的父节点比key大,它自己比key小,并且没有右子树
                Entry parent = p.parent;
                Entry ch = p;
                while (parent != null && ch == parent.right) {
                    ch = parent;
                    parent = parent.parent;
                }
                return parent;
            }
        } else
            return p;
    }
    return null;
}

举个例子
TreeMap treeMap = new TreeMap<>();
treeMap.put(15, "15");
treeMap.put(7, "7");
treeMap.put(6, "6");
treeMap.put(9, "9");
treeMap.put(21, "21");
treeMap.put(17, "28");
treeMap.put(24, "24");
treeMap.put(30, "30");
System.out.print("key :  " + treeMap.ceilingEntry(20).getKey());
结果就是21
小结
主要几个Map实现方式:HashMap,LinkedHashMap和Tree都进行了分析,对应的HashSet和TreeSet大家再回顾下Set章节里的内容一定会有一个更深的了解。还有一个很经典的ConcurrentHashMap等有时间再单独开一章节讲下,只要能把ConcurrentHashMap研究透了,你的多线程处理功夫就到家了,