appium+python PageObject 模式实现(一)
前言:
一。接触过selenium的同学一定对PO模式不陌生,何为PO模式呢,PageObject,字面理解即可知道是页面对象的意思。
意思就是将页面元素的定位和页面元素的操作行为封装成一个page类,而测试用例中只包含业务逻辑代码!
page类构成:
类的属性:各个元素的定位
类的方法:各个元素的操作方法
case中的测试用例:
用例中就是调用所需页面类中的方法根据业务逻辑组成测试用例
二。优点
1.当某页面元素发生变化,只需要修改页面中的元素的定位,不需修改测试用例
2.提高代码重用性,结构更加清晰
3.测试用例发生变化,只需修改少数页面对象
PO的核心要素:
在PO模式中抽象封装成一个BasePage类,该基类应该拥有一个只实现webdriver实例的属性。
每个一个page都继承BasePage,通过driver来管理本page中元素,将page中的操作封装成一个个的方法。
TestCase继承unittest.Testcase类,并且依赖page类,从而实现相应的测试步骤
好了,概念说清楚了,那我们就准备实现吧,这次要在appium中实现!
这次就用我们公司软件做个案例,主要做一个简单的登录测试用例,由于登录按钮在“我的”页面,所以要用到两个page类(“我的”page类和“登录”page类)
1.首先我们来看basepage
BasePage
封装所有页面的公共方法。
例如:在__init__中定义Driver
重写find_element方法(使用显示等待+异常判断(是否找到目标元素))
重写send_keys,封装一个判断安卓toast的方法供调用
代码如下:
#coding:utf-8
from selenium.webdriver.support.wait import WebDriverWait
from appium import webdriver
from selenium.webdriver.common.by import By
from selenium.webdriver.support import expected_conditions as EC

class BasePage(object):
    def __init__(self, driver):
        self.driver = driver

    # 重写元素定位
    def find_element(self,*loc): # *loc任意数量的位置参数(带单个星号参数)
        try:
            WebDriverWait(self.driver, 10, 0.5).until(EC.visibility_of_element_located(loc))
            return self.driver.find_element(*loc)
        except:
            print('页面未找到%s元素' % (loc))

    def find_elements(self,*loc):
        try:
            WebDriverWait(self.driver,10,0.5).until(EC.visibility_of_element_located(loc))
            return self.driver.find_elements(*loc)
        except:
            print('页面未找到%s元素' % (loc))

    # 重写send_keys
    def send_keys(self, loc, vaule, clear_first=True, click_first=True):
        try:
            loc = getattr(self, "_%s" % loc)  # getattr相当于实现self.loc
            if click_first:
                self.find_element(*loc).click()
            if clear_first:
                self.find_element(*loc).clear()
                self.find_element(*loc).send_keys(vaule)
        except AttributeError:
            print("%s 页面中未能找到 %s 元素" % (self, loc))

    # 封装判断是否存在toast消息,存在返回True,不存在返回False
    def is_toast_exist(self, driver, text):
        '''is toast exist, return True or False
        :Agrs:
         - driver - 传driver
         - text   - 页面上看到的文本内容
         - timeout - 最大超时时间,默认30s
         - poll_frequency  - 间隔查询时间,默认0.5s查询一次
        :Usage:
         is_toast_exist(driver, "看到的内容")
        '''
        try:
            toast_loc = (By.XPATH, ".//*[contains(@text,'%s')]" % text)
            WebDriverWait(self.driver, 20, 0.01).until(EC.presence_of_element_located(toast_loc))
            return True
        except Exception as e:
            print(e)
            return False
如代码,其实appium和selenium有很多共通的地方,两者就想一堆双胞胎兄弟一样!
2.第二步就是编写软件中每个页面的page类,每个页面的page类都继承BasePage类。一个页面一个类,类属性就是元素定位,类方法就是元素操作!
下面的代码就是我司软件中的“我的”页面,“我的”page类如下
class MyPage(BasePage):
    u'我的页面'
    # 定位器,需要用到的元素
    # 我的按钮
    my_button = (By.XPATH, "//*[@resource-id='com.mld.LanTin:id/ly_main_home_tab04']")
    # 登录按钮
    login_button = (By.XPATH,'//*[@text="登录"]')
    # 用户名
    real_name = (By.ID, "com.mld.LanTin:id/tv_real_name")
    # 渟说
    feed = (By.ID, "com.mld.LanTin:id/tv_publish")
    # 关注
    follow = (By.ID, "com.mld.LanTin:id/tv_attention")
    # 粉丝
    fans = (By.ID, "com.mld.LanTin:id/tv_fans")
    # 我的收藏
    collect = (By.ID, "com.mld.LanTin:id/ic_me_favorite")
    # 意见反馈
    feedback = (By.ID, "com.mld.LanTin:id/rl_feedback")
    # 设置
    set_button = (By.ID, "com.mld.LanTin:id/rl_setting")

    # 点击我的
    def click_my_button(self):
        self.find_element(*self.my_button).click()
    # 获取用户名text
    def get_username(self):
        return self.find_element(self.real_name).text
    # 点击设置
    def login_out(self):
        self.find_element(*self.set_button).click()
    # 点击登录按钮
    def click_login_button(self):
        self.find_element(*self.login_button).click()
        time.sleep(3)
注:使用By来做定位器,然后把定位器传给find_element方法
下面是从我的中进去,点击登录,进入登录页面,如下为“登录”page类
class LoginPage(BasePage):
    u'登录页面'
    # 定位器,需要用到的元素

    # 进入登录页
    login_button = (By.ID, "")
    # 用户名
    username_loc = (By.ID,"com.mld.LanTin:id/et_telephone")
    # 密码
    password_loc = (By.ID,"com.mld.LanTin:id/et_checkcode")
    # 同意
    agree_loc = (By.ID,"com.mld.LanTin:id/cb_UserAgreement")
    # 登录
    submit_loc = (By.ID,"com.mld.LanTin:id/btn_tel_login")
    # 微信
    wechat = (By.ID,"com.mld.LanTin:id/btn_wx_login")
    # 成功后用户名
    real_name = (By.XPATH,"//*[@resource-id='com.mld.LanTin:id/tv_real_name']")


    '''
    以下所有发find_element方法均为继承父类使用父类的
    '''
    # 操作用户名输入框
    def input_usernam(self,user):
        return self.find_element(*self.username_loc).send_keys(user)

    # 操作验证码输入框
    def input_pass(self,psw):
        return self.find_element(*self.password_loc).send_keys(psw)

    # 点击登录
    def tap_login(self):
        return self.find_element(*self.submit_loc).click()

    # 微信登录
    def wechat_login(self):
        return self.find_element(*self.wechat).click()

    # 登录后用户名
    def show_name(self):
        return self.find_element(*self.real_name).text
如图所示,两个page类中的结构还是很清晰的对吧!接下来就是真正的测试用例了,测试用例只需要将你需要的page类导入,然后实例化page类,就可以调用其中的操作方法,然后根据你的业务逻辑来操作就行了!
测试用例主要就是结合unittest框架,跟之前的接口框架类似!
上测试用例代码:
from appium import webdriver
import time
import unittest
from pages.login_page import LoginPage
from pages.my_page import MyPage
from pages.set_page import SetPage
from common.My_swipe import swipe_up
from selenium.webdriver.support.wait import WebDriverWait
from selenium.webdriver.support import expected_conditions as EC


class Test_lgin(unittest.TestCase):

    @classmethod
    def setUpClass(cls):
        desired_caps = {
            'platformName': 'android',
            'deviceName': '740dc3d1',
            'platformVersion': '8.0.0',
            'appPackage': 'com.mld.LanTin',
            'appActivity': 'com.mld.LanTin.main.activity.SplashActivity',
            'unicodeKeyboard': True,
            'resetKeyboard': True,
            'noReset': True
        }
        # 配置
        cls.driver = webdriver.Remote(r'http://127.0.0.1:4723/wd/hub', desired_caps)
        time.sleep(5)
        # 实例化
        # 每子页面的page类都继承了basepage父类,而basepage父类需要传入driver来初始化,所以子类也需传driver来实例化
        cls.login_page = LoginPage(cls.driver)
        cls.my_page = MyPage(cls.driver)
        cls.set_page = SetPage(cls.driver)

    def test_login01(self):
        u'微信登录成功'
        self.my_page.click_my()
        self.my_page.click_login_button()
        self.login_page.wechat_login()
        time.sleep(11)
        # 获取当前context
        cont = self.driver.current_context
        print(cont)
        # 切换至当前context
        self.driver.switch_to.context(cont)
        print(self.driver.current_context)
        time.sleep(1)
        # 登录后返回我的页面,验证用户名
        t = self.login_page.show_name()
        print(t)
        # 断言是否登录成功
        self.assertEqual('我是一朵花', t)

    def test_login02(self):
        # 向上滑动
        swipe_up(self.driver)
        # 退出登录
        self.set_page.logout()
        # 检查是否退出成功
        t2 = self.driver.current_context
        self.driver.switch_to.context(t2)
        time.sleep(2)
        # 当前页面若有登录按钮则推出成功
        try:
            WebDriverWait(self.driver,10,0.5).until(EC.visibility_of_element_located(self.login_page.submit_loc))
            print('退出登录成功')
            return True
        except Exception as e:
            raise

    @classmethod
    def tearDownClass(cls):
        cls.driver.quit()

if __name__=='__main__':
    unittest.main()
如上图所示,测试用例中只需要调用方法来执行你想要的步骤就可以了,然后执行完毕后还需要进行验证,就是断言是否符合预期!
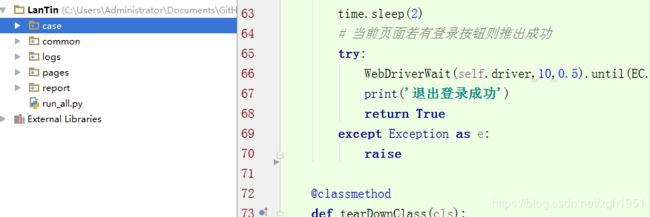
哦哦,对了,这里附上框架结构图吧,以防有小白不知道结构
解释:case中存放测试用例
common中存放依赖的公共模块
logs就是记录日志的模块(暂时还未添加,晚点搞下)
report存放测试报告(html格式报告,后面搞)
run_all.py 就是执行所有测试用例,也是这个框架的入口!
好了,到这里应该差不多块结束了,后续还有续集,有兴趣的小伙伴可以加我qq 970185127 一起讨论一起成长!
最后,最后,最后,我想说,在公司没有人一起讨论,一起学习的话一个人真的很痛苦,很孤独,会踩很多坑阿!!!!!
