【140】Centos7 安装consul 1.6.2(单个节点)
解压consul压缩包,把consul 文件上传到centos服务器的 /root/consul 目录下。
执行如下命令修改 /root/.bashrc 文件:
vi /root/.bashrc
按 i 编辑文件,在最后一行加入如下代码:
export PATH=/root/consul:$PATH
然后先Esc键,接着输入:wq保存文件并推出vi。
退出 vi 以后,在命令行里面再次输入一遍 /root/.bashrc文件里面刚才我们放到最后一行的内容: export PATH=/root/consul:$PATH
在命令行里面输入 consul ,出现如下内容说明安装成功。
[root@iZm5e5w8irul9hn3uva51gZ ~]# consul
Usage: consul [--version] [--help] <command> [<args>]

Available commands are:
    acl            Interact with Consul's ACLs
    agent          Runs a Consul agent
    catalog        Interact with the catalog
    config         Interact with Consul's Centralized Configurations
    connect        Interact with Consul Connect
    debug          Records a debugging archive for operators
    event          Fire a new event
    exec           Executes a command on Consul nodes
    force-leave    Forces a member of the cluster to enter the "left" state
    info           Provides debugging information for operators.
    intention      Interact with Connect service intentions
    join           Tell Consul agent to join cluster
    keygen         Generates a new encryption key
    keyring        Manages gossip layer encryption keys
    kv             Interact with the key-value store
    leave          Gracefully leaves the Consul cluster and shuts down
    lock           Execute a command holding a lock
    login          Login to Consul using an auth method
    logout         Destroy a Consul token created with login
    maint          Controls node or service maintenance mode
    members        Lists the members of a Consul cluster
    monitor        Stream logs from a Consul agent
    operator       Provides cluster-level tools for Consul operators
    reload         Triggers the agent to reload configuration files
    rtt            Estimates network round trip time between nodes
    services       Interact with services
    snapshot       Saves, restores and inspects snapshots of Consul server state
    tls            Builtin helpers for creating CAs and certificates
    validate       Validate config files/directories
    version        Prints the Consul version
    watch          Watch for changes in Consul
创建/root/consul/data_dir目录。创建 /root/consul/consul.d 目录,里面创建web.json 文件。
现在web.json 是配置文件。内容如下:
{
    "data_dir": "/root/consul/data_dir",
    "services":[
        {
            "name": "demo_web_1_0_6",
            "tags": ["1.0.6"],
            "port": 8016,
            "check": {
                "id": "api4",
                "name": "HTTP API on port 8013",
                "http": "http://172.31.130.126:8013",
                "tls_skip_verify": false,
                "method": "GET",
                "header": {"x-foo":["bar", "baz"]},
                "interval": "10s",
                "timeout": "3s"
            }
        },
        {
            "name": "demo_web_1_0_7",
            "tags": ["1.0.7"],
            "port": 8016,
            "check": {
                "id": "api5",
                "name": "HTTP API on port 8016",
                "http": "http://172.31.130.126:8016",
                "tls_skip_verify": false,
                "method": "GET",
                "header": {"x-foo":["bar", "baz"]},
                "interval": "10s",
                "timeout": "3s"
            }
        },
        {
            "name": "demo_web_1_0_8",
            "tags": ["1.0.8"],
            "port": 8017,
            "check": {
                "id": "api_demo_web_1_0_8",
                "name": "HTTP API on port 8017",
                "http": "http://172.31.130.126:8017",
                "tls_skip_verify": false,
                "method": "GET",
                "header": {"x-foo":["bar", "baz"]},
                "interval": "10s",
                "timeout": "3s"
            }
        },
        {
            "name": "demo_web_gateway",
            "tags": ["gateway"],
            "port": 8090,
            "check": {
                "id": "api6",
                "name": "HTTP API on port 8090",
                "http": "http://172.31.130.126:8090/centGateway/health",
                "tls_skip_verify": false,
                "method": "GET",
                "header": {"x-foo":["bar", "baz"]},
                "interval": "10s",
                "timeout": "3s"
            }
        }
    ]
}
先解释一下配置项,data_dir 是consul存放数据的目录,这里设置成 /root/consul/data_dir
services数组是要进行健康检查的服务。这里用http地址进行检查,interval 表示检查的间隔,这里规定10s检查一次。timeout 是请求多长时间没响应算作失败,这里是3秒不响应算失败。id必须不一样。port指定请求的端口。
启动
nohup consul agent -dev -enable-local-script-checks -config-dir=/root/consul/consul.d -client 0.0.0.0 > /data0/out/consul.out &
停止
consul leave
重新加载配置
consul reload
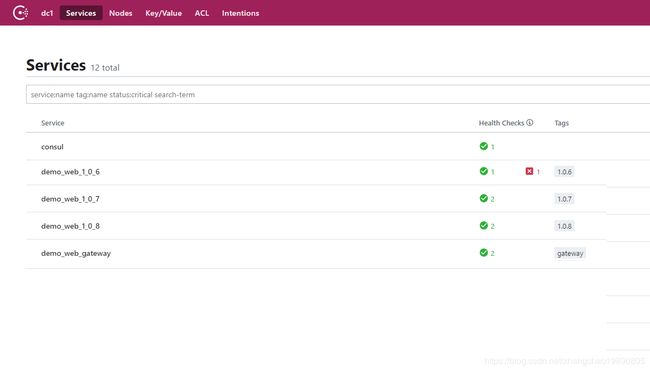
当consul启动后,假设服务器地址是 192.168.1.16,浏览器输入 http://192.168.1.16:8500

这里可以看到所有的服务。带红色叉号表示服务不正常,比如服务停止运行。有些读者可能会觉得奇怪,为什么 Health Checks 等于 2 ? 这里有两个健康检查,一个是我在web.json 配置文件中配置的服务;另一个是consul 自己节点的健康检查。因为 consul 可以搭建集群,所以 consul 会检查自己的节点是否正常。我们在本文中只用了一个consul节点,因此必然会有一个额外的健康检查。