1.在控制器下导入"AppDelegate.h"头文件
2.因为需要多次使用到AppDelegate中的数据上下文,为了避免每次都通过这种方式去获取:
((AppDelegate *)[UIApplication sharedApplication].delegate).managedObjectModel
所以直接声明一个全局成员变量,并通过懒加载方式获取
@property (nonatomic,strong) AppDelegate *appDelegate;


- (AppDelegate *)appDelegate{
    if (_appDelegate == nil) {

        _appDelegate = [UIApplication sharedApplication].delegate;
    }
    return _appDelegate;
}
在xcdatamodeld文件中,创建实体,添加字段:
3.接下来封装一个方法,用来演示插入数据:
// 插入数据
- (void)insertData{

    // 设置实体   entityForName(相当于表名)
    NSEntityDescription *entityDescription = [NSEntityDescription entityForName:@"Person" inManagedObjectContext:self.appDelegate.managedObjectContext];

    // 创建并且插入的数据   对应数据库中的一条记录  基类NSManagerObject
    NSManagedObject *person = [[NSManagedObject alloc]initWithEntity:entityDescription insertIntoManagedObjectContext:self.appDelegate.managedObjectContext];

    // 插入数据  如果需要插入的数据上下文对象还不确定,上面设置实体,插入数据时,上下文可以传nil,再通过下面的方法分开使用
    // self.appDelegate.managedObjectContext insertObject:<#(nonnull NSManagedObject *)#>

    // 设置数据
    [person setValue:@"laowang" forKey:@"name"];
    [person setValue:@18 forKey:@"age"];
    [person setValue:@178.5 forKey:@"height"];

    // 保存上下文 保存后才会和数据库进行同步
    [self.appDelegate saveContext];

}
4.在ViewDidLoad中调用插入数据方法后,通过导入CoreData类库默认提供的获取沙盒方法,打印出沙盒路径,查看沙盒路径
第一个就是我们生成的CoreData数据库文件
后面两个文件是用来做数据回滚的
这样插入数据就完成了
上面的示例代码中,在设置数据时,使用的是KVC的方式,但在现实开发中,数据库表的字段可能会很多,即便字段不是很多,这样设置起来也比较麻烦
我们可以通过Xcode给NSManagedObject自动生成一个子类,直接以属性的方式来使用,自动生成子类方式来实现,具体步骤:
1> 创建并且插入数据对象 对应数据库中的一条记录 基类NSManagedObject
2> Xcode-Editor设置NSManagedObject的子类
3> 通过点语法直接设置数据
4> 保存上下文 保存后才会和数据库进行同步
首先,通过Xcode自动帮我们生成数据模型的子类
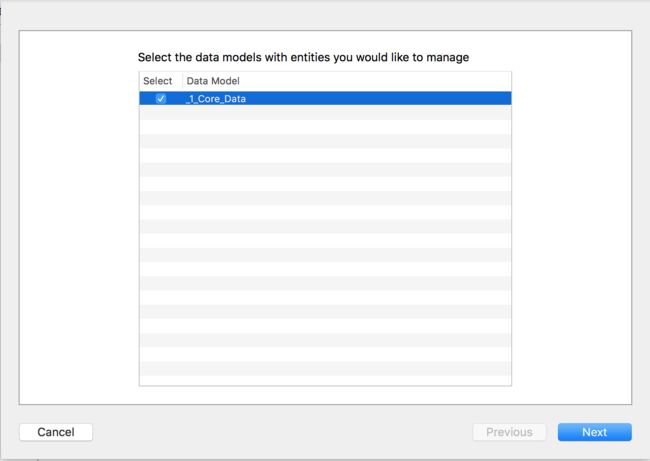
点击"Create NSManagedObject Subclass"后,选择数据模型
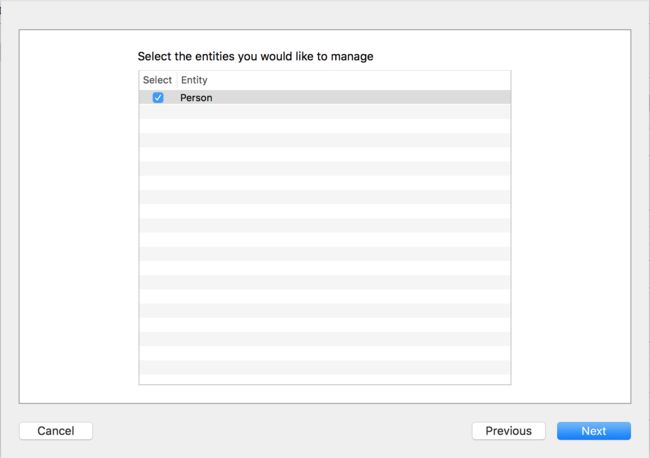
接下来选择实体
最后选择路径.
自动生成的子类Person.h文件
#import
#import

NS_ASSUME_NONNULL_BEGIN

@interface Person : NSManagedObject

// Insert code here to declare functionality of your managed object subclass

@end

NS_ASSUME_NONNULL_END

#import "Person+CoreDataProperties.h"
XCode帮我们生成的子类中,并没有提供成员变量,而是以分类的形式提供
因为分类中添加属性只是声明setter和getter方法,并不会生成带下划线的成员变量,这里只是通过@dynamic告诉编译器,属性会在运行时实现setter和getter方法,CoreData会在运行时将数据对象的属性生成setter和getter方法
(并不一定会生成成员变量,只是可以在外界调用属性,只是编译器不再提示警报)
#import "Person+CoreDataProperties.h"

@implementation Person (CoreDataProperties)

@dynamic age;
@dynamic height;
@dynamic name;

@end
这里是CoreData通过@dynamic的方式运行时合成了setter和getter方法,并不代表自己可以这样的方式来实现
因为Person中已经导入了分类,所以在控制器下使用时,只需要再倒入Person类的头文件即可
示例代码:
// 通过数据模型子类
- (void)insertDataWithSubclass{

    // 设置实体 entityForName (相当于表名)
    NSEntityDescription *entityDescription = [NSEntityDescription entityForName:@"Person" inManagedObjectContext:self.appDelegate.managedObjectContext];
    // 创建并且插入的数据
    Person *person = [[Person alloc] initWithEntity:entityDescription insertIntoManagedObjectContext:self.appDelegate.managedObjectContext];

    // 设置数据
    person.name = @"laozhang";
    person.age = @30;
    person.height = @158.2;

    // 保存上下文
    [self.appDelegate saveContext];

}
这样在设置数据时,就通过点语法直接进行赋值实现了
完整示例代码:
#import "ViewController.h"
#import "AppDelegate.h"
#import "Person.h"

@interface ViewController ()

@property (nonatomic,strong) AppDelegate *appDelegate;

@end

@implementation ViewController

- (void)viewDidLoad {
    [super viewDidLoad];

//    [self insertData];
    [self insertDataWithSubclass];

    // 打印沙盒路径
    NSLog(@"%@",[self.appDelegate applicationDocumentsDirectory]);

}

// 插入数据
- (void)insertData{

    // 设置实体   entityForName(相当于表名)
    NSEntityDescription *entityDescription = [NSEntityDescription entityForName:@"Person" inManagedObjectContext:self.appDelegate.managedObjectContext];

    // 创建并且插入的数据   对应数据库中的一条记录  基类NSManagerObject
    NSManagedObject *person = [[NSManagedObject alloc]initWithEntity:entityDescription insertIntoManagedObjectContext:self.appDelegate.managedObjectContext];

    // 插入数据  如果需要插入的数据上下文对象还不确定,上面设置实体,插入数据时,上下文可以传nil,再通过下面的方法分开使用
    // self.appDelegate.managedObjectContext insertObject:<#(nonnull NSManagedObject *)#>

    // 设置数据
    [person setValue:@"laowang" forKey:@"name"];
    [person setValue:@18 forKey:@"age"];
    [person setValue:@178.5 forKey:@"height"];

    // 如果字段比较多,通过KVC的方式来设置数据显然是不方便的
    // 直接

    // 保存上下文 保存后才会和数据库进行同步
    [self.appDelegate saveContext];

}

// 通过数据模型子类
- (void)insertDataWithSubclass{

    // 设置实体 entityForName (相当于表名)
    NSEntityDescription *entityDescription = [NSEntityDescription entityForName:@"Person" inManagedObjectContext:self.appDelegate.managedObjectContext];
    // 创建并且插入的数据
    Person *person = [[Person alloc] initWithEntity:entityDescription insertIntoManagedObjectContext:self.appDelegate.managedObjectContext];

    // 设置数据
    person.name = @"laozhang";
    person.age = @30;
    person.height = @158.2;

    // 保存上下文
    [self.appDelegate saveContext];

}

- (AppDelegate *)appDelegate{

    //    ((AppDelegate *)[UIApplication sharedApplication].delegate).managedObjectModel
    if (_appDelegate == nil) {

        _appDelegate = [UIApplication sharedApplication].delegate;
    }
    return _appDelegate;
}

@end


