SpringBoot2.x整合RabbitMQ
在之前的博客中https://blog.csdn.net/zhoujian_Liu/article/details/95197408,讲解了一下RabbitMQ的核心概念及如何使用web页面手动创建队列、交换器及绑定规则,在本文中将介绍SpringBoot与RabbitMQ的整合方法,使用Java代码的方式创建交换器、队列及绑定关系,并使用自定义配置替代RabbitMQ中默认JDK序列化方式,将结果转为JSON 保存在队列中。
1、环境搭建:创建一个SpringBoot项目
1.1、pom.xml
    4.0.0

        org.springframework.boot
        spring-boot-starter-parent
        2.1.2.RELEASE


    com.lzj
    springboot-rabbitmq
    0.0.1-SNAPSHOT
    springboot-rabbitmq
    Demo project for Spring Boot


        1.8


            org.springframework.boot
            spring-boot-starter-amqp


            org.springframework.boot
            spring-boot-starter-web


            org.projectlombok
            lombok
            true


            org.springframework.boot
            spring-boot-starter-test
            test


                org.springframework.boot
                spring-boot-maven-plugin
1.2、application.properties
spring.rabbitmq.host=127.0.0.1
spring.rabbitmq.username=guest
spring.rabbitmq.password=guest
spring.rabbitmq.port=5672
1.3 启动类
@EnableRabbit //开启rabbitmq注解
@SpringBootApplication
public class SpringbootRabbitmqApplication {
    public static void main(String[] args) {
        SpringApplication.run(SpringbootRabbitmqApplication.class, args);
    }
}
使用@EnableRabbit注解开启SpringBoot对RabblitMQ的注解支持。
至此基本环境搭建完毕,启动程序,可以看到已连接到RabbitMQ.
2、编写单元测试
由于RabbitMQ的自动配置RabbitAutoConfiguration给我们创建了配置连接工厂、RabbitTemplate、AmqpAdmin等,我们可以直接在代码中注入RabbitTemplate向RabbitMQ中发送或接受消息,也可以注入AmqpAdmin用以创建交换器、队列及绑定规则。
2.1 使用AmqpAdmin 创建队列、交换器、绑定规则
代码如下:
    @Test
    public void createExchangeAndQueue() {
        //构建exchange,这里简单的使用一个参数的构造器:参数为:交换器名称;还有其他的构造器可以设置持久化及自动删除等。
        amqpAdmin.declareExchange(new DirectExchange("test.direct"));

        //构建queue,第一个参数为队列名,第二个参数为是否持久化
        amqpAdmin.declareQueue(new Queue("test.queue", true));

        //构建绑定规则:第一个参数为绑定队列名、第二个参数为绑定类型、第三个参数为绑定交换器名、第四个参数为路由键、第五个参数:参数列表
        amqpAdmin.declareBinding(new Binding("test.queue",
        Binding.DestinationType.QUEUE,"test.direct" , "test.lzj", null));
    }
此外,共有如下五种类型的交换器,可以根据自己的需求选择:
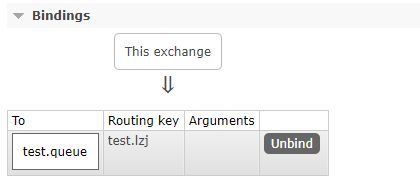
运行测试代码:可以看到已经创建了一个名为test.queue的队列和test.direct的交换器,并且绑定了test.lzj为路由键。
2.2 单播,点对点模式
   /**
     * 单播-点对点
     */
    @Test
    public void sendMsgToOne() {
        //参数依次为:exchange名称、routingKey、消息
        Map maps = new HashMap<>();
        maps.put("message", "正常");
        maps.put("status", 200);
        maps.put("data", Arrays.asList("张三", "李四"));
        rabbitTemplate.convertAndSend("test.direct", "test.lzj",  maps);
    }


    //从queue中取出数据
    @Test
    public void receive() {
        Object o = rabbitTemplate.receiveAndConvert("test.queue");
        System.out.println(o.getClass());
        System.out.println(o);
    }
在代码中把消息交给了test.direct交换器,并设置的路由键是test-lzj,于是交换器会拿着test-lzj路由键进行全局匹配,会将这个消息转发到与之绑定的test-queue中。
运行代码:可以看到test.queue已经有了一条消息。
运行从queue中取数据的代码:可以看到从队列中成功获取了数据。
但是通过web界面查看里面的消息,发现都读不懂,这是因为默认序列化机制采用了SimpleMessageConverter,而SimpleMessageConverter底层还是用了JDK的序列化机制。
源码:
content = SerializationUtils.deserialize(this.createObjectInputStream(new ByteArrayInputStream(message.getBody()), this.codebaseUrl));
为了是开发者方便阅读消息内容,可以自己配置MessageConverter。(注意若要发送自定义对象必须配置MessageConverter,因为默认的SimpleMessageConverter只支持string、byte[]和序列化后的数据,若没有配置报错:java.lang.IllegalArgumentException: SimpleMessageConverter only supports String, byte[] and Serializable payloads)
@Configuration
public class AMQPConfig {

    //配置messageConverter,在RabbitMQ中以JSON格式存储数据,不配置默认使用Java的序列化机制
    @Bean
    public MessageConverter messageConverter() {
        return new Jackson2JsonMessageConverter();
    }
}
此外为了测试,编写有个user对象,代码如下:
@Data
@NoArgsConstructor
@AllArgsConstructor
public class User {

    private String name;
    private Integer age;
}
测试代码如下:
    @Test
    public void sendMsgToOne() {
       rabbitTemplate.convertAndSend("test.direct", "test.lzj", new User("张三", 18));
    }

    @Test
    public void receive() {
        User user = (User) rabbitTemplate.receiveAndConvert("test-queue");
        System.out.println(user);
    }
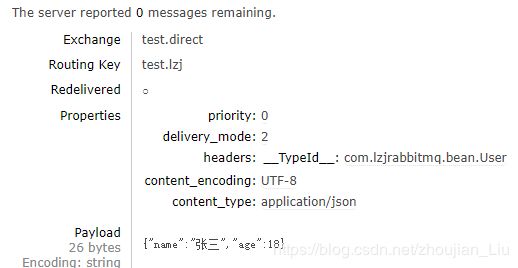
通过web查看结果如下:数据以JSON串进行存储。
接收数据测试代码运行结果:
![]()
2.3 广播
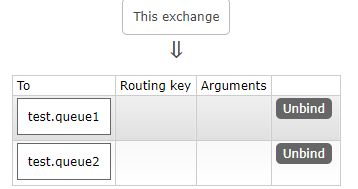
创建fanout交换器、两个队列及绑定规则
   @Test
    public void createExchangeAndQueue() {
        //2、构建广播类型 exchange
        amqpAdmin.declareExchange(new FanoutExchange("test.fanout"));
        amqpAdmin.declareQueue(new Queue("test.queue1"));
        amqpAdmin.declareQueue(new Queue("test.queue2"));
        amqpAdmin.declareBinding(new Binding("test.queue1", Binding.DestinationType.QUEUE, "test.fanout", "", null));
        amqpAdmin.declareBinding(new Binding("test.queue2", Binding.DestinationType.QUEUE, "test.fanout", "", null));
    }
结果如下:
测试代码:
    @Test
    public void sendMsgToAll() {
        rabbitTemplate.convertAndSend("test.fanout", "",  new User("张三", 18));
    }
运行后的结果:
3、监听方式接收队列中的数据
@Service
public class UserService {

    @RabbitListener(queues = "test.queue")
    public void receive(User user) {
        System.out.println(user);
    }

    @RabbitListener(queues = "test.queue")
    public void receiveMessage(Message message) {
        System.out.println("receiveMessage:" + message.getBody());
        System.out.println("receiveMessage:" + message.getMessageProperties());
    }
}
使用@RabblitListener(监听队列名称)。方法的参数可以为User类型,也可以为Message类型,Message类型可以获取到数据头部信息。注意要在启动类型添加@EnableRabbit,@RabbitListener才能生效!
Github代码


