Android Studio使用AIDL 实现进程间通信实例
参考:博客:http://www.cnblogs.com/BeyondAnyTime/p/3204119.html,
http://www.cnblogs.com/linlf03/p/3192025.html
视频教程:http://www.imooc.com/learn/606
这也算做是我学习笔记吧,以后可以拿回来看看。
关于IPC应该不用多介绍了,Android系统中的进程之间不能共享内存,那么如果两个不同的应用程序之间需要通讯怎么办呢?比如公司的一个项目要更新,产品的需求是依附于当前项目开发一个插件,但是呢这个插件功能以及界面比较复杂,不能和当前项目在一个进程中,同时呢,还要用到当前项目中已经写好了的一些东西,那么因为新开发的依附于当前项目的插件和当前项目不是一个进程,因此不能共享内存,就出现了问题,于是,需要提供一些机制在不同进程之间进行数据通信,这个机制就是AIDL了。
这篇博客的内容包括:
1. 完成一个简单的小例子:软件A(aidlclient) 需要调用 软件 B(aidlsever)中的一个算法(以加法为例);
2. Aidl支持的数据类型,实现传递自定义的数据类型。
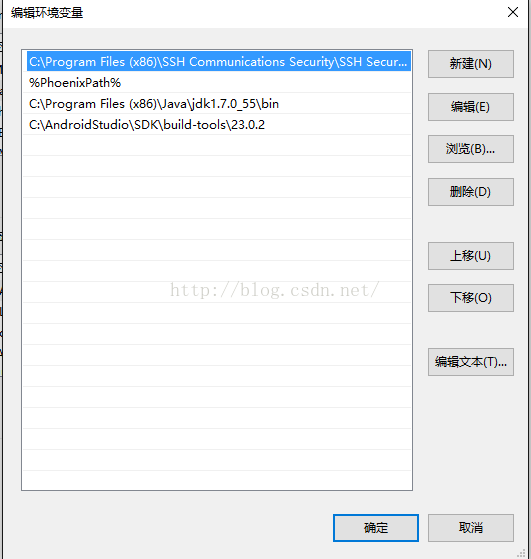
前提:将Aidl的编译工具的路径添加到PATH,(在sdk目录下 ***\SDK\build-tools\23.0.2)
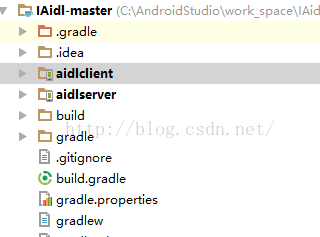
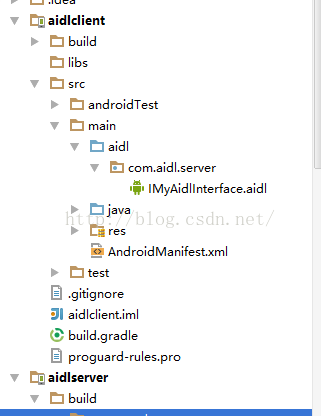
1.完成简单的小例子:在Android Studio 的project中创建两个Module,一个取名为aidlsever,另一个aidlclient, 目录结构如下:
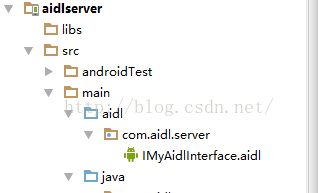
首先来完成aidlserver,新建aidl文件
添加函数后编译,编译快捷按钮:
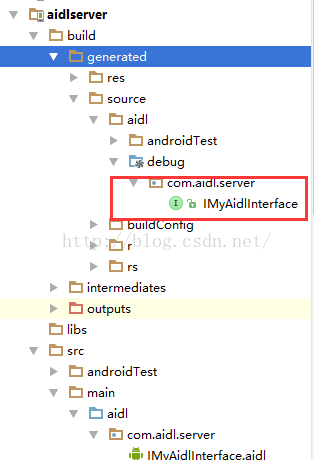
编译完成你会发现在build目录里面生成了新的文件:
新建service类,提供add方法的实现
public class IRemoteService extends Service {
    @Override
    public IBinder onBind(Intent intent) {
        return mBinder;
    }

    private IBinder mBinder = new IMyAidlInterface.Stub() {
        @Override
        public int add(int num1, int num2) throws RemoteException {
            return num1 + num2;
        }
    };
}
OK, aidlserver完成,首先运行在模拟器里面:
接下来完成aidlclient:
将aidlserver里面的src目录下的 aidl拷贝粘贴到 aidlclient的src下,如图:
然后进行编译,上面提供过编译的快捷键方式;
因为 aidlclient需要远程调用aidlserver里面的add方法,需要先远程绑定service,然后才能执行,下面来实现下,代码不多,很简单。
界面布局:
<LinearLayout xmlns:android="http://schemas.android.com/apk/res/android"
    xmlns:tools="http://schemas.android.com/tools"
    android:layout_width="match_parent"
    android:layout_height="match_parent"
    android:orientation="vertical"
    android:paddingBottom="@dimen/activity_vertical_margin"
    android:paddingLeft="@dimen/activity_horizontal_margin"
    android:paddingRight="@dimen/activity_horizontal_margin"
    android:paddingTop="@dimen/activity_vertical_margin"
    tools:context="com.aidl.client.MainActivity">

    <EditText
        android:id="@+id/num1"
        android:layout_width="match_parent"
        android:layout_height="wrap_content" />

    <TextView
        android:layout_width="wrap_content"
        android:layout_height="wrap_content"
        android:text="+" />

    <EditText
        android:id="@+id/num2"
        android:layout_width="match_parent"
        android:layout_height="wrap_content" />

    <TextView
        android:layout_width="wrap_content"
        android:layout_height="wrap_content"
        android:text="=" />

    <TextView
        android:id="@+id/result"
        android:layout_width="wrap_content"
        android:layout_height="wrap_content" />

    <Button
        android:id="@+id/measure"
        android:layout_width="match_parent"
        android:layout_height="wrap_content"
        android:text="AIDL 远 程计 算" />

    <TextView
        android:id="@+id/text"
        android:layout_width="match_parent"
        android:layout_height="wrap_content" />
LinearLayout>
activity代码:
public class MainActivity extends AppCompatActivity implements View.OnClickListener {
    private EditText num1,num2;
    private TextView result,text;
    private Button measure;
    private IMyAidlInterface iMyAidl;
    private ServiceConnection conn = new ServiceConnection() {
        @Override
        public void onServiceConnected(ComponentName name, IBinder service) {
            iMyAidl = IMyAidlInterface.Stub.asInterface(service);
            Log.i("TAG", "bind service successful");
        }
        @Override
        public void onServiceDisconnected(ComponentName name) {
            iMyAidl = null;
        }
    };
    @Override
    protected void onCreate(Bundle savedInstanceState) {
        super.onCreate(savedInstanceState);
        setContentView(R.layout.activity_main);

        num1 = (EditText) findViewById(R.id.num1);
        num2 = (EditText) findViewById(R.id.num2);
        measure = (Button) findViewById(R.id.measure);
        result = (TextView) findViewById(R.id.result);
        text = (TextView) findViewById(R.id.text);
        measure.setOnClickListener(this);
        bindService();
    }


    @Override
    public void onClick(View v) {
        try {
            int i = iMyAidl.add(Integer.parseInt(num1.getText().toString()),Integer.parseInt(num2.getText().toString()));
            result.setText("" + i);
        } catch (RemoteException e) {
            e.printStackTrace();
        }
    }

    private void bindService() {
        Intent intent = new Intent();
        intent.setComponent(new ComponentName("com.aidl.server","com.aidl.server.IRemoteService"));
        bindService(intent,conn, Context.BIND_AUTO_CREATE);
    }

    @Override
    protected void onDestroy() {
        super.onDestroy();
        unbindService(conn);
    }
}
好了,已经完成了aidlclient的代码,运行:
看,成功了吧。
2.好吧,第一个内容已经搞定了,接下来搞定第二个:传递自定义的参数类型
aidl支持的基本数据类型:int,long,boolean, String, float, double, 和支持byte, List, Map,Parcelable
这个我相信大家都会使用,下面我们进入自定义类型的研究:自定义一个Student类,但是要实现Parcelable
还是在aidlserver 项目中新建:
package com.aidl.server;

import android.os.Parcel;
import android.os.Parcelable;

/**
 * Created by Jimmy on 2016/2/26.
 */
public class Student implements Parcelable{
    private String name;
    private int age;
    private long number;

    public Student(String name, int age, long number) {
        this.name = name;
        this.age = age;
        this.number = number;
    }

    public Student(Parcel source) {//注意:这里的name  age  number 的读取顺序和下面writeToParcel()方法里面的顺序要一致,否则出错
        this.name = source.readString();
        this.age = source.readInt();
        this.number = source.readLong();
    }

    public String getName() {
        return name;
    }

    public void setName(String name) {
        this.name = name;
    }

    public int getAge() {
        return age;
    }

    public void setAge(int age) {
        this.age = age;
    }

    public long getNumber() {
        return number;
    }

    public void setNumber(int number) {
        this.number = number;
    }

    @Override
    public String toString() {
        return "Student{" +
                "name='" + name + '\'' +
                ", age=" + age +
                ", number=" + number +
                '}';
    }

    @Override
    public int describeContents() {
        return 0;
    }

    @Override
    public void writeToParcel(Parcel dest, int flags) {
        dest.writeString(name);
        dest.writeInt(age);
        dest.writeLong(number);
    }

    public static final Creator<Student> CREATOR = new Creator<Student>() {
        @Override
        public Student createFromParcel(Parcel source) {
            return new Student(source);
        }

        @Override
        public Student[] newArray(int size) {
            return new Student[0];
        }
    };
}
然后修改aidl文件,
// IMyAidlInterface.aidl package com.aidl.server; import com.aidl.server.Student; interface IMyAidlInterface { int add(int num1,int num2); ListaddStudent(in Student student);//这里的in 一定需要的 或者out }
还需要再添加一个aidl配置文件,文件名必须使用Student,否则系统编译无法找到或者识别Student
package com.aidl.server;

parcelable Student;
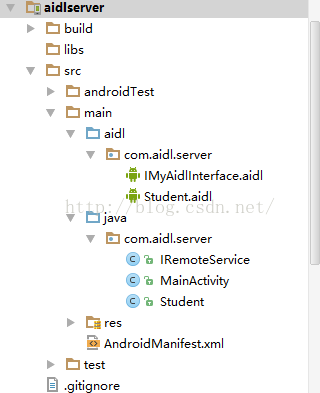
现在的目录结构如图:
在这里必须注意如下三点:
1.在Student 类中必须有一个静态常量,常量名必须是CREATOR,而且CREATOR 常量的数据类型必须是 Parcelable.Creator
2.在writeToParcel 方法中需要将要序列化的值写入到 Parcel对象中。
3.编写完Student 为时,必须再新建一个Student.aidl 文件,此文件输入以下内容:
parcelable Student; 这里的书写是供上面我们说过的接口 *.aidl 文件导包时可以找到,并通过此文件找到Student类对象。
重新编译,修改service文件的代码:
public class IRemoteService extends Service {
    private ArrayList<Student> students;
    @Override
    public IBinder onBind(Intent intent) {
        students = new ArrayList<>();
        return mBinder;
    }

    private IBinder mBinder = new IMyAidlInterface.Stub() {
        @Override
        public int add(int num1, int num2) throws RemoteException {
            return num1 + num2;
        }

        @Override
        public List<Student> addStudent(Student student) throws RemoteException {
            students.add(student);
            return students;
        }
    };
}
OK,aidlservice已经OK了,可以先运行在模拟器上;
接下来修改aidlclient,
1)还是需要将
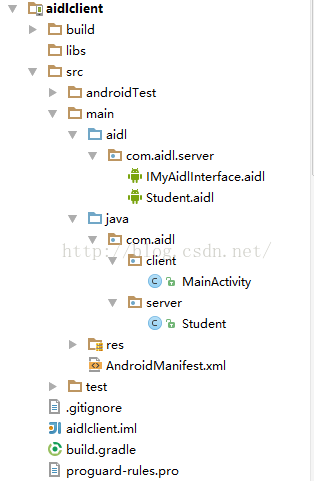
aidlservice的src下aidl整个包复制粘贴到aidlclient的src下,覆盖原来的文件;
2)强aidlservice的Student文件连同它的包复制到aidlclient的src/java下;
如图:
修改aidlclient,加几行代码而已,
public class MainActivity extends AppCompatActivity implements View.OnClickListener {
    private EditText num1,num2;
    private TextView result,text;
    private Button measure;
    private IMyAidlInterface iMyAidl;
    private ServiceConnection conn = new ServiceConnection() {
        @Override
        public void onServiceConnected(ComponentName name, IBinder service) {
            iMyAidl = IMyAidlInterface.Stub.asInterface(service);
            Log.i("TAG", "bind service successful");
        }
        @Override
        public void onServiceDisconnected(ComponentName name) {
            iMyAidl = null;
        }
    };
    @Override
    protected void onCreate(Bundle savedInstanceState) {
        super.onCreate(savedInstanceState);
        setContentView(R.layout.activity_main);

        num1 = (EditText) findViewById(R.id.num1);
        num2 = (EditText) findViewById(R.id.num2);
        measure = (Button) findViewById(R.id.measure);
        result = (TextView) findViewById(R.id.result);
        text = (TextView) findViewById(R.id.text);
        measure.setOnClickListener(this);
        bindService();
    }


    @Override
    public void onClick(View v) {
        try {
            int i = iMyAidl.add(Integer.parseInt(num1.getText().toString()),Integer.parseInt(num2.getText().toString()));
            result.setText("" + i);
            ArrayList<Student> students = (ArrayList<Student>) iMyAidl.addStudent(new Student("张三",22,1102004));
            text.setText(students.toString());
        } catch (RemoteException e) {
            e.printStackTrace();
        }
    }

    private void bindService() {
        Intent intent = new Intent();
        intent.setComponent(new ComponentName("com.aidl.server","com.aidl.server.IRemoteService"));
        bindService(intent,conn, Context.BIND_AUTO_CREATE);
    }

    @Override
    protected void onDestroy() {
        super.onDestroy();
        unbindService(conn);
    }
}
OK啦,运行:
list的student对象都打印出来了。
没发过几次贴,请大家多多见谅,欢迎大神指出我的问题!灰常感谢
源码:
点击打开链接
