最简单的JSP-Servlet案例
JSP配合Servlet是最基础也是相当重要的前后端交互的一种方式。也许现阶段可能不需要再去写原生的JSP+Servlet,而工作中对于接口可能写的更多,不需要我们去关注这些基础的东西,但并不表示我们可以略过这些知识点。
如果能很好的掌握这种方式,对于我们实际工作中对编程的理解有莫大的好处。
备注:
我使用的工具
MyEclipse,tomcat8
1.实现过程
1.web.xml搭建
这里就不去细说什么是xml了,总的来说XML 被设计用来传输和存储数据,而web.xml的作用可以说存储了我们web项目的初始化信息。相对于其他的复杂项目,我们的这个需要的东西只有两个部分。
<web-app>
    <display-name>PutHereTheNameOfYourWebAppdisplay-name>
    <description>This a description of my web app made by Eclipsedescription>

    <servlet>
        <servlet-name>myservletcodeservlet-name>
        <servlet-class>com.it.myservlet.myservletcodeservlet-class>
    servlet>

    <servlet-mapping>
        <servlet-name>myservletcodeservlet-name>
        <url-pattern>/loginurl-pattern>
    servlet-mapping>

    <welcome-file-list>
        <welcome-file>login.jspwelcome-file>
    welcome-file-list>
web-app>
一个是我们项目的欢迎界面,可以理解为首页。一个是对我们网页数据进行处理的servlet.
2.欢迎页面
这个页面主要是我们的登录页面
<%@ page language="java" import="java.util.*" pageEncoding="UTF-8"%>
<%
String path = request.getContextPath();
String basePath = request.getScheme()+"://"+request.getServerName()+":"+request.getServerPort()+path+"/";
%>


<html>
  <head>
    <base href="<%=basePath%>">

    <title>JSP and servlet logintitle>
    <style>
        .main {
            float:left;
            min-width:1200;
        }
    style>
  head>

  <body>
    <div class="main">
        <h1>请输入账号密码h1>
        <div class="logindiv">
            <form id="loginid" action="login" method="post">
                <span>请输入账号:span><input type="text" name="account"><br>
                <span>请输入账号:span><input type="password" name="mypassword"><br>
                <input type="submit" value="提交">
            form>
        div>
    div>
  body>
html>这两步可以说是非常非常基础的东西了,这也意味这我们整个项目最开始的引线已经出来了。
3.servlet
package com.it.myservlet;

import java.io.IOException;

import javax.servlet.ServletException;
import javax.servlet.http.HttpServlet;
import javax.servlet.http.HttpServletRequest;
import javax.servlet.http.HttpServletResponse;

public class myservletcode extends HttpServlet{

    /**
     *
     */
    private static final long serialVersionUID = 1L;
    @Override
    public void doPost(HttpServletRequest req,HttpServletResponse resp) throws ServletException,IOException{
        System.out.println("in dopost");
        doGet(req, resp);
    }

    @Override
    public void doGet(HttpServletRequest req,HttpServletResponse resp) throws ServletException,IOException{
        System.out.println("in doget");
    }
}
到了这一步,这个JSP+Servlet就连贯起来的,相当于一个骨架已经成型,我们只需要在后面继续雕琢即可。
4.后续添加
下面我们想要对传入的数据进行分析操作并且做出反应。
所以这里需要另外一个层对其进行操作,一般这种可以看成MVC中的service层。
public class MyService {
    private String account;
    private String password;
    private final static String accounttrue="people";
    private final static String passowrdtrue="123456";


    public MyService(String account,String password){
        this.account=account;
        this.password=password;
        System.out.println("account"+account);
    }
    public boolean istrue(){//判断账户密码是不是正确
        System.out.println("istrue run");
        if(account.equals(accounttrue)){
            System.out.println("用户名正确");
            if(password.equals(passowrdtrue)){
                System.out.println("密码正确");
                return true;
            }
            System.out.println("密码错误");
        }
        return false;
    }
}
因为只是说说servlet,所以这里就不引入JDBC来查询数据库了。
package com.it.myservlet;

import java.io.IOException;
import javax.servlet.ServletException;
import javax.servlet.http.HttpServlet;
import javax.servlet.http.HttpServletRequest;
import javax.servlet.http.HttpServletResponse;
import javax.servlet.http.HttpSession;


public class MyServletCode extends HttpServlet{

    /**
     *
     */
    private static final long serialVersionUID = 1L;
    @Override
    public void doPost(HttpServletRequest req,HttpServletResponse resp) throws ServletException,IOException{
        System.out.println("in dopost");
        doGet(req, resp);
    }

    @Override
    public void doGet(HttpServletRequest req,HttpServletResponse resp) throws ServletException,IOException{
        System.out.println("in doget");
        String account=req.getParameter("account");
        String password=req.getParameter("mypassword");
        System.out.println(account);
        System.out.println(password);
        MyService myService = new MyService(account,password);//调用类Myservice
        boolean istrue=myService.istrue();
        System.out.println(istrue);
        if(istrue){//如果密码正确,重定向到success.jsp
            System.out.println("正确");
            HttpSession jspSession = req.getSession();
            jspSession.setAttribute("account", account);
            jspSession.setAttribute("password", password);
            resp.sendRedirect("success.jsp");
        }else{//密码错误,回login页面
            System.err.println("错误");
            resp.sendRedirect("http://localhost:8080/JSP_Servlet/");
        }


    }
}
这里有很多system输出,一般正常情况下我们是Debug来完成这些操作,但是在这里使用这个可能更加直观。
<%@ page language="java" import="java.util.*" pageEncoding="UTF-8"%>
<%
String path = request.getContextPath();
String basePath = request.getScheme()+"://"+request.getServerName()+":"+request.getServerPort()+path+"/";
%>


<html>
  <head>
    <base href="<%=basePath%>">

    <title>My JSP 'success.jsp' starting pagetitle>

    <meta http-equiv="pragma" content="no-cache">
    <meta http-equiv="cache-control" content="no-cache">
    <meta http-equiv="expires" content="0">
    <meta http-equiv="keywords" content="keyword1,keyword2,keyword3">
    <meta http-equiv="description" content="This is my page">


  head>

  <body>
        <div><span>你的密码正确:span>div>
        <div>
            <ul>
                <li>账户:<%=(String)session.getAttribute("account")%>  li>
                <li>密码:<%=(String)session.getAttribute("password")%> li>
            ul>
        div>
         <br>
  body>
html>
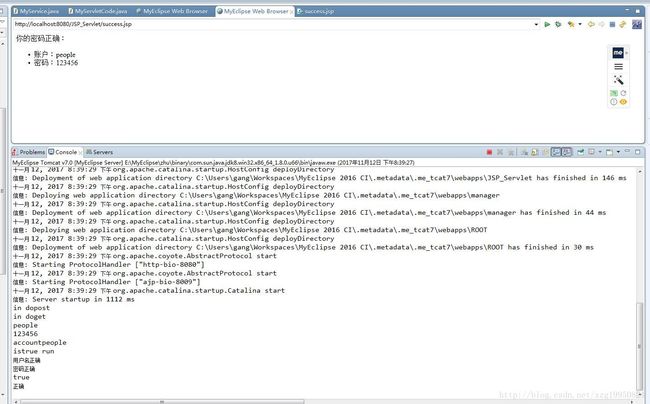
利用session来显示数据

到这里最简单的Servlet+JSP就完成了
我们进入登录页面,完成登录,业务判断,返回视图
基本上这种MVC结构是一个项目的基础组成部分。
总结:
很久没有接触这些了,加上工作主要在熟悉JavaScript,所以代码有点渣,见谅。。。。。。

