Gitlab安装、汉化及使用
环境:centos6.9
关闭防火墙和selinux
[root@Gitlab ~]# setenforce 0
[root@Gitlab ~]# service iptables stop && chkconfig iptables off
安装Gitlab
安装方式分两种: RPM安装、YUM安装
因为懒,我就直接rpm安装了
[root@Gitlab ~]# wget https://mirrors.tuna.tsinghua.edu.cn/gitlab-ce/yum/el6/gitlab-ce-11.1.4-ce.0.el6.x86_64.rpm
[root@Gitlab ~]# rpm -ivh gitlab-ce-11.1.4-ce.0.el6.x86_64.rpm 默认安装在/opt目录
GitLab常用命令
sudo gitlab-ctl start # 启动所有 gitlab 组件;
sudo gitlab-ctl stop # 停止所有 gitlab 组件;
sudo gitlab-ctl restart # 重启所有 gitlab 组件;
sudo gitlab-ctl status # 查看服务状态;
sudo gitlab-ctl reconfigure # 启动服务;
sudo vim /etc/gitlab/gitlab.rb # 修改默认的配置文件;
gitlab-rake gitlab:check SANITIZE=true --trace # 检查gitlab;
sudo gitlab-ctl tail # 查看日志;
配置
[root@Gitlab ~]# vim /etc/gitlab/gitlab.rb
external_url 'http://192.168.1.111' //写server的IP,绝对不能写默认的hostname!!!
unicorn['port'] = 8088 //633行,为了防止汉化后502就改端口,也可以不改(我是以防万一了- -)
:wq
汉化
[root@Gitlab ~]# gitlab-ctl stop
[root@Gitlab ~]# git clone https://gitlab.com/xhang/gitlab.git //汉化包
[root@Gitlab ~]# cd gitlab/
[root@Gitlab ~]# git diff v10.0.2 v10.0.2-zh > ../10.0.2-zh.diff //没问题就没有提示
[root@Gitlab ~]#patch -d /opt/gitlab/embedded/service/gitlab-rails -p1 < /mnt/10.0.2-zh.diff //刚刚git克隆出来的diff文件,需要打绝对路径
[root@Gitlab ~]# gitlab-ctl reconfigure //重新刷新配置
[root@Gitlab ~]# gitlab-ctl start
访问地址http://ip由于第一次登陆,需要设置密码
如果在这一步发现502,先stop掉Gitlab(gitlab-ctl stop)
再改 vim /etc/gitlab/gitlab.rb //改unicorn['port'] 改端口,为的防止冲突
[root@Gitlab ~]# gitlab-ctl reconfigure
[root@Gitlab ~]# reboot //改完需要reboot
[root@Gitlab ~]# gitlab-ctl start
再次访问web就会发现熟悉的中文啦~~
贴一下我解决502的帖子:https://blog.csdn.net/wangxicoding/article/details/43738137 感谢大神
添加项目组
登入web(废话- -)
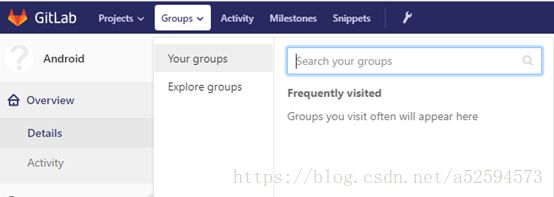
左上角点击Group --> Your groups
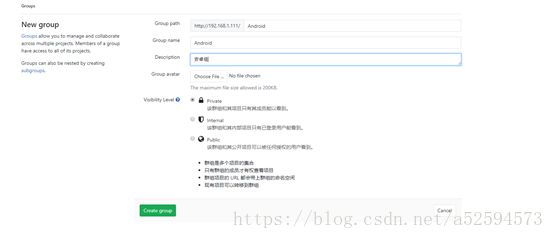
点击new group,编辑组名和描述 --> create group
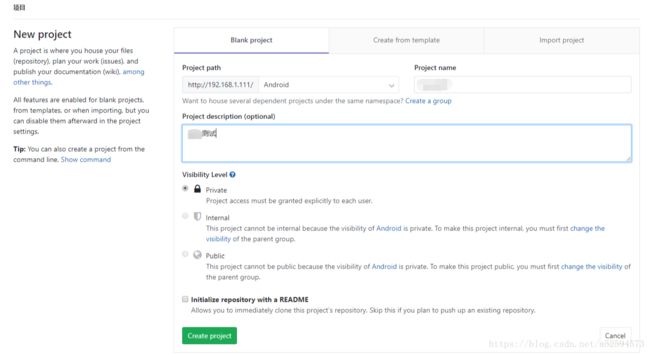
创建项目
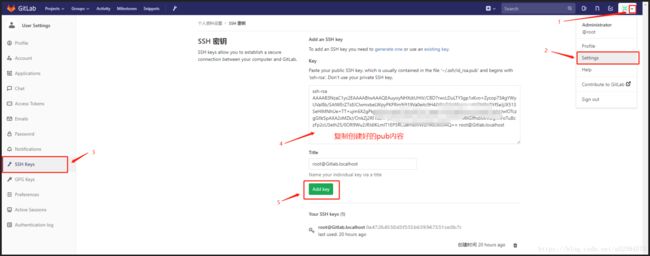
导入秘钥至gitlab
[root@Gitlab ~]# ssh-keygen
[root@Gitlab .ssh]# cat /root/.ssh/id_rsa.pub
![]()
第一次拉取代码
传输秘钥至需要拉取代码的机器上
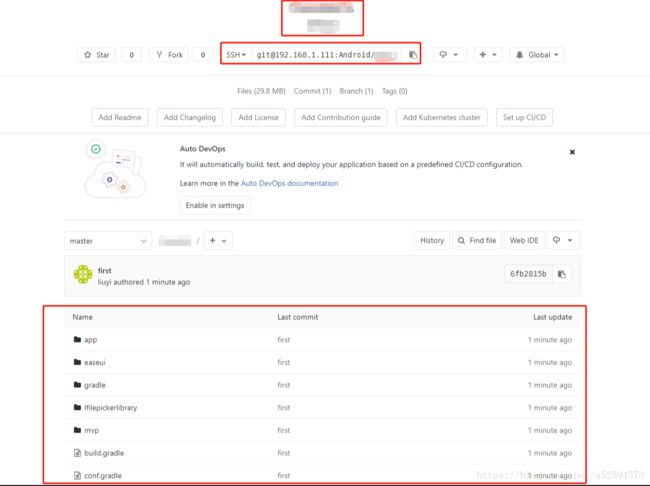
git clone [email protected]:Android/test.git
cd test
拉取代码至test目录后:
git add *
git commit -m 'first'
git push
返回 gitlab查看:
