精确地识别及验证Graphical Editing Framework图形
Graphical Editing Framework(GEF)简介
GEF(Graphical Editor Framework)是 Eclipse 的一个图形化编辑框架,它允许开发人员以图形化的方式展示和编辑模型,从而提升用户体验。很多应用软件会使用到 GEF 进行图形开发,例如:BPM 结构图、软件模块展示、UML 类图编辑器、图形化 XML 编辑器,以及图形化数据库结构设计工具等等。GEF 目前提供了两种展示方式:图形(GraphicalViewer)和树状(TreeViewer)。前者利用 Draw2D 图形(IFigure)作为表现方式,多用于编辑区域,后者则多用于实现大纲展示。
在自动化测试中,图形的识别、操作以及验证一直是薄弱环节。GEF 作为结构化的矢量图形,理应比 bmp、jpg 等好识别。然而 Rational Functional Tester 的早期版本并不能够识别到单个 GEF 模型,而只是 Draw2D 的主框架。这对于自动化测试 GEF 图形是极其不方便的,我们只能使用位置偏移量来定位和操作图形,这样图像任何位置上的移动都会导致自动化测试脚本回放失败。而针对图形的验证更是成为了不可能的任务。
由于应用程序经常会设计到大量的、属性不确定的 GEF 操作,简单的录制脚本并不适合开发系统化的测试用例,推荐使用 ITCL 测试框架来实现涉及到 GEF 图形的应用程序自动化测试。本文将在最后结合 ITCL 框架来阐述如何在 Rational Functional Tester V8.0 中实现 GEF 图形的识别,操作以及验证。
回页首
GEF 图形在 Rational Functional Tester V8.0 中的识别
激活测试环境
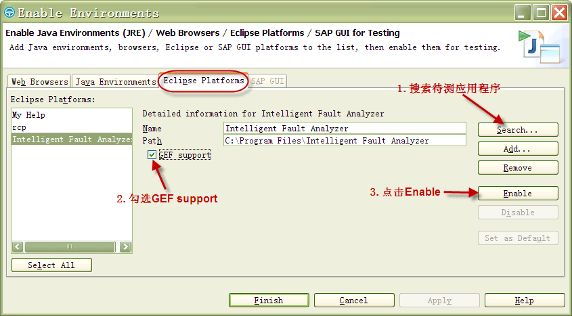
想要在 RFT 中识别 GEF 图形,就需要对应用程序进行测试环境激活。
在菜单中选择配置,选择激活测试环境。如图 1。
图 1. 对待测的应用程序进行激活

注意:激活后需要重启待测应用程序才能生效。
GEF 图形的分类及层次
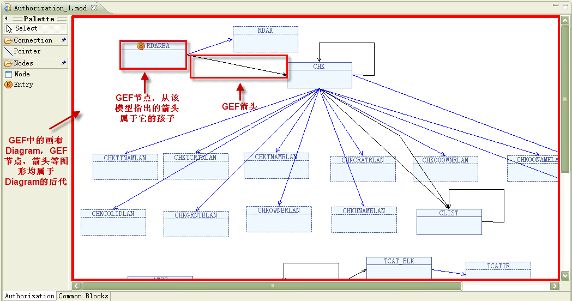
GEF 应用主要是节点与箭头的链接来展示父子以及流程关系。下面以一个简单的例子来说明 GEF 图形的分类及其层次。
最上面一层是 RootEditPart,这是一种特殊的 Editpart,用来盛放 GEF 图像内容,一般我们不会去识别和操作它。接下来的一层是 DiagramPart,也就是所谓画布,所有画布上的节点与箭头都是它的后代(Descendant)。再下来是节点 NodePart,所有从它指出的箭头都是它的孩子。最后是箭头 ConnectionPart。
图 2. GEF 图形层次

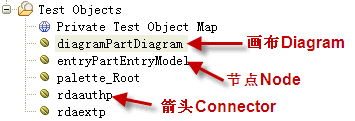
RFT 用于识别 Diagram 的属性包括 .class、.classIndex、.figureclassname、.modelclassname、height、width。同时还可以选用 name、structure,或者 tooltip。同样,节点和箭头的识别属性还可以选用 name、text 和 tooltip 以更精确地识别。将这些 GEF 对象加入自动化脚本中,我们就可以在右侧的 Script. Explorer 中看到加入的 GEF 对象。
图 3. 加入测试脚本的 GEF 对象

如果你的测试对象包含的 GEF 对象数量不多,并且属性从不发生变化,那么可以在测试脚本中直接对 GEF 对象进行操作,如下例 1。
清单 1. 直接对 GEF 对象操作
public void testMain (Object[] args)
{
// Unit testing can go here
//right click diagram
diagramPartDiagram().click(RIGHT);
//move node 80pix right, 100pix down
entryPartEntryModel().drag(atPoint(0,0), atPoint(80,100));
//get the tooltip of connector rdaauthp
rdaauthp().getProperty("tooltip");

}
|
或者也可以直接返回 Public 对象以便其他脚本调用,如下例 2。
清单 2. 返回 Public 对象
public class vcbeEditView extends vcbeEditViewHelper {

//return diagram for public use
public GefEditPartTestObject getDiagramPartDiagram() {
TestObject to = diagramPartDiagram(ANY, NO_STATE);
return new GefEditPartTestObject(to);
}
//return node for public use
public GefEditPartTestObject getEntryPartEntryModel() {
TestObject to = entryPartEntryModel(ANY, NO_STATE);
return new GefEditPartTestObject(to);
}
//return connector for public use
public GefEditPartTestObject getRdaauthp() {
TestObject to = rdaauthp(ANY, NO_STATE);
return new GefEditPartTestObject(to);
}
}
|
如果你的应用程序包含很多 GEF 图形,并且需要操作的 GEF 对象是不确定的,那么你就需要动态寻找你所需要的 GEF 图形。下面将讲述如何针对 GEF 编写健壮的识别代码。
回页首
针对 GEF 编写健壮的识别、操作、以及验证代码
健壮的识别代码
由于大多数情况下应用程序会使用到很多 GEF 图形,并且数量、类型,以及名称都不确定,使用对象映射图已经无法帮助我们有效地识别各种图形对象。这种情况下我们需要动态地查找 GEF 图形。在上一节我们讲过 GEF 图形的层次,diagram->node->connector,在查找时我们就要应用这个层次去精确地定位所需对象。
比如需要在画布上寻找一个已知名字的节点,我们可以在脚本中利用 find 方法来查找它的 name 属性,传入它的名字 nodeName 作为参数,抑或其他如 text、tooltip 等已知属性。注意找准该节点的 parent,也就是画布 diagram。在例 3 中,this.getDiagramPartDiagram 就是 node 的 parent。
清单 3. 利用 find 动态查找名字为”nodeName”的节点
//return the node with given name "nodeName"
public GefEditPartTestObject getNode(String nodeName) {

//wait for the existence of diagram
this.getDiagramPartDiagram().waitForExistence();

//look for the node with given name "nodeName", and the class type is node
TestObject[] to = this.getDiagramPartDiagram().find(atChild("name", nodeName,
".figureclassname","com.ibm.db2zos.ifa.vcbeditor.figures.NodeFigure"));

//if more than 1 node are identified, throw the ambiguous exception
if (to.length > 1)
throw new AmbiguousRecognitionException(
"There are more than 1 object identified.");

return new GefEditPartTestObject(to[0]);
}
|
健壮的操作代码
这样在其他测试脚本中,就可以调用例 3 来对一个 node 节点进行操作,只需传入所需节点名字即可。如例 4 中定义了一个移动节点的方法,调用了例 3 中的查找方法来定位所需节点,传入所需节点的名字,需要移动的距离即可。注意如果例 4 与例 3 不在同一脚本中,需要在例 4 脚本开头将例 3 脚本 import 进来,然后将 this 替换为实例化的例三脚本对象。
清单 4. 调用节点进行操作
//move node rightPix to the right, and downPix to the bottom
public void moveNode(String nodeName, int rightPix, int downPix)
{
this.getNode(nodeName).drag(atPoint(0,0), atPoint(rightPix,downPix));
}
|
这样在接下来的测试脚本中,我们只需要写一句话就可以实现将 node1 向右下移动 (80,100) 像素
this.moveNode(“node1”, 80, 100); |
健壮的验证代码
自动化测试离不开合理的验证点,对于 GEF 同样我们需要编写灵活健壮的验证方法。RFT 通常提供的录制验证点方法虽然简便,但却缺乏灵活性以及重用性,无法在整个测试框架中共享。这里我们使用 vpManual 方法来进行验证。比如想要验证一个叫 connectorName 的箭头是否连接在节点 nodeName 上,我们可以利用类似例 3 中所讲的方法来找到这个箭头,然后取出它的 parent 看看是不是叫 nodeName,如下例 5。
清单 5. 灵活的、可重用的验证方法
import ibm.loggers.GenericLogger;
public class vcbeEditView extends vcbeEditViewHelper {

private GenericLogger gl = new GenericLogger();

public boolean verifyConnectorBelong(String connectorName, String nodeName)
{
//find the connector named "connectorName" from the diagram
TestObject[] to = this.getDiagramPartDiagram().find(atDescendant("tooltip",
    connectorName, ".figureclassname",
    "com.ibm.db2zos.ifa.vcbeditor.figures.LinkConnectionFigure"));
if (to.length > 1)
throw new AmbiguousRecognitionException("There are more than 1 object
identified.");
//locate the connector’s parent’s name
String parentName = to[0].getParent().getProperty("name").toString();

//verify if parent’s name = desired nodeName
Boolean succed = vpManual("VERIFY_CONNECTOR_" + connectorName +
"_BELONGS_TO_NODE_" + nodeName, true , parentName == nodeName).performTest();

if (succed)
{
gl.logScriptTestResult("VERIFY_SUCCESS",true,"VERIFY_CONNECTOR_" +
connectorName + "_BELONGS_TO_NODE_" + nodeName);
}
else
{
gl.logScriptTestResult("VERIFY_FAIL",false,"VERIFY_CONNECTOR_" +
connectorName + "DOES_NOT_BELONGS_TO_NODE_" + nodeName);
}

return succed;
}
}
|
这样在接下来的自动化脚本中,我们只需一句话便可以验证 connector1 是否从 node1 指出
this.verifyConnectorBelong("connector1", "node1");
|
GEF 自动化在 ITCL 框架中的应用
我们知道,在 ITCL 框架中,测试脚本分为三层:对象层(AppObject)、任务层(Tasks),测试用例层(Testcases)。
在对象层我们建议直接抓取画布 Diagram 并返回公有对象,即例 2 中的 getDiagramPartDiagram()。对于节点和箭头,由于绝大多数情况下它们的数量和名字是不定的,建议使用 find 来动态查找对象,如例 3,以便任务层调用。
在任务层我们就可以调用对象层的公有对象来编写操作以及验证代码,如例 4 和例 5,以便测试用例调用。
在测试用例层事情就变得非常简单了,只需调用几句任务层的方法,就可以实现一个灵活而又健壮的测试用例了。如下例 6。
清单 6. 清晰、灵活、健壮的测试用例
//1.Click the Node button in the palette
vcbeEditViewMgr.clickNodeButton();

//2.Click a blank area in the Editor view A blank node is created
//vcbeEditViewMgr.clickFigureArea();
sleep(3);

//3.Select the node name ACE in the name list for control block.
//The node ACE is created successfully
vcbeEditViewMgr.setNodeName("ACE");

//4.Click the save buttonA warning dialog pops up
vcbeToolBarMgr.clickSave();
saveConfirmDlgMgr.verifyNoEntryWarning();
|
来自 “ ITPUB博客 ” ,链接:http://blog.itpub.net/14780873/viewspace-664879/,如需转载,请注明出处,否则将追究法律责任。
转载于:http://blog.itpub.net/14780873/viewspace-664879/