spring-cloud-oauth2
一.参考文章
- Spring Security OAuth2 开发指南
- 理解OAuth2.0
3.Spring Security oAuth2简介
二.oauth2知识整理
2.1 基本概念
oauth:
OAuth就是一种授权机制。数据的所有者告诉系统,同意授权第三方应用进入系统,获取这些数据。系统从而产生一个短期的进入令牌(token),用来代替密码,供第三方应用使用。
JWT:
JSON Web Token,是JSON风格的轻量级授权和认证规范,可以实现无状态,分布式的web应用授权。JWT的内容由三部分组成,分别是Header,Payload,Signature,三个部分之间通过.连接。
Access Token:
Access Token 是客户端访问资源服务器的令牌。拥有这个令牌代表着得到用户的授权。然而,这个授权应该是 临时 的,有一定有效期。Access Token 在使用的过程中 可能会泄露。给 Access Token 限定一个 较短的有效期 可以降低因 Access Token 泄露而带来的风险。然而引入了有效期之后,客户端使用起来就不那么方便了。每当 Access Token 过期,客户端就必须重新向用户索要授权。这样用户可能每隔几天,甚至每天都需要进行授权操作。这是一件非常影响用户体验的事情。希望有一种方法,可以避免这种情况。于是 oAuth2.0 引入了 Refresh Token 机制
Refresh Token:
Refresh Token 的作用是用来刷新 Access Token。认证服务器提供一个刷新接口。
传入 refresh_token 和 client_id,认证服务器验证通过后,返回一个新的 Access Token。为了安全,oAuth2.0 引入了两个措施:
1.Refresh Token 一定是保存在客户端的服务器上 ,而绝不能存放在狭义的客户端(例如 App、PC 端软件)上。调用 refresh 接口的时候,一定是从服务器到服务器的访问。
2.client_secret 机制。即每一个 client_id 都对应一个 client_secret。这个 client_secret 会在客户端申请 client_id 时,随 client_id 一起分配给客户端。客户端必须把 client_secret 妥善保管在服务器上,决不能泄露。刷新 Access Token 时,需要验证这个 client_secret。
2.2 OAuth的思路
OAuth在"客户端"与"服务提供商"之间,设置了一个授权层(authorization layer)。"客户端"不能直接登录"服务提供商",只能登录授权层,以此将用户与客户端区分开来。"客户端"登录授权层所用的令牌(token),与用户的密码不同。用户可以在登录的时候,指定授权层令牌的权限范围和有效期。
"客户端"登录授权层以后,"服务提供商"根据令牌的权限范围和有效期,向"客户端"开放用户储存的资料。
2.3 OAuth 2.0的四种授权方式
OAuth 2.0 规定了四种获得令牌的流程。不管哪一种授权方式,第三方应用申请令牌之前,都必须先到系统备案,说明自己的身份,然后会拿到两个身份识别码:客户端 ID(client ID)和客户端密钥(client secret)。这是为了防止令牌被滥用,没有备案过的第三方应用,是不会拿到令牌的。
2.3.1授权码模式(authorization code)
授权码(authorization code)方式,指的是第三方应用先申请一个授权码,然后再用该码获取令牌。
(A)用户访问客户端,后者将前者导向认证服务器。
(B)用户选择是否给予客户端授权。
(C)假设用户给予授权,认证服务器将用户导向客户端事先指定的"重定向URI"(redirection URI),同时附上一个授权码。
(D)客户端收到授权码,附上早先的"重定向URI",向认证服务器申请令牌。这一步是在客户端的后台的服务器上完成的,对用户不可见。
(E)认证服务器核对了授权码和重定向URI,确认无误后,向客户端发送访问令牌(access token)和更新令牌(refresh token)。
2.3.2简化模式(implicit)
简化模式(implicit grant type)不通过第三方应用程序的服务器,直接在浏览器中向认证服务器申请令牌,跳过了"授权码"这个步骤,因此得名。所有步骤在浏览器中完成,令牌对访问者是可见的,且客户端不需要认证。
(A)客户端将用户导向认证服务器。
(B)用户决定是否给于客户端授权。
(C)假设用户给予授权,认证服务器将用户导向客户端指定的"重定向URI",并在URI的Hash部分包含了访问令牌。
(D)浏览器向资源服务器发出请求,其中不包括上一步收到的Hash值。
(E)资源服务器返回一个网页,其中包含的代码可以获取Hash值中的令牌。
(F)浏览器执行上一步获得的脚本,提取出令牌。
(G)浏览器将令牌发给客户端。
2.3.3密码模式(resource owner password credentials)
密码模式(Resource Owner Password Credentials Grant)中,用户向客户端提供自己的用户名和密码。客户端使用这些信息,向"服务商提供商"索要授权。
(A)用户向客户端提供用户名和密码。
(B)客户端将用户名和密码发给认证服务器,向后者请求令牌。
(C)认证服务器确认无误后,向客户端提供访问令牌。
2.3.4客户端模式(client credentials)
客户端模式(Client Credentials Grant)指客户端以自己的名义,而不是以用户的名义,向"服务提供商"进行认证。严格地说,客户端模式并不属于OAuth框架所要解决的问题。在这种模式中,用户直接向客户端注册,客户端以自己的名义要求"服务提供商"提供服务,其实不存在授权问题。
(A)客户端向认证服务器进行身份认证,并要求一个访问令牌。
(B)认证服务器确认无误后,向客户端提供访问令牌。
2.4 更新令牌
令牌的有效期到了,OAuth2允许用户自动更新令牌。具体方法是,认证服务器颁发令牌的时候,一次性颁发两个令牌,一个用于获取数据,另一个用于获取新的令牌(refresh token 字段)。令牌到期前,用户使用 refresh token 发一个请求,去更新令牌。
2.5 JWT
1.Header
头部Header一般由2个部分组成alg和typ,alg是加密算法,如HMAC或SHA256,typ是token类型,取值为jwt,一个Header的例子
{
"alg": "HS256",
"typ": "JWT"
}
然后对Header部分进行Base64编码,得到第一部分的值
2.Payload
内容部分Payload是JWT存储信息的主体。JWT指定七个默认字段供选择。
iss:发行人
exp:到期时间
sub:主题
aud:用户
nbf:在此之前不可用
iat:发布时间
jti:JWT ID用于标识该JWT
除以上默认字段外,自定义的信息保存在该部分。然后对该部分的值进行Base64编码,得到第二部分的值。
3.Signature
签名哈希部分是对上面两部分数据签名,通过指定的算法生成哈希,以确保数据不会被篡改。包含三部分:
header (base64后的)、payload (base64后的)、secret(私钥)
这个部分需要base64加密后的header和base64加密后的payload使用.连接组成的字符串,然后通过header中声明的加密方式进行加密,然后就构成了jwt的第三部分。
Java生成JWT【待完成】
三.oauth2项目【待完成】
3.1 基于内存储存的oauth2项目
创建认证服务器
在spring项目中引入spring security和spring oauth2依赖,因为oauth2包含security,因此引入oauth2就可以了
    org.springframework.cloud
    spring-cloud-starter-oauth2
    2.2.0.RELEASE
main方法
import org.springframework.boot.SpringApplication;
import org.springframework.boot.autoconfigure.SpringBootApplication;
/*
创建认证服务器
 */
@SpringBootApplication
public class Oauth2ServerApplication {
    public static void main(String[] args) {
        SpringApplication.run(Oauth2ServerApplication.class, args);
    }
}
创建config包,保存配置文件。
创建AuthorizationServerConfig配置一个客户端。使用BCryptPasswordEncoder进行对客户端secret加密。
package com.li.spring.cloud.oauth2.config;

import org.springframework.context.annotation.Bean;
import org.springframework.context.annotation.Configuration;
import org.springframework.security.crypto.bcrypt.BCryptPasswordEncoder;
import org.springframework.security.oauth2.config.annotation.configurers.ClientDetailsServiceConfigurer;
import org.springframework.security.oauth2.config.annotation.web.configuration.AuthorizationServerConfigurerAdapter;
import org.springframework.security.oauth2.config.annotation.web.configuration.EnableAuthorizationServer;

@Configuration
@EnableAuthorizationServer
public class AuthorizationServerConfig extends AuthorizationServerConfigurerAdapter {

    @Bean
    public BCryptPasswordEncoder passwordEncoder() {
        return new BCryptPasswordEncoder();
    }

    //配置客户端
    @Override
    public void configure(ClientDetailsServiceConfigurer clients) throws Exception {
        // 配置客户端
        clients
                // 使用内存设置
                .inMemory()
                // client_id
                .withClient("client")
                // client_secret
                .secret(passwordEncoder().encode("secret"))
                // 授权类型
                .authorizedGrantTypes("authorization_code")
                // 授权范围
                .scopes("app")
                // 注册回调地址
                .redirectUris("http://localhost");
    }
}
@EnableAuthorizationServer注解开启认证服务。注入加密用的BCryptPasswordEncoder实例。然后,配置需要认证的客户端,
参数:client_id代表是哪个客户端也就是哪个APP或者web服务需要认证的;然后是客户端的secret秘钥需要加密,
authorizedGrantTypes授权方式指的是授权码,账户密码等,这里使用的是授权码(authorization_code),scopes表示范围,
redirectUris重定向地址。
认证之前需要先校验用户的账户密码是否正确,所以先配置WebSecurityConfig拦截(目前写死,后面改用数据库验证),配置了两个用户密码用了BCryptPasswordEncoder进行加密,不加密报错。
package com.li.spring.cloud.oauth2.config;

import org.springframework.beans.factory.annotation.Autowired;
import org.springframework.context.annotation.Configuration;
import org.springframework.security.config.annotation.authentication.builders.AuthenticationManagerBuilder;
import org.springframework.security.config.annotation.method.configuration.EnableGlobalMethodSecurity;
import org.springframework.security.config.annotation.web.configuration.EnableWebSecurity;
import org.springframework.security.config.annotation.web.configuration.WebSecurityConfigurerAdapter;
import org.springframework.security.crypto.bcrypt.BCryptPasswordEncoder;

@Configuration
@EnableWebSecurity
//对全部方法进行验证
@EnableGlobalMethodSecurity(prePostEnabled = true, securedEnabled = true, jsr250Enabled = true)
public class WebSecurityConfig extends WebSecurityConfigurerAdapter {

    @Autowired
    BCryptPasswordEncoder passwordEncoder;

    //配置内存登录用户验证

    @Override
    protected void configure(AuthenticationManagerBuilder auth) throws Exception {
        auth.inMemoryAuthentication()
                .withUser("admin").password(passwordEncoder.encode("123456")).roles("ADMIN")
                .and()
                .withUser("user").password(passwordEncoder.encode("123456")).roles("USER");
    }


}
然后就可以访问oauth2默认提供的接口获取授权码。
oauth2提供的默认端点URL

/oauth/authorize:授权端点
/oauth/token:令牌端点
/oauth/confirm_access:用户确认授权提交端点
/oauth/error:授权服务错误信息端点
/oauth/check_token:用于资源服务访问的令牌解析端点
/oauth/token_key:提供公有密匙的端点,如果使用JWT令牌
启动项目,访问
http://localhost:8080/oauth/authorize?client_id=client&response_type=code
填写账号:admin和密码:123456
点击授权
得到地址:http://localhost/?code=GlwyCi
得到授权码:GlwyCi,通过授权码取token。
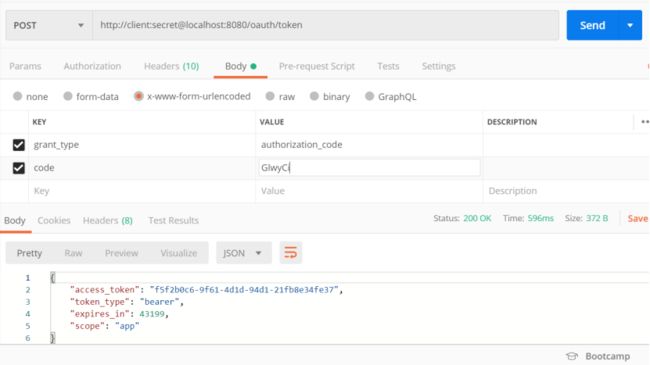
使用postman发送post请求取token
地址:http://client:secret@localhost:8080/oauth/token
按照Oauth2规范,Access token请求应该使用application/x-www-form-urlencoded,填写grant_type和code。
结果如下图:
获取到token:"f5f2b0c6-9f61-4d1d-94d1-21fb8e34fe37"
3.2 基于JDBC储存令牌
按照官方提供的数据库脚本创建创建数据表
CREATE TABLE `clientdetails` (
  `appId` varchar(128) NOT NULL,
  `resourceIds` varchar(256) DEFAULT NULL,
  `appSecret` varchar(256) DEFAULT NULL,
  `scope` varchar(256) DEFAULT NULL,
  `grantTypes` varchar(256) DEFAULT NULL,
  `redirectUrl` varchar(256) DEFAULT NULL,
  `authorities` varchar(256) DEFAULT NULL,
  `access_token_validity` int(11) DEFAULT NULL,
  `refresh_token_validity` int(11) DEFAULT NULL,
  `additionalInformation` varchar(4096) DEFAULT NULL,
  `autoApproveScopes` varchar(256) DEFAULT NULL,
  PRIMARY KEY (`appId`)
) ENGINE=InnoDB DEFAULT CHARSET=utf8;

CREATE TABLE `oauth_access_token` (
  `token_id` varchar(256) DEFAULT NULL,
  `token` blob,
  `authentication_id` varchar(128) NOT NULL,
  `user_name` varchar(256) DEFAULT NULL,
  `client_id` varchar(256) DEFAULT NULL,
  `authentication` blob,
  `refresh_token` varchar(256) DEFAULT NULL,
  PRIMARY KEY (`authentication_id`)
) ENGINE=InnoDB DEFAULT CHARSET=utf8;

CREATE TABLE `oauth_approvals` (
  `userId` varchar(256) DEFAULT NULL,
  `clientId` varchar(256) DEFAULT NULL,
  `scope` varchar(256) DEFAULT NULL,
  `status` varchar(10) DEFAULT NULL,
  `expiresAt` timestamp NULL DEFAULT NULL,
  `lastModifiedAt` timestamp NULL DEFAULT NULL
) ENGINE=InnoDB DEFAULT CHARSET=utf8;

CREATE TABLE `oauth_client_details` (
  `client_id` varchar(128) NOT NULL,
  `resource_ids` varchar(256) DEFAULT NULL,
  `client_secret` varchar(256) DEFAULT NULL,
  `scope` varchar(256) DEFAULT NULL,
  `authorized_grant_types` varchar(256) DEFAULT NULL,
  `web_server_redirect_uri` varchar(256) DEFAULT NULL,
  `authorities` varchar(256) DEFAULT NULL,
  `access_token_validity` int(11) DEFAULT NULL,
  `refresh_token_validity` int(11) DEFAULT NULL,
  `additional_information` varchar(4096) DEFAULT NULL,
  `autoapprove` varchar(256) DEFAULT NULL,
  PRIMARY KEY (`client_id`)
) ENGINE=InnoDB DEFAULT CHARSET=utf8;

CREATE TABLE `oauth_client_token` (
  `token_id` varchar(256) DEFAULT NULL,
  `token` blob,
  `authentication_id` varchar(128) NOT NULL,
  `user_name` varchar(256) DEFAULT NULL,
  `client_id` varchar(256) DEFAULT NULL,
  PRIMARY KEY (`authentication_id`)
) ENGINE=InnoDB DEFAULT CHARSET=utf8;

CREATE TABLE `oauth_code` (
  `code` varchar(256) DEFAULT NULL,
  `authentication` blob
) ENGINE=InnoDB DEFAULT CHARSET=utf8;

CREATE TABLE `oauth_refresh_token` (
  `token_id` varchar(256) DEFAULT NULL,
  `token` blob,
  `authentication` blob
) ENGINE=InnoDB DEFAULT CHARSET=utf8;
插入一条客户端数据,secret是已经通过BCryptPasswordEncoder加密的数据。
insert into oauth_client_details (client_id, client_secret, scope, authorized_grant_types, web_server_redirect_uri)
value ('client', '$2a$10$agcHmHOgO7yHZBKNOBGlauHKwT3NoGRBmZe6TqsUJ1dXJhE465tbG','app','authorization_code','http://localhost');
在pom文件中引入连接数据库的jar包
            com.alibaba
            druid
            1.1.6


            org.springframework.boot
            spring-boot-starter-jdbc


            mysql
            mysql-connector-java
在application.xml中配置数据库信息
spring:
  profiles:
    active: dev
  application:
    name: spring-oauth2-server
  datasource:
    url: jdbc:mysql://${mysqlServer.ip}:${mysqlServer.port}/spring_oauth2?useUnicode=true&characterEncoding=UTF-8&serverTimezone=GMT%2b8&allowMultiQueries=true
    username: ${mysqlServer.name}
    password: ${mysqlServer.password}
    driver-class-name: com.mysql.jdbc.Driver
    druid:
      initial-size: 3
      min-idle: 3
      max-active: 10
      max-wait: 60000
      stat-view-servlet:
        login-username: root
        login-password: 1234
      filter:
        stat:
          log-slow-sql: true
          slow-sql-millis: 2000
    type: com.alibaba.druid.pool.DruidDataSource
server:
  port: 8080
修改AuthorizationServerConfig类
import org.springframework.beans.factory.annotation.Autowired;
import org.springframework.context.annotation.Bean;
import org.springframework.context.annotation.Configuration;
import org.springframework.security.oauth2.config.annotation.configurers.ClientDetailsServiceConfigurer;
import org.springframework.security.oauth2.config.annotation.web.configuration.AuthorizationServerConfigurerAdapter;
import org.springframework.security.oauth2.config.annotation.web.configuration.EnableAuthorizationServer;
import org.springframework.security.oauth2.config.annotation.web.configurers.AuthorizationServerEndpointsConfigurer;
import org.springframework.security.oauth2.provider.ClientDetailsService;
import org.springframework.security.oauth2.provider.client.JdbcClientDetailsService;
import org.springframework.security.oauth2.provider.token.TokenStore;
import org.springframework.security.oauth2.provider.token.store.JdbcTokenStore;

import javax.sql.DataSource;

@Configuration
@EnableAuthorizationServer
public class AuthorizationServerConfig extends AuthorizationServerConfigurerAdapter {

    @Autowired
    private DataSource dataSource;

    @Bean
    public TokenStore tokenStore() {
        // 令牌保存到数据
        return new JdbcTokenStore(dataSource);
    }

    @Bean
    public ClientDetailsService jdbcClientDetails() {
        // 配置客户端信息
        return new JdbcClientDetailsService(dataSource);
    }

    @Override
    public void configure(AuthorizationServerEndpointsConfigurer endpoints) throws Exception {
        // 设置令牌
        endpoints.tokenStore(tokenStore());
    }

    @Override
    public void configure(ClientDetailsServiceConfigurer clients) throws Exception {
        // 读取客户端配置
        clients.withClientDetails(jdbcClientDetails());
    }
}
经测试,在数据表oauth_access_token中成功保存token信息。
3.3 资源服务配置
新建spring-cloud-oauth2-resource的spring boot项目,
在pom.xml中导入oauth2依赖
    org.springframework.cloud
    spring-cloud-starter-oauth2
新建config包保存配置文件。新建ResourceServerConfig类配置资源服务。
import org.springframework.context.annotation.Configuration;
import org.springframework.security.config.annotation.method.configuration.EnableGlobalMethodSecurity;
import org.springframework.security.config.annotation.web.builders.HttpSecurity;
import org.springframework.security.config.http.SessionCreationPolicy;
import org.springframework.security.oauth2.config.annotation.web.configuration.EnableResourceServer;
import org.springframework.security.oauth2.config.annotation.web.configuration.ResourceServerConfigurerAdapter;

@Configuration
@EnableResourceServer
@EnableGlobalMethodSecurity(prePostEnabled = true, securedEnabled = true, jsr250Enabled = true)
public class ResourceServerConfig extends ResourceServerConfigurerAdapter {

    @Override
    public void configure(HttpSecurity http) throws Exception {
        http
                .exceptionHandling()
                .and()
                .sessionManagement().sessionCreationPolicy(SessionCreationPolicy.STATELESS)
                .and()
                .authorizeRequests()
                // 以下为配置所需保护的资源路径及权限,需要与认证服务器配置的授权部分对应
                .antMatchers("/resource").authenticated();

    }
}
在该类中配置resource路径需要授权访问。
在application.yml中配置认证服务器
spring:
  application:
    name: spring-cloud-oauth2-resource

security:
  oauth2:
    client:
      client-id: client
      client-secret: secret
      access-token-uri: http://localhost:8080/oauth/token
      user-authorization-uri: http://localhost:8080/oauth/authorize
    resource:
      token-info-uri: http://localhost:8080/oauth/check_token


server:
  port: 8081
因为resource需要oauth/check_token访问授权服务器验证token,所以在授权项目中排出/check_token接口。修改WebSecurityConfig类,
    //添加如下代码
    @Override
    public void configure(WebSecurity web) throws Exception {
        web.ignoring().antMatchers("/oauth/check_token");
    }
创建测试ResourceTestController
package com.li.spring.cloud.oauth2.resource.controller;

import org.springframework.web.bind.annotation.GetMapping;
import org.springframework.web.bind.annotation.RequestMapping;
import org.springframework.web.bind.annotation.RestController;

@RestController
public class ResourceTestController {

    @RequestMapping("resource")
    public String testResource() {
        return "资源测试";
    }

    @GetMapping("test")
    public String test() {
        return "不需要授权测试";
    }
}
当未携带令牌访问http://localhost:8081/test时可以访问,当访问http://localhost:8081/resource时拒绝访问
按照上文的方式获取到令牌:eb6df7b2-337d-4c0c-8be5-d692fdc9b5de。
携带令牌访问http://localhost:8081/resource?access_token=eb6df7b2-337d-4c0c-8be5-d692fdc9b5de,访问成功。
3.4 JWT令牌
上面的授权方法的问题是用户每次请求资源服务,资源服务都需要携带令牌访问认证服务去校验令牌的合法性,并根据令牌获取用户的相关信息,性能低下。
使用JWT的思路是,用户认证通过会得到一个JWT令牌,JWT令牌中已经包括了用户相关的信息,客户端只需要携带 JWT访问资源服务,资源服务根据事先约定的算法自行完成令牌校验,无需每次都请求认证服务完成授权。
JWT令牌的优点: 1、jwt基于json,非常方便解析。 2、可以在令牌中自定义丰富的内容,易扩展。 3、通过非对称加密算法及数字签名技术,JWT防止篡改,安全性高。 4、资源服务使用JWT可不依赖认证服务即可完成授权。 缺点: 1、JWT令牌较长,占存储空间比较大。
3.4.1 生成私钥和公钥
1.生成密钥证书
keytool -genkeypair -alias mykey -keyalg RSA -keypass vortex -keystore key.keystore -storepass vortex
keytools是Java提供的证书管理工具
-alias:密钥的别名
-keyalg:使用的hash算法
-keypass:密钥的访问密码
-keystore:密钥库文件名
-storepass:密钥库的访问密码
2.导出公钥
下载openssl,安装并配置到环境变量
keytool -list -rfc --keystore key.keystore | openssl x509 -inform pem -pubkey
输入密钥库密码就可以得到公钥
-----BEGIN PUBLIC KEY-----MIIBIjANBgkqhkiG9w0BAQEFAAOCAQ8AMIIBCgKCAQEAo2UE2U3slFjFFedcMwxGrJdLfKCOfo2ptmm6brcQHfECQgSgtuCBpgtdiYmXWN4RHNyXE83ljXSjtOYp64QcyhfyvWpE+P13vg3qJDgVNdq3i6ZPZfgAlacHI92p8Im5Wy+NMaV4Tv8woNDC0tQjKBdVdGX8ev8W0W5CtNSPPWYw7GupG2OaSThxKnXa5GPFlfgsa6pmv+03G0QbuY7MyrXl/aItmi+l0j0vy7hqlHbjj2FpxPDXeTqNjThy5l3aBjh1kGv8K/j/9wDsKEPNRlminROR6Hj9+6FD9O8HM32malJmZmDu2tqwaXnilLZGFiSLKFeoH8WNKDRLhpUM8wIDAQAB-----END PUBLIC KEY-----
将证书文件放置在resource文件夹下,在test文件夹下测试jwt令牌生成及校验。
package com.li.oauth2.test;


import org.springframework.core.io.ClassPathResource;
import org.springframework.security.jwt.Jwt;
import org.springframework.security.jwt.JwtHelper;
import org.springframework.security.jwt.crypto.sign.RsaSigner;
import org.springframework.security.jwt.crypto.sign.RsaVerifier;
import org.springframework.security.oauth2.provider.token.store.KeyStoreKeyFactory;

import java.security.KeyPair;
import java.security.interfaces.RSAPrivateKey;


public class TestJwt {

    public static void main(String[] args) {
        //证书文件
        String keystore = "key.keystore";
        //密钥库密码
        String keystorePassword = "vortex";
        //密钥别名
        String alias = "mykey";
        //密钥的密码
        String keyPassword = "vortex";

        ClassPathResource resource = new ClassPathResource(keystore);
        //密钥工厂
        KeyStoreKeyFactory factory = new KeyStoreKeyFactory(resource, keystorePassword.toCharArray());
        //密钥对
        KeyPair keyPair = factory.getKeyPair(alias, keyPassword.toCharArray());
        //私钥
        RSAPrivateKey privateKey = (RSAPrivateKey) keyPair.getPrivate();

        Jwt token = JwtHelper.encode("姓名:lijianyou", new RsaSigner(privateKey));
        String encode = token.getEncoded();
        System.out.println(encode);
        //公钥
        String publicKey = "-----BEGIN PUBLIC KEY-----MIIBIjANBgkqhkiG9w0BAQEFAAOCAQ8AMIIBCgKCAQEAo2UE2U3slFjFFedcMwxGrJdLfKCOfo2ptmm6brcQHfECQgSgtuCBpgtdiYmXWN4RHNyXE83ljXSjtOYp64QcyhfyvWpE+P13vg3qJDgVNdq3i6ZPZfgAlacHI92p8Im5Wy+NMaV4Tv8woNDC0tQjKBdVdGX8ev8W0W5CtNSPPWYw7GupG2OaSThxKnXa5GPFlfgsa6pmv+03G0QbuY7MyrXl/aItmi+l0j0vy7hqlHbjj2FpxPDXeTqNjThy5l3aBjh1kGv8K/j/9wDsKEPNRlminROR6Hj9+6FD9O8HM32malJmZmDu2tqwaXnilLZGFiSLKFeoH8WNKDRLhpUM8wIDAQAB-----END PUBLIC KEY-----";
        //校验令牌
        Jwt jwt = JwtHelper.decodeAndVerify(encode, new RsaVerifier(publicKey));
        System.out.println(jwt.getClaims());

    }
}
测试成功。
修改AuthorizationServerConfig配置类
package com.li.spring.cloud.oauth2.config;

import org.springframework.beans.factory.annotation.Autowired;
import org.springframework.beans.factory.annotation.Qualifier;
import org.springframework.context.annotation.Bean;
import org.springframework.context.annotation.Configuration;
import org.springframework.core.io.ClassPathResource;
import org.springframework.security.authentication.AuthenticationManager;
import org.springframework.security.core.userdetails.UserDetailsService;
import org.springframework.security.oauth2.config.annotation.configurers.ClientDetailsServiceConfigurer;
import org.springframework.security.oauth2.config.annotation.web.configuration.AuthorizationServerConfigurerAdapter;
import org.springframework.security.oauth2.config.annotation.web.configuration.EnableAuthorizationServer;
import org.springframework.security.oauth2.config.annotation.web.configurers.AuthorizationServerEndpointsConfigurer;
import org.springframework.security.oauth2.config.annotation.web.configurers.AuthorizationServerSecurityConfigurer;
import org.springframework.security.oauth2.provider.client.JdbcClientDetailsService;
import org.springframework.security.oauth2.provider.token.store.JdbcTokenStore;
import org.springframework.security.oauth2.provider.token.store.JwtAccessTokenConverter;
import org.springframework.security.oauth2.provider.token.store.KeyStoreKeyFactory;

import javax.sql.DataSource;

@Configuration
@EnableAuthorizationServer
public class AuthorizationServerConfig extends AuthorizationServerConfigurerAdapter {

    @Autowired
    private UserDetailsService userDetailsService;

    @Autowired
    private AuthenticationManager authenticationManager;

    @Autowired
    @Qualifier("dataSource")
    private DataSource dataSource;


    @Bean("jdbcTokenStore")
    public JdbcTokenStore getJdbcTokenStore() {
        return new JdbcTokenStore(dataSource);
    }


    @Bean("jdbcClientDetailsService")
    public JdbcClientDetailsService getJdbcClientDetailsService() {
        return new JdbcClientDetailsService(dataSource);
    }


    @Override
    public void configure(ClientDetailsServiceConfigurer clients) throws Exception {
        // 使用JdbcClientDetailsService客户端详情服务
        clients.withClientDetails(getJdbcClientDetailsService());
    }


    @Override
    public void configure(AuthorizationServerEndpointsConfigurer endpoints) {
        endpoints.authenticationManager(authenticationManager)
                // 配置JwtAccessToken转换器
                .accessTokenConverter(jwtAccessTokenConverter())
                // refresh_token需要userDetailsService
                .reuseRefreshTokens(false).userDetailsService(userDetailsService);
        //.tokenStore(getJdbcTokenStore());
    }

    @Override
    public void configure(AuthorizationServerSecurityConfigurer oauthServer) {
        oauthServer
                .tokenKeyAccess("permitAll()")
                // 开启/oauth/check_token验证端口认证权限访问
                .checkTokenAccess("isAuthenticated()");
    }

    /**
     * 使用非对称加密算法来对Token进行签名
     * @return
     */
    @Bean
    public JwtAccessTokenConverter jwtAccessTokenConverter() {

        //TODO 自定义converter,将用户信息保存到token
        final JwtAccessTokenConverter converter = new JwtAccessTokenConverter();
        // 导入证书
        KeyStoreKeyFactory keyStoreKeyFactory =
                new KeyStoreKeyFactory(new ClassPathResource("key.keystore"), "vortex".toCharArray());
        converter.setKeyPair(keyStoreKeyFactory.getKeyPair("mykey"));

        return converter;
    }
}
实现UserDetails接口
package com.li.spring.cloud.oauth2.domain;

import org.springframework.security.core.GrantedAuthority;
import org.springframework.security.core.authority.AuthorityUtils;
import org.springframework.security.core.userdetails.User;
import org.springframework.security.core.userdetails.UserDetails;

import java.util.Collection;

public class MyUserDetails implements UserDetails {

    private String userName;

    private String password;

    private User user;

    public String getUserName() {
        return userName;
    }

    public void setUserName(String userName) {
        this.userName = userName;
    }

    public void setPassword(String password) {
        this.password = password;
    }

    public User getUser() {
        return user;
    }

    public void setUser(User user) {
        this.user = user;
    }

    /**
     * 重写getAuthorities方法,将用户的角色作为权限
     */
    @Override
    public Collection getAuthorities() {
        //TODO 后续带完善
        return AuthorityUtils.commaSeparatedStringToAuthorityList("ROLE_SUPER");
    }

    @Override
    public String getPassword() {
        return password;
    }

    @Override
    public String getUsername() {
        return userName;
    }

    @Override
    public boolean isAccountNonExpired() {
        return true;
    }


    @Override
    public boolean isAccountNonLocked() {
        return true;
    }

    @Override
    public boolean isCredentialsNonExpired() {
        return true;
    }

    @Override
    public boolean isEnabled() {
        return true;
    }
}
自定义实现UserDetailsService,覆写loadUserByUsername方法
package com.li.spring.cloud.oauth2.service.impl;

import com.li.spring.cloud.oauth2.domain.MyUserDetails;
import org.apache.commons.lang3.StringUtils;
import org.springframework.beans.factory.annotation.Autowired;
import org.springframework.context.annotation.Primary;
import org.springframework.security.core.userdetails.UserDetails;
import org.springframework.security.core.userdetails.UserDetailsService;
import org.springframework.security.core.userdetails.UsernameNotFoundException;
import org.springframework.security.oauth2.provider.ClientDetailsService;
import org.springframework.stereotype.Service;

@Primary
@Service
public class UserDetailsServiceImpl implements UserDetailsService {

    @Autowired
    ClientDetailsService clientDetailsService;

    @Override
    public UserDetails loadUserByUsername(String username) throws UsernameNotFoundException {

        //TODO 判断用户是否是admin,(后面改从数据库查用户)
        if (StringUtils.isEmpty(username) || !"admin".equals(username)) {
            throw new UsernameNotFoundException("用户不存在");
        }

        MyUserDetails userDetails = new MyUserDetails();
        userDetails.setUserName(username);
        userDetails.setPassword("123456");
        return userDetails;
    }
}
在WebSecurityConfig配置类中覆写AuthenticationManager并配置成bean
package com.li.spring.cloud.oauth2.config;

import org.springframework.context.annotation.Bean;
import org.springframework.context.annotation.Configuration;
import org.springframework.security.authentication.AuthenticationManager;
import org.springframework.security.config.annotation.authentication.builders.AuthenticationManagerBuilder;
import org.springframework.security.config.annotation.method.configuration.EnableGlobalMethodSecurity;
import org.springframework.security.config.annotation.web.builders.WebSecurity;
import org.springframework.security.config.annotation.web.configuration.EnableWebSecurity;
import org.springframework.security.config.annotation.web.configuration.WebSecurityConfigurerAdapter;
import org.springframework.security.crypto.bcrypt.BCryptPasswordEncoder;

@Configuration
@EnableWebSecurity
//对全部方法进行验证
@EnableGlobalMethodSecurity(prePostEnabled = true, securedEnabled = true, jsr250Enabled = true)
public class WebSecurityConfig extends WebSecurityConfigurerAdapter {

    @Bean
    public BCryptPasswordEncoder passwordEncoder() {
        return new BCryptPasswordEncoder();
    }

    //配置内存登录用户验证

    @Override
    protected void configure(AuthenticationManagerBuilder auth) throws Exception {
        auth.inMemoryAuthentication()
                .withUser("admin").password(passwordEncoder().encode("123456")).roles("ADMIN")
                .and()
                .withUser("user").password(passwordEncoder().encode("123456")).roles("USER");
    }

    @Override
    public void configure(WebSecurity web) throws Exception {
        web.ignoring().antMatchers("/oauth/check_token");
    }

    @Override
    @Bean
    public AuthenticationManager authenticationManagerBean() throws Exception {
        return super.authenticationManagerBean();
    }

}
启动项目
访问http://localhost:8080/oauth/authorize?client_id=client&response_type=code
得到授权码:J3rnGY
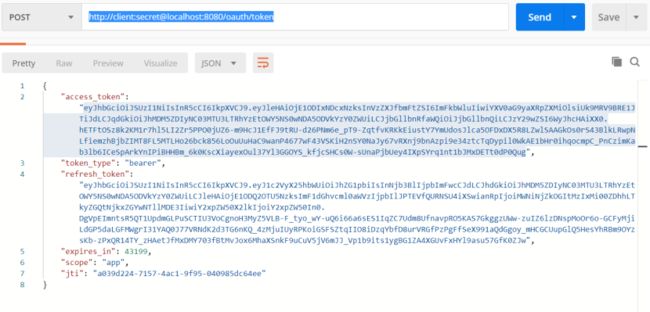
用postman发送post请求获取token
得到token
eyJhbGciOiJSUzI1NiIsInR5cCI6IkpXVCJ9.eyJleHAiOjE1ODIxNDcxNzksInVzZXJfbmFtZSI6ImFkbWluIiwiYXV0aG9yaXRpZXMiOlsiUk9MRV9BRE1JTiJdLCJqdGkiOiJhMDM5ZDIyNC03MTU3LTRhYzEtOWY5NS0wNDA5ODVkYzY0ZWUiLCJjbGllbnRfaWQiOiJjbGllbnQiLCJzY29wZSI6WyJhcHAiXX0.hETFtOSz8k2KM1r7hl5LI2Zr5PPO0jUZ6-m9HcJ1EfFJ9tRU-d26PNm6e_pT9-ZqtfvKRKkEiustY7YmUdosJlca5OFDxDX5R8LZwlSAAGkOs0rS43BlkLRwpNLfiemzhBjbZIMT8FL5MTLHo26bck856LoOuUuHaC9wanP4677wF43VSKiH2nSY0NaJy67vRXnj9bnAzpi9e34ztcTqDypil0WkAE1bHr0ihqocmpC_PnCzimKab3lb6ICeSpArkYnIPiBHHBm_6k0KscXiayexOul37Yl3GGOYS_kfjcSHCs0W-sUnaPjbUey4IXpSYrq1nt1bJMxDETt0dP0Qug
将上文得到的公钥保存到publickey.txt文件夹中,放在资源服务项目的resource文件夹中,修改ResourceServerConfig配置类
package com.li.spring.cloud.oauth2.resource.config;

import org.springframework.context.annotation.Bean;
import org.springframework.context.annotation.Configuration;
import org.springframework.core.io.ClassPathResource;
import org.springframework.core.io.Resource;
import org.springframework.security.config.annotation.method.configuration.EnableGlobalMethodSecurity;
import org.springframework.security.config.annotation.web.builders.HttpSecurity;
import org.springframework.security.config.http.SessionCreationPolicy;
import org.springframework.security.oauth2.config.annotation.web.configuration.EnableResourceServer;
import org.springframework.security.oauth2.config.annotation.web.configuration.ResourceServerConfigurerAdapter;
import org.springframework.security.oauth2.provider.token.TokenStore;
import org.springframework.security.oauth2.provider.token.store.JwtAccessTokenConverter;
import org.springframework.security.oauth2.provider.token.store.JwtTokenStore;

import java.io.BufferedReader;
import java.io.IOException;
import java.io.InputStreamReader;
import java.util.stream.Collectors;

@Configuration
@EnableResourceServer
@EnableGlobalMethodSecurity(prePostEnabled = true, securedEnabled = true, jsr250Enabled = true)
public class ResourceServerConfig extends ResourceServerConfigurerAdapter {

    //公钥
    private static final String PUBLIC_KEY = "publickey.txt";

    //定义JwtTokenStore,使用jwt令牌
    @Bean
    public TokenStore tokenStore(JwtAccessTokenConverter jwtAccessTokenConverter) {
        return new JwtTokenStore(jwtAccessTokenConverter);
    }

    //定义JJwtAccessTokenConverter,使用jwt令牌
    @Bean
    public JwtAccessTokenConverter jwtAccessTokenConverter() {
        JwtAccessTokenConverter converter = new JwtAccessTokenConverter();
        converter.setVerifierKey(getPubKey());
        return converter;
    }

    /**
     * 获取非对称加密公钥 Key
     * @return 公钥 Key
     */
    private String getPubKey() {
        Resource resource = new ClassPathResource(PUBLIC_KEY);
        try {
            InputStreamReader inputStreamReader = new
                    InputStreamReader(resource.getInputStream());
            BufferedReader br = new BufferedReader(inputStreamReader);
            return br.lines().collect(Collectors.joining("\n"));
        } catch (IOException ioe) {
            return null;
        }
    }

    //Http安全配置,对每个到达系统的http请求链接进行校验
    @Override
    public void configure(HttpSecurity http) throws Exception {

//        http.authorizeRequests().anyRequest().authenticated(); //所有请求必须认证通过

        //所有请求必须认证通过 (swagger-ui放行)
        http.authorizeRequests()
                //下边的路径放行
                .antMatchers("/swagger-ui.html").permitAll()
                .anyRequest().authenticated();
    }
}
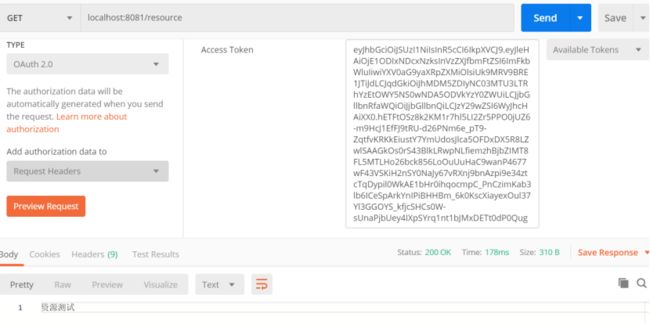
启动项目测试,填写token,测试成功
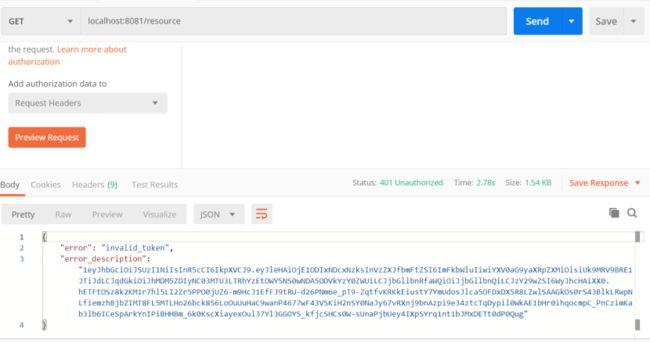
修改token,测试失败
3.5 修改项目(使用公司spring版本)
单点登录:单点登录全称Single Sign On,是指在多系统应用群中登录一个系统,便可在其他所有系统中得到授权而无需再次登录,包括单点登录与单点注销两部分。
用户访问系统1的受保护资源,系统1发现用户未登录,跳转至sso认证中心,并将自己的地址作为参数
sso认证中心发现用户未登录,将用户引导至登录页面
用户输入用户名密码提交登录申请
sso认证中心校验用户信息,创建用户与sso认证中心之间的会话,称为全局会话,同时创建授权令牌
sso认证中心带着令牌跳转会最初的请求地址(系统1)
系统1拿到令牌,去sso认证中心校验令牌是否有效
sso认证中心校验令牌,返回有效,注册系统1
系统1使用该令牌创建与用户的会话,称为局部会话,返回受保护资源
用户访问系统2的受保护资源
系统2发现用户未登录,跳转至sso认证中心,并将自己的地址作为参数
sso认证中心发现用户已登录,跳转回系统2的地址,并附上令牌
系统2拿到令牌,去sso认证中心校验令牌是否有效
sso认证中心校验令牌,返回有效,注册系统2
系统2使用该令牌创建与用户的局部会话,返回受保护资源
3.5.1 修改项目
主要修改:
- 去除BCryptPasswordEncoder加密,spring 1.5版本不支持客户端secret和用户密码加密
- 注释掉JWT令牌部分,改用oauth2原生令牌
- 加入redis保存令牌(目前项目中注释掉)
- 采用密码模式测试项目(不改动项目代码,在数据库客户端表中给客户端加密码模式)
AuthorizationServerConfig认证服务器配置
package com.vortex.cloud.config;

import org.springframework.beans.factory.annotation.Autowired;
import org.springframework.beans.factory.annotation.Qualifier;
import org.springframework.context.annotation.Bean;
import org.springframework.context.annotation.Configuration;
import org.springframework.core.io.ClassPathResource;
import org.springframework.data.redis.connection.RedisConnectionFactory;
import org.springframework.security.authentication.AuthenticationManager;
import org.springframework.security.core.userdetails.UserDetailsService;
import org.springframework.security.oauth2.config.annotation.configurers.ClientDetailsServiceConfigurer;
import org.springframework.security.oauth2.config.annotation.web.configuration.AuthorizationServerConfigurerAdapter;
import org.springframework.security.oauth2.config.annotation.web.configuration.EnableAuthorizationServer;
import org.springframework.security.oauth2.config.annotation.web.configurers.AuthorizationServerEndpointsConfigurer;
import org.springframework.security.oauth2.config.annotation.web.configurers.AuthorizationServerSecurityConfigurer;
import org.springframework.security.oauth2.provider.client.JdbcClientDetailsService;
import org.springframework.security.oauth2.provider.token.store.JdbcTokenStore;
import org.springframework.security.oauth2.provider.token.store.JwtAccessTokenConverter;
import org.springframework.security.oauth2.provider.token.store.KeyStoreKeyFactory;
import org.springframework.security.oauth2.provider.token.store.redis.RedisTokenStore;

import javax.sql.DataSource;

@Configuration
@EnableAuthorizationServer
public class AuthorizationServerConfig extends AuthorizationServerConfigurerAdapter {

    @Autowired
    private UserDetailsService userDetailsService;

    @Autowired
    private AuthenticationManager authenticationManager;

    @Autowired
    private RedisConnectionFactory redisConnectionFactory;

    @Autowired
    @Qualifier("dataSource")
    private DataSource dataSource;


    @Bean("jdbcTokenStore")
    public JdbcTokenStore getJdbcTokenStore() {
        return new JdbcTokenStore(dataSource);
    }

    @Bean("redisTokenStore")
    public RedisTokenStore redisTokenStore() {
        return new RedisTokenStore(redisConnectionFactory);
    }

    @Bean("jdbcClientDetailsService")
    public JdbcClientDetailsService getJdbcClientDetailsService() {
        return new JdbcClientDetailsService(dataSource);
    }


    @Override
    public void configure(ClientDetailsServiceConfigurer clients) throws Exception {
        // 使用JdbcClientDetailsService客户端详情服务
        clients.withClientDetails(getJdbcClientDetailsService());
    }


    @Override
    public void configure(AuthorizationServerEndpointsConfigurer endpoints) {
        endpoints.authenticationManager(authenticationManager)
                // 配置Jwt令牌转换器
                //.accessTokenConverter(jwtAccessTokenConverter())
                // refresh_token需要userDetailsService
                .reuseRefreshTokens(false).userDetailsService(userDetailsService)
                //配置redis储存令牌
                //.tokenStore(redisTokenStore())
                //配置jdbc储存令牌
                .tokenStore(getJdbcTokenStore());
    }

    @Override
    public void configure(AuthorizationServerSecurityConfigurer oauthServer) {
        oauthServer
                .tokenKeyAccess("permitAll()")
                // 开启/oauth/check_token验证端口认证权限访问
                .checkTokenAccess("isAuthenticated()")
                .allowFormAuthenticationForClients();
    }

    /*
    @Bean
    public JwtAccessTokenConverter jwtAccessTokenConverter() {

        //TODO 自定义converter,将用户信息保存到token
        final JwtAccessTokenConverter converter = new JwtAccessTokenConverter();
        // 导入证书
        KeyStoreKeyFactory keyStoreKeyFactory =
                new KeyStoreKeyFactory(new ClassPathResource("key.keystore"), "vortex".toCharArray());
        converter.setKeyPair(keyStoreKeyFactory.getKeyPair("mykey"));

        return converter;
    }

     */
}
WebSecurityConfig安全配置类,使用userDetailsService校验用户数据(目前在userDetailsService类中写死,后面改从数据库查询)
package com.vortex.cloud.config;

import org.springframework.beans.factory.annotation.Autowired;
import org.springframework.context.annotation.Bean;
import org.springframework.context.annotation.Configuration;
import org.springframework.security.authentication.AuthenticationManager;
import org.springframework.security.config.annotation.authentication.builders.AuthenticationManagerBuilder;
import org.springframework.security.config.annotation.method.configuration.EnableGlobalMethodSecurity;
import org.springframework.security.config.annotation.web.builders.WebSecurity;
import org.springframework.security.config.annotation.web.configuration.EnableWebSecurity;
import org.springframework.security.config.annotation.web.configuration.WebSecurityConfigurerAdapter;
import org.springframework.security.core.userdetails.UserDetailsService;
import org.springframework.security.crypto.bcrypt.BCryptPasswordEncoder;

@Configuration
@EnableWebSecurity
//对全部方法进行验证
@EnableGlobalMethodSecurity(prePostEnabled = true, securedEnabled = true, jsr250Enabled = true)
public class WebSecurityConfig extends WebSecurityConfigurerAdapter {

    @Autowired
    private UserDetailsService userDetailsService;


    @Override
    protected void configure(AuthenticationManagerBuilder auth) throws Exception {
        auth.userDetailsService(userDetailsService);
    }

    @Override
    public void configure(WebSecurity web) throws Exception {
        web.ignoring().antMatchers("/oauth/check_token");
    }

    @Override
    @Bean
    public AuthenticationManager authenticationManagerBean() throws Exception {
        return super.authenticationManagerBean();
    }

}
UserDetailsServiceImpl类从数据库校验用户信息(目前写死)
package com.vortex.cloud.service.impl;

import org.apache.commons.lang3.StringUtils;
import org.springframework.beans.factory.annotation.Autowired;
import org.springframework.context.annotation.Primary;
import org.springframework.security.core.authority.SimpleGrantedAuthority;
import org.springframework.security.core.userdetails.User;
import org.springframework.security.core.userdetails.UserDetails;
import org.springframework.security.core.userdetails.UserDetailsService;
import org.springframework.security.core.userdetails.UsernameNotFoundException;
import org.springframework.security.crypto.bcrypt.BCryptPasswordEncoder;
import org.springframework.security.oauth2.provider.ClientDetailsService;
import org.springframework.stereotype.Service;

import java.util.ArrayList;
import java.util.List;

@Primary
@Service
public class UserDetailsServiceImpl implements UserDetailsService {

    @Autowired
    ClientDetailsService clientDetailsService;

    @Override
    public UserDetails loadUserByUsername(String username) throws UsernameNotFoundException {

        //TODO 判断用户是否是admin,(后面改从数据库查用户)
        if (StringUtils.isEmpty(username) || !"admin".equals(username)) {
            throw new UsernameNotFoundException("用户不存在");
        }

        String role = "ADMIN";
        List authorities = new ArrayList<>();
        authorities.add(new SimpleGrantedAuthority(role));
        return new User(username, "123456", authorities);
    }
}
资源服务配置(注释掉JWT令牌校验部分)
package com.vortex.cloud.config;

import org.springframework.context.annotation.Bean;
import org.springframework.context.annotation.Configuration;
import org.springframework.core.io.ClassPathResource;
import org.springframework.core.io.Resource;
import org.springframework.security.config.annotation.method.configuration.EnableGlobalMethodSecurity;
import org.springframework.security.config.annotation.web.builders.HttpSecurity;
import org.springframework.security.oauth2.config.annotation.web.configuration.EnableResourceServer;
import org.springframework.security.oauth2.config.annotation.web.configuration.ResourceServerConfigurerAdapter;
import org.springframework.security.oauth2.provider.token.TokenStore;
import org.springframework.security.oauth2.provider.token.store.JwtAccessTokenConverter;
import org.springframework.security.oauth2.provider.token.store.JwtTokenStore;

import java.io.BufferedReader;
import java.io.IOException;
import java.io.InputStreamReader;
import java.util.stream.Collectors;

@Configuration
@EnableResourceServer
@EnableGlobalMethodSecurity(prePostEnabled = true, securedEnabled = true, jsr250Enabled = true)
public class ResourceServerConfig extends ResourceServerConfigurerAdapter {
    //JWT令牌配置
/*
    //公钥
    private static final String PUBLIC_KEY = "publickey.txt";

    //定义JwtTokenStore,使用jwt令牌
    @Bean
    public TokenStore tokenStore(JwtAccessTokenConverter jwtAccessTokenConverter) {
        return new JwtTokenStore(jwtAccessTokenConverter);
    }

    //定义JJwtAccessTokenConverter,使用jwt令牌
    @Bean
    public JwtAccessTokenConverter jwtAccessTokenConverter() {
        JwtAccessTokenConverter converter = new JwtAccessTokenConverter();
        converter.setVerifierKey(getPubKey());
        return converter;
    }

     //获取非对称加密公钥 Key

    private String getPubKey() {
        Resource resource = new ClassPathResource(PUBLIC_KEY);
        try {
            InputStreamReader inputStreamReader = new
                    InputStreamReader(resource.getInputStream());
            BufferedReader br = new BufferedReader(inputStreamReader);
            return br.lines().collect(Collectors.joining("\n"));
        } catch (IOException ioe) {
            return null;
        }
    }

*/
    //Http安全配置,对每个到达系统的http请求链接进行校验
    @Override
    public void configure(HttpSecurity http) throws Exception {

//        http.authorizeRequests().anyRequest().authenticated(); //所有请求必须认证通过

        //所有请求必须认证通过 (swagger-ui放行)
        http.authorizeRequests()
                //下边的路径放行
                .antMatchers("/swagger-ui.html").permitAll()
                .anyRequest().authenticated();
    }
}
资源服务项目配置(application.yml)
spring:
  application:
    name: spring-cloud-oauth2-resource

security:
  oauth2:
    client:
      client-id: client
      client-secret: secret
      access-token-uri: http://localhost:8080/oauth/token
      user-authorization-uri: http://localhost:8080/oauth/authorize
    resource:
      token-info-uri: http://localhost:8080/oauth/check_token


server:
  port: 8081
数据库中插入新客户端信息
INSERT INTO oauth_client_details
    (client_id, client_secret, scope, authorized_grant_types,
    web_server_redirect_uri, authorities, access_token_validity,
    refresh_token_validity, additional_information, autoapprove)
VALUES
    ('client1', 'secret', 'all',
    'authorization_code,refresh_token,password', null, null, 3600, 36000, null, true);
经测试,授权码模式成功。
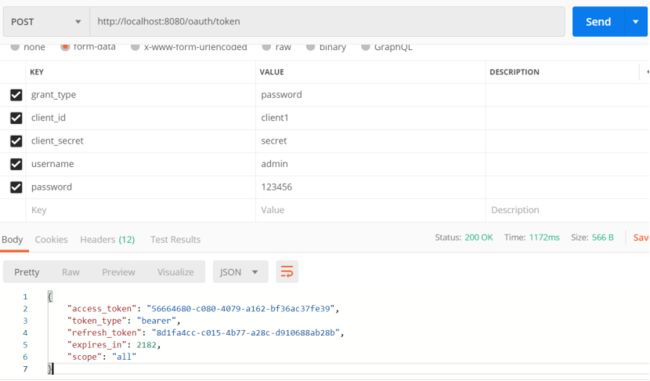
测试密码模式:
使用postman访问http://localhost:8080/oauth/token
成功获得token
使用token从资源服务器获取数据成功

