Java成长之路(一)--SpringBoot基础学习--SpringBoot与其他技术集成
SpringBoot与其他技术集成
上一篇文章《Java成长之路(一)–SpringBoot基础学习–3种项目创建及热部署》我们说了,如何创建springboot项目。这次我们一起来学习springboot的技术整合。本文中不可能列举所有的技术整合过程,之抛砖引玉,供大家入门学习。
1. 集成MyBatis
使用SpringBoot整合MyBatis,完成查询所有功能。
实现步骤:
-
创建SpringBoot工程
-
勾选依赖坐标
-
数据库连接信息
-
创建User表、创建实体UserBean
-
编写三层架构:Mapper、Service、controller,编写查询所有的方法
-
配置Mapper映射文件
-
在application.properties中添加MyBatis配置,扫描mapper.xml和mapper
-
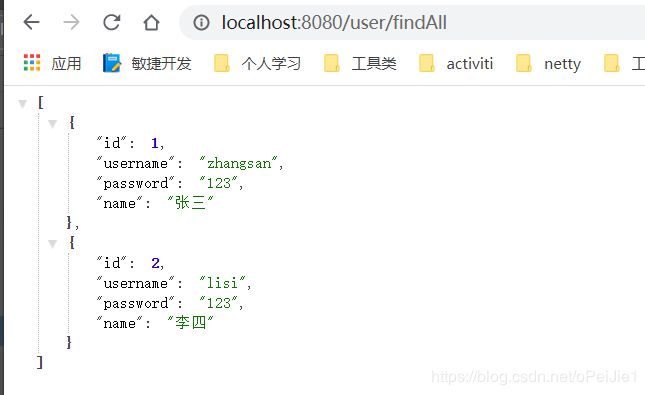
访问测试地址http://localhost:8080/queryUsers
实现过程:
- 创建SpringBoot工程,day01_springboot_mybatis;
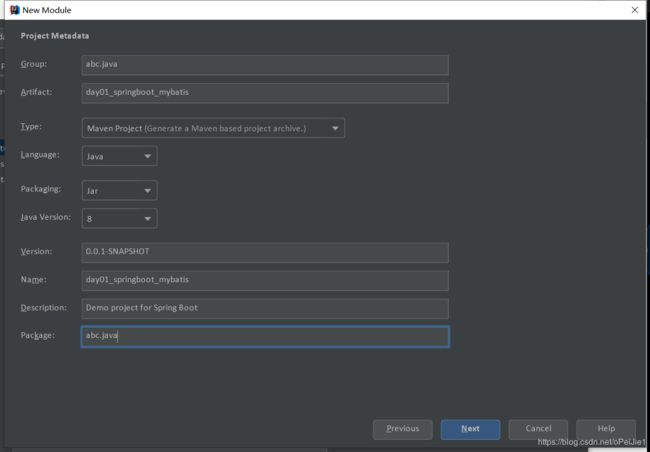
- 勾选依赖坐标

- 在application.yml中添加数据库连接信息
spring.datasource.driver-class-name: com.mysql.cj.jdbc.Driver
spring.datasource.password: root
spring.datasource.username: root
spring.datasource.url: jdbc:mysql://127.0.0.1/test?useUnicode=true&characterEncoding=UTF-8&serverTimezone=UTC
数据库连接地址后加
?useUnicode=true&characterEncoding=UTF-8&serverTimezone=UTC,不然会报错。
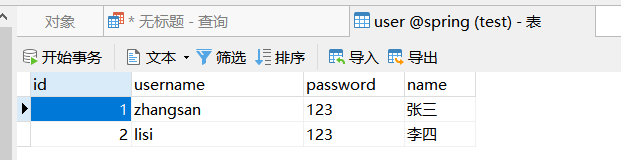
- 创建User表
-- ----------------------------
-- Table structure for `user`
-- ---------------------------- DROP TABLE IF EXISTS `user`;
CREATE TABLE `user` (
`id` int(11) NOT NULL AUTO_INCREMENT,
`username` varchar(50) DEFAULT NULL,
`password` varchar(50) DEFAULT NULL,
`name` varchar(50) DEFAULT NULL, PRIMARY KEY (`id`)
) ENGINE=InnoDB AUTO_INCREMENT=3 DEFAULT CHARSET=utf8;
-- ----------------------------
-- Records of user
-- ----------------------------
INSERT INTO `user` VALUES ('1', 'zhangsan', '123', '张三'); INSERT INTO `user` VALUES ('2', 'lisi', '123', '李四');
- 在domain包下创建实体User
public class User {
	private Integer id;
	private String username;//用户名
	private String password;//密码private String name;//姓名
	//getter setter...
	//toString
}
- mapper包下编写UserMapper:
使用
@Mapper标记该类是一个Mapper接口,可以被SpringBoot自动扫描。
package abc.java.mapper;

import abc.java.domain.User;
import org.apache.ibatis.annotations.Mapper;
import java.util.List;

@Repository //注入spring容器
@Mapper
public interface UserMapper {
    List<User> findAll();
    User findById(Integer id);
    void save(User user);
    void update(User user);
    void delete(Integer id);
}
- 配置Mapper映射文件:
在src/main/resources/mapper路径下创建UserMapper.xml配置文件
<?xml version="1.0" encoding="utf-8" ?>
<!DOCTYPE mapper PUBLIC "-//mybatis.org//DTD Mapper 3.0//EN"
        "http://mybatis.org/dtd/mybatis-3-mapper.dtd" >
<mapper namespace="abc.java.mapper.UserMapper">

    <select id="findAll" resultType="user">
		select * from user
	</select>
    <select id="findById" parameterType="Integer" resultType="user">
		select * from user where id = #{id}
	</select>
	<insert id="save" parameterType="user">
		INSERT into user (username,password,name) VALUES (#{username},#{password},#{name})
	</insert>
	<update id="update" parameterType="user">
		update user set username=#{username},password=#{password},name=#{name} where id=#{id}
	</update>
	<delete id="delete" parameterType="Integer">
		delete from user where id=#{id}
	</delete>
</mapper>
- 在application.properties中添加MyBatis的配置信息
# 扫描实体
mybatis.type-aliases-package: abc.java.domain
# mapper.xml配置文件路径,mapper目录下的所有以Mapper.xml结尾的文件
mybatis.mapper-locations: classpath:mapper/*Mapper.xml
- controller包下编写UserController
package abc.java.controller;

import abc.java.domain.User;
import abc.java.service.UserService;
import org.springframework.beans.factory.annotation.Autowired;
import org.springframework.web.bind.annotation.RequestMapping;
import org.springframework.web.bind.annotation.RestController;

import java.util.List;

@RestController
@RequestMapping("/user")
public class UserController {

    @Autowired
    UserService userService;

    /**
     * 查询所有
     * @return
     */
    @RequestMapping("/findAll")
    public List<User> findAll() {
        return userService.findAll();
    }

    /**
     * 根据id查询
     * @param id
     * @return
     */
    @RequestMapping("/findById")
    public User findById(Integer id) {
        return userService.findById(id);
    }

    /**
     * 新增
     * @param user
     */
    @RequestMapping("/save")
    public void save(User user) {
        userService.save(user);
    }

    /**
     * 修改
     * @param user
     */
    @RequestMapping("/update")
    public void update(User user) {
        userService.update(user);
    }

    /**
     * 删除
     * @param id
     */
    @RequestMapping("/delete")
    public void delete(Integer id) {
        userService.delete(id);
    }
}
- 访问测试地址http://localhost:8080/queryUsers
2. 集成SpringDataRedis
实现目标:
SpringBoot整合了Redis之后,实现用户数据查询缓存。
实现步骤:
- 添加Redis起步依赖
- 在application.properties中配置redis端口、地址
- 注入RedisTemplate操作Redis缓存查询所有用户数据
- 测试缓存
实现过程:
- 添加Redis起步依赖
<!--Redis 依赖-->
<dependency>
	<groupId>org.springframework.boot</groupId>
	<artifactId>spring-boot-starter-data-redis</artifactId>
</dependency>
- 配置Redis连接信息
# Redis 配置(使用的是默认设置,可以不配置)
spring.redis.host: localhost
spring.redis.port: 6379
- 注入RedisTemplate测试Redis操作
    /**
     * 查询所有
     * @return
     */
    @RequestMapping("/redis")
    public String testRedis() throws JsonProcessingException {
        //从redis获取数据
        String users  = (String) redisTemplate.boundValueOps("userList").get();
        if (StringUtils.isEmpty(users)) {
            System.out.println("==从数据库中获取用户数据");
            //如果为空,则从数据库获取数据
            List<User> userList = userService.findAll();
            //写入redis
            ObjectMapper jsonFormat = new ObjectMapper();
            users = jsonFormat.writeValueAsString(userList);
            System.out.println("==向redis存储用户数据");
            redisTemplate.boundValueOps("userList").set(users);
        }
        return users;
    }
3.集成定时器
使用SpringBoot开发定时器,每隔5秒输出一个当前时间。实现步骤:
[if !supportLists]1. [endif]开启定时器注解
@SpringBootApplication
@EnableScheduling//开启定时器
public class Day01SpringbootIntergrationApplication {
	public static void main(String[] args) {
		SpringApplication.run(Day01SpringbootIntergrationApplication.class,args);
	}
}
[if !supportLists]2. [endif]配置定时器方法
@Component
public class TimerUtil {
	@Scheduled(initialDelay = 1000,fixedRate = 1000)
	public void mytask(){
		System.out.println(LocalDateTime.now());
	}
}
[if !supportLists]3. [endif]测试定时器。

发送HTTP请求
1. 服务调用方式:RPC和HTTP
常见远程调用方式:
RPC:(Remote Produce Call)远程过程调用
-
基于Socket、自定义数据格式、速度快,效率高。
-
典型应用代表:Dubbo,WebService,ElasticSearch集群间互相调用。
HTTP:网络传输协议
- 基于TCP/IP、规定数据传输格式、缺点是消息封装比较臃肿、传输速度比较慢。
- 优点是对服务提供和调用方式没有任何技术限定,自由灵活,更符合微服务理念。
RPC和HTTP的区别:RPC是根据语言API来定义,而不是根据基于网络的应用来定义。
2. Spring的RestTemplate
- RestTemplate是Rest的HTTP客户端模板工具类
- 对基于Http的客户端进行封装
- 实现对象与JSON的序列化与反序列化
- 不限定客户端类型,目前常用的3种客户端都支持:HttpClient、OKHttp、JDK原生 URLConnection(默认方式)
URLConnection(默认方式)
3. RestTemplate案例
目标:
发送Http请求
实现步骤:
- 创建一个springboot的工程
- 配置RestTemplate的对象Bean到Spring容器中
- 在测试类中用@Autowired注入Spring容器中的RestTemplate对象
- 通过RestTemplate对象的getForObject发送请求
- 运行测试类的测试方法
实现过程:
- 创建一个springboot的工程,勾选Web的Starter

2. 在项目启动类位置中注册一个RestTemplate对象
@Configuration
public class MyConfiguration {

	@Bean
	public RestTemplate restTemplate(){
		return new RestTemplate();
	}
}
- 在测试类ApplicationTests中@Autowired 注入RestTemplate
- 通过RestTemplate的getForObject()方法,传递url地址及实体类的字节码
@RunWith(SpringRunner.class)
@SpringBootTest
public class ApplicationTests {
	@Autowired
	private RestTemplate restTemplate;

	@Test
	public void testREST() {
		String url = "http://baidu.com";
		String json = restTemplate.getForObject(url, String.class);
		System.out.println(json);
	}
}
RestTemplate会自动发起请求,接收响应并且帮我们对响应结果进行反序列化
- 运行测试类中的testREST方法;

5. 扩展了解:除此之外还可以整合什么?
- 集成 MongoDB
- 集成 ElasticSearch
- 集成 Memcached
- 集成邮件服务:普通邮件、模板邮件、验证码、带Html的邮件
- 集成RabbitMQ消息中间件
- 集成Freemarker或者Thymeleaf