Springboot 定时任务 调度远程服务方法 ,完成 Mqtt 遗嘱消息
一、Springboot 定时任务 调度远程服务方法 ,完成 Mqtt 遗嘱消息
DEMO的主要功能为:
springboot的定时调度任务,远程访问设备存储在数据库的断面信息,并将取到的断面信息发送给设备。
相关配置,依赖,启动类如下:
1.1相关配置
#Mqtt消息的配置
mqtt.broker = tcp://177.168.7.184:1883
mqtt.clientId = mqttRetained
mqtt.userName = client
mqtt.password = client
mqtt.connectionTimeout = 3
mqtt.keepAliveInterval = 10


#进行eureka 注册,
#注册时的 name
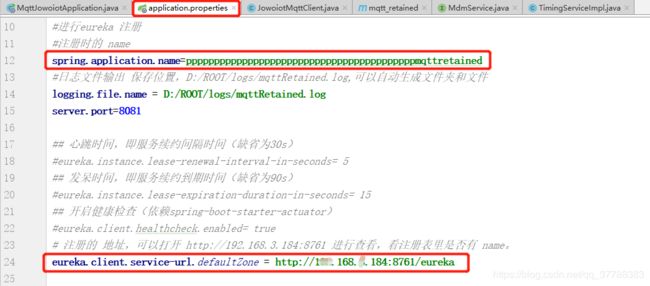
spring.application.name=pppppppppppppppppppppppppppppppppppppppppmqttretained
#日志文件输出 保存位置,D:/ROOT/logs/mqttRetained.log,可以自动生成文件夹和文件
logging.file.name = D:/ROOT/logs/mqttRetained.log
server.port=8081

## 心跳时间,即服务续约间隔时间(缺省为30s)
#eureka.instance.lease-renewal-interval-in-seconds= 5
## 发呆时间,即服务续约到期时间(缺省为90s)
#eureka.instance.lease-expiration-duration-in-seconds= 15
## 开启健康检查(依赖spring-boot-starter-actuator)
#eureka.client.healthcheck.enabled= true
# 注册的 地址,可以打开 http://177.168.7.184:8761 进行查看,看注册表里是否有 name。
eureka.client.service-url.defaultZone = http://177.168.7.184:8761/eureka


#是否开启jackson的序列化.#fail_on_empty_beans: false忽略无法转换的对象
spring.jackson.serialization.FAIL_ON_EMPTY_BEANS = false
management.security.enabled = false
hystrix.command.default.execution.isolation.thread.timeoutInMilliseconds = 15000

apollo.bootstrap.enabled = true
eureka.instance.perfer-ip-address = true
1.2添加依赖
主要有两方面的依赖:
mqtt消息相关的依赖、
调用远程服务方法的依赖EnableEurekaClient
<?xml version="1.0" encoding="UTF-8"?>
<project xmlns="http://maven.apache.org/POM/4.0.0" xmlns:xsi="http://www.w3.org/2001/XMLSchema-instance"
         xsi:schemaLocation="http://maven.apache.org/POM/4.0.0 https://maven.apache.org/xsd/maven-4.0.0.xsd">
    <modelVersion>4.0.0</modelVersion>

    <parent>
        <groupId>org.springframework.boot</groupId>
        <artifactId>spring-boot-starter-parent</artifactId>
        <version>2.3.0.RELEASE</version>
        <relativePath/> <!-- lookup parent from repository -->
    </parent>

    <groupId>com.jowoiot</groupId>
    <artifactId>mqtt_retained</artifactId>
    <version>0.0.1-SNAPSHOT</version>
    <name>mqttRetained</name>
    <packaging>jar</packaging>
    <description>Demo project for Spring Boot</description>

    <properties>
        <java.version>1.8</java.version>
        <spring-cloud.version>Hoxton.RELEASE</spring-cloud.version>
    </properties>

    <dependencies>
        <dependency>
            <groupId>org.springframework.boot</groupId>
            <artifactId>spring-boot-starter-web</artifactId>
        </dependency>

        <dependency>
            <groupId>org.springframework.boot</groupId>
            <artifactId>spring-boot-starter-test</artifactId>
            <scope>test</scope>
            <exclusions>
                <exclusion>
                    <groupId>org.junit.vintage</groupId>
                    <artifactId>junit-vintage-engine</artifactId>
                </exclusion>
            </exclusions>
        </dependency>

        <!-- mqtt -->
        <dependency>
            <groupId>org.eclipse.paho</groupId>
            <artifactId>org.eclipse.paho.client.mqttv3</artifactId>
            <version>1.2.0</version>
        </dependency>
        <dependency>
            <groupId>org.springframework.boot</groupId>
            <artifactId>spring-boot-starter-integration</artifactId>
        </dependency>
        <dependency>
            <groupId>org.springframework.integration</groupId>
            <artifactId>spring-integration-stream</artifactId>
        </dependency>
        <dependency>
            <groupId>org.springframework.integration</groupId>
            <artifactId>spring-integration-mqtt</artifactId>
        </dependency>
        <dependency>
            <groupId>com.google.code.gson</groupId>
            <artifactId>gson</artifactId>
            <version>2.8.2</version>
        </dependency>


        <dependency>
        <groupId>com.vaadin.external.google</groupId>
        <artifactId>android-json</artifactId>
        <version>0.0.20131108.vaadin1</version>
        <scope>compile</scope>
        </dependency>
        <dependency>
            <groupId>org.projectlombok</groupId>
            <artifactId>lombok</artifactId>
            <optional>true</optional>
        </dependency>


        <!-- @EnableEurekaClient -->
        <dependency>
            <groupId>org.springframework.cloud</groupId>
            <artifactId>spring-cloud-starter-netflix-eureka-client</artifactId>
        </dependency>
        <dependency>
            <groupId>org.springframework.cloud</groupId>
            <artifactId>spring-cloud-starter-netflix-eureka-server</artifactId>
        </dependency>
        <dependency>
            <groupId>org.springframework.cloud</groupId>
            <artifactId>spring-cloud-starter-netflix-ribbon</artifactId>
        </dependency>
        <dependency>
            <groupId>org.springframework.cloud</groupId>
            <artifactId>spring-cloud-starter-openfeign</artifactId>
        </dependency>
        <dependency>
            <groupId>org.springframework.boot</groupId>
            <artifactId>spring-boot-starter-actuator</artifactId>
        </dependency>
    </dependencies>

    <dependencyManagement>
        <dependencies>
            <dependency>
                <groupId>org.springframework.cloud</groupId>
                <artifactId>spring-cloud-dependencies</artifactId>
                <version>${spring-cloud.version}</version>
                <type>pom</type>
                <scope>import</scope>
            </dependency>
        </dependencies>
    </dependencyManagement>

    <build>
        <plugins>
            <plugin>
                <groupId>org.springframework.boot</groupId>
                <artifactId>spring-boot-maven-plugin</artifactId>
            </plugin>
        </plugins>
    </build>

</project>
1.3启动类
在启动类中,注意注解:
远程服务调用(@EnableDiscoveryClient、@EnableFeignClients),
定时任务(@EnableScheduling)。
package com.jowoiot.mqtt_retained;

import org.springframework.boot.SpringApplication;
import org.springframework.boot.autoconfigure.SpringBootApplication;
import org.springframework.cloud.client.discovery.EnableDiscoveryClient;
import org.springframework.cloud.openfeign.EnableFeignClients;
import org.springframework.scheduling.annotation.EnableScheduling;

@SpringBootApplication
//注册进 Eureka 服务中心,开启服务发现 只要一个注解@EnableDiscoveryClient就可以,不需要编写其它程序,然后就是将配置文件要配置好。
@EnableDiscoveryClient
//注解@EnableFeignClients告诉框架扫描所有使用注解@FeignClient定义的feign客户端,
@EnableFeignClients
// 启动类启用 定时调度任务
@EnableScheduling
public class MqttJowoiotApplication {
    public static void main(String[] args) {
        SpringApplication.run(MqttJowoiotApplication.class, args);
    }
}
二、实现mqtt遗嘱消息
相关设置参考文章:Springboot 写一个mqtt 发布/订阅案例(一)
这里贴上代码:
2.1 mqtt消息的配置类
package com.jowoiot.mqtt_retained.config;

import org.eclipse.paho.client.mqttv3.MqttClient;
import org.eclipse.paho.client.mqttv3.MqttConnectOptions;
import org.eclipse.paho.client.mqttv3.MqttException;
import org.eclipse.paho.client.mqttv3.persist.MemoryPersistence;
import org.springframework.beans.factory.annotation.Value;
import org.springframework.context.annotation.Bean;
import org.springframework.context.annotation.Configuration;

import java.util.UUID;

/**
 * mqtt客户端连接配置信息
 */
@Configuration
public class BeanConfig {

    @Value("${mqtt.broker:tcp://177.168.7.184:1883}")
    String broker;

    /*@Value("${mqtt.clientId:ups_mqtt_service}")
    String clientId;*/

    @Value("${mqtt.userName:client}")
    String username;

    @Value("${mqtt.password:client}")
    String password;

    @Value("10")
    int connectTimeout;

    @Value("${mqtt.keepAliveInterval:15}")
    int keepAliveInterval;


    @Bean
    public MqttConnectOptions mqttConnectOptions() {
        MqttConnectOptions options = new MqttConnectOptions();
        options.setCleanSession(false);
        options.setAutomaticReconnect(true);
        options.setConnectionTimeout(connectTimeout);    //设置连接超时
        options.setKeepAliveInterval(keepAliveInterval); // 设置 心跳  设置保持间隔
        options.setPassword(password.toCharArray());
        options.setUserName(username);
        options.setServerURIs(new String[]{broker});
        return options;
    }

    @Bean
    public MqttClient mqttClient() throws MqttException {
        return new MqttClient(broker,"UPS_"+ UUID.randomUUID().toString(),new MemoryPersistence());

    }
}
2.2 mqtt消息的服务类
package com.jowoiot.mqtt_retained.service;


import com.jowoiot.mqtt_retained.MqttJowoiotApplication;
import org.eclipse.paho.client.mqttv3.*;
import org.json.JSONArray;
import org.json.JSONException;
import org.json.JSONObject;
import org.slf4j.Logger;
import org.slf4j.LoggerFactory;
import org.springframework.beans.factory.annotation.Autowired;
import org.springframework.beans.factory.annotation.Value;
import org.springframework.stereotype.Component;

import javax.annotation.PostConstruct;
import java.util.ArrayList;
import java.util.HashMap;
import java.util.List;
import java.util.Map;
import java.util.concurrent.ConcurrentLinkedQueue;
import java.util.concurrent.TimeUnit;


@Component
public class JowoiotMqttClient {

    Logger logger = LoggerFactory.getLogger(JowoiotMqttClient.class.getName());

    @Autowired
    MqttClient mqttClient;

    @Autowired
    MqttConnectOptions mqttConnectOptions;

    public static ConcurrentLinkedQueue<List<Map<String, Object>>> payloadQueue = new ConcurrentLinkedQueue<>();
    boolean client_1_triggle = false;                                //判断 Client_1 连接上的标志开关
    public JSONArray dataArray;

    String messageToJson;
    String topicToJson;

    @Value("${mqtt.qos:2}")
    int qos;

    @Value("${retained:false}")
    boolean retained;

    public void connect() throws MqttException {
        //在连接的时候通过调用 MqttConnectOptions 实例的 setWill 方法来设定。任何订阅了下面的主题的客户端都可以收到该遗嘱消息。
        mqttConnectOptions.setWill("jowoiot/toServer/bruceS/lptestpub","i am server_1 OFF line".getBytes(),2,true);                      //***设置mqtt遗嘱,如果PUBLISH消息的RETAIN标记位被设置为1,则称该消息为“保留消息”;Broker会存储每个Topic的最后一条保留消息及其Qos,当订阅该Topic的客户端上线后,Broker需要将该消息投递给它。
        mqttClient.connect(mqttConnectOptions);
        mqttClient.publish("jowoiot/toServer/bruceS/lptestpub", "i am server_1 ON line".getBytes(), 2, false);                               //连接上了,就向Srever发布一个 “I'm back”的消息,作为判断Client连接上的标志。
    }

    //订阅消息
    public void subscrib() {
        try {
            mqttClient.subscribe("jowoiot/toServer/bruce/#");
            mqttClient.setCallback(new MqttCallback() {
                @Override
                public void connectionLost(Throwable throwable) {
                    System.out.println("connectionLost");
                }

                @Override                                                       //This method is called when a message arrives from the server.
                public void messageArrived( String topic,MqttMessage mqttMessage) throws Exception {
                    //接收消息
                    byte[] payload = mqttMessage.getPayload();
                    String message = new String(payload, "utf-8");// 经过转换,这里得到了 字符串式 的消息
                    topicToJson = topic;
                    messageToJson = message;
                    if( !messageToJson.equals("i am client_1 pub OFF line") ){
                        client_1_triggle = true;
                    }else {
                        client_1_triggle = false;
                        System.out.println("马上回来...");
                    }

                    List<Map<String, Object>> mapList = new ArrayList<>();      //map是定义了一个Map集合变量,然后list>是定义了一个mapList的集合变量,是map的一个集合,map是那个list的其中一个值。
                    Map<String, Object> map = new HashMap<>();
                    map.put("message", message);                                //实际上是Key/Value形式,Value可以是任意类型
                    mapList.add(map);                                           //map是mapList中的其中一个值。
                    //数据放入容器payloadQueue
                    payloadQueue.offer(mapList);                                // add()和offer()都是用来向队列添加一个元素,在容量已满的情况下,add()方法会抛出IllegalStateException异常,offer() 方法只会返回 false 。
                }

                @Override
                public void deliveryComplete(IMqttDeliveryToken iMqttDeliveryToken) {    // 传输完成
//                    System.out.println("deliveryComplete");
                    logger.info("deliveryComplete");                                     // 使用 打印,不如用 打印日志的方式,帅
                }
            });
        } catch (MqttException e) {

            e.printStackTrace();
        }


    }


    /**
     * 发布消息
     * @throws MqttException
     */
    public void publish() throws MqttException {
        try {
            TimeUnit.SECONDS.sleep(2);                          //延时 timeout 秒
//                    取出messageMap数据
            List<Map<String, Object>> poll = payloadQueue.poll();        //poll()移除队列头的元素并且返回,如果队列为空则返回null;remove()移除队列头的元素并且返回,如果队列为空则抛出异常.
            if (poll != null) {
                //发送数据
                mqttClient.publish("jowoiot/toServer/bruceS/lptestpub", poll.toString().getBytes(), 0, false);
                System.out.println("mqtt发送的数据内容为:    " + poll.toString());          //****************************************************
            }
        } catch (InterruptedException e) {
            e.printStackTrace();
        }
    }


    //检查 刚接收到 的消息 信息
    // {"meta":{"expire":3600,"t":1552553109000},"data":[{"k":"device.point_1","v":"571"},{"k":"device.point_2","v":"1.333"},{"k":"point_3","v":"345"}]}
    public void saveAndProcessing(){
        try{
            if( client_1_triggle ){
                System.out.println("topicToJson:" + topicToJson);                       //****************************************************
                System.out.println("print received messageToJson:" + messageToJson);    //****************************************************
                JSONObject RootMessageObject = new JSONObject(messageToJson);           //将 全部接收的 字符串消息 转换为 JSON格式

                JSONObject metaObject = RootMessageObject.getJSONObject("meta");

                // IMEI 的处理
                String IMEIId = topicToJson.substring(23);                               //"jowoiot/toServer/bruceS/lptestpub",将字符串从索引号为23开始截取,一直到字符串末尾。(索引值从0开始)
                System.out.println("JSON 格式的 IMEI 数据值是:" + IMEIId);
                // expire 信息 的处理
                String expire = metaObject.getString("expire");
                String time = metaObject.getString("t");
                System.out.println("JSON 格式的 expire 数据值是:" + expire);
                System.out.println("JSON 格式的 time 数据值是:" + time);
                // data 信息 的处理
                dataArray = RootMessageObject.getJSONArray("data");         //[{"k":"device.point_1","v":"571"},{"k":"device.point_2","v":"1.333"},{"k":"point_3","v":"345"}]
                for (int i = 0; i < dataArray.length(); i++) {
                    JSONObject dataSonObject = dataArray.getJSONObject(i);               // {"k":"device.point_1","v":"571"}
                    String key = dataSonObject.getString("k");
                    String value = dataSonObject.getString("v");
                    System.out.println("JSON 格式的 key 数据值是:" + key +",  JSON 格式的 value 数据值是:" + value);

                }
                client_1_triggle = false;
                System.out.println("JSON 格式的 数据 检查完毕。");
                System.out.println();
            }
        }catch(JSONException e){
            e.printStackTrace();
        }

    }


    @PostConstruct
    public void run() throws MqttException {
        LoggerFactory.getLogger(MqttJowoiotApplication.class).info("ups server start...");
        connect();
        subscrib();
        System.out.println("开启 连接 ,订阅完成。");
//        while (true) {
//            publish();
//            System.out.println("i love china111111111");
//            saveAndProcessing();
//        }
    }
}


//mqttClient.subscribe("jowoiot/toServer/bruce/#");
//Integer.parseInt(message.substring(17,22)))
三、Springboot 的定时任务调度
3.1 定时任务的配置类
package com.jowoiot.mqtt_retained.config;

import org.springframework.context.annotation.Configuration;
import org.springframework.scheduling.annotation.SchedulingConfigurer;
import org.springframework.scheduling.config.ScheduledTaskRegistrar;
import java.util.concurrent.Executors;


/**************************************
 * 开启多线程后,每次任务开始的间隔都是5秒钟。这是符合我们预期的,
 * 但是最后还有点缺陷,这种情况下的线程是随着任务一执行完就销毁的,等下次有需要了程序再创建一个。
 * 每次都要重新创建明显是太影响性能了,所以需要在代码里给他一个线程池。
 *
 *可以看到现在程序就不会再自己创建线程了,每次都会从线程池里面拿。
 * 需注意的是,如果线程池里的所有线程都被拿去执行调度任务了,且又到了时间要执行一次任务,那么这个任务又会被阻塞。
 * 所以实际开发中如果想要保证任务以速度被执行,线程池的最大线程数量可要想好。
 * ****************************************/
@Configuration
public class SchedulerConfig implements SchedulingConfigurer{
    //开启一个线程调度池
    @Override
    public void configureTasks(ScheduledTaskRegistrar taskRegistrar) {
        taskRegistrar.setScheduler(Executors.newScheduledThreadPool(100));
    }
}
3.2 定时任务的服务类
在此服务类里,是一个 远程服务方法的调用,
这个服务需要下面的 第四点: 远程服务的相关配置。
package com.jowoiot.mqtt_retained.service;

import com.fasterxml.jackson.core.type.TypeReference;
import com.jowoiot.mqtt_retained.Model.DeviceInfo;
import com.jowoiot.mqtt_retained.service.MdmService;
import com.jowoiot.mqtt_retained.util.JsonUtil;

import org.eclipse.paho.client.mqttv3.MqttClient;
import org.eclipse.paho.client.mqttv3.MqttConnectOptions;
import org.eclipse.paho.client.mqttv3.MqttException;
import org.json.JSONException;

import org.json.JSONObject;
import org.springframework.beans.factory.annotation.Autowired;
import org.springframework.scheduling.annotation.Async;
import org.springframework.scheduling.annotation.EnableAsync;
import org.springframework.scheduling.annotation.Scheduled;
import org.springframework.stereotype.Component;
import java.time.Instant;
import java.util.ArrayList;
import java.util.List;


/*****************************************************************
Spring Boot 默认已经实现了定时任务,只需要添加相应的 注解 即可完成。
 pom.xml 不需要添加其他依赖,只需要加入 Spring Boot 依赖即可,即依赖文件中的 web 和 test 的依赖。
 在启动类上面加上 @EnableScheduling 注解即可开启定时任务。
****************************************************************/
@Component
@EnableAsync
public class TimingServiceImpl {

    @Autowired
    MqttClient mqttClient;

    @Autowired
    MdmService mdmService;

    @Autowired
    private JowoiotMqttClient jowoiotMqttClient;

    @Autowired
    private MqttConnectOptions mqttConnectOptions;

    @Scheduled(cron = "*/10 * * * * ?")
    public void runJobA() throws JSONException, MqttException {
        String sql = "MATCH (n:Device)-[e:EXTENDS]->(t:Template)<-[c:CONNECT_INTO]-(p:Point) where p.retained=true return " +
                "{rtuId:e.rtuId,devId:e.devId,customerId:n.customerId,deviceId:n.mdmId,pointId:p.mdmId,pointName:p.name}";
       // Object queryResult
        List<DeviceInfo> deviceInfoList = new ArrayList<DeviceInfo>();
        deviceInfoList= mdmService.queryV2(sql, false);
        System.out.println("deviceInfoList:" + deviceInfoList);


        JSONObject jsonMessageSetWill = new JSONObject();
        for(int i=0;i<deviceInfoList.size();i++){
            DeviceInfo deviceInfo= deviceInfoList.get(i);
            System.out.println("* * * * * *下面是 List 第 " + i + "个 数据值* * * * * *");
            System.out.println("List 格式的 devId 数据值是:     "+deviceInfo.getDevId());
            System.out.println("List 格式的 rtuId 数据值是:     "+deviceInfo.getRtuId());
            System.out.println("List 格式的 pointId 数据值是:   "+deviceInfo.getPointId());
            System.out.println("List 格式的 pointname 数据值是: "+deviceInfo.getPointName());
            System.out.println("List 格式的 customerId 数据值是:"+deviceInfo.getCustomerId());
            System.out.println("List 格式的 deviceId 数据值是:  "+deviceInfo.getDeviceId());

            // 比较 List格式的pointname数据 和  JSON格式的key数据,要是有相同的名称,返回发送List格式的pointname 断面数据
            for(int j=0;j<jowoiotMqttClient.dataArray.length();j++){
                if(jowoiotMqttClient.dataArray.getJSONObject(j).getString("k").equals(deviceInfo.getPointName())){
                    jsonMessageSetWill.put("meta", deviceInfo.getDeviceId());
                    jsonMessageSetWill.put("data", jowoiotMqttClient.dataArray.getJSONObject(j).toString());
                    mqttClient.publish("jowoiot/toServer/bruceS/lptestpub", jsonMessageSetWill.toString().getBytes(), 0, false);
                    mqttConnectOptions.setWill("jowoiot/toServer/bruceS/lptestpub",jsonMessageSetWill.toString().getBytes(),2,true);
                    System.out.println("$ $ $ $ $ $已返回 pointname 断面数据的 deviceId $ $ $ $ $ $");
                    break;
                }
            }


        }

    }
/*******************************************
 * @Scheduled(fixedRate)如何避免任务被阻塞
 * 答案是加上注解@EnableAsync(类上)和@Async(方法上),加了注解以后,就开启了多线程模式,
 * 当到了下一次任务的执行时机时,如果上一次任务还没执行完,就会自动创建一个新的线程来执行它。
 * 异步执行也可以理解为保证了任务以固定速度执行。
 * ********************************************/
    @Async                       //基于@Async标注的方法,称之为异步方法;这些方法将在执行的时候,将会在独立的线程中被执行,调用者无需等待它的完成,即可继续其他的操作。
    @Scheduled(fixedRate = 100) //采用间隔调用
    public void runJobB() throws MqttException  {
//        System.err.println("[MyTaskB-定时调度调度***" + Instant.now());
        jowoiotMqttClient.publish();
        jowoiotMqttClient.saveAndProcessing();
    }

}

//corn表达式:
//每隔5秒执行一次:*/5 * * * * ?
//每隔1分钟执行一次:0 */1 * * * ?
//每天23点执行一次:0 0 23 * * ?
//每天凌晨1点执行一次:0 0 1 * * ?
//每月1号凌晨1点执行一次:0 0 1 1 * ?
//每月最后一天23点执行一次:0 0 23 L * ?
//每周星期天凌晨1点实行一次:0 0 1 ? * L
//在26分、29分、33分执行一次:0 26,29,33 * * * ?
//每天的0点、13点、18点、21点都执行一次:0 0 0,13,18,21 * * ?
四、远程服务方法的配置
远程服务:就是注册 eureka、建立虚拟通道 、实现Feign请求,远程读取数据库的数据。
前辈已经写好服务端,这里只写一个客户端的程序进行试验。
4.1 注册eureka
4.1.1在启动类中添加注解使能:
远程服务调用,要添加注解(@EnableDiscoveryClient、@EnableFeignClients)
还要添加相关依赖文件。
4.1.2在配置文件里配置 eureka 相关内容,要先注册
主要是这两点(spring.application.name、eureka.client.service-url.defaultZone)
通过地址查看, Eureka注册 是否成功。
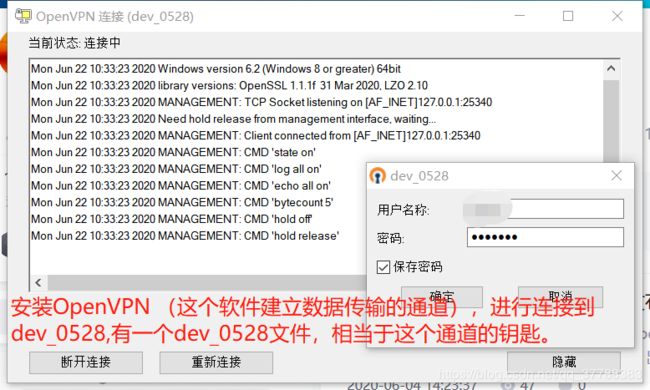
4.2 建立数据虚拟专用通道
4.2.1 这个dev_0528文件是 连接 虚拟专用通道 的配置文件
虚拟专用通道下载地址:链接:https://pan.baidu.com/s/1d8HdezRqeuZcpkCcODik6A
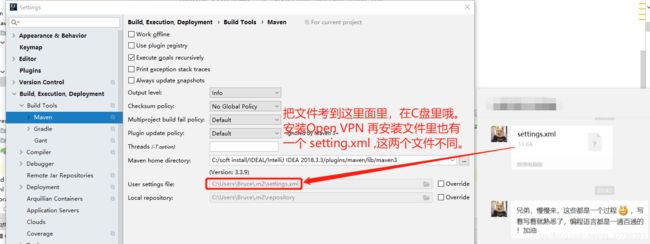
4.2.2 没有这个setting.xml文件,不影响。
4.3 实现Feigh请求,获取数据
新建服务类,这个服务在 定时调度任务里被调用,用于获取数据库数据。
package com.jowoiot.mqtt_retained.service;

import com.google.gson.JsonObject;
import com.jowoiot.mqtt_retained.Model.DeviceInfo;
import org.springframework.cloud.openfeign.FeignClient;
import org.springframework.web.bind.annotation.RequestMapping;
import org.springframework.web.bind.annotation.RequestMethod;
import org.springframework.web.bind.annotation.RequestParam;

import java.util.List;


@FeignClient(value = "MDMSERVICE")
public interface MdmService {

    @RequestMapping(value = "/graph/v2/single", method = RequestMethod.GET)
    List<Object> queryV2(@RequestParam("query") String query);

    @RequestMapping(value = "/graph/v2/single", method = RequestMethod.GET)
    List<DeviceInfo> queryV2(@RequestParam("query") String query, @RequestParam(value = "single", defaultValue = "false") Boolean single);

}


