hadoop2.6.0分布式集群搭建(详细),搭建es-hadoop
安装es-hadoop查了很多资料和书籍,自己搭建好了之后写了一下自己安装的流程,如有不足,欢迎大家批评指正,hadoop是2.6.0版本,elasticsearch是2.2.0版本。
一、hadoop集群配置
1、安装前准备
1.1安装vmwareworkstation软件
1.2在虚拟机上安装linux操作系统
由于是分布式,最少得有三个节点,故准备三个虚拟机节点。我在虚拟机上安装的linux系统是ubuntu12.04(较之ubuntu14.04要稳定一些),安装好一个虚拟机之后,将整个安装文件夹进行复制粘贴形成第二和第三个虚拟机节点。
分别将linux系统的主机名进行重命名以却分三个不同的虚拟机节点,重命名的方式是,在terminal终端(Ctrl+Alt+T打开)输入sudo gedit /etc/hostname,我将三个节点分别命名为master、slave1、slave2。
2、新建用户
在每个节点终端输入如下指令,注意密码要一致,其中useradd是指添加一个用户,而adduser是指生成一个同名用户组且将该用户添加到同名用户组中,最后一行指令赋予该用户及用户组权限
sudo useradd –m hadoop –s /bin/bash
sudo passwd hadoop
sudo adduser hadoop sudo
3、配置hosts文件
配置hosts文件是为了确定每一个节点的ip地址,以便于master节点能够快速查询并访问到各个节点。
3.1查看ip
在终端输入ifconfig查看当前节点的ip地址,如下所示ip为inet addr后面所显示
3.2配置hosts
使用命令行sudo gedit /etc/hosts打开配置文件进行如下配置:
配置中master,slave1和slave2的ip为自己节点查询得到的ip
3.3注意事项
3.3.1网络连接使用桥接
3.3.2设置静态ip
每次虚拟机关闭之后再开启对应的ip可能发生变化,而如果hadoop配置完成之后,再次使用hadoop集群的时候若ip变化,则会导致hadoop不可用,原因是ssh生成的密码不再可用,故建议在开始时就设定静态ip。设置方法如下:
1)修改ip
2)添加DNS3)若2)中的所述方法重启后可能失效,使用如下长久有效(有的是head,有的是bash)
4)
sudo ifconfig eth0 down
sudo ifconfig eth0 up
6)ping百度成功联网
4、配置ssh免密码连接
SSH主要通过RSA算法来产生公钥与私钥,在数据传输过程中对数据进行加密来保障数据的安全性和可靠性,公钥部分是公共部分,网络上任一结点均可以访问,私钥主要用于对数据进行加密,以防他人盗取数据。总而言之,这是一种非对称算法,想要破解还是非常有难度的。Hadoop集群的各个结点之间需要进行数据的访问,被访问的结点对于访问用户结点的可靠性必须进行验证,hadoop采用的是ssh的方法通过密钥验证及数据加解密的方式进行远程安全登录操作,当然,如果hadoop对每个结点的访问均需要进行验证,其效率将会大大降低,所以才需要配置SSH免密码的方法直接远程连入被访问结点,这样将大大提高访问效率。
4.1每个节点分别产生公私密钥
1)在终端输入ssh-keygen –t dsa –P ‘’ –f ~/.ssh/id_dsa产生公私密钥
2)将公钥文件复制成authorized_keys文件:
cd .ssh/
catid_dsa.pub >> authorized_keys
4.2每个节点单机回环ssh免密码登录测试
在.ssh下输入ssh localhost出现welcome to ubuntu,则表示操作成功,注意记得exit退出登录,为之后的工作做准备4.3让master能够与从节点互相ssh免密码登录
为了实现这个功能,需要两个slave节点的公钥文件中包含主节点的公钥信息,这样master就可以顺利安全访问这两个slave从节点了。同理,从节点要顺利访问主节点,则主节点中也应该有从节点的公钥信息
如上过程显示了从结点通过scp命令远程登录主结点,并复制主节点的公钥文件到当前的目录下,这一过程需要密码验证。接着,将主结点的公钥文件追加至authorized_keys文件中,通过这步操作,如果不出问题,主结点就可以通过ssh远程免密码连接从结点了。
在master结点中操作如下,在master界面输入ssh slave1,即master可以ssh连接slave1.
从结点首次连接时需要,“YES”确认连接,这意味着master结点连接从结点时需要人工询问,无法自动连接,输入yes后成功接入,紧接着注销退出至master结点。要实现ssh免密码连接至其它结点,还差一步,只需要再执行一遍ssh slave1(这个slave1为你设置的从节点的名),如果没有要求你输入”yes”,就算成功了
以上过程是master能够ssh免密码登录slave1的过程,master免密码ssh登录slave2和两个从节点(slave1和slave2)免密码登录master的操作与上述过程相似。
5、安装jdk
5.1下载jdk
我下载的是jdk1.8.0_74
5.2安装jdk
tar –zxvf jdk-8u74-linux-i586.tar.gz
sudo mkdir/usr/java
sudo mv jdk1.8.0_74 /usr /java
5.3配置环境
![]()
![]()
输入java–version显示如下则表示java安装好

5.4关闭每台机器的防火墙
ufwdisable(重启生效)
注意关闭防火墙要在root下执行,输入su即可切换到root用户模式下
6、hadoop的安装
6.1解压安装
tar -zxvf hadoop-2.6.0.tar.gz(我将hadoop的压缩包放在了/home/hadoop里了)
sudo mkdir /usr/local/hadoop
sudo mv hadoop-2.6.0 /usr/local/hadoop
6.2新建文件夹并赋予权限
~/dfs/name
~/dfs/data
~/tmp
在终端用如下命令进行新建
sudo mkdir dfs
sudo mkdir tmp
cd dfs
sudo mkdir name
sudo mkdir data需要注意的是创建之后的文件及文件夹的权限问题,运用如下命令行可以修改文件夹的权限:sudo chown –R hadoop:hadoop /home/hadoop/dfs意思是将目录~/dfs中所有文件以及文件夹所有者和用户组改为用户hadoop和用户组hadoop(sudo chown –R用户:用户组需要修改所有者的文件夹的绝对路径)
6.3修改配置文件
这里要涉及到的配置文件有7个:
安装路径/hadoop-2.6.0/etc/hadoop/hadoop-env.sh
安装路径/hadoop-2.6.0/etc/hadoop/yarn-env.sh
安装路径/hadoop-2.6.0/etc/hadoop/slaves
安装路径/hadoop-2.6.0/etc/hadoop/core-site.xml
安装路径/hadoop-2.6.0/etc/hadoop/hdfs-site.xml
安装路径/hadoop-2.6.0/etc/hadoop/mapred-site.xml
安装路径/hadoop-2.6.0/etc/hadoop/yarn-site.xml
以上文件默认不存在的,可以复制相应的template文件获得。比如已经存在mapred-site.xml.template,将这个文件复制粘贴并重命名为mapred-site.xml
6.3.1 hadoop-env.sh

6.3.2 yarn-env.sh

6.3.3 slaves

6.3.4 core-site.xml
注意所有的配置文件
注意我在文件中写的hadoop是我自己设置的用户名和用户组名,需改为自己设置的用户名
6.3.5hdfs-site.xml
6.3.6mapred-site.xml
6.3.7yarn-site.xml
6.4复制到其他节点
sudo scp-r /usr/hadoop aboutyun@slave1:~/
输入上述命令行将master里面的hadoop(/usr/hadoop为我的hadoop路径)复制到slave1上的/home/hadoop里面,之后再转移到/usr,同样的方法复制到slave2
6.5配置hadoop的环境变量
sudo gedit/etc/environment

source /etc/environment
7、启动验证
7.1启动hadoop
格式化namenode:hdfs namenode –format或使用hadoop namenode format
7.2启动dfs
start-dfs.sh,此时在master上运行的进程有namenode、secondarynamenode,slave节点上运行的进程有datanode
7.3启动yarn
start-yarn.sh,此时运行如下(在终端输入jps查看进程)
master有如下进程:
slave有如下进程
此时hadoop集群全部配置完成!!!!
在浏览器中输入http://master:8088/
如何修改hosts:
Win7进入下面的路径:C:\Windows\System32\drivers\etc

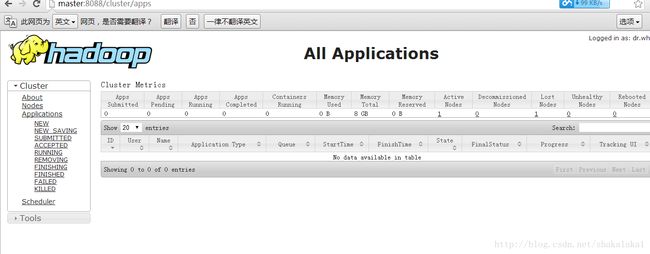
在浏览器中输入http://master:8088/cluster/apps显示如下表示成功
二、配置es集群
1、每个节点解压es安装包
在官网上下载es压缩包,我安装的是elasticsearch-2.2.0.tar.gz
tar -zxvf elasticsearch-2.2.0.tar.gz
sudo mv elasticsearch-2.2.0 /usr/local
sudo ln -s /usr/local/elasticsearch-2.2.0 /usr/local/elasticsearch
sudo chown -R hadoop:hadoop /usr/local/elasticsearch
2、配置elasticsearch.yml
2.1集群名
cluster.name: eshadoopcluster
es会自动发现在同一网段下的es,如果在同一网段下有多个集群,就可以通过这个集群名来区分不同的集群。
2.2节点名
node.name:master
slave1和slave2节点则将节点名配置成slave1和slave2即可,默认随机指定一个name列表中名字,该列表在es的jar包中config文件夹里name.txt文件中,其中有很多作者添加的有趣名字,但是会经常变动,为了清楚的指导节点信息和状态,建议将节点名配置成自己熟悉的名字。
2.3被选举为master资格
node.master: true
指定该节点是否有资格被选举成为node,默认是true,es是默认集群中的第一台机器为master,如果这台机挂了就会重新选举master。
2.4存储索引数据
node.data:true
2.5设置shards
index.number_of_shards: 5
默认为5
2.6设置replicas
index.number_of_replicas: 1
2.7设置路径
path.conf: /path/to/conf
path.data: /path/to/data
path.work: /path/to/work
path.plugins: /path/to/plugins
建议新建文件夹存储数据等,以免升级es的时候出现错误
2.8强制所有内存锁定
bootstrap.mlockall: true
2.9设置ip
network.bind_host: xxx.xxx.xxx.xxx
network.publish_host: xxx.xxx.xxx.xxx
network.host:xxx.xxx.xxx.xxx
绑定的ip地址设置为自己当前主机的ip地址即可
2.10设置端口和协议
transport.tcp.port: 9300 设置节点间交互的tcp端口,默认9300
transport.tcp.compress: true
http.port: 9200设置对外服务的http端口,默认为9200
http.enabled: false 设置是否使用http协议对外提供服务,默认为true开启
2.11防止脑裂
discovery.zen.minimum_master_nodes: 1 默认为1,但是对于有多个节点的集群需要注意的是如果有N个节点,且N大于等于3,则这个参数需要满足的公式是(N/2+1向下取整数),也就是说如果有三个节点,则该参数需要设置为2才可以满足防止脑裂发生条件。分布式脑裂简单的说来是指在一个高可用系统中,当联系着的节点之间断开联系时,本来为一个整体的系统,分裂成两个集群,这个时候分裂开来的两个集群开始争抢共享资源,导致系统混乱甚至数据损坏。
比如说创建了一个包含10个节点的集群,一切工作正常直到有一天网络出现故障,有三个节点从集群中断开连接,按时节点之间仍然能够互相看见对方。由于zen发现机制和主节点选取的过程,断开的三个节点中选出了一个新的master,这样就有了两个名字相同的集群,各自有一个master,这样就会产生很多问题。为了避免这种情况发生,我们将这个参数配置成(N/2+1),这样就表明如果网络正常,那么需要至少有6个节点才会形成一个集群,而分离出去的小于6的节点无法选举出新的主节点,只能等待重新连回原来的集群。
discovery.zen.ping.timeout: 3s 设置集群中自动发现其它节点时ping连接超时时间,默认为3秒,对于比较差的网络环境可以高点的值来防止自动发现时出错。
2.12设置单播
discovery.zen.ping.multicast.enabled: false 禁止多播
discovery.zen.ping.unicast.hosts: ["host1", "host2:port", "host3[portX-portY]"] 设置单播,如我在自己的配置文件中是这样设置的:
discovery.zen.ping.unicast.hosts: ["xxx.xxx.xxx.xxx:9300", "xxx.xxx.xxx.xxx:9300", "xxx.xxx.xxx.xxx:9300"] 注意逗号之后有空格,这三个ip分别为master、slave1和slave2的ip
2.13配置文件具体如下
# ======================== Elasticsearch Configuration=========================
#
# NOTE: Elasticsearch comes with reasonable defaults for mostsettings.
# Before you setout to tweak and tune the configuration, make sure you
# understand whatare you trying to accomplish and the consequences.
#
# The primary way of configuring a node is via this file. Thistemplate lists
# the most important settings you may want to configure for aproduction cluster.
#
# Please see the documentation for further information onconfiguration options:
#
#
# ---------------------------------- Cluster-----------------------------------
#
# Use a descriptive name for your cluster:
#
cluster.name: eshadoopcluster
#
# ------------------------------------ Node------------------------------------
#
# Use a descriptive name for the node:
#
node.name: master
node.master: true
node.data: true
index.number_of_shards: 5
index.number_of_replicas: 1
#
# Add custom attributes to the node:
#
# node.rack: r1
#
# ----------------------------------- Paths------------------------------------
#
# Path to directory where to store the data (separate multiplelocations by comma):
#
path.data: /var/lib/elasticsearch/data
#
# Path to log files:
#
path.logs: /var/lib/elasticsearch/logs
path.plugins: /var/lib/elasticsearch/plugins
#
# ----------------------------------- Memory-----------------------------------
#
# Lock the memory on startup:
#
bootstrap.mlockall: true
#
# Make sure that the `ES_HEAP_SIZE` environment variable is setto about half the memory
ES_HEAP_SIZE: 512mb
# available on the system and that the owner of the process isallowed to use this limit.
#
# Elasticsearch performs poorly when the system is swapping thememory.
#
# ---------------------------------- Network-----------------------------------
#
# Set the bind address to a specific IP (IPv4 or IPv6):
#
network.host: 192.168.0.109
network.bind_host: 192.168.0.109
network.publish_host: 192.168.0.109
#
# Set a custom port for HTTP:
#
http.port: 9200
transport.tcp.port: 9300
transport.tcp.compress: true
http.max_content_length: 100mb
http.enabled: true
#
# For more information, see the documentation at:
#
#
# --------------------------------- Discovery----------------------------------
#
# Pass an initial list of hosts to perform discovery when newnode is started:
# The default list of hosts is ["127.0.0.1","[::1]"]
#
discovery.zen.ping.unicast.hosts:["192.168.0.109:9300", "192.168.0.110:9300","192.168.0.111:9300"]
#discovery.zen.ping.unicast.hosts: ["192.168.0.110","192.168.0.111"]
#
# Prevent the "split brain" by configuring themajority of nodes (total number of nodes / 2 + 1):
#
discovery.zen.minimum_master_nodes: 2
#
# For more information, see the documentation at:
#
#
# ---------------------------------- Gateway-----------------------------------
#
# Block initial recovery after a full cluster restart until Nnodes are started:
#
#gateway.type: local
gateway.recover_after_nodes: 2
gateway.recover_after_time: 5m
gateway.expected_nodes: 3
cluster.routing.allocation.node_initial_primaries_recoveries: 4
cluster.routing.allocation.node_concurrent_recoveries: 2
indices.recovery.max_size_per_sec: 0
indices.recovery.concurrent_streams: 5
discovery.zen.ping.timeout: 3s
discovery.zen.ping.multicast.enabled: false
index.refresh_interval: -1
index.translog.flush_threshhode_size: 1gb
#
# For more information, see the documentation at:
#
#
# ---------------------------------- Various-----------------------------------
#
# Disable starting multiple nodes on a single system:
#
# node.max_local_storage_nodes: 1
#
# Require explicit names when deleting indices:
#
# action.destructive_requires_name: true
注意设置一下ES_HEAP_SIZE这个参数,设置为分配给该节点的运行内存的50%,可以再在~/.bashrc中配置一下
3、启动elasticsearch
在终端输入cd /usr/local/elasticsearch/bin(这个是安装elasticsearch的路径)
./elasticsearch启动
可以在浏览器中输入http://xxx.xxx.xxx.xxx:9200,也可以在终端输入curl -X GEThttp://xxx.xxx.xxx.xxx:9200(其中xxx.xxx.xxx.xxx为我在配置文件中设置的自己节点的ip)
4、es-hadoop
这是一个库,在使用es和hadoop的时候调用即可。运行java程序的时候调用它对es和hadoop进行操作联系


