首先,我们做一个简单的Form添加页面,几个简单的用户名、年龄等基本元素。代码如下:
 1 <script src="../../assets/js/user/add.js">
 2 script>
 3 <template>
 4   <div>
 5     <h1>user addh1>
 6     <main
 7       id="content"
 8       class="bd-content"
 9       role="main">
10       <b-form
11         @submit="onSubmit"
12         @reset="onReset">
13         <b-form-input
14           id="txtId"
15           v-model="form.id"
16           type="text"/>
17         <b-form-group
18           id="exampleInputGroup1"
19           label="Your Name:"
20           label-for="txtName"
21           description="User's name and phone is unique">
22           <b-form-input
23             v-focus
24             id="txtName"
25             v-model="form.name"
26             type="text"
27             required
28             placeholder="Enter name"/>
29         b-form-group>
30         <b-form-group
31           id="exampleInputGroup2"
32           label="Your Age:"
33           label-for="txtAge">
34           <b-form-input
35             id="txtAge"
36             v-model="form.age"
37             type="text"
38             placeholder="Enter age"/>
39         b-form-group>
40         <b-form-group
41           id="exampleInputGroup3"
42           label="Your Phone Num:"
43           label-for="txtPhone">
44           <b-form-input
45             id="txtPhone"
46             v-model="form.phone"
47             required
48             placeholder="Enter phone num"/>
49         b-form-group>
50         <b-alert
51           :show="dismissCountDown"
52           dismissible
53           variant="warning"
54           @dismissed="dismissCountDown=0"
55           @dismiss-count-down="countDownChanged"
56           @close="closeFunc">
57           <p>Save successful, page will location to list after {{ dismissCountDown }} seconds...p>
58           <b-progress
59             :max="dismissSecs"
60             :value="dismissCountDown"
61             variant="warning"
62             height="4px"/>
63         b-alert>
64         <b-button
65           type="submit"
66           variant="primary">Submit
67         b-button>
68         <b-button
69           type="reset"
70           variant="danger">Reset
71         b-button>
72         <b-button
73           type="button"
74           variant="danger"
75           @click="test">Test
76         b-button>
77       b-form>
78     main>
79   div>
80 template>
81
82 <style scoped>
83 style>
其中,23行的 v-focus,使用了vue 的 directive,就是指令的意思,下面说一下指令的添加步骤:
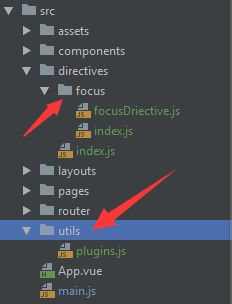
1. 在src目录中新增directives目录,然后添加简单的 focus 指令文件,代码结构如下图:
utils中的plugins.js是对directive文件引入的简单封装,focus文件夹中是directive的定义和安装,代码如下:
1 export default {
2   name: 'focus',
3   inserted: function(el) {
4     el.focus()
5   }
6 }
 1 import focus from './focusDriective'
 2 import { registerDirectives, vueUse } from '@/utils/plugins.js'
 3
 4 const directives = {
 5   focus
 6 }
 7
 8 const VuePlugin = {
 9   install(Vue) {
10     registerDirectives(Vue, directives)
11   }
12 }
13
14 vueUse(VuePlugin)
15
16 export default VuePlugin
当指令插件有多个时,在directives根目录下添加一个index.js,统一导出以供使用,代码如下:
import Focus from './focus'
import SomeA from './someA'
export { Focus, SomeA..... }
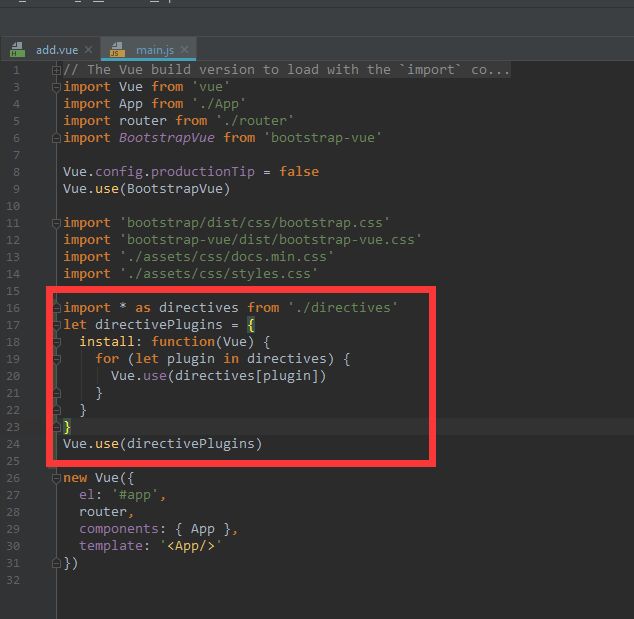
2. 在main.js中引入,代码如下图:
然后在add.vue的text元素中加入 v-focus 即可实现焦点事件。详细代码请参见Github。运行效果如图:
简单的页面如上图,下面说一下VUE如何绑定数据的,add.vue第一行引入了 add.js,代码如下:
 1 export default {
 2   layout: 'func',
 3   data() {
 4     return {
 5       form: {
 6         id: '',
 7         name: '',
 8         age: '',
 9         phone: '',
10         carList: {
11           name: '',
12           brand: ''
13         }
14       },
15       dismissCountDown: 0,
16       dismissSecs: 5
17     }
18   },
19   async asyncData({ route, app }) {
20     let getId = route.query.id
21     if (!getId) return
22     let res = await app.$axios.get(app.$api.user.get, {
23       params: { id: getId }
24     })
25     return {
26       form: {
27         id: res.data.id,
28         name: res.data.name,
29         age: res.data.age,
30         phone: res.data.phone
31       },
32       dismissCountDown: 0,
33       dismissSecs: 5
34     }
35   },
36   methods: {
37     onSubmit(evt) {
38       evt.preventDefault()
39       let that = this
40       let userJson = JSON.stringify(this.form)
41       this.$HttpPost(this.$api.user.add, { userJson: userJson }, function(obj) {
42         that.dismissCountDown = 5
43       })
44     },
45     onReset(evt) {
46       evt.preventDefault()
47       this.form.id = ''
48       this.form.name = ''
49       this.form.age = ''
50       this.form.phone = ''
51       this.show = false
52     },
53     countDownChanged(dismissCountDown) {
54       this.dismissCountDown = dismissCountDown
55       this.$router.push({ path: '/user' }) // TODO 添加 alert close 后事件
56     },
57     test() {
58       alert(this.$testGlobalName)
59     },
60     closeFunc() {
61       alert('close 掉了')
62     }
63   }
64 }
页面add.vue中使用 v-model="form.name" 绑定form元素,新增时,js中使用下面的代码进行初始化:
data() {
  return {
    form: {
      id: '',
      name: '',
      age: '',
      phone: '',
      carList: {
        name: '',
        brand: ''
      }
    },
    dismissCountDown: 0,
    dismissSecs: 5
  }
}

PS: add.js 中的
  layout:'func'
  this.$HttpPost
  alert(this.$testGlobalName) 在后续的文章中会解释。


