jsp简单登陆界面加图形验证码,新手必备(一)
小菜鸟写的,如有错误敬请指正。
先通过Maven构建系统配置好web服务,这边简单过一下

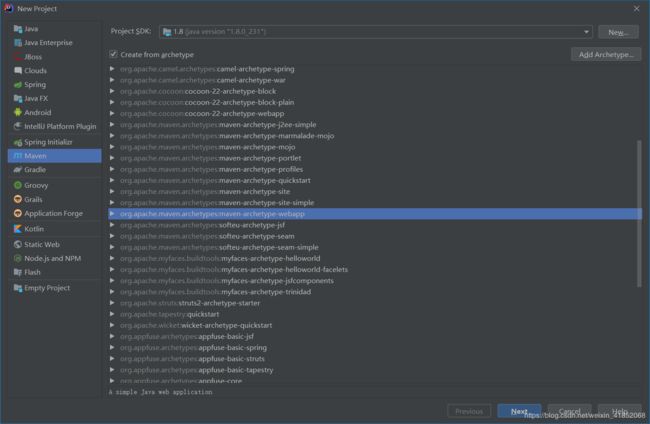
输入项目的名字与地址
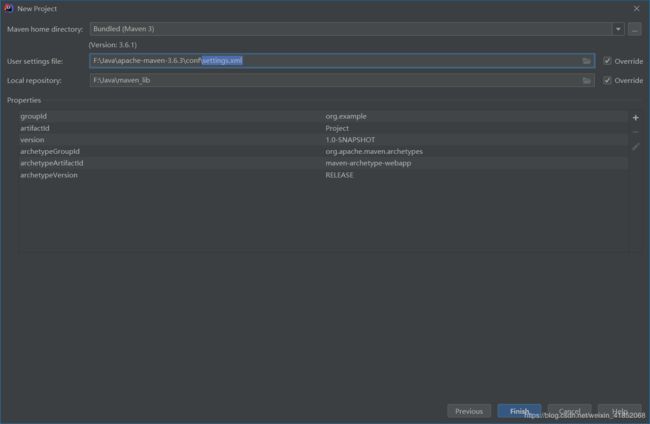
这边GroupId的格式要是唯一的所以一般为域名的形式列例如:cn.edu.mju.project
选择Mavens中settings.xml的路径与库的路径,这边按自己电脑的安装情况而定
将pom.xml文件中信息更改如下:
<?xml version="1.0" encoding="UTF-8"?>

<project xmlns="http://maven.apache.org/POM/4.0.0" xmlns:xsi="http://www.w3.org/2001/XMLSchema-instance"
         xsi:schemaLocation="http://maven.apache.org/POM/4.0.0 http://maven.apache.org/xsd/maven-4.0.0.xsd">
  <modelVersion>4.0.0</modelVersion>

  <groupId>cn.edu.mju</groupId>
  <artifactId>Project2</artifactId>
  <version>1.0-SNAPSHOT</version>
  <packaging>war</packaging>

  <name>Project2 Maven Webapp</name>
  <!-- FIXME change it to the project's website -->
  <url>http://www.example.com</url>

  <properties>
    <project.build.sourceEncoding>UTF-8</project.build.sourceEncoding>
    <maven.compiler.source>1.7</maven.compiler.source>
    <maven.compiler.target>1.7</maven.compiler.target>
  </properties>

  <dependencies>

    <!-- https://mvnrepository.com/artifact/javax.servlet/javax.servlet-api -->
    <dependency>
      <groupId>javax.servlet</groupId>
      <artifactId>javax.servlet-api</artifactId>
      <version>3.1.0</version>
      <scope>provided</scope>
    </dependency>

    <dependency>
      <groupId>junit</groupId>
      <artifactId>junit</artifactId>
      <version>4.11</version>
      <scope>test</scope>
    </dependency>
  </dependencies>

  <build>
    <finalName>Project2</finalName>
    <pluginManagement><!-- lock down plugins versions to avoid using Maven defaults (may be moved to parent pom) -->
      <plugins>
        <plugin>
          <groupId>org.mortbay.jetty</groupId>
          <artifactId>jetty-maven-plugin</artifactId>
          <configuration>
            <webApp>
              <contextPath>/test50</contextPath>
            </webApp>

            <connectors>
              <connector implementation="org.eclipse.jetty.server.nio.SelectChannelConnector">
                <port>8081</port>
                <maxIdleTime>6000</maxIdleTime>
              </connector>
            </connectors>
          </configuration>
        </plugin>

        <plugin>
          <artifactId>maven-clean-plugin</artifactId>
          <version>3.1.0</version>
        </plugin>
        <!-- see http://maven.apache.org/ref/current/maven-core/default-bindings.html#Plugin_bindings_for_war_packaging -->
        <plugin>
          <artifactId>maven-resources-plugin</artifactId>
          <version>3.0.2</version>
        </plugin>
        <plugin>
          <artifactId>maven-compiler-plugin</artifactId>
          <version>3.8.0</version>
        </plugin>
        <plugin>
          <artifactId>maven-surefire-plugin</artifactId>
          <version>2.22.1</version>
        </plugin>
        <plugin>
          <artifactId>maven-war-plugin</artifactId>
          <version>3.2.2</version>
        </plugin>
        <plugin>
          <artifactId>maven-install-plugin</artifactId>
          <version>2.5.2</version>
        </plugin>
        <plugin>
          <artifactId>maven-deploy-plugin</artifactId>
          <version>2.8.2</version>
        </plugin>
      </plugins>
    </pluginManagement>
  </build>
</project>
设置端口号8081,与空闲时间,例如:
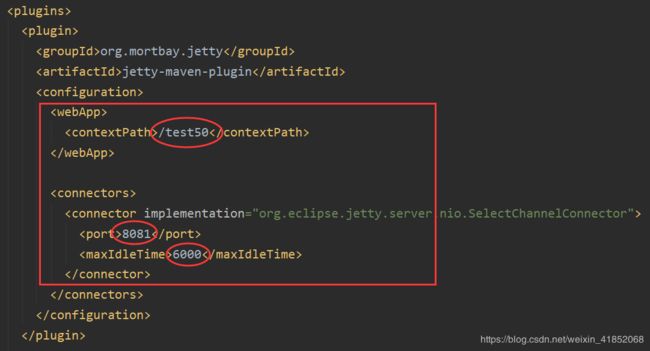
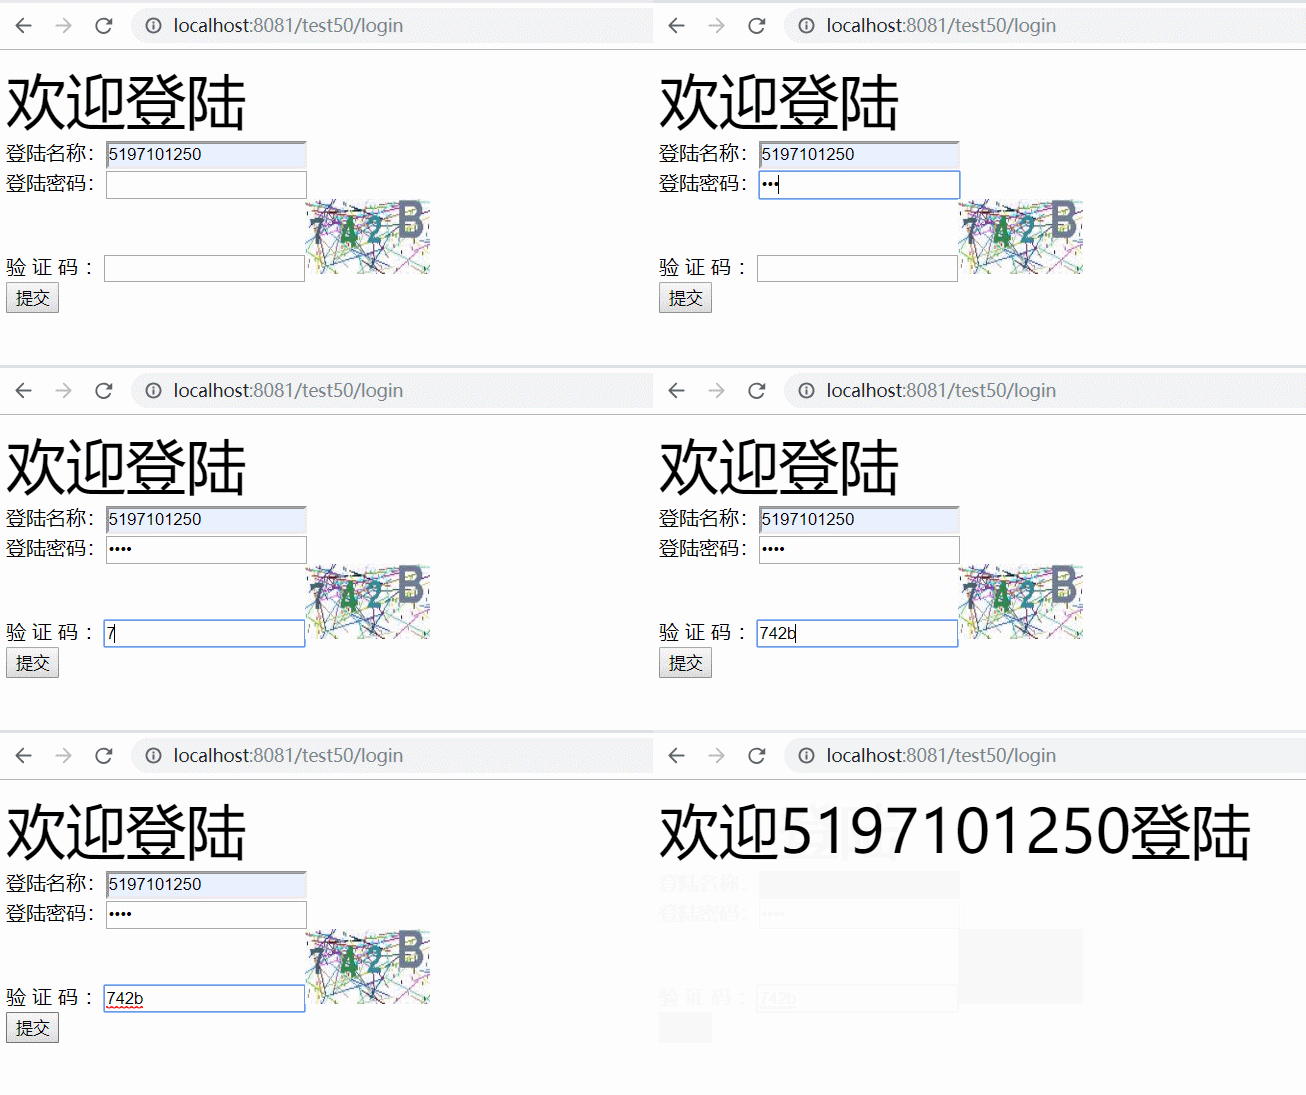
则地址为:localhost:8081/test50/
代码文件
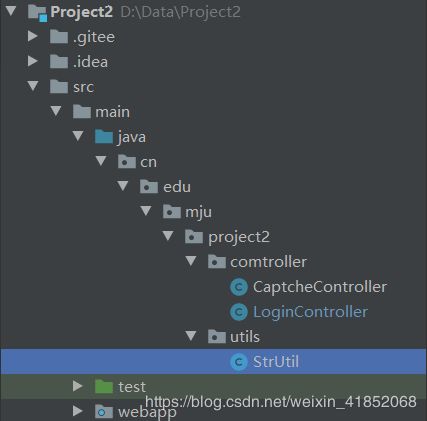
配置完web服务后,在main文件夹下创建java文件夹并右键Mark Directory as标记为Sources Root用来放置我们的代码文件,如下:

然后在java文件夹下新建一个cn.edu.mju.project2.comtroller包,并创建一个LoginController类与CaptcheController类用来放置所需的代码文件

CaptcheController类代码如下
package cn.edu.mju.project2.comtroller;

import javax.imageio.ImageIO;
import javax.servlet.ServletException;
import javax.servlet.ServletOutputStream;
import javax.servlet.annotation.WebServlet;
import javax.servlet.http.HttpServlet;
import javax.servlet.http.HttpServletRequest;
import javax.servlet.http.HttpServletResponse;
import javax.servlet.http.HttpSession;
import java.awt.*;
import java.awt.image.BufferedImage;
import java.io.IOException;
import java.util.Random;

/**
 * @Author xqs
 * @Date 2020/4/7 20:26
 * @Description 简单验证码的实现
 */
@WebServlet("/captcha")
public class CaptcheController extends HttpServlet {
    private final int WIDTH = 130 ;
    private final int HEIGHT = 60;

    @Override
    protected void service(HttpServletRequest req, HttpServletResponse resp) throws ServletException, IOException {
        //禁止缓存,防止验证码过期
        resp.setHeader("pragma", "no-cache");
        resp.setHeader("cache-control", "no-cache");
        resp.setHeader("Expires", "0");//过期时间设置为0,就是立马过期的意思
        //申请内存空间
        BufferedImage img = new BufferedImage(WIDTH, HEIGHT, BufferedImage.TYPE_INT_RGB);
        //画笔
        Graphics gg = img.getGraphics();
        Graphics2D g = (Graphics2D) gg;//为了旋转功能

        //设置背景颜色
        g.setColor(Color.white);
        //g.fillRect(0,0,100,60);
        //设置背景大小
        g.fillRect(0, 0, WIDTH, HEIGHT);

        //设置干扰线
        randomLine(80, g);

        //设置干扰点
        randomDrop(100, g);

        //设置验证码
        Random rd = new Random();
        StringBuilder b = new StringBuilder();

        //循环四次,四位
        for (int i = 0; i < 4; i++) {
            //字体固定,大小随机
            g.setFont(new Font("name", Font.BOLD, rd.nextInt(20) + 25));
            //设置验证码颜色,稍微深一点
            g.setColor(getColor(50));
            //调用randomString方法设置验证码个数
            String code = randomString(1);
            //设置每个验证码的坐标
            int x = 30 * i;
            int y = rd.nextInt(10) + 35;
            //设置随机旋转角度
            int revolve = rd.nextInt(10);
            //设置随机顺时针或逆时针旋转
            if (rd.nextBoolean()) revolve = -revolve;
            //旋转,Math.toRadians角度转弧度
            g.rotate(Math.toRadians(revolve), 5 + x, HEIGHT / 3);
            //g.rotate(Math.toRadians(-revolve),65 , 30);
            //设置验证码位置,x大往右,y大往下
            g.drawString(code, 5 + x, y);
            b.append(code);
        }

        //创建session对象,将验证码code  保存在session中
        HttpSession session = req.getSession();
        session.setAttribute("code", b.toString());
        // 释放资源
        g.dispose();


        // 图片输出 ImageIO
        ServletOutputStream out = resp.getOutputStream();
        ImageIO.write(img, "JPEG", out);
        try {
            out.flush();
        } catch (Exception ex) {
        } finally {
            out.close();
        }
    }

    /**
     * @Description 生成随机干扰
     * @Param [count, g]
     * @Return void
     */
    //随机干扰点
    public void randomDrop(int count, Graphics2D g) {
        for (int i = 0; i < count; i++) {
            Random rd = new Random();
            int x = rd.nextInt(WIDTH);//产生小于WIDTH的随机整数
            int y = rd.nextInt(HEIGHT);//产生小于HEIGHT的随机整数

            g.setColor(getColor(0));//随机颜色
            g.drawLine(x, y, x, y + 2);//绘制超短的线,看着是个点
        }
    }

    //随机干扰线
    public void randomLine(int count, Graphics2D g) {
        for (int i = 0; i < count; i++) {
            Random rd = new Random();
            int xBegin = rd.nextInt(WIDTH);//产生小于WIDTH的随机整数,起始位置
            int yBegin = rd.nextInt(HEIGHT);//产生小于HEIGHT的随机整数
            int xEnd = rd.nextInt(xBegin + 50);//终点
            int yEnd = rd.nextInt(yBegin + 30);
            g.setColor(getColor(0));//随机颜色
            g.drawLine(xBegin, yBegin, xEnd, yEnd);//绘制线条
        }
    }

    /**
     * @Description 生成随机验证码
     * @Param 需要几位验证码
     * @Return 随机生成的验证码
     */
    //随机验证码
    public String randomString(int count) {
        StringBuilder builder = new StringBuilder();
        String source = "ABCDEFGHJKLMNPQRSTUVWXYZ0123456789";
        Random rnd = new Random();
        for (int i = 0; i < count; i++) {
            int pos = rnd.nextInt(source.length());
            String s = source.substring(pos, pos + 1);
            builder.append(s);//每位验证码之间加个空格

        }
        return builder.toString();
    }

    /**
     * @Description 生成随机颜色值
     * @Param a越大颜色越深
     * @Return 随机的RGB颜色
     */
    public Color getColor(int a) {
        Random rd = new Random();      //Math.random()为生成0-1随机数
        int r = rd.nextInt(256 - a);//rd.nextInt(256)为随机生成0-255随机数
        int g = rd.nextInt(256 - a);
        int b = rd.nextInt(256 - a);
        return new Color(r, g, b);
    }
}
LoginController类代码如下
package cn.edu.mju.project2.comtroller;
import cn.edu.mju.project2.utils.StrUtil;
import javax.servlet.ServletException;
import javax.servlet.annotation.WebServlet;
import javax.servlet.http.HttpServlet;
import javax.servlet.http.HttpServletRequest;
import javax.servlet.http.HttpServletResponse;
import java.io.IOException;
import java.io.PrintWriter;
//@Servlet("/login")
@WebServlet("/login")
public class LoginController extends HttpServlet {
@Override
protected void doGet(HttpServletRequest req, HttpServletResponse resp) throws ServletException, IOException {
String info = "Hello ";
StringBuilder stringBuilder = new StringBuilder();
stringBuilder.append("欢迎登陆");
stringBuilder.append(");
stringBuilder.append("登陆名称:
");
stringBuilder.append("登陆密码:
");
stringBuilder.append("验 证 码 :
");
stringBuilder.append("");
stringBuilder.append("");
showMsg(resp, stringBuilder.toString());
}
@Override
protected void doPost(HttpServletRequest req, HttpServletResponse resp) throws ServletException, IOException {
String loginName = req.getParameter("loginName");
String loginPwd = req.getParameter("loginPwd");
String validCode = req.getParameter("validCode");
String saveCode = (String) req.getSession().getAttribute("code");//用强转不用tostring,否则会空指针异常
String msg = null;
if (StrUtil.isBank(loginName) && StrUtil.isBank(loginPwd)) {
msg = "请输入账号密码!";
} else {
if (StrUtil.isBank(validCode)) {
msg = "请输入验证码!";
} else {
if (validCode.equalsIgnoreCase(saveCode)) {//比较验证码,不区分大小写
//登陆名称是你的学号,密码是1234,那么显示下面的内容,否则,显示用户账户或密码错误
if ("5197101250".equals(loginName) && "1234".equals(loginPwd)) {
msg = "欢迎" + loginName + "登陆";
} else {
msg = "账号或密码错误!";
}
} else {
msg = "验证码错误!";
}
}
}
showMsg(resp, msg);
}
private void showMsg(HttpServletResponse resp,String msg){
resp.setCharacterEncoding("utf-8");
try{
PrintWriter out = resp.getWriter();
out.println("");
out.println("");
out.println("" );
out.println("test ");
out.println("");
out.println("");
out.println(msg);
out.println("");
out.println("");
out.close();
}catch (Exception ex){
System.out.println(ex.getMessage());
}
}
}
strUtil类代码如下
package cn.edu.mju.project2.utils;
/**
 * @Author xqs
 * @Date 2020/4/7 16:33
 * @Description 功能类
 */
public class StrUtil {
    /**
     * @Description 判断输入字符串是否为空
     * @Param 要判断是否为空的字符串
     * @Return boolean
     */
    public static boolean isBank(String str) {
        if (str == null || str.equals("")) {
            return true;
        } else {
            return false;
        }
    }
}
