webpack知识梳理
本文github仓库地址: https://github.com/Rynxiao/webpack-tutorial ,里面包括了本教程的所有代码。
【如果你觉得这篇文章写得不错,麻烦给本仓库一颗星:-D】
1. 导语
1.1 什么叫做webpack
webpack is a module bundler.
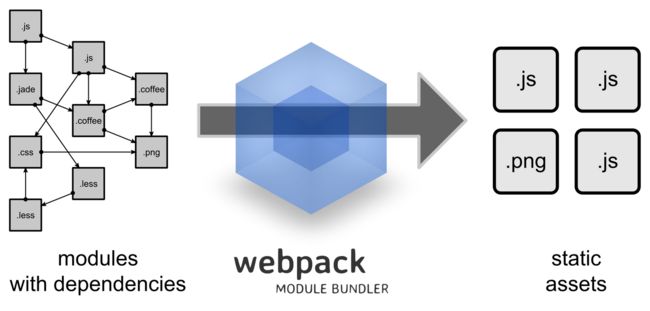
webpack takes modules with dependencies and generates static assets representing those modules.
简单的概括就是:webpack是一个模块打包工具,处理模块之间的依赖同时生成对应模块的静态资源。
1.2 webpack可以做一些什么事情
图中已经很清楚的反应了几个信息:
- webpack把项目中所有的静态文件都看作一个模块
- 模快之间存在着一些列的依赖
- 多页面的静态资源生成(打包之后生成多个静态文件,涉及到代码拆分)
2. webpack安装
- 全局安装(供全局调用:如
webpack --config webpack.config.js)
npm install -g webpack- 项目安装
npm install webpack

// 处理类似如下调用
import webpack from "webpack";
var webpack = require("webpack");
建议安装淘宝的npm镜像,这样下载npm包会快上很多,具体做法:
// 方式一
npm install xx --registry=https://registry.npm.taobao.org/

// 方式二:安装淘宝提供的npm工具
npm install -g cnpm
cnpm install xx

// 方式三
// 在用户主目录下,找到.npmrc文件,加上下面这段配置
registry=https://registry.npm.taobao.org/
3. webpack的基本配置
创建配置文件(webpack.config.js,执行webpack命令的时候,默认会执行这个文件)
module.export = {
    entry : 'app.js',
    output : {
        path : 'assets/',
        filename : '[name].bundle.js'
    },
    module : {
        loaders : [
            // 使用babel-loader解析js或者jsx模块
            { test : /\.js|\.jsx$/, loader : 'babel' },
            // 使用css-loader解析css模块
            { test : /\.css$/, loader : 'style!css' },
            // or another way
            { test : /\.css$/, loader : ['style', 'css'] }
        ]
    }
};
说明一: webpack.config.js默认输出一个webpack的配置文件,与CLI方式调用相同,只是更加简便
说明二: 执行webpack命令即可以运行配置,先决条件,全局安装webpack,项目安装各模块loader
说明三: entry对应需要打包的入口js文件,output对应输出的目录以及文件名,module中的loaders对应解析各个模块时需要的加载器
一个简单的例子
basic/app.js
require('./app.css');
document.getElementById('container').textContent = 'APP';
basic/app.css
* {
    margin: 0;
    padding: 0;
}
#container {
    margin: 50px auto;
    width: 50%;
    height: 200px;
    line-height: 200px;
    border-radius: 5px;
    box-shadow: 0 0 .5em #000;
    text-align: center;
    font-size: 40px;
    font-weight: bold;
}
basic/webpack.config.js
/**
 * webpack打包配置文件
 */

module.exports = {
    // 如果你有多个入口js,需要打包在一个文件中,那么你可以这么写
    // entry : ['./app1.js', './app2.js']
    entry : './app.js',
    output : {
        path : './assets/',
        filename : '[name].bundle.js'
    },
    module : {
        loaders : [
            { test : /\.js$/, loader : 'babel' },
            { test : /\.css$/, loader : 'style!css' }
        ]
    }
};
basic/index.html
<html lang="en">
<head>
    <meta charset="UTF-8">
    <title>basic webpacktitle>
head>
<body>
    <div id="container">div>
    <script src="./assets/main.bundle.js">script>
body>
html>在basic文件夹执行webpack,打包信息如下
生成main.bundle.js文件,chunk名称为main,也是webpack默认生成的chunk名
4. webapck常用到的各点拆分
4.1 entry相关
4.1.1webpack的多入口配置
上例的简单配置中,只有一个入口文件,那么如果对应于一个页面需要加载多个打包文件或者多个页面想同时引入对应的打包文件的时候,应该怎么做?
entry : {
    app1 : './app1.js',
    app2 : './app2.js'
}在multi-entry文件夹执行webpack,打包信息如下
可见生成了两个入口文件,以及各自对应的chunk名
4.2 output相关
4.2.1 output.publicPath
output: {
    path: "/home/proj/cdn/assets/[hash]",
    publicPath: "http://cdn.example.com/assets/[hash]/"
}
引用一段官网的话:
The publicPath specifies the public URL address of the output files when referenced in a browser. For loaders that embed


