——scrapy是为持续运行设计的网络爬虫框架,提供操作的Scrapy命令行
scrapy快速入门
1. 创建项目
要使用scrapy框架创建项目,需要通过命令来创建。首先进入到你想把这个项目存放的目录。然后使用以下命令创建:
scrapy startproject +<项目的名字>
下面我们创建一个名为myspider的项目,输入scrapy startproject myspider

它提示我们创建的myspider项目使用了scrapy库提供的模板,我们看生成的文件,这些.py文件就是继承的模块了
以下介绍下主要文件的作用:
- items.py:用来存放爬虫爬取下来数据的模型
- middlewares.py:用来存放各种中间件的文件
- pipelines.py:用来将items的模型存储到本地磁盘中
- settings.py:本爬虫的一些设置信息(比如请求头、iP代理池等)
- scrapy.cfg:项目的配置文件
- spiders包:以后所有的爬虫,都是存放到这个里面
2. 创建爬虫
命令:在项目路径下执行:scrapy genspider +<爬虫的名字> + <允许爬取的域名>
注意:<项目的名字> 和 <爬虫的名字>不能一致。
实例:下面我们用scrapy框架爬取糗事百科段子
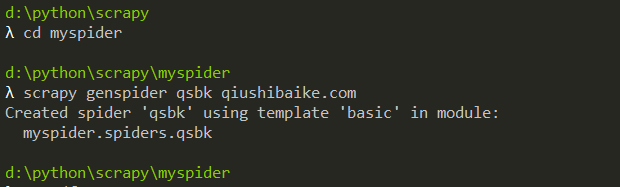
在spiders里面生成爬虫文件qsbk.py,内容如下:
# -*- coding: utf-8 -*-
import scrapy

# # 自定义spider类,继承scrapy.spider
class QsbkSpider(scrapy.Spider):
    # 爬虫的名字
    name = 'qsbk'
    # 允许爬取的范围,防止爬虫爬到别的网网站
    allowed_domains = ['qiushibaike.com']
    # 开始爬取的url地址
    start_urls = ['http://qiushibaike.com/']

    # 接受下载中间件传过来的response
    def parse(self, response):
        pass
3. 设置爬虫
在settings.py文件中设置User-Agent和忽略robots协议
BOT_NAME = 'myspider'

SPIDER_MODULES = ['myspider.spiders']
NEWSPIDER_MODULE = 'myspider.spiders'

# Crawl responsibly by identifying yourself (and your website) on the user-agent
USER_AGENT = 'Mozilla/5.0'

# Obey robots.txt rules
ROBOTSTXT_OBEY = False
4. 编辑爬虫
下面,我们先来通过type()函数打印response的类型
# -*- coding: utf-8 -*-
import scrapy


class QsbkSpider(scrapy.Spider):
    name = 'qsbk'
    allowed_domains = ['qiushibaike.com']
    # 糗事百科段子的第一页
    start_urls = ['https://www.qiushibaike.com/text/page/1/']
    # 把response放在等号中间方便查看
    def parse(self, response):
        print('='*30)
        print(type(response))
        print('='*30)
5. 运行爬虫
命令:在项目目录下执行scrapy crawl +<爬虫的名字>
示例:scrapy crawl qsbk
截取部分内容如下:
['scrapy.spidermiddlewares.httperror.HttpErrorMiddleware',
'scrapy.spidermiddlewares.offsite.OffsiteMiddleware',
'scrapy.spidermiddlewares.referer.RefererMiddleware',
'scrapy.spidermiddlewares.urllength.UrlLengthMiddleware',
'scrapy.spidermiddlewares.depth.DepthMiddleware']
2019-07-31 19:48:46 [scrapy.middleware] INFO: Enabled item pipelines:
[]
2019-07-31 19:48:46 [scrapy.core.engine] INFO: Spider opened
2019-07-31 19:48:46 [scrapy.extensions.logstats] INFO: Crawled 0 pages (at 0 pages/min), scraped 0 items (at 0 items/min)
2019-07-31 19:48:46 [scrapy.extensions.telnet] INFO: Telnet console listening on 127.0.0.1:6023
2019-07-31 19:48:47 [scrapy.core.engine] DEBUG: Crawled (200)
==============================
2019-07-31 19:48:47 [scrapy.core.engine] INFO: Closing spider (finished)
2019-07-31 19:48:47 [scrapy.statscollectors] INFO: Dumping Scrapy stats:
{'downloader/request_bytes': 207,
'downloader/request_count': 1,
'downloader/request_method_count/GET': 1,
'downloader/response_bytes': 17189,
'downloader/response_count': 1,
'downloader/response_status_count/200': 1,
'elapsed_time_seconds': 0.258309,
'finish_reason': 'finished',
'finish_time': datetime.datetime(2019, 7, 31, 11, 48, 47, 172685),
'log_count/DEBUG': 1,
可以看到生成很多日志,这些日志在我们的终端上看起来很不方便,我不想看它,那么我们可以在settings.py文件中设置
加入一行代码:LOG_LEVEL = 'WARNING'
BOT_NAME = 'myspider'

SPIDER_MODULES = ['myspider.spiders']
NEWSPIDER_MODULE = 'myspider.spiders'

LOG_LEVEL = 'WARNING'
# Crawl responsibly by identifying yourself (and your website) on the user-agent
USER_AGENT = 'Mozilla/5.0'

# Obey robots.txt rules
ROBOTSTXT_OBEY = False
接着,我们看返回的对象,
我们通过from scrapy.http.response.html import HtmlResponse这段代码去找它的属性和方法
可以看到这个对象的属性有
response.text、
response.encoding等
解析方法有
Xpath Selector 、
CSS Selector
当然,也可以
response.text转文本后再用Re、Xpath等
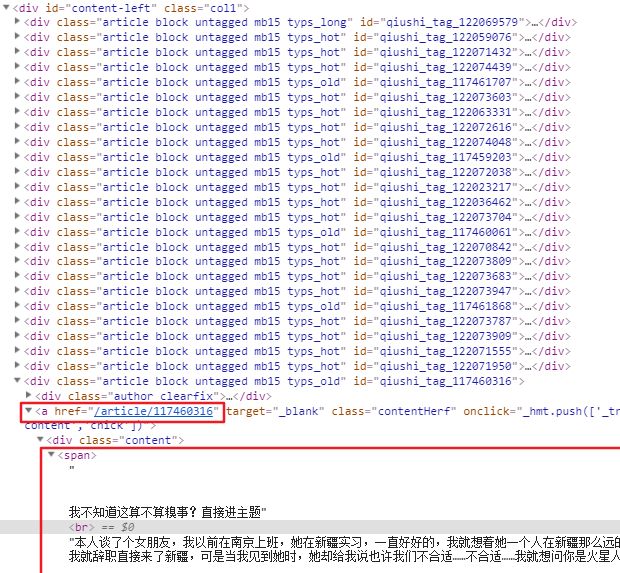
6. 分析网页
可以看到,所有段子在 这时候我们发现每次要去cmd运行代码很麻烦,我们可以在项目目录下(和scrapy.cfg同一目录)创建一个run.py文件(名字随便起),输入以下代码,这样我们就不用去cmd运行了 运行代码,返回 在源代码中,我们发现, get()方法用于提取符合要求的第一个元素,返回字符串 完善一下代码: 这样,我们爬取到了数据 如果数据需要存储,scrapy建议我们在 这里的 我们回到爬虫文件qsbk.py,导入这个类MyspiderItem 打开pipelines.py文件 在这里我们用yield关键字传过来的数据就会传给item这个参数,我们看到有个item-pipeline的文档链接,https://docs.scrapy.org/en/latest/topics/item-pipeline.html 在这个文档里可以看到pipeline的方法: 还有一个示例: 下面我们编写这个pipelines 这时候,还要做做最后一步设置,打开settings.py文件,把管道打开 这里的键就是我们的pipelines,值这里是300,这个值是设置优先权的,当我们有多个pipelines时,数字小的优先执行 python爬虫从入门到放弃之一:认识爬虫# -*- coding: utf-8 -*-
import scrapy
class QsbkSpider(scrapy.Spider):
name = 'qsbk'
allowed_domains = ['qiushibaike.com']
start_urls = ['https://www.qiushibaike.com/text/page/1/']
def parse(self, response):
articles = response.xpath('//div[@id="content-left"]')
print(type(articles))
from scrapy import cmdline
# cmdline.execute(['scrapy','crawl','qsbk'])
cmdline.execute('scrapy crawl qsbk'.split())
from scrapy.selector.unified import SelectorList去找它的属性和方法
内容如下:
# SelectorList继承于_ParselSelector
class SelectorList(_ParselSelector.selectorlist_cls, object_ref):
"""
The :class:`SelectorList` class is a subclass of the builtin ``list``
class, which provides a few additional methods.
"""
# 下面是ParselSelector中找到的两个提取内容的方法
def getall(self):
"""
Call the ``.get()`` method for each element is this list and return
their results flattened, as a list of unicode strings.
"""
return [x.get() for x in self]
extract = getall
def get(self, default=None):
"""
Return the result of ``.get()`` for the first element in this list.
If the list is empty, return the default value.
"""
for x in self:
return x.get()
else:
return default
extract_first = get
SelectorList对象可以继续使用xpath,也可以遍历,除此之外,还有两个实用的提取内容的方法
geall()方法用于提取所有符合要求的元素,返回列表
还有等价的写法 :extract_first = get ,extract = getall# -*- coding: utf-8 -*-
import scrapy
class QsbkSpider(scrapy.Spider):
name = 'qsbk'
allowed_domains = ['qiushibaike.com']
start_urls = ['https://www.qiushibaike.com/text/page/1/']
def parse(self, response):
# articles属于SelectorList对象
articles = response.xpath('//div[@id="content-left"]/div')
# article属于Selector对象
for article in articles:
link = 'https://www.qiushibaike.com'+ article.xpath('./a/@href').get()
content = article.xpath('./a/div/span/text()').get().strip()
print(content,link)
7. 数据模型
items.py里面定义数据模型,我们打开items.pyimport scrapy
class MyspiderItem(scrapy.Item):
# define the fields for your item here like:
# name = scrapy.Field()
pass
name = scrapy.Field()中的scrapy.Field()是固定的写法,变量名我们自己定义,修改如下:import scrapy
#定义一个类 MyspiderItem,它继承自scrapy.Item
class MyspiderItem(scrapy.Item):
# 定义文章概要的数据属性
content = scrapy.Field()
# 定义文章链接的数据属性
link = scrapy.Field()
# -*- coding: utf-8 -*-
import scrapy
# 从myspider项目的items.py文件导入MyspiderItem这个类
from myspider.items import MyspiderItem
class QsbkSpider(scrapy.Spider):
name = 'qsbk'
allowed_domains = ['qiushibaike.com']
start_urls = ['https://www.qiushibaike.com/text/page/1/']
def parse(self, response):
# articles属于SelectorList对象
articles = response.xpath('//div[@id="content-left"]/div')
# article属于Selector对象
for article in articles:
link = 'https://www.qiushibaike.com'+ article.xpath('./a/@href').get()
content = article.xpath('./a/div/span/text()').get().strip()
# 实例化MyspiderItem这个类,第一个content是我们在items.py中定义的属性
# 第二个content是这里的数据content,把它放进去MyspiderItem
items = MyspiderItem(content = content,link = link)
# 用yield关键字把它传去管道
yield items
8. 数据管道
# -*- coding: utf-8 -*-
# Define your item pipelines here
#
# Don't forget to add your pipeline to the ITEM_PIPELINES setting
# See: https://docs.scrapy.org/en/latest/topics/item-pipeline.html
class MyspiderPipeline(object):
def process_item(self, item, spider):
return item

# -*- coding: utf-8 -*-
# Define your item pipelines here
#
# Don't forget to add your pipeline to the ITEM_PIPELINES setting
# See: https://docs.scrapy.org/en/latest/topics/item-pipeline.html
import json
class MyspiderPipeline(object):
def __init__(self):
self.file= open('duanzi.json','w',encoding = 'utf-8')
def open_spider(self, spider):
print('爬虫开始了...')
def process_item(self, item, spider):
# ensure_ascii=False实现让中文写入的时候保持为中文
line = json.dumps(dict(item),ensure_ascii=False) + "\n"
self.file.write(line)
return item
def close_spider(self, spider):
self.file.close()
print('爬虫结束了!')
ITEM_PIPELINES = {
'myspider.pipelines.MyspiderPipeline': 300,
}
总结:
设置文件settings.py
# 关闭小的日志生成
LOG_LEVEL = 'WARNING'
# 设置 user-agent
USER_AGENT = 'Mozilla/5.0'
# 忽略robots协议
ROBOTSTXT_OBEY = False
# 打开管道
ITEM_PIPELINES = {
'myspider.pipelines.MyspiderPipeline': 300,
}
爬虫文件qsbk.py
# -*- coding: utf-8 -*-
import scrapy
from myspider.items import MyspiderItem
class QsbkSpider(scrapy.Spider):
name = 'qsbk'
allowed_domains = ['qiushibaike.com']
start_urls = ['https://www.qiushibaike.com/text/page/1/']
def parse(self, response):
articles = response.xpath('//div[@id="content-left"]/div')
for article in articles:
link = 'https://www.qiushibaike.com'+ article.xpath('./a/@href').get()
content = article.xpath('./a/div/span/text()').get().strip()
items = MyspiderItem(content = content,link = link)
yield items
数据模型items.py
import scrapy
class MyspiderItem(scrapy.Item):
content = scrapy.Field()
link = scrapy.Field()
数据管道pipelines.py
import json
class MyspiderPipeline(object):
def open_spider(self, spider):
print('爬虫开始了...')
self.file= open('duanzi.json','w',encoding = 'utf-8')
def process_item(self, item, spider):
line = json.dumps(dict(item),ensure_ascii=False) + "\n"
self.file.write(line)
return item
def close_spider(self, spider):
self.file.close()
print('爬虫结束了...')
运行爬虫
scrapy crawl qsbk
from scrapy import cmdline
cmdline.execute('scrapy crawl qsbk'.split())
scrapy中的response对象常用的属性和方法
# 属性
response.text # Response对应的内容信息,字符串类型
response.status # HTTP状态码
response.headers # Response对应的头部信息
response.request # Response对应的Request对象
# 提取数据方法一 (推荐)
response.xpath()
提取文本:get()、getall()
# 提取数据方法二
response.css('a::attr(href)')
提取文本:get()、getall()
# 提取数据方法三
response.text,再交给其他库re,beautifulsoup,lxml
scrapy爬虫笔记
scrapy.http.response.html.HtmlResponse对象。可以执行xpath或css语法来提取数据SelectorList对象,或是一个Selector对象getall()方法:获取Selector中所有文本,返回的是一个列表。gat()方法:获取Selector中的第一个文本,返回的是一个str类型yield返回items.py中定义好模型。而不是使用字典
open_spider(self, spider):当爬虫被打开的时候执行process_item(self, item, spider):当爬虫有item传过来的时候会被调用close_spider(self, spider):当爬虫关闭的时候会被调用
要激活pipeline,在settings.py中,开启ITEM_PIPELINES
>>>阅读更多文章请点击以下链接:
python爬虫从入门到放弃之二:HTML基础
python爬虫从入门到放弃之三:爬虫的基本流程
python爬虫从入门到放弃之四:Requests库基础
python爬虫从入门到放弃之五:Requests库高级用法
python爬虫从入门到放弃之六:BeautifulSoup库
python爬虫从入门到放弃之七:正则表达式
python爬虫从入门到放弃之八:Xpath
python爬虫从入门到放弃之九:Json解析
python爬虫从入门到放弃之十:selenium库
python爬虫从入门到放弃之十一:定时发送邮件
python爬虫从入门到放弃之十二:多协程
python爬虫从入门到放弃之十三:Scrapy概念和流程
python爬虫从入门到放弃之十四:Scrapy入门使用
python爬虫从入门到放弃之十五:ScrapyScrapy爬取多个页面
python爬虫从入门到放弃之十六:Xpath简化
python爬虫从入门到放弃之十七:常见反爬手段
python爬虫已放弃,视频教程资源来领取