浅谈Vue项目优化心得
路由优化
1.代码包优化
1.禁止sourceMap,即取消生成map.js文件。
一方面可以减少上线代码包的大小;另一方面提高系统的安全性。
在vuejs项目的config目录下有三个文件dev.env.js(开发环境配置文件)、prod.env.js(上线配置文件)、index.js(通用配置文件)。
vue-cli脚手架在上线配置文件会自动设置允许sourceMap打包,所以在上线前可以屏蔽sourceMap。
		'use strict'
		// Template version: 1.3.1
		// see http://vuejs-templates.github.io/webpack for documentation.
		const path = require('path')
		module.exports = {
		  dev: {
		    // Paths
		    assetsSubDirectory: 'static',
		    assetsPublicPath: '/',
		    proxyTable: {},
		    // Various Dev Server settings
		    host: 'localhost', // can be overwritten by process.env.HOST
		    port: 8080, // can be overwritten by process.env.PORT, if port is in use, a free one will be determined
		    autoOpenBrowser: false,
		    errorOverlay: true,
		    notifyOnErrors: true,
		    poll: false, // https://webpack.js.org/configuration/dev-server/#devserver-watchoptions-
		    /**
		     * Source Maps
		     */
		    // https://webpack.js.org/configuration/devtool/#development
		    devtool: 'cheap-module-eval-source-map',
		    // If you have problems debugging vue-files in devtools,
		    // set this to false - it *may* help
		    // https://vue-loader.vuejs.org/en/options.html#cachebusting
		    cacheBusting: true,
		    cssSourceMap: true
		  },
		  build: {
		    // Template for index.html
		    index: path.resolve(__dirname, '../dist/ndindex.html'),
		   // Paths
		    assetsRoot: path.resolve(__dirname, '../dist'),
		    assetsSubDirectory: 'static',
		    assetsPublicPath: './',
		    /**
		     * Source Maps
		     */
		    productionSourceMap: false,
		    //**true修改为false
		    // https://webpack.js.org/configuration/devtool/#production
		    devtool: '#source-map',
		    // Gzip off by default as many popular static hosts such as
		    // Surge or Netlify already gzip all static assets for you.
		    // Before setting to `true`, make sure to:
		    // npm install --save-dev compression-webpack-plugin
		    productionGzip: true,
		    productionGzipExtensions: ['js', 'css','svg'],
		    // Run the build command with an extra argument to
		    // View the bundle analyzer report after build finishes:
		    // `npm run build --report`
		    // Set to `true` or `false` to always turn it on or off
		    bundleAnalyzerReport: process.env.npm_config_report
		  }
		}
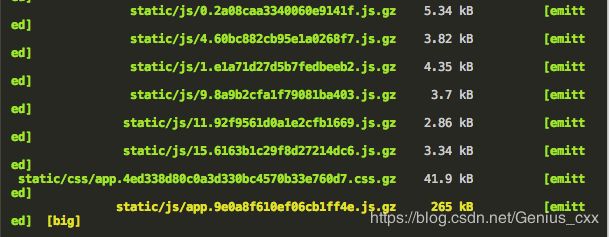
2.对项目代码中的JS/CSS/SVG(*.ico)文件进行gzip压缩
在vue-cli脚手架的配置信息中,有对代码进行压缩的配置项。
例如index.js的通用配置,productionGzip设置为true,但是首先需要对compress-webpack-plugin支持,所以需要通过 npm install --save-dev compression-webpack-plugin(如果npm install出错了,就使用cnpm install安装。
可能网络比较差npm install会出现频率比较大),gzip会对js、css文件进行压缩处理;对于图片进行压缩问题,对于png,jpg,jpeg没有压缩效果,对于svg,ico文件以及bmp文件压缩效果达到50%,在productionGzipExtensions: [‘js’, ‘css’,‘svg’]设置需要进行压缩的什么格式的文件。 对项目文件进行压缩之后,需要浏览器客户端支持gzip以及后端支持gzip。
	'use strict'
	// Template version: 1.3.1
	// see http://vuejs-templates.github.io/webpack for documentation.
	const path = require('path')
	module.exports = {
	  build: {
	    // Template for index.html
	    index: path.resolve(__dirname, '../dist/ndindex.html'),

    // Paths
    assetsRoot: path.resolve(__dirname, '../dist'),
    assetsSubDirectory: 'static',
    assetsPublicPath: './',

    /**
     * Source Maps
     */

    productionSourceMap: false,
    // https://webpack.js.org/configuration/devtool/#production
    devtool: '#source-map',

    // Gzip off by default as many popular static hosts such as
    // Surge or Netlify already gzip all static assets for you.
    // Before setting to `true`, make sure to:
    // npm install --save-dev compression-webpack-plugin
    productionGzip: true,
    productionGzipExtensions: ['js', 'css','svg'],

    // Run the build command with an extra argument to
    // View the bundle analyzer report after build finishes:
    // `npm run build --report`
    // Set to `true` or `false` to always turn it on or off
    bundleAnalyzerReport: process.env.npm_config_report
 	 }
	}
3.路由优化
在路由配置文件里,这里是router.js里面引用组件。
如果使用同步的方式加载组件,在首屏加载时会对网络资源加载加载比较多,资源比较大,加载速度比较慢。
所以设置路由懒加载,按需加载会加速首屏渲染。
-
第一种
{ path: '/test', name: 'test', component: resolve => require(['../components/test'], resolve) } -
第二种 (官方文档:https://cn.vuejs.org/v2/guide/components-dynamic-async.html)
const test = () => import("../components/test") { path: '/test', name: 'test', component: test }, -
第三种 (webpack提供的require.ensure())
  {
     path: '/test',
     name: 'test',
     component: resolve => require.ensure([], () => resolve(require('../components/test')), 'test')
  },
*以上3种方式都能实现按需加载,最后在webpack config 里面配置chunkFilename
	output: {
		    path: path.resolve(__dirname, '../dist'),
		    filename: 'js/[name].js',//.[hash].js',
		    publicPath: '/',
		    chunkFilename: 'js/[name].[chunkhash:3].js',
		},
4.源码优化
1.v-if 和 v-show选择调用
v-show和v-if的区别是:v-if是懒加载,当状态为true时才会加载,并且为false时不会占用布局空间;v-show是无论状态是true或者是false,都会进行渲染,并对布局占据空间对于在项目中,需要频繁调用,不需要权限的显示隐藏,可以选择使用v-show,可以减少系统的切换开销。
2.为item设置唯一key值,
在列表数据进行遍历渲染时,需要为每一项item设置唯一key值,方便vuejs内部机制精准找到该条列表数据。当state更新时,新的状态值和旧的状态值对比,较快地定位到diff。
3.细分vuejs组件
在项目开发过程之中,第一版本把所有的组件的布局写在一个组件中,当数据变更时,由于组件代码比较庞大,vuejs的数据驱动视图更新比较慢,造成渲染比较慢。造成比较差的体验效果。所以把组件细分,比如一个组件,可以把整个组件细分成轮播组件、列表组件、分页组件等。
4.减少watch的数据
当组件某个数据变更后需要对应的state进行变更,就需要对另外的组件进行state进行变更。可以使用watch监听相应的数据变更并绑定事件。当watch的数据比较小,性能消耗不明显。当数据变大,系统会出现卡顿,所以减少watch的数据。其它不同的组件的state双向绑定,可以采用事件中央总线或者vuex进行数据的变更操作。
5.内容类系统的图片资源按需加载
对于内容类系统的图片按需加载,如果出现图片加载比较多,可以先使用v-lazy之类的懒加载库或者绑定鼠标的scroll事件,滚动到可视区域先再对数据进行加载显示,减少系统加载的数据。
6.SSR(服务端渲染)
如果项目比较大,首屏无论怎么做优化,都出现闪屏或者一阵黑屏的情况。可以考虑使用SSR(服务端渲染),vuejs官方文档提供next.js很好的服务端解决方案,但是局限性就是目前仅支持Koa、express等Nodejs的后台框架,需要webpack支持。目前自己了解的就是后端支持方面,vuejs的后端渲染支持php,其它的不太清楚。
5.用户体验优化
优化方面很多,再次仅提及数据交互时,例如图片采用懒加载,若图标渲染也需要一些懒加载状态,在这里推荐element-ui的table 中v-loading进行数据渲染的前置加载状态处理。
官方文档:https://element.eleme.cn/#/zh-CN/component/table
6.异步组件
在大型应用中,我们可能需要将应用拆分为多个小模块,按需从服务器下载。为了让事情更简单, Vue.js 允许将组件定义为一个工厂函数,动态地解析组件的定义。Vue.js 只在组件需要渲染时触发工厂函数,并且把结果缓存起来,用于后面的再次渲染。
例如:
	const search = resolve => require(['./search.vue'], resolve);
	{
	            path: '/search',
	            name: 'search',
	            component: search
	}
总结
-
路由异步处理,尤其需要做权限的,官方文档很详细,多撸几遍文档
-
在使用ui库时,尽量使用按需加载方式.
-
数据交互时,采用ui库一些loading状态提高用户体验
-
服务端开启 gzip压缩,效果显著
例外附上:
- gulp安装与使用
- 搭建基于webpack的vue环境
- 浅谈Vue项目优化心得
- 总结:搭建Vue项目心得
- 总结:vue中Axios的封装-API接口的管理
