wait()和notify()详解
等待通知机制基本用法:
public class Test {

    public static void main(String[] args) throws InterruptedException {

        Thread waitThread = new Thread(new Runnable() {
            @Override
            public void run() {
                synchronized (Test.class){
                    System.out.println(Thread.currentThread().getName() + " is holding lock...");
                    try {
                        Thread.currentThread().sleep(1000);
                        System.out.println();
                    } catch (InterruptedException e) {
                        e.printStackTrace();
                    }
                    try {
                        System.out.println("wait() will release lock");
                        Test.class.wait();
                        System.out.println(Thread.currentThread().getName() + " need hold the lock again, and then to continue...");
                    } catch (InterruptedException e) {
                        e.printStackTrace();
                    }
                    System.out.println(Thread.currentThread().getName() + " will release lock again");
                }
            }
        }, "waitThread");

        Thread notifyThread = new Thread(new Runnable() {
            @Override
            public void run() {
                System.out.println(Thread.currentThread().getName() + " blocked.... for the lock");
                synchronized (Test.class){
                    System.out.println(Thread.currentThread().getName() + " is holding lock...");
                    Test.class.notify();
                    try {
                        Thread.currentThread().sleep(1000);
                        System.out.println();
                    } catch (InterruptedException e) {
                        e.printStackTrace();
                    }
                    System.out.println(Thread.currentThread().getName() + " will release lock");
                }
            }
        }, "notifyThread");

        waitThread.start();
        Thread.sleep(100);
        notifyThread.start();

    }

}


输出结果:
waitThread is holding lock...
notifyThread blocked.... for the lock

wait() will release lock
notifyThread is holding lock...

notifyThread will release lock
waitThread need hold the lock again, and then to continue...
waitThread will release lock again

Process finished with exit code 0
总结:
- wait()和notify()方法调用的前提是,二者所在的线程体中(即run()方法体)都需要先通过synchronized获取对象的锁;
- 当waitThread线程调用wait()方法后,会释放锁对象,线程由RUNNING状态转向WAITING状态,即该线程进入等待队列中;(记住这三点)
- wait()方法释放锁对象之前,notifyThread线程会阻塞在synchronzied获取锁对象的位置;而当wait()释放锁后,notifyThread线程会由阻塞状态尝试竞争锁,并拿到锁,开始执行同步块,当执行到notify()方法后,会将waitThread线程从等待队列中移到同步队列中,即notify方法会触发waitThread线程由WAITING非竞争状态转化为BLOCKED状态;
- 即,notify()方法只是会触发wait()所在的线程由非竞争的等待队列进入锁竞争的同步队列,由WAITING状态转向BLOCKED状态;想要执行wait()方法后续代码的前提是waitThread需要先竞争到锁对象,而由于notify()所在的同步块目前正持有锁,所以在notify从方法刚被调用(触发waitThread参与竞争)到所在同步块释放锁(释放waitThread需要的东西)这个过程里,waitThread只能一直阻塞。
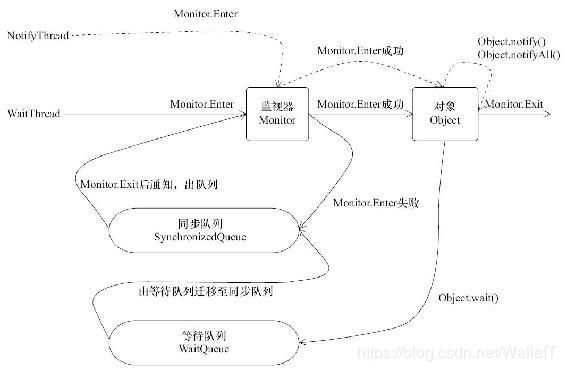
等待通知机制:
- 等待线程获取到对象的锁,调用wait()方法,放弃锁,进入等待队列
- 通知线程获取到对象的锁,调用对象的notify()方法
- 等待线程接受到通知,从等待队列移到同步队列,进入阻塞状态
- 通知线程释放锁后,等待线程获取到锁继续执行
从上面叙述可以看出,不管是notifyThread竞争锁,还是notify之后,waitThread需要重新进入同步队列,重新竞争锁,,最后都需要在阻塞状态下竞争同一个锁对象,,因此,等待/通知机制仍依托于同步机制。
使用常见细节:
我们做个试验,尝试在notify方法调用后,执行一个while循环,不让其同步块执行完,这样的话,wait()虽然接到了从waiting到blocked的提醒,但是仍然获不到锁,没法继续执行后续代码:
public class Test {

    public static void main(String[] args) throws InterruptedException {

        Thread waitThread = new Thread(new Runnable() {
            @Override
            public void run() {
                synchronized (Test.class){
                    try {
                        System.out.println(Thread.currentThread().getName() + " hold lock");
                        Test.class.wait();
                        System.out.println(Thread.currentThread().getName() + " hold lock again!!!");
                    } catch (InterruptedException e) {
                        e.printStackTrace();
                    }
                }
            }
        }, "waitThread");

        Thread notifyThread = new Thread(new Runnable() {
            @Override
            public void run() {
                synchronized (Test.class){
                    System.out.println(Thread.currentThread().getName() + " hold lock");
                    Test.class.notify();
                    while (true);
                }
            }
        }, "notifyThread");

        waitThread.start();
        Thread.sleep(100);
        notifyThread.start();

    }

}


输出结果:
waitThread hold lock
notifyThread hold lock
从输出结果可知,虽然notify()通知了wait()方法,但是由于notify所在同步块存在死循环,也就是一直没法释放wait()需要的锁,所以waitThread线程一直会阻塞下去;
线程状态切换过程
接下来,我们通过getState方法获取线程状态,来更直观的理解wait和notify机制对线程状态改变的过程:
import org.apache.poi.ss.formula.functions.T;

public class Test {

    private static Thread waitThread;

    public static void main(String[] args) throws InterruptedException {

        waitThread = new Thread(new Runnable() {
            @Override
            public void run() {
                synchronized (Test.class){
                    try {
                        System.out.println(Thread.currentThread().getName() + " hold lock");
                        Test.class.wait();
                        System.out.println(Thread.currentThread().getName() + " hold lock again!!!");
                        for (int i=0; i<5;i++){
                            try {
                                Thread.currentThread().sleep(1000);
                                System.out.println(Thread.currentThread().getName() + "'s state after hold lock again: "
                                        + Thread.currentThread().getState());
                            } catch (InterruptedException e) {
                                e.printStackTrace();
                            }
                        }
                    } catch (InterruptedException e) {
                        e.printStackTrace();
                    }
                }
            }
        }, "waitThread");

        Thread notifyThread = new Thread(new Runnable() {
            @Override
            public void run() {
                synchronized (Test.class){
                    System.out.println(Thread.currentThread().getName() + " hold lock");
                    for (int i=0; i<5;i++){
                        try {
                            Thread.currentThread().sleep(1000);
                            System.out.println(waitThread.getName() + "'s state before notify: " + waitThread.getState());
                        } catch (InterruptedException e) {
                            e.printStackTrace();
                        }

                    }
                    System.out.println("----------------------------------------");
                    Test.class.notify();
                    for (int i=0; i<5;i++){
                        try {
                            Thread.currentThread().sleep(1000);
                            System.out.println(waitThread.getName() + "'s state after notify: " + waitThread.getState());
                        } catch (InterruptedException e) {
                            e.printStackTrace();
                        }
                    }
                    System.out.println("----------------------------------------");
                }
            }
        }, "notifyThread");

        waitThread.start();
        Thread.sleep(100);
        notifyThread.start();

    }

}


输出结果:
waitThread hold lock
notifyThread hold lock
waitThread's state before notify: WAITING
waitThread's state before notify: WAITING
waitThread's state before notify: WAITING
waitThread's state before notify: WAITING
waitThread's state before notify: WAITING
----------------------------------------
waitThread's state after notify: BLOCKED
waitThread's state after notify: BLOCKED
waitThread's state after notify: BLOCKED
waitThread's state after notify: BLOCKED
waitThread's state after notify: BLOCKED
----------------------------------------
waitThread hold lock again!!!
waitThread's state after hold lock again: RUNNABLE
waitThread's state after hold lock again: RUNNABLE
waitThread's state after hold lock again: RUNNABLE
waitThread's state after hold lock again: RUNNABLE
waitThread's state after hold lock again: RUNNABLE

Process finished with exit code 0
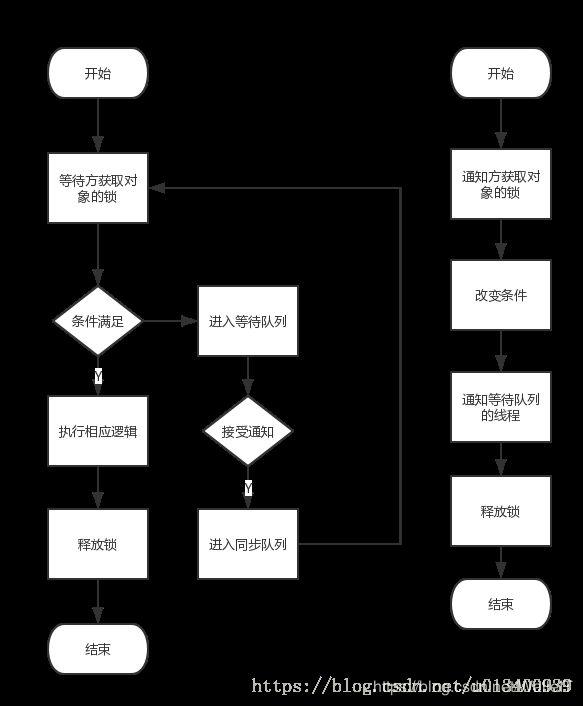
等待/通知的经典范式:
该范式分为两部分,分别针对等待方(消费者)和通知方(生产者)。
等待方遵循如下原则。
- 获取对象的锁。
- 如果条件不满足,那么调用对象的wait()方法,被通知后仍要检查条件。
- 条件满足则执行对应的逻辑。
// 对应的伪代码如下:
synchronized(对象) {

    while(条件不满足) {

        对象.wait();

    }

    对应的处理逻辑

}

理解说明:
while在这里是有意义的,当notify的同步块释锁之后,
wait()竞争得到锁,进入第二轮循环,若此时条件仍不满足,
那么wait()被第二次执行,由于这次执行之前,当前线程仍持有锁,
所以wait有锁可释,不会报错,释完锁之后,当前线程就由RUNNING转向WAITING,
线程进入等待队列,等待下一次notify通知.
通知方遵循如下原则:
- 获得对象的锁。
- 改变条件。
- 通知所有等待在对象上的线程。
// 对应的伪代码如下:
synchronized(对象) {

    // 改变条件得位置不重要 ,只要在同步块执行之前(释锁之前),
    // 因为wait只有在notify释锁后才有机会加锁,进而响应条件的变化
    改变条件

    对象.notifyAll();

}