Google Colaboratory中有多个py文件时的使用技巧
更新(只需两步即可完成)
1.挂载云盘
from google.colab import drive
drive.mount('/content/gdrive')
2.切换到指定文件夹
import os
os.chdir("/content/drive/Shared drives/项目名")
说明:上述路径根据自己的实际情况具体配置,可直接配置到项目所在路径下,这样代码基本不需要改动就可以运行啦。
PS:colab训练时会将旧的模型删除放在回收站里,依旧占着空间,不一会15G的免费空间就用完了,需要手动清空回收站。
所以安利一个goole drive无限网盘空间的方法,需要的小伙伴请点这。
1.安装必要的库,授权,连接你的Google drive
这个Colaboratory很牛逼的一点就是,它不光是一个notebook,还可以当命令行用!
我们在所有代码前面,加一个单元格,粘贴如下命令:
!apt-get install -y -qq software-properties-common python-software-properties module-init-tools
!add-apt-repository -y ppa:alessandro-strada/ppa 2>&1 > /dev/null
!apt-get update -qq 2>&1 > /dev/null
!apt-get -y install -qq google-drive-ocamlfuse fuse
from google.colab import auth
auth.authenticate_user()
from oauth2client.client import GoogleCredentials
creds = GoogleCredentials.get_application_default()
import getpass
!google-drive-ocamlfuse -headless -id={creds.client_id} -secret={creds.client_secret} < /dev/null 2>&1 | grep URL
vcode = getpass.getpass()
!echo {vcode} | google-drive-ocamlfuse -headless -id={creds.client_id} -secret={creds.client_secret}
运行!你应该看到类似下面这种结果:

点击结果里面的验证链接,会跳到一个网页,显示一长串验证码,
将验证码复制粘贴到上面的框框中,回车!
好了,然后再在一个新单元格中输入下面命令:
!mkdir -p drive
!google-drive-ocamlfuse drive  -o nonempty
再运行!就设置好了!
这样,Google drive就和Google Colaboratory连接好了,基本就可以像操作本地文件一样来操作云端的代码了。
2.多个py文件的使用技巧

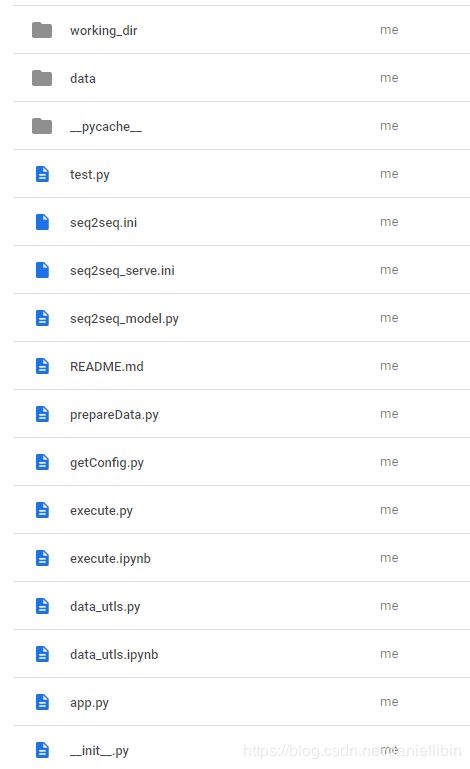
例如上图结构,需要运行execute.ipynb,但是这个文件又需要导入其他py文件中的库。
1.通过from drive.***.package import *导入
例如:
from drive.Colab.seq2seqChatbot.getConfig import *
from drive.Colab.seq2seqChatbot.prepareData import *
from drive.Colab.seq2seqChatbot.seq2seq_model import *
"."表示下级目录
2.使用包中的函数时,直接写函数名即可,不必再加包的名字。
例如 getConfig.py如下,需要在execute.ipynb中调用getConfig 包中的get_config()函数
import math
import os
import random
import sys
import time

import numpy as np


# python2 and python3 support
try:
    reload
except NameError:
    # py3k has unicode by default
    pass
else:
    reload(sys).setdefaultencoding('utf-8')

try:
    from ConfigParser import SafeConfigParser
except:
    from configparser import SafeConfigParser # In Python 3, ConfigParser has been renamed to configparser for PEP 8 compliance.

def get_config(config_file='seq2seq.ini'):
    parser = SafeConfigParser()
    parser.read(config_file,encoding="utf-8")
    # get the ints, floats and strings
    _conf_ints = [ (key, int(value)) for key,value in parser.items('ints') ]
    _conf_floats = [ (key, float(value)) for key,value in parser.items('floats') ]
    _conf_strings = [ (key, str(value)) for key,value in parser.items('strings') ]
    return dict(_conf_ints + _conf_floats + _conf_strings)
正确的调用方法
#正确
gConfig = get_config()
错误的调用方法
#错误
gConfig = getConfig.get_config()
3.在普通程序下import package和 from package import *的区别
import package
import getConfig
#调用
getConfig.get_config()
from package import *
from drive.Colab.seq2seqChatbot.getConfig import *
#调用
get_config()
from drive.Colab.seq2seqChatbot.getConfig import *
1.参考文章
[https://www.jianshu.com/p/2cf00bb9db34?utm_source=oschina-app]