创建GitHub私有库,制作CocoaPods依赖库(史上最详细)
CocoaPods 是托管在 github 上的,所有的 Pods 也都是托管在 github 上
7.注册CocoaPods
8.发布
1.创建自己的 github 仓库
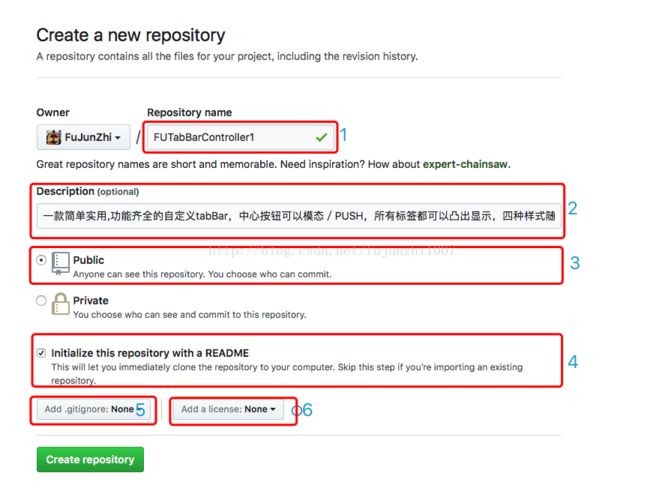
- Repository name: 仓库名称,这里写上我们的依赖库名字 O2View ,必填。
- Description: 仓库的描述信息,可选。
- Public or Private: 仓库的公开性,开源的话选 Public 。 如果是公司内部使用的话这里推荐大家使用私有的仓库,但是 github 的私有仓库是要收费的 $7/month 。大部分公司都是有自己的git服务器,不过一般只能在公司内网使用,或者可以选择Gitlab,Coding,Bitbucket任意一种。
- Initialize: 是否默认创建一个 README 文档,一个完整的库都会有这个说明文档,这里最好勾选一下。不过如果忘记的话也不要紧,后面手动创建也是可以的。
- .gitignore: 忽略项文件,记录一些想忽略的文件类型,凡是该文件包含的文件类型, git 都不会将其纳入到版本管理中。看需要选择就行。
- license: 正规的仓库都有一个 license 文件, Pods 依赖库对这个文件要求比较严格,需要有这个文件。这里最好让 github 自动创建一个,不过后续手动创建也行。我们这次先使用 MIT 类型的 license。
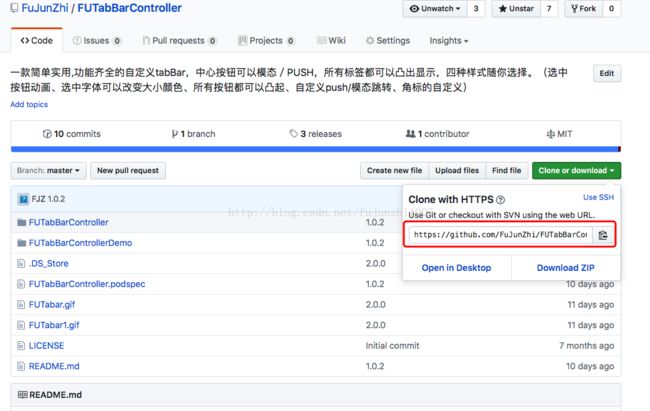
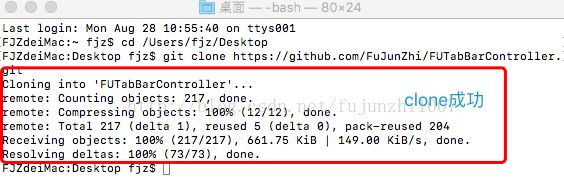
2.Clone仓库到本地
3.创建并编辑.podspec文件
两种途径:
- 执行命令行创建(改起来比较麻烦)。
- 复制已有的 podspec 文件然后修改对应的参数。
1>执行命令行创建:先cd到你项目的目录,执行命令,你也可以使用vim创建,只要创建就可以了
// 注 FUTabBarController 这个是你框架的名称
$ pod spec create FUTabBarController#
# Be sure to run `pod spec lint FUTabBarController.podspec' to ensure this is a
# valid spec and to remove all comments including this before submitting the spec.
#
# To learn more about Podspec attributes see http://docs.cocoapods.org/specification.html
# To see working Podspecs in the CocoaPods repo see https://github.com/CocoaPods/Specs/
#
Pod::Spec.new do |s|
# ――― Spec Metadata ―――――――――――――――――――――――――――――――――――――――――――――――――――――――――― #
#
# These will help people to find your library, and whilst it
# can feel like a chore to fill in it's definitely to your advantage. The
# summary should be tweet-length, and the description more in depth.
#
s.name = "FUTabBarController"
s.version = "0.0.1"
s.summary = "A short description of FUTabBarController."
# This description is used to generate tags and improve search results.
# * Think: What does it do? Why did you write it? What is the focus?
# * Try to keep it short, snappy and to the point.
# * Write the description between the DESC delimiters below.
# * Finally, don't worry about the indent, CocoaPods strips it!
s.description = <<-DESC
DESC
s.homepage = "http://EXAMPLE/FUTabBarController"
# s.screenshots = "www.example.com/screenshots_1.gif", "www.example.com/screenshots_2.gif"
# ――― Spec License ――――――――――――――――――――――――――――――――――――――――――――――――――――――――――― #
#
# Licensing your code is important. See http://choosealicense.com for more info.
# CocoaPods will detect a license file if there is a named LICENSE*
# Popular ones are 'MIT', 'BSD' and 'Apache License, Version 2.0'.
#
s.license = "MIT (example)"
# s.license = { :type => "MIT", :file => "FILE_LICENSE" }
# ――― Author Metadata ――――――――――――――――――――――――――――――――――――――――――――――――――――――――― #
#
# Specify the authors of the library, with email addresses. Email addresses
# of the authors are extracted from the SCM log. E.g. $ git log. CocoaPods also
# accepts just a name if you'd rather not provide an email address.
#
# Specify a social_media_url where others can refer to, for example a twitter
# profile URL.
#
s.author = { "" => "" }
# Or just: s.author = ""
# s.authors = { "" => "" }
# s.social_media_url = "http://twitter.com/"
# ――― Platform Specifics ――――――――――――――――――――――――――――――――――――――――――――――――――――――― #
#
# If this Pod runs only on iOS or OS X, then specify the platform and
# the deployment target. You can optionally include the target after the platform.
#
# s.platform = :ios
# s.platform = :ios, "5.0"
# When using multiple platforms
# s.ios.deployment_target = "5.0"
# s.osx.deployment_target = "10.7"
# s.watchos.deployment_target = "2.0"
# s.tvos.deployment_target = "9.0"
# ――― Source Location ―――――――――――――――――――――――――――――――――――――――――――――――――――――――――― #
#
# Specify the location from where the source should be retrieved.
# Supports git, hg, bzr, svn and HTTP.
#
s.source = { :git => "http://EXAMPLE/FUTabBarController.git", :tag => "#{s.version}" }
# ――― Source Code ―――――――――――――――――――――――――――――――――――――――――――――――――――――――――――――― #
#
# CocoaPods is smart about how it includes source code. For source files
# giving a folder will include any swift, h, m, mm, c & cpp files.
# For header files it will include any header in the folder.
# Not including the public_header_files will make all headers public.
#
s.source_files = "Classes", "Classes/**/*.{h,m}"
s.exclude_files = "Classes/Exclude"
# s.public_header_files = "Classes/**/*.h"
# ――― Resources ―――――――――――――――――――――――――――――――――――――――――――――――――――――――――――――――― #
#
# A list of resources included with the Pod. These are copied into the
# target bundle with a build phase script. Anything else will be cleaned.
# You can preserve files from being cleaned, please don't preserve
# non-essential files like tests, examples and documentation.
#
# s.resource = "icon.png"
# s.resources = "Resources/*.png"
# s.preserve_paths = "FilesToSave", "MoreFilesToSave"
# ――― Project Linking ―――――――――――――――――――――――――――――――――――――――――――――――――――――――――― #
#
# Link your library with frameworks, or libraries. Libraries do not include
# the lib prefix of their name.
#
# s.framework = "SomeFramework"
# s.frameworks = "SomeFramework", "AnotherFramework"
# s.library = "iconv"
# s.libraries = "iconv", "xml2"
# ――― Project Settings ――――――――――――――――――――――――――――――――――――――――――――――――――――――――― #
#
# If your library depends on compiler flags you can set them in the xcconfig hash
# where they will only apply to your library. If you depend on other Podspecs
# you can include multiple dependencies to ensure it works.
# s.requires_arc = true
# s.xcconfig = { "HEADER_SEARCH_PATHS" => "$(SDKROOT)/usr/include/libxml2" }
# s.dependency "JSONKit", "~> 1.4"
endPod::Spec.new do |s| s.name = "FUTabBarController" s.version = "1.0.2" s.summary = "custom FUTabBar" s.homepage = "https://github.com/FuJunZhi/FUTabBarController" s.license = {:type=>"MIT",:file=>"LICENSE"}s.authors = {"fujunzhi" => "[email protected]"} s.platform = :ios, "7.0" s.source = {:git => "https://github.com/FuJunZhi/FUTabBarController.git", :tag => s.version} s.source_files = "FUTabBarController/*.{h,m}" s.requires_arc = true end
注意这里一定要和.podspec的名称一样,否则报错s.version:版本号
s.ios.deployment_target:支持的pod最低版本
s.summary: 简介
s.homepage:项目主页地址
s.license:许可证
s.author:作者
s.social_media_url:社交网址,你的podspec发布成功后会@你
s.source:项目的地址
s.source_files:需要包含的源文件
s.resources: 资源文件" FUTabBarController/* “*” 表示匹配所有文件""FUTabBarController/*.{h,m}" “*.{h,m}” 表示匹配所有以.h和.m结尾的文件"FUTabBarContriller/**/*.h"“**” 表示匹配所有子目录
s.requires_arc: 是否支持ARC
s.dependency:依赖库,不能依赖未发布的库,如果有多个可以写多个s.dependency
4.创建LICENSE文件、README.md文件
LICENSE文件
| MIT License | |
| Copyright (c) 2016 FuJunZhi | |
| Permission is hereby granted, free of charge, to any person obtaining a copy | |
| of this software and associated documentation files (the "Software"), to deal | |
| in the Software without restriction, including without limitation the rights | |
| to use, copy, modify, merge, publish, distribute, sublicense, and/or sell | |
| copies of the Software, and to permit persons to whom the Software is | |
| furnished to do so, subject to the following conditions: | |
| The above copyright notice and this permission notice shall be included in all | |
| copies or substantial portions of the Software. | |
| THE SOFTWARE IS PROVIDED "AS IS", WITHOUT WARRANTY OF ANY KIND, EXPRESS OR | |
| IMPLIED, INCLUDING BUT NOT LIMITED TO THE WARRANTIES OF MERCHANTABILITY, | |
| FITNESS FOR A PARTICULAR PURPOSE AND NONINFRINGEMENT. IN NO EVENT SHALL THE | |
| AUTHORS OR COPYRIGHT HOLDERS BE LIABLE FOR ANY CLAIM, DAMAGES OR OTHER | |
| LIABILITY, WHETHER IN AN ACTION OF CONTRACT, TORT OR OTHERWISE, ARISING FROM, | |
| OUT OF OR IN CONNECTION WITH THE SOFTWARE OR THE USE OR OTHER DEALINGS IN THE | |
| SOFTWARE. |
README.md文件
使用 github 的人应该都熟悉这个文件,它使一个成功的 github 仓库必不可少的一部分,使用 markdown 对仓库进行详细说明。# FUTabBarController
*Custom FUTabBarController
包括功能:选中按钮动画(缩放/旋转)、选中字体可以改变大小颜色、所有按钮都可以凸起、自定义push/模态跳转、角标的自定义
### CocoaPods
1. Add `pod 'FUTabBarController', '~> 1.0.2'` to your Podfile.
2. Run `pod install` or `pod update`.
3. 创建UITabBarController自定义类 继承FUTabBarController
4. 具体实现可以看demo`Home->MainTabBarController.m`
### 带动画的效果图

5.验证.podspec文件
- 验证会先测试本地 .podspec 文件是否存在语法错误.
- 到此检查一下你工程下面的文件, .podspec文件, LICENSE文件,这两个文件必须要有
//1.--allow-warnings 忽略一些警告
pod lib lint --allow-warnings第二种验证命令(会打印出详细信息):
//2. --verbose 如果验证失败会报错误信息
pod spec lint FUTabBarController.podspec --verbose[!] The spec did not pass validation, due to 1 error.6.提交修改到GitHub,并对当前版本打Tag
1>验证成功之后,我们只要把代码提交到 github 仓库,命令:
git add -A && git commit -m "add pod files"

git push origin master以后再次更新只需要把你的项目打一个tag
然后修改.podspec文件中的版本接着提交到cocoapods官方就可以了,提交命令请看下面
//为git打tag
git tag "v1.0.2"
//将tag推送到远程仓库
git push --tags
经过前面的步骤,我们的 CocoaPods 依赖库就已经准备好了,但是现在你还不能在你的工程中使用它。如果你想成为一个真正可用的依赖库,还需要最后一步操作:将刚才生产的podspec 文件提交到 CocoaPods Specs中。
没错,我们平时用的能用 pod search 搜到的依赖库都会把它上传到这个仓库中, 也就是说只有将我们的podspec 文件上传到这里,才能成为一个真正的依赖库,别人才能用!
按照 github 的规则,要想向别人的库中添加文件,就要先 fork 别人的仓库,做相应的修改,再 pullrequest 给仓库的原作者,等到作者审核通过,进行 meger 之后就可以了!
7.注册CocoaPods
用pod --version命令查看安装的版本,尽量使用最新版本
- 如果版本低,需要升级:
sudo gen install cocoapods
pod setup
- 已经注册过的不需要注册(可以跳过注册步骤),怎么看自己有没有注册
pod trunk me- 我的注册信息
FJZdeiMac:FUTabBarController-master fjz$ pod trunk me
- Name: FuJunZhi
- Email: [email protected]
- Since: September 18th, 2016 02:46
- Pods:
- FUCanlendar
- FUThemeManager
- FUTableViewIndexBar
- FUTabBarController
- Sessions:
-September 18th, 2016 02:46 - May 25th, 21:03. IP:
180.166.66.226
-August 17th, 19:32 - January 3rd, 2018 19:08. IP:
218.83.245.210
- 注册,如果没有注册信息就需要注册了
// 加上--verbose可以输出详细debug信息,方便出错时查看。
pod trunk register [email protected] "FuJunZhi" --verbose
8.发布
- 验证你的podspec文件是否合法。在trunk方式之前我们一般用“pod lib lint”命令进行验证。
- 上传podspec文件到trunk服务器(其实最终也会自动添加到https://github.com/CocoaPods/Specs中,只是使用trunk方式省去了以前先fork在pull request的繁琐操作)
- 将你上传的podspec文件转成json格式文件
- 执行上面的push操作,就相当于你把你的源代码提交给CocoaPods团队审核了,现在CocoaPods审核只需要几秒钟或者几分钟就可以完成了。
1>发布时会验证 Pod 的有效性,如果你在手动验证 Pod 时使用了 --use-libraries 或 --allow-warnings 等修饰符,那么发布的时候也应该使用相同的字段修饰,否则出现相同的报错。
// --use-libraries --allow-warnings
pod trunk push FUTabBarController.podspec在trunk push后,先用"pod search"查找一下你的代码,有结果的话就欢天喜地;
没有的话执行"pod setup"进行本地依赖库更新,再search。
pod search FUTabbarController 如果不出意外,大多数同学在执行上述命令后会卡在“Setting up CocoaPods master repo”这一句中。我的经验是一个字:等!不要关闭Terminal,大概半小时到一小时左右就会完成,提示“Setup completed”。(第一次会比较慢,第一次以后只需要几秒钟即可完成)为什么会卡这么久呢?pod setup其实在做这么一件事:Cocoapods在将https://github.com/CocoaPods/Specs的信息下载到你电脑的~/.cocoapods目录下并进行文件比对,总数据大小大约在100MB左右,再加上服务器在国外,因此速度会比较慢。在执行过程中你也可以新开一个Terminal窗口,cd到~/.cocoapods目录,用du -sh *来查看下载进度。
到此大功告成,同学们赶快让你的框架支持pod吧
https://github.com/FuJunZhi


