玩转Google开源C++单元测试框架Google Test系列
http://www.cnblogs.com/coderzh/archive/2009/04/06/1426755.html
前段时间学习和了解了下Google的开源C++单元测试框架Google Test,简称gtest,非常的不错。 我们原来使用的是自己实现的一套单元测试框架,在使用过程中,发现越来越多使用不便之处,而这样不便之处,gtest恰恰很好的解决了。
其实gtest本身的实现并不复杂,我们完全可以模仿gtest,不断的完善我们的测试框架, 但最后我们还是决定使用gtest取代掉原来的自己的测试框架,原因是:
1.不断完善我们的测试框架之后就会发觉相当于把gtest重新做了一遍,虽然轮子造的很爽,但是不是必要的。
2.使用gtest可以免去维护测试框架的麻烦,让我们有更多精力投入到案例设计上。
3.gtest提高了非常完善的功能,并且简单易用,极大的提高了编写测试案例的效率。
gtest的官方网站是:
http://code.google.com/p/googletest/
从官方的使用文档里,你几乎可以获得你想要的所有东西
http://code.google.com/p/googletest/wiki/GoogleTestPrimer
http://code.google.com/p/googletest/wiki/GoogleTestAdvancedGuide
如果还想对gtest内部探个究竟,就把它的代码下载下来研究吧,这就是开源的好处,哈!
官方已经有如此完备的文档了,为什么我还要写呢?一方面是自己记记笔记,好记性不如烂笔头,以后自己想查查一些用法也可以直接在这里查到,一方面是对于不想去看一大堆英文文档的朋友,在我这里可以快速的找到gtest相关的内容。
额外篇:
1.gtest中如何跳出当前测试案例
2.编写优美的GTest测试案例
3.gtest 参数化测试代码示例 (内含完整工程示例)
玩转Google开源C++单元测试框架Google Test系列(gtest)之一 - 初识gtest
一、前言
本篇将介绍一些gtest的基本使用,包括下载,安装,编译,建立我们第一个测试Demo工程,以及编写一个最简单的测试案例。
二、下载
如果不记得网址, 直接在google里搜gtest,第一个就是。目前gtest的最新版本为1.3.0,从下列地址可以下载到该最新版本:
http://googletest.googlecode.com/files/gtest-1.3.0.zip
http://googletest.googlecode.com/files/gtest-1.3.0.tar.gz
http://googletest.googlecode.com/files/gtest-1.3.0.tar.bz2
三、编译
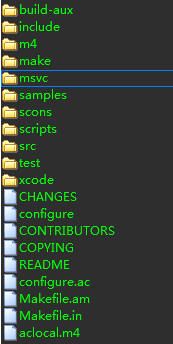
下载解压后, 里面有个msvc目录:
使用VS的同学可以直接打开msvc里面的工程文件, 如果你在使用的是VS2005或是VS2008,打开后会提示你升级,升完级后,我们直接编译里面的“gtest”工程,可以直接编过的。
这里要提醒一下的是,如果你升级为VS2008的工程,那么你的测试Demo最好也是VS2008工程,不然你会发现很郁闷,你的Demo怎么也编不过,我也曾折腾了好久,当时我升级为了VS2008工程,结果我使用VS2005工程建Demo,死活编不过。(这里有人误解了,并不是说只能在VS2008中编译,在VS2005中同样可以。如果要编译VS2005版本,最好保证gtest和你的测试工程都使用VS2005工程。)
编译之后,在msvc里面的Debug或是Release目录里看到编译出来的gtestd.lib或是gtest.lib文件。
四、第一个Demo
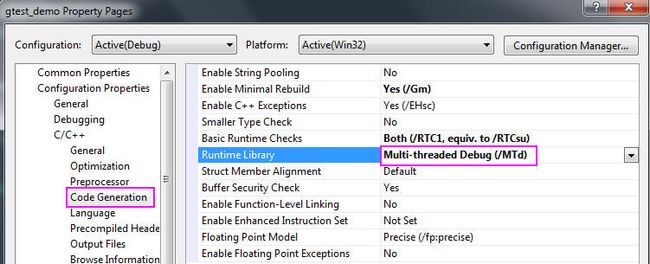
下面我们开始建立我们的第一个Demo了,假如之前使用的VS2008编译的gtest,那么,我们在VS2008中,新建一个Win32 Console Application。接着就是设置工程属性,总结如下:
1.设置gtest头文件路径
2.设置gtest.lib路径
3.Runtime Library设置
如果是Release版本,Runtime Library设为/MT。当然,其实你也可以选择动态链接(/MD),前提是你之前编译的gtest也使用了同样是/MD选项。
工程设置后了后,我们来编写一个最简单测试案例试试,我们先来写一个被测试函数:
{
if (a == 0 || b == 0 )
{
throw " don't do that " ;
}
int c = a % b;
if (c == 0 )
return b;
return Foo(b, c);
}
没错,上面的函数是用来求最大公约数的。下面我们就来编写一个简单的测试案例。
TEST(FooTest, HandleNoneZeroInput)
{
EXPECT_EQ( 2 , Foo( 4 , 10 ));
EXPECT_EQ( 6 , Foo( 30 , 18 ));
}
上面可以看到,编写一个测试案例是多么的简单。 我们使用了TEST这个宏,它有两个参数,官方的对这两个参数的解释为:[TestCaseName,TestName],而我对这两个参数的定义是:[TestSuiteName,TestCaseName],在下一篇我们再来看为什么这样定义。
对检查点的检查,我们上面使用到了EXPECT_EQ这个宏,这个宏用来比较两个数字是否相等。Google还包装了一系列EXPECT_* 和ASSERT_*的宏,而EXPECT系列和ASSERT系列的区别是:
1. EXPECT_* 失败时,案例继续往下执行。
2. ASSERT_* 失败时,直接在当前函数中返回,当前函数中ASSERT_*后面的语句将不会执行。
在下一篇,我们再来具体讨论这些断言宏。为了让我们的案例运行起来,我们还需要在main函数中添加如下代码:
{
testing::InitGoogleTest( & argc, argv);
return RUN_ALL_TESTS();
}
“testing::InitGoogleTest(&argc, argv);” :gtest的测试案例允许接收一系列的命令行参数,因此,我们将命令行参数传递给gtest,进行一些初始化操作。gtest的命令行参数非常丰富,在后面我们也会详细了解到。
“RUN_ALL_TESTS()” :运行所有测试案例
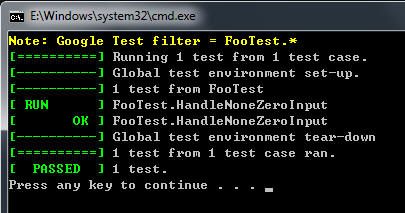
OK,一切就绪了,我们直接运行案例试试(一片绿色,非常爽):
五、总结
本篇内容确实是非常的初级,目的是让从来没有接触过gtest的同学了解gtest最基本的使用。gtest还有很多更高级的使用方法,我们将会在后面讨论。总结本篇的内容的话:
1. 使用VS编译gtest.lib文件
2. 设置测试工程的属性(头文件,lib文件,/MT参数(和编译gtest时使用一样的参数就行了))
3. 使用TEST宏开始一个测试案例,使用EXPECT_*,ASSER_*系列设置检查点。
4. 在Main函数中初始化环境,再使用RUN_ALL_TEST()宏运行测试案例。
优点:
1. 我们的测试案例本身就是一个exe工程,编译之后可以直接运行,非常的方便。
2. 编写测试案例变的非常简单(使用一些简单的宏如TEST),让我们将更多精力花在案例的设计和编写上。
3. 提供了强大丰富的断言的宏,用于对各种不同检查点的检查。
4. 提高了丰富的命令行参数对案例运行进行一系列的设置。
玩转Google开源C++单元测试框架Google Test系列(gtest)之二 - 断言
一、前言
这篇文章主要总结gtest中的所有断言相关的宏。 gtest中,断言的宏可以理解为分为两类,一类是ASSERT系列,一类是EXPECT系列。一个直观的解释就是:
1. ASSERT_* 系列的断言,当检查点失败时,退出当前函数(注意:并非退出当前案例)。
2. EXPECT_* 系列的断言,当检查点失败时,继续往下执行。
二、示例
EXPECT_EQ( 3 , Add( 1 , 2 ))
//
假如你的Add(1, 2) 结果为4的话,会在结果中输出:
Actual: 4
Expected: 3
如果是将结果输出到xml里的话,将输出:(关于将结果输出为xml,见:http://www.cnblogs.com/coderzh/archive/2009/04/10/1432789.html)
< failure message ="Value of: Add(1, 2) Actual: 4Expected: 3" type ="" > g:\myproject\c++\gtestdemo\gtestdemo\gtestdemo.cpp:16
Value of: Add(1, 2)
Actual: 4
Expected: 3 ]]> failure >
testcase >
如果你对自动输出的出错信息不满意的话,你还可以通过操作符<<将一些自定义的信息输出,通常,这对于调试或是对一些检查点的补充说明来说,非常有用!
下面举个例子:
如果不使用<<操作符自定义输出的话:
{
EXPECT_EQ(x[i], y[i]) ;
}
看到的结果将是这样的,你根本不知道出错时 i 等于几:
Actual: 4
Expected: x[i]
Which is : 3
如果使用<<操作符将一些重要信息输出的话:
{
EXPECT_EQ(x[i], y[i]) << " Vectors x and y differ at index " << i;
}
从输出结果中就可以定位到在 i = 2 时出现了错误。这样的输出结果看起来更加有用,容易理解:
Actual: 4
Expected: x[i]
Which is : 3
Vectors x and y differ at index 2
三、布尔值检查
| Fatal assertion | Nonfatal assertion | Verifies |
| ASSERT_TRUE(condition); | EXPECT_TRUE(condition); | condition is true |
| ASSERT_FALSE(condition); | EXPECT_FALSE(condition); | condition is false |
四、数值型数据检查
| Fatal assertion | Nonfatal assertion | Verifies |
| ASSERT_EQ(expected, actual); | EXPECT_EQ(expected, actual); | expected == actual |
| ASSERT_NE(val1, val2); | EXPECT_NE(val1, val2); | val1 != val2 |
| ASSERT_LT(val1, val2); | EXPECT_LT(val1, val2); | val1 < val2 |
| ASSERT_LE(val1, val2); | EXPECT_LE(val1, val2); | val1 <= val2 |
| ASSERT_GT(val1, val2); | EXPECT_GT(val1, val2); | val1 > val2 |
| ASSERT_GE(val1, val2); | EXPECT_GE(val1, val2); | val1 >= val2 |
五、字符串检查
| Fatal assertion | Nonfatal assertion | Verifies |
| ASSERT_STREQ(expected_str, actual_str); | EXPECT_STREQ(expected_str, actual_str); | the two C strings have the same content |
| ASSERT_STRNE(str1, str2); | EXPECT_STRNE(str1, str2); | the two C strings have different content |
| ASSERT_STRCASEEQ(expected_str, actual_str); | EXPECT_STRCASEEQ(expected_str, actual_str); | the two C strings have the same content, ignoring case |
| ASSERT_STRCASENE(str1, str2); | EXPECT_STRCASENE(str1, str2); | the two C strings have different content, ignoring case |
*STREQ*和*STRNE*同时支持char*和wchar_t*类型的,*STRCASEEQ*和*STRCASENE*却只接收char*,估计是不常用吧。下面是几个例子:
{
char * pszCoderZh = " CoderZh " ;
wchar_t * wszCoderZh = L " CoderZh " ;
std:: string strCoderZh = " CoderZh " ;
std::wstring wstrCoderZh = L " CoderZh " ;
EXPECT_STREQ( " CoderZh " , pszCoderZh);
EXPECT_STREQ(L " CoderZh " , wszCoderZh);
EXPECT_STRNE( " CnBlogs " , pszCoderZh);
EXPECT_STRNE(L " CnBlogs " , wszCoderZh);
EXPECT_STRCASEEQ( " coderzh " , pszCoderZh);
// EXPECT_STRCASEEQ(L"coderzh", wszCoderZh); 不支持
EXPECT_STREQ( " CoderZh " , strCoderZh.c_str());
EXPECT_STREQ(L " CoderZh " , wstrCoderZh.c_str());
}
六、显示返回成功或失败
直接返回成功:SUCCEED();
返回失败:
| Fatal assertion | Nonfatal assertion |
| FAIL(); | ADD_FAILURE(); |
{
ADD_FAILURE() << " Sorry " ; // None Fatal Asserton,继续往下执行。
// FAIL(); // Fatal Assertion,不往下执行该案例。
SUCCEED();
}
七、异常检查
| Fatal assertion | Nonfatal assertion | Verifies |
| ASSERT_THROW(statement, exception_type); | EXPECT_THROW(statement, exception_type); | statement throws an exception of the given type |
| ASSERT_ANY_THROW(statement); | EXPECT_ANY_THROW(statement); | statement throws an exception of any type |
| ASSERT_NO_THROW(statement); | EXPECT_NO_THROW(statement); | statement doesn't throw any exception |
例如:
{
if (a == 0 || b == 0 )
{
throw " don't do that " ;
}
int c = a % b;
if (c == 0 )
return b;
return Foo(b, c);
}
TEST(FooTest, HandleZeroInput)
{
EXPECT_ANY_THROW(Foo( 10 , 0 ));
EXPECT_THROW(Foo( 0 , 5 ), char * );
}
八、Predicate Assertions
在使用EXPECT_TRUE或ASSERT_TRUE时,有时希望能够输出更加详细的信息,比如检查一个函数的返回值TRUE还是FALSE时,希望能够输出传入的参数是什么,以便失败后好跟踪。因此提供了如下的断言:
| Fatal assertion | Nonfatal assertion | Verifies |
| ASSERT_PRED1(pred1, val1); | EXPECT_PRED1(pred1, val1); | pred1(val1) returns true |
| ASSERT_PRED2(pred2, val1, val2); | EXPECT_PRED2(pred2, val1, val2); | pred2(val1, val2) returns true |
| ... | ... | ... |
Google人说了,他们只提供<=5个参数的,如果需要测试更多的参数,直接告诉他们。下面看看这个东西怎么用。
{
return Foo(m , n) > 1 ;
}
TEST(PredicateAssertionTest, Demo)
{
int m = 5 , n = 6 ;
EXPECT_PRED2(MutuallyPrime, m, n);
}
当失败时,返回错误信息:
error: MutuallyPrime(m, n) evaluates to false, where
m evaluates to 5
n evaluates to 6
如果对这样的输出不满意的话,还可以自定义输出格式,通过如下:
| Fatal assertion | Nonfatal assertion | Verifies |
| ASSERT_PRED_FORMAT1(pred_format1, val1);` | EXPECT_PRED_FORMAT1(pred_format1, val1); | pred_format1(val1) is successful |
| ASSERT_PRED_FORMAT2(pred_format2, val1, val2); | EXPECT_PRED_FORMAT2(pred_format2, val1, val2); | pred_format2(val1, val2) is successful |
| ... | ... |
用法示例:
if (Foo(m, n) == k)
return testing::AssertionSuccess();
testing::Message msg;
msg << m_expr << " 和 " << n_expr << " 的最大公约数应该是: " << Foo(m, n) << " 而不是: " << k_expr;
return testing::AssertionFailure(msg);
}
TEST(AssertFooTest, HandleFail)
{
EXPECT_PRED_FORMAT3(AssertFoo, 3 , 6 , 2 );
}
失败时,输出信息:
error: 3 和 6 的最大公约数应该是:3 而不是:2
是不是更温馨呢,呵呵。
九、浮点型检查
| Fatal assertion | Nonfatal assertion | Verifies |
| ASSERT_FLOAT_EQ(expected, actual); | EXPECT_FLOAT_EQ(expected, actual); | the two float values are almost equal |
| ASSERT_DOUBLE_EQ(expected, actual); | EXPECT_DOUBLE_EQ(expected, actual); | the two double values are almost equal |
对相近的两个数比较:
| Fatal assertion | Nonfatal assertion | Verifies |
| ASSERT_NEAR(val1, val2, abs_error); | EXPECT_NEAR(val1, val2, abs_error); | the difference between val1 and val2 doesn't exceed the given absolute error |
同时,还可以使用:
EXPECT_PRED_FORMAT2(testing::DoubleLE, val1, val2);
十、Windows HRESULT assertions
| Fatal assertion | Nonfatal assertion | Verifies |
| ASSERT_HRESULT_SUCCEEDED(expression); | EXPECT_HRESULT_SUCCEEDED(expression); | expression is a success HRESULT |
| ASSERT_HRESULT_FAILED(expression); | EXPECT_HRESULT_FAILED(expression); | expression is a failure HRESULT |
例如:
ASSERT_HRESULT_SUCCEEDED(shell.CoCreateInstance(L " Shell.Application " ));
CComVariant empty;
ASSERT_HRESULT_SUCCEEDED(shell -> ShellExecute(CComBSTR(url), empty, empty, empty, empty));
十一、类型检查
类型检查失败时,直接导致代码编不过,难得用处就在这?看下面的例子:
public :
void Bar() { testing::StaticAssertTypeEq < int , T > (); }
};
TEST(TypeAssertionTest, Demo)
{
FooType < bool > fooType;
fooType.Bar();
}
十二、总结
本篇将常用的断言都介绍了一遍,内容比较多,有些还是很有用的。要真的到写案例的时候,也行只是一两种是最常用的,现在时知道有这么多种选择,以后才方便查询。
玩转Google开源C++单元测试框架Google Test系列(gtest)之三 - 事件机制
一、前言
gtest提供了多种事件机制,非常方便我们在案例之前或之后做一些操作。总结一下gtest的事件一共有3种:
1. 全局的,所有案例执行前后。
2. TestSuite级别的,在某一批案例中第一个案例前,最后一个案例执行后。
3. TestCase级别的,每个TestCase前后。
二、全局事件
要实现全局事件,必须写一个类,继承testing::Environment类,实现里面的SetUp和TearDown方法。
1. SetUp()方法在所有案例执行前执行
2. TearDown()方法在所有案例执行后执行
{
public :
virtual void SetUp()
{
std::cout << " Foo FooEnvironment SetUP " << std::endl;
}
virtual void TearDown()
{
std::cout << " Foo FooEnvironment TearDown " << std::endl;
}
};
当然,这样还不够,我们还需要告诉gtest添加这个全局事件,我们需要在main函数中通过testing::AddGlobalTestEnvironment方法将事件挂进来,也就是说,我们可以写很多个这样的类,然后将他们的事件都挂上去。
{
testing::AddGlobalTestEnvironment( new FooEnvironment);
testing::InitGoogleTest( & argc, argv);
return RUN_ALL_TESTS();
}
三、TestSuite事件
我们需要写一个类,继承testing::Test,然后实现两个静态方法
1. SetUpTestCase() 方法在第一个TestCase之前执行

2. TearDownTestCase() 方法在最后一个TestCase之后执行
protected :
static void SetUpTestCase() {
shared_resource_ = new
}
static void TearDownTestCase() {
delete shared_resource_;
shared_resource_ = NULL;
}
// Some expensive resource shared by all tests.
static T * shared_resource_;
};
在编写测试案例时,我们需要使用TEST_F这个宏,第一个参数必须是我们上面类的名字,代表一个TestSuite。
{
// you can refer to shared_resource here
}
TEST_F(FooTest, Test2)
{
// you can refer to shared_resource here
}
四、TestCase事件
TestCase事件是挂在每个案例执行前后的,实现方式和上面的几乎一样,不过需要实现的是SetUp方法和TearDown方法:
1. SetUp()方法在每个TestCase之前执行
2. TearDown()方法在每个TestCase之后执行
{
protected :
virtual void SetUp()
{
m_foo.Init();
}
virtual void TearDown()
{
m_foo.Finalize();
}
FooCalc m_foo;
};
TEST_F(FooCalcTest, HandleNoneZeroInput)
{
EXPECT_EQ( 4 , m_foo.Calc( 12 , 16 ));
}
TEST_F(FooCalcTest, HandleNoneZeroInput_Error)
{
EXPECT_EQ( 5 , m_foo.Calc( 12 , 16 ));
}
五、总结
gtest提供的这三种事件机制还是非常的简单和灵活的。同时,通过继承Test类,使用TEST_F宏,我们可以在案例之间共享一些通用方法,共享资源。使得我们的案例更加的简洁,清晰。
玩转Google开源C++单元测试框架Google Test系列(gtest)之四 - 参数化
一、前言
在设计测试案例时,经常需要考虑给被测函数传入不同的值的情况。我们之前的做法通常是写一个通用方法,然后编写在测试案例调用它。即使使用了通用方法,这样的工作也是有很多重复性的,程序员都懒,都希望能够少写代码,多复用代码。Google的程序员也一样,他们考虑到了这个问题,并且提供了一个灵活的参数化测试的方案。
二、旧的方案
为了对比,我还是把旧的方案提一下。首先我先把被测函数IsPrime帖过来(在gtest的example1.cc中),这个函数是用来判断传入的数值是否为质数的。
bool IsPrime( int n)
{
// Trivial case 1: small numbers
if (n <= 1 ) return false ;
// Trivial case 2: even numbers
if (n % 2 == 0 ) return n == 2 ;
// Now, we have that n is odd and n >= 3.
// Try to divide n by every odd number i, starting from 3
for ( int i = 3 ; ; i += 2 ) {
// We only have to try i up to the squre root of n
if (i > n / i) break ;
// Now, we have i <= n/i < n.
// If n is divisible by i, n is not prime.
if (n % i == 0 ) return false ;
}
// n has no integer factor in the range (1, n), and thus is prime.
return true ;
}
假如我要编写判断结果为True的测试案例,我需要传入一系列数值让函数IsPrime去判断是否为True(当然,即使传入再多值也无法确保函数正确,呵呵),因此我需要这样编写如下的测试案例:
{
EXPECT_TRUE(IsPrime( 3 ));
EXPECT_TRUE(IsPrime( 5 ));
EXPECT_TRUE(IsPrime( 11 ));
EXPECT_TRUE(IsPrime( 23 ));
EXPECT_TRUE(IsPrime( 17 ));
}
我们注意到,在这个测试案例中,我至少复制粘贴了4次,假如参数有50个,100个,怎么办?同时,上面的写法产生的是1个测试案例,里面有5个检查点,假如我要把5个检查变成5个单独的案例,将会更加累人。
接下来,就来看看gtest是如何为我们解决这些问题的。
三、使用参数化后的方案
1. 告诉gtest你的参数类型是什么
你必须添加一个类,继承testing::TestWithParam
{
};
2. 告诉gtest你拿到参数的值后,具体做些什么样的测试
这里,我们要使用一个新的宏(嗯,挺兴奋的):TEST_P,关于这个"P"的含义,Google给出的答案非常幽默,就是说你可以理解为”parameterized" 或者 "pattern"。我更倾向于 ”parameterized"的解释,呵呵。在TEST_P宏里,使用GetParam()获取当前的参数的具体值。
{
int n = GetParam();
EXPECT_TRUE(IsPrime(n));
}
嗯,非常的简洁!
3. 告诉gtest你想要测试的参数范围是什么
使用INSTANTIATE_TEST_CASE_P这宏来告诉gtest你要测试的参数范围:
第一个参数是测试案例的前缀,可以任意取。
第二个参数是测试案例的名称,需要和之前定义的参数化的类的名称相同,如:IsPrimeParamTest
第三个参数是可以理解为参数生成器,上面的例子使用test::Values表示使用括号内的参数。Google提供了一系列的参数生成的函数:
| Range(begin, end[, step]) | 范围在begin~end之间,步长为step,不包括end |
| Values(v1, v2, ..., vN) | v1,v2到vN的值 |
| ValuesIn(container) and ValuesIn(begin, end) | 从一个C类型的数组或是STL容器,或是迭代器中取值 |
| Bool() | 取false 和 true 两个值 |
| Combine(g1, g2, ..., gN) | 这个比较强悍,它将g1,g2,...gN进行排列组合,g1,g2,...gN本身是一个参数生成器,每次分别从g1,g2,..gN中各取出一个值,组合成一个元组(Tuple)作为一个参数。 说明:这个功能只在提供了 |
四、参数化后的测试案例名
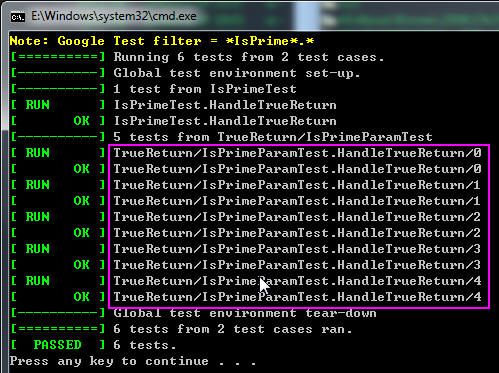
因为使用了参数化的方式执行案例,我非常想知道运行案例时,每个案例名称是如何命名的。我执行了上面的代码,输出如下:
从上面的框框中的案例名称大概能够看出案例的命名规则,对于需要了解每个案例的名称的我来说,这非常重要。 命名规则大概为:
prefix/test_case_name.test.name/index
五、类型参数化
gtest还提供了应付各种不同类型的数据时的方案,以及参数化类型的方案。我个人感觉这个方案有些复杂。首先要了解一下类型化测试,就用gtest里的例子了。
首先定义一个模版类,继承testing::Test:
class FooTest : public testing::Test {
public :
typedef std::list < T > List;
static T shared_;
T value_;
};
接着我们定义需要测试到的具体数据类型,比如下面定义了需要测试char,int和unsigned int :
TYPED_TEST_CASE(FooTest, MyTypes);
又是一个新的宏,来完成我们的测试案例,在声明模版的数据类型时,使用TypeParam
// Inside a test, refer to the special name TypeParam to get the type
// parameter. Since we are inside a derived class template, C++ requires
// us to visit the members of FooTest via 'this'.
TypeParam n = this -> value_;
// To visit static members of the fixture, add the 'TestFixture::'
// prefix.
n += TestFixture::shared_;
// To refer to typedefs in the fixture, add the 'typename TestFixture::'
// prefix. The 'typename' is required to satisfy the compiler.
typename TestFixture::List values;
values.push_back(n);
}
上面的例子看上去也像是类型的参数化,但是还不够灵活,因为需要事先知道类型的列表。gtest还提供一种更加灵活的类型参数化的方式,允许你在完成测试的逻辑代码之后再去考虑需要参数化的类型列表,并且还可以重复的使用这个类型列表。下面也是官方的例子:
class FooTest : public testing::Test {
};
TYPED_TEST_CASE_P(FooTest);
接着又是一个新的宏TYPED_TEST_P类完成我们的测试案例:
// Inside a test, refer to TypeParam to get the type parameter.
TypeParam n = 0 ;
}
TYPED_TEST_P(FooTest, HasPropertyA) {
接着,我们需要我们上面的案例,使用REGISTER_TYPED_TEST_CASE_P宏,第一个参数是testcase的名称,后面的参数是test的名称
接着指定需要的类型列表:
INSTANTIATE_TYPED_TEST_CASE_P(My, FooTest, MyTypes);
这种方案相比之前的方案提供更加好的灵活度,当然,框架越灵活,复杂度也会随之增加。
六、总结
gtest为我们提供的参数化测试的功能给我们的测试带来了极大的方便,使得我们可以写更少更优美的代码,完成多种参数类型的测试案例。
玩转Google开源C++单元测试框架Google Test系列(gtest)之五 - 死亡测试
一、前言
“死亡测试”名字比较恐怖,这里的“死亡”指的的是程序的崩溃。通常在测试过程中,我们需要考虑各种各样的输入,有的输入可能直接导致程序崩溃,这时我们就需要检查程序是否按照预期的方式挂掉,这也就是所谓的“死亡测试”。gtest的死亡测试能做到在一个安全的环境下执行崩溃的测试案例,同时又对崩溃结果进行验证。
二、使用的宏
| Fatal assertion | Nonfatal assertion | Verifies |
| ASSERT_DEATH(statement, regex`); | EXPECT_DEATH(statement, regex`); | statement crashes with the given error |
| ASSERT_EXIT(statement, predicate, regex`); | EXPECT_EXIT(statement, predicate, regex`); | statement exits with the given error and its exit code matches predicate |
由于有些异常只在Debug下抛出,因此还提供了*_DEBUG_DEATH,用来处理Debug和Realease下的不同。
三、*_DEATH(statement, regex`)
1. statement是被测试的代码语句
2. regex是一个正则表达式,用来匹配异常时在stderr中输出的内容
如下面的例子:
{
int * pInt = 0 ;
* pInt = 42 ;
}
TEST(FooDeathTest, Demo)
{
EXPECT_DEATH(Foo(), "" );
}
重要:编写死亡测试案例时,TEST的第一个参数,即testcase_name,请使用DeathTest后缀。原因是gtest会优先运行死亡测试案例,应该是为线程安全考虑。
四、*_EXIT(statement, predicate, regex`)
1. statement是被测试的代码语句
2. predicate 在这里必须是一个委托,接收int型参数,并返回bool。只有当返回值为true时,死亡测试案例才算通过。gtest提供了一些常用的predicate:
如果程序正常退出并且退出码与exit_code相同则返回 true
如果程序被signal_number信号kill的话就返回true
3. regex是一个正则表达式,用来匹配异常时在stderr中输出的内容
这里, 要说明的是,*_DEATH其实是对*_EXIT进行的一次包装,*_DEATH的predicate判断进程是否以非0退出码退出或被一个信号杀死。
例子:
{
EXPECT_EXIT(_exit( 1 ), testing::ExitedWithCode( 1 ), "" );
}
五、*_DEBUG_DEATH
先来看定义:
#define EXPECT_DEBUG_DEATH(statement, regex) \
do { statement; } while ( false )
#define ASSERT_DEBUG_DEATH(statement, regex) \
do { statement; } while ( false )
#else
#define EXPECT_DEBUG_DEATH(statement, regex) \
EXPECT_DEATH(statement, regex)
#define ASSERT_DEBUG_DEATH(statement, regex) \
ASSERT_DEATH(statement, regex)
#endif // NDEBUG for EXPECT_DEBUG_DEATH
可以看到,在Debug版和Release版本下, *_DEBUG_DEATH的定义不一样。因为很多异常只会在Debug版本下抛出,而在Realease版本下不会抛出,所以针对Debug和Release分别做了不同的处理。看gtest里自带的例子就明白了:
if (sideeffect) * sideeffect = 12 ;
#ifndef NDEBUG
GTEST_LOG_(FATAL, " debug death inside DieInDebugElse12() " );
#endif // NDEBUG
return 12 ;
}
TEST(TestCase, TestDieOr12WorksInDgbAndOpt)
{
int sideeffect = 0 ;
// Only asserts in dbg.
EXPECT_DEBUG_DEATH(DieInDebugElse12( & sideeffect), " death " );
#ifdef NDEBUG
// opt-mode has sideeffect visible.
EXPECT_EQ( 12 , sideeffect);
#else
// dbg-mode no visible sideeffect.
EXPECT_EQ( 0 , sideeffect);
#endif
}
六、关于正则表达式
在POSIX系统(Linux, Cygwin, 和 Mac)中,gtest的死亡测试中使用的是POSIX风格的正则表达式,想了解POSIX风格表达式可参考:
1. POSIX extended regular expression
2. Wikipedia entry.
在Windows系统中,gtest的死亡测试中使用的是gtest自己实现的简单的正则表达式语法。 相比POSIX风格,gtest的简单正则表达式少了很多内容,比如 ("x|y"), ("(xy)"), ("[xy]") 和("x{5,7}")都不支持。
下面是简单正则表达式支持的一些内容:
| matches any literal character c | |
| \\d | matches any decimal digit |
| \\D | matches any character that's not a decimal digit |
| \\f | matches \f |
| \\n | matches \n |
| \\r | matches \r |
| \\s | matches any ASCII whitespace, including \n |
| \\S | matches any character that's not a whitespace |
| \\t | matches \t |
| \\v | matches \v |
| \\w | matches any letter, _, or decimal digit |
| \\W | matches any character that \\w doesn't match |
| \\c | matches any literal character c, which must be a punctuation |
| . | matches any single character except \n |
| A? | matches 0 or 1 occurrences of A |
| A* | matches 0 or many occurrences of A |
| A+ | matches 1 or many occurrences of A |
| ^ | matches the beginning of a string (not that of each line) |
| $ | matches the end of a string (not that of each line) |
| xy | matches x followed by y |
gtest定义两个宏,用来表示当前系统支持哪套正则表达式风格:
1. POSIX风格:GTEST_USES_POSIX_RE = 1
2. Simple风格:GTEST_USES_SIMPLE_RE=1
七、死亡测试运行方式
1. fast方式(默认的方式)
2. threadsafe方式
你可以在 main() 里为所有的死亡测试设置测试形式,也可以为某次测试单独设置。Google Test会在每次测试之前保存这个标记并在测试完成后恢复,所以你不需要去管这部分工作 。如:
testing::FLAGS_gtest_death_test_style = " threadsafe " ;
// This test is run in the "threadsafe" style:
ASSERT_DEATH(ThisShouldDie(), "" );
}
TEST(MyDeathTest, TestTwo) {
// This test is run in the "fast" style:
ASSERT_DEATH(ThisShouldDie(), "" );
}
int main( int argc, char ** argv) {
testing::InitGoogleTest( & argc, argv);
testing::FLAGS_gtest_death_test_style = " fast " ;
return RUN_ALL_TESTS();
}
八、注意事项
1. 不要在死亡测试里释放内存。
2. 在父进程里再次释放内存。
3. 不要在程序中使用内存堆检查。
九、总结
关于死亡测试,gtest官方的文档已经很详细了,同时在源码中也有大量的示例。如想了解更多的请参考官方的文档,或是直接看gtest源码。
简单来说,通过*_DEATH(statement, regex`)和*_EXIT(statement, predicate, regex`),我们可以非常方便的编写导致崩溃的测试案例,并且在不影响其他案例执行的情况下,对崩溃案例的结果进行检查。
玩转Google开源C++单元测试框架Google Test系列(gtest)之六 - 运行参数
一、前言
使用gtest编写的测试案例通常本身就是一个可执行文件,因此运行起来非常方便。同时,gtest也为我们提供了一系列的运行参数(环境变量、命令行参数或代码里指定),使得我们可以对案例的执行进行一些有效的控制。
二、基本介绍
前面提到,对于运行参数,gtest提供了三种设置的途径:
1. 系统环境变量
2. 命令行参数
3. 代码中指定FLAG
因为提供了三种途径,就会有优先级的问题, 有一个原则是,最后设置的那个会生效。不过总结一下,通常情况下,比较理想的优先级为:
命令行参数 > 代码中指定FLAG > 系统环境变量
为什么我们编写的测试案例能够处理这些命令行参数呢?是因为我们在main函数中,将命令行参数交给了gtest,由gtest来搞定命令行参数的问题。
{
testing::InitGoogleTest( & argc, argv);
return RUN_ALL_TESTS();
}
这样,我们就拥有了接收和响应gtest命令行参数的能力。如果需要在代码中指定FLAG,可以使用testing::GTEST_FLAG这个宏来设置。比如相对于命令行参数--gtest_output,可以使用testing::GTEST_FLAG(output) = "xml:";来设置。注意到了,不需要加--gtest前缀了。同时,推荐将这句放置InitGoogleTest之前,这样就可以使得对于同样的参数,命令行参数优先级高于代码中指定。
{
testing::GTEST_FLAG(output) = " xml: " ;
testing::InitGoogleTest( & argc, argv);
return RUN_ALL_TESTS();
}
最后再来说下第一种设置方式-系统环境变量。如果需要gtest的设置系统环境变量,必须注意的是:
1. 系统环境变量全大写,比如对于--gtest_output,响应的系统环境变量为:GTEST_OUTPUT
2. 有一个命令行参数例外,那就是--gtest_list_tests,它是不接受系统环境变量的。(只是用来罗列测试案例名称)
三、参数列表
了解了上面的内容,我这里就直接将所有命令行参数总结和罗列一下。如果想要获得详细的命令行说明,直接运行你的案例,输入命令行参数:/? 或 --help 或 -help
1. 测试案例集合
| 命令行参数 | 说明 |
| --gtest_list_tests | 使用这个参数时,将不会执行里面的测试案例,而是输出一个案例的列表。 |
| --gtest_filter | 对执行的测试案例进行过滤,支持通配符 ? 单个字符 * 任意字符 - 排除,如,-a 表示除了a : 取或,如,a:b 表示a或b 比如下面的例子: ./foo_test 没有指定过滤条件,运行所有案例 |
| --gtest_also_run_disabled_tests | 执行案例时,同时也执行被置为无效的测试案例。关于设置测试案例无效的方法为: 在测试案例名称或测试名称中添加DISABLED前缀,比如:
//
Tests that Foo does Abc.
TEST(FooTest, DISABLED_DoesAbc) { class DISABLED_BarTest : public testing::Test { // Tests that Bar does Xyz. TEST_F(DISABLED_BarTest, DoesXyz) { |
| --gtest_repeat=[COUNT] | 设置案例重复运行次数,非常棒的功能!比如: --gtest_repeat=1000 重复执行1000次,即使中途出现错误。 |
2. 测试案例输出
| 命令行参数 | 说明 |
| --gtest_color=(yes|no|auto) | 输出命令行时是否使用一些五颜六色的颜色。默认是auto。 |
| --gtest_print_time | 输出命令行时是否打印每个测试案例的执行时间。默认是不打印的。 |
| --gtest_output=xml[:DIRECTORY_PATH\|:FILE_PATH] | 将测试结果输出到一个xml中。 1.--gtest_output=xml: 不指定输出路径时,默认为案例当前路径。 2.--gtest_output=xml:d:\ 指定输出到某个目录 3.--gtest_output=xml:d:\foo.xml 指定输出到d:\foo.xml 如果不是指定了特定的文件路径,gtest每次输出的报告不会覆盖,而会以数字后缀的方式创建。xml的输出内容后面介绍吧。 |
3. 对案例的异常处理
| 命令行参数 | 说明 |
| --gtest_break_on_failure | 调试模式下,当案例失败时停止,方便调试 |
| --gtest_throw_on_failure | 当案例失败时以C++异常的方式抛出 |
| --gtest_catch_exceptions | 是否捕捉异常。gtest默认是不捕捉异常的,因此假如你的测试案例抛了一个异常,很可能会弹出一个对话框,这非常的不友好,同时也阻碍了测试案例的运行。如果想不弹这个框,可以通过设置这个参数来实现。如将--gtest_catch_exceptions设置为一个非零的数。 注意:这个参数只在Windows下有效。 |
四、XML报告输出格式
< testsuites tests ="3" failures ="1" errors ="0" time ="35" name ="AllTests" >
< testsuite name ="MathTest" tests ="2" failures ="1" * errors ="0" time ="15" >
< testcase name ="Addition" status ="run" time ="7" classname ="" >
< failure message ="Value of: add(1, 1) Actual: 3Expected: 2" type ="" />
< failure message ="Value of: add(1, -1) Actual: 1Expected: 0" type ="" />
testcase >
< testcase name ="Subtraction" status ="run" time ="5" classname ="" >
testcase >
testsuite >
< testsuite name ="LogicTest" tests ="1" failures ="0" errors ="0" time ="5" >
< testcase name ="NonContradiction" status ="run" time ="5" classname ="" >
testcase >
testsuite >
testsuites >
从报告里可以看出,我们之前在TEST等宏中定义的测试案例名称(testcase_name)在xml测试报告中其实是一个testsuite name,而宏中的测试名称(test_name)在xml测试报告中是一个testcase name,概念上似乎有点混淆,就看你怎么看吧。
当检查点通过时,不会输出任何检查点的信息。当检查点失败时,会有详细的失败信息输出来failure节点。
在我使用过程中发现一个问题,当我同时设置了--gtest_filter参数时,输出的xml报告中还是会包含所有测试案例的信息,只不过那些不被执行的测试案例的status值为“notrun”。而我之前认为的输出的xml报告应该只包含我需要运行的测试案例的信息。不知是否可提供一个只输出需要执行的测试案例的xml报告。因为当我需要在1000个案例中执行其中1个案例时,在报告中很难找到我运行的那个案例,虽然可以查找,但还是很麻烦。
五、总结
本篇主要介绍了gtest案例执行时提供的一些参数的使用方法,这些参数都非常有用。在实际编写gtest测试案例时肯定会需要用到的时候。至少我现在比较常用的就是:
1. --gtest_filter
2. --gtest_output=xml[:DIRECTORY_PATH\|:FILE_PATH]
3. --gtest_catch_exceptions
最后再总结一下我使用过程中遇到的几个问题:
1. 同时使用--gtest_filter和--gtest_output=xml:时,在xml测试报告中能否只包含过滤后的测试案例的信息。
2. 有时,我在代码中设置 testing::GTEST_FLAG(catch_exceptions) = 1和我在命令行中使用--gtest_catch_exceptions结果稍有不同,在代码中设置FLAG方式有时候捕捉不了某些异常,但是通过命令行参数的方式一般都不会有问题。这是我曾经遇到过的一个问题,最后我的处理办法是既在代码中设置FLAG,又在命令行参数中传入--gtest_catch_exceptions。不知道是gtest在catch_exceptions方面不够稳定,还是我自己测试案例的问题。
玩转Google开源C++单元测试框架Google Test系列(gtest)之七 - 深入解析gtest
一、前言
“深入解析”对我来说的确有些难度,所以我尽量将我学习到和观察到的gtest内部实现介绍给大家。本文算是抛砖引玉吧,只能是对gtest的整体结构的一些介绍,想要了解更多细节最好的办法还是看gtest源码,如果你看过gtest源码,你会发现里面的注释非常的详细!好了,下面就开始了解gtest吧。
二、从TEST宏开始
前面的文章已经介绍过TEST宏的用法了,通过TEST宏,我们可以非法简单、方便的编写测试案例,比如:
{
EXPECT_EQ( 1 , 1 );
}
我们先不去看TEST宏的定义,而是先使用/P参数将TEST展开。如果使用的是Vistual Studio的话:
1. 选中需要展开的代码文件,右键 - 属性 - C/C++ - Preprocessor
2. Generate Preprocessed File 设置 Without Line Numbers (/EP /P) 或 With Line Numbers (/P)
3. 关闭属性对话框,右键选中需要展开的文件,右键菜单中点击:Compile
编译过后,会在源代码目录生成一个后缀为.i的文件,比如我对上面的代码进行展开,展开后的内容为:
{
public :
FooTest_Demo_Test() {}
private :
virtual void TestBody();
static ::testing::TestInfo * const test_info_;
FooTest_Demo_Test( const FooTest_Demo_Test & );
void operator = ( const FooTest_Demo_Test & );
};
::testing::TestInfo * const FooTest_Demo_Test
::test_info_ =
::testing:: internal ::MakeAndRegisterTestInfo(
" FooTest " , " Demo " , "" , "" ,
(::testing:: internal ::GetTestTypeId()),
::testing::Test::SetUpTestCase,
::testing::Test::TearDownTestCase,
new ::testing:: internal ::TestFactoryImpl < FooTest_Demo_Test > );
void FooTest_Demo_Test::TestBody()
{
switch ( 0 )
case 0 :
if ( const ::testing::AssertionResult
gtest_ar =
(::testing:: internal :: EqHelper < ( sizeof (::testing:: internal ::IsNullLiteralHelper( 1 )) == 1 ) > ::Compare( " 1 " , " 1 " , 1 , 1 )))
;
else
::testing:: internal ::AssertHelper(
::testing::TPRT_NONFATAL_FAILURE,
" .\\gtest_demo.cpp " ,
9 ,
gtest_ar.failure_message()
) = ::testing::Message();
}
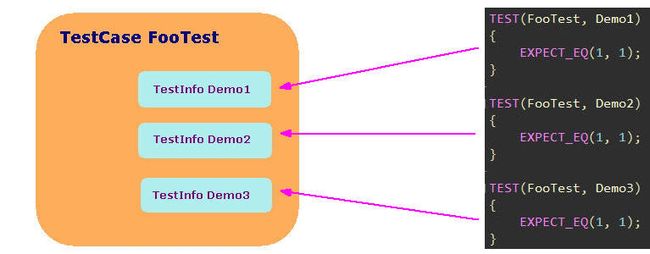
展开后,我们观察到:
1. TEST宏展开后,是一个继承自testing::Test的类。
2. 我们在TEST宏里面写的测试代码,其实是被放到了类的TestBody方法中。
3. 通过静态变量test_info_,调用MakeAndRegisterTestInfo对测试案例进行注册。
如下图:
上面关键的方法就是MakeAndRegisterTestInfo了,我们跳到MakeAndRegisterTestInfo函数中:
// 返回创建的TestInfo对象
//
// 参数:
//
// test_case_name: 测试案例的名称
// name: 测试的名称
// test_case_comment: 测试案例的注释信息
// comment: 测试的注释信息
// fixture_class_id: test fixture类的ID
// set_up_tc: 事件函数SetUpTestCases的函数地址
// tear_down_tc: 事件函数TearDownTestCases的函数地址
// factory: 工厂对象,用于创建测试对象(Test)
TestInfo * MakeAndRegisterTestInfo(
const char * test_case_name, const char * name,
const char * test_case_comment, const char * comment,
TypeId fixture_class_id,
SetUpTestCaseFunc set_up_tc,
TearDownTestCaseFunc tear_down_tc,
TestFactoryBase * factory) {
TestInfo * const test_info =
new TestInfo(test_case_name, name, test_case_comment, comment,
fixture_class_id, factory);
GetUnitTestImpl() -> AddTestInfo(set_up_tc, tear_down_tc, test_info);
return test_info;
}
我们看到,上面创建了一个TestInfo对象,然后通过AddTestInfo注册了这个对象。TestInfo对象到底是一个什么样的东西呢?
TestInfo对象主要用于包含如下信息:
1. 测试案例名称(testcase name)
2. 测试名称(test name)
3. 该案例是否需要执行
4. 执行案例时,用于创建Test对象的函数指针
5. 测试结果
我们还看到,TestInfo的构造函数中,非常重要的一个参数就是工厂对象,它主要负责在运行测试案例时创建出Test对象。我们看到我们上面的例子的factory为:
我们明白了,Test对象原来就是TEST宏展开后的那个类的对象(FooTest_Demo_Test),再看看TestFactoryImpl的实现:
class TestFactoryImpl : public TestFactoryBase {
public :
virtual Test * CreateTest() { return new TestClass; }
};
这个对象工厂够简单吧,嗯,Simple is better。当我们需要创建一个测试对象(Test)时,调用factory的CreateTest()方法就可以了。
创建了TestInfo对象后,再通过下面的方法对TestInfo对象进行注册:
GetUnitTestImpl()是获取UnitTestImpl对象:
return UnitTest::GetInstance() -> impl();
}
其中UnitTest是一个单件(Singleton),整个进程空间只有一个实例,通过UnitTest::GetInstance()获取单件的实例。上面的代码看到,UnitTestImpl对象是最终是从UnitTest对象中获取的。那么UnitTestImpl到底是一个什么样的东西呢?可以这样理解:
UnitTestImpl是一个在UnitTest内部使用的,为执行单元测试案例而提供了一系列实现的那么一个类。(自己归纳的,可能不准确)
我们上面的AddTestInfo就是其中的一个实现,负责注册TestInfo实例:
//
// 参数:
//
// set_up_tc: 事件函数SetUpTestCases的函数地址
// tear_down_tc: 事件函数TearDownTestCases的函数地址
// test_info: TestInfo对象
void AddTestInfo(Test::SetUpTestCaseFunc set_up_tc,
Test::TearDownTestCaseFunc tear_down_tc,
TestInfo * test_info) {
// 处理死亡测试的代码,先不关注它
if (original_working_dir_.IsEmpty()) {
original_working_dir_.Set(FilePath::GetCurrentDir());
if (original_working_dir_.IsEmpty()) {
printf( " %s\n " , " Failed to get the current working directory. " );
abort();
}
}
// 获取或创建了一个TestCase对象,并将testinfo添加到TestCase对象中。
GetTestCase(test_info -> test_case_name(),
test_info -> test_case_comment(),
set_up_tc,
tear_down_tc) -> AddTestInfo(test_info);
}
我们看到,TestCase对象出来了,并通过AddTestInfo添加了一个TestInfo对象。这时,似乎豁然开朗了:
1. TEST宏中的两个参数,第一个参数testcase_name,就是TestCase对象的名称,第二个参数test_name就是Test对象的名称。而TestInfo包含了一个测试案例的一系列信息。
2. 一个TestCase对象对应一个或多个TestInfo对象。
我们来看看TestCase的创建过程(UnitTestImpl::GetTestCase):
//
// 参数:
//
// test_case_name: 测试案例名称
// set_up_tc: 事件函数SetUpTestCases的函数地址
// tear_down_tc: 事件函数TearDownTestCases的函数地址
TestCase * UnitTestImpl::GetTestCase( const char * test_case_name,
const char * comment,
Test::SetUpTestCaseFunc set_up_tc,
Test::TearDownTestCaseFunc tear_down_tc) {
// 从test_cases里查找指定名称的TestCase
internal ::ListNode < TestCase *>* node = test_cases_.FindIf(
TestCaseNameIs(test_case_name));
if (node == NULL) {
// 没找到,我们来创建一个
TestCase * const test_case =
new TestCase(test_case_name, comment, set_up_tc, tear_down_tc);
// 判断是否为死亡测试案例
if ( internal ::UnitTestOptions::MatchesFilter(String(test_case_name),
kDeathTestCaseFilter)) {
// 是的话,将该案例插入到最后一个死亡测试案例后
node = test_cases_.InsertAfter(last_death_test_case_, test_case);
last_death_test_case_ = node;
} else {
// 否则,添加到test_cases最后。
test_cases_.PushBack(test_case);
node = test_cases_.Last();
}
}
// 返回TestCase对象
return node -> element();
}
三、回过头看看TEST宏的定义
GTEST_TEST_(test_case_name, test_name, \
::testing::Test, ::testing:: internal ::GetTestTypeId())
同时也看看TEST_F宏
GTEST_TEST_(test_fixture, test_name, test_fixture, \
::testing:: internal ::GetTypeId < test_fixture > ())
都是使用了GTEST_TEST_宏,在看看这个宏如何定义的:
class GTEST_TEST_CLASS_NAME_(test_case_name, test_name) : public parent_class {\
public :\
GTEST_TEST_CLASS_NAME_(test_case_name, test_name)() {}\
private :\
virtual void TestBody();\
static ::testing::TestInfo * const test_info_;\
GTEST_DISALLOW_COPY_AND_ASSIGN_(\
GTEST_TEST_CLASS_NAME_(test_case_name, test_name));\
};\
\
::testing::TestInfo * const GTEST_TEST_CLASS_NAME_(test_case_name, test_name)\
::test_info_ = \
::testing:: internal ::MakeAndRegisterTestInfo(\
#test_case_name, #test_name, "" , "" , \
(parent_id), \
parent_class::SetUpTestCase, \
parent_class::TearDownTestCase, \
new ::testing:: internal ::TestFactoryImpl < \
GTEST_TEST_CLASS_NAME_(test_case_name, test_name) > );\
void GTEST_TEST_CLASS_NAME_(test_case_name, test_name)::TestBody()
不需要多解释了,和我们上面展开看到的差不多,不过这里比较明确的看到了,我们在TEST宏里写的就是TestBody里的东西。这里再补充说明一下里面的GTEST_DISALLOW_COPY_AND_ASSIGN_宏,我们上面的例子看出,这个宏展开后:
void operator = ( const FooTest_Demo_Test & );
正如这个宏的名字一样,它是用于防止对对象进行拷贝和赋值操作的。
四、再来了解RUN_ALL_TESTS宏
我们的测试案例的运行就是通过这个宏发起的。RUN_ALL_TEST的定义非常简单:
(::testing::UnitTest::GetInstance() -> Run())
我们又看到了熟悉的::testing::UnitTest::GetInstance(),看来案例的执行时从UnitTest的Run方法开始的,我提取了一些Run中的关键代码,如下:
__try {
return impl_ -> RunAllTests();
} __except( internal ::UnitTestOptions::GTestShouldProcessSEH(
GetExceptionCode())) {
printf( " Exception thrown with code 0x%x.\nFAIL\n " , GetExceptionCode());
fflush(stdout);
return 1 ;
}
return impl_ -> RunAllTests();
}
我们又看到了熟悉的impl(UnitTestImpl),具体案例该怎么执行,还是得靠UnitTestImpl。
// ...
printer -> OnUnitTestStart(parent_);
// 计时
const TimeInMillis start = GetTimeInMillis();
printer -> OnGlobalSetUpStart(parent_);
// 执行全局的SetUp事件
environments_.ForEach(SetUpEnvironment);
printer -> OnGlobalSetUpEnd(parent_);
// 全局的SetUp事件执行成功的话
if ( ! Test::HasFatalFailure()) {
// 执行每个测试案例
test_cases_.ForEach(TestCase::RunTestCase);
}
// 执行全局的TearDown事件
printer -> OnGlobalTearDownStart(parent_);
environments_in_reverse_order_.ForEach(TearDownEnvironment);
printer -> OnGlobalTearDownEnd(parent_);
elapsed_time_ = GetTimeInMillis() - start;
// 执行完成
printer -> OnUnitTestEnd(parent_);
// Gets the result and clears it.
if ( ! Passed()) {
failed = true ;
}
ClearResult();
// 返回测试结果
return failed ? 1 : 0 ;
}
上面,我们很开心的看到了我们前面讲到的全局事件的调用。environments_是一个Environment的链表结构(List),它的内容是我们在main中通过:
添加进去的。test_cases_我们之前也了解过了,是一个TestCase的链表结构(List)。gtest实现了一个链表,并且提供了一个Foreach方法,迭代调用某个函数,并将里面的元素作为函数的参数:
void ForEach(F functor) const {
for ( const ListNode < E > * node = Head();
node != NULL;
node = node -> next() ) {
functor(node -> element());
}
}
因此,我们关注一下:environments_.ForEach(SetUpEnvironment),其实是迭代调用了SetUpEnvironment函数:
最终调用了我们定义的SetUp()函数。
再看看test_cases_.ForEach(TestCase::RunTestCase)的TestCase::RunTestCase实现:
再看TestCase的Run实现:
if ( ! should_run_) return ;
internal ::UnitTestImpl * const impl = internal ::GetUnitTestImpl();
impl -> set_current_test_case( this );
UnitTestEventListenerInterface * const result_printer =
impl -> result_printer();
result_printer -> OnTestCaseStart( this );
impl -> os_stack_trace_getter() -> UponLeavingGTest();
// 哈!SetUpTestCases事件在这里调用
set_up_tc_();
const internal ::TimeInMillis start = internal ::GetTimeInMillis();
// 嗯,前面分析的一个TestCase对应多个TestInfo,因此,在这里迭代对TestInfo调用RunTest方法
test_info_list_ -> ForEach( internal ::TestInfoImpl::RunTest);
elapsed_time_ = internal ::GetTimeInMillis() - start;
impl -> os_stack_trace_getter() -> UponLeavingGTest();
// TearDownTestCases事件在这里调用
tear_down_tc_();
result_printer -> OnTestCaseEnd( this );
impl -> set_current_test_case(NULL);
}
第二种事件机制又浮出我们眼前,非常兴奋。可以看出,SetUpTestCases和TearDownTestCaess是在一个TestCase之前和之后调用的。接着看test_info_list_->ForEach(internal::TestInfoImpl::RunTest):
test_info -> impl() -> Run();
}
哦?TestInfo也有一个impl?看来我们之前漏掉了点东西,和UnitTest很类似,TestInfo内部也有一个主管各种实现的类,那就是TestInfoImpl,它在TestInfo的构造函数中创建了出来(还记得前面讲的TestInfo的创建过程吗?):
const char * name,
const char * test_case_comment,
const char * comment,
internal ::TypeId fixture_class_id,
internal ::TestFactoryBase * factory) {
impl_ = new internal ::TestInfoImpl( this , test_case_name, name,
test_case_comment, comment,
fixture_class_id, factory);
}
因此,案例的执行还得看TestInfoImpl的Run()方法,同样,我简化一下,只列出关键部分的代码:
// ...
UnitTestEventListenerInterface * const result_printer =impl -> result_printer();
result_printer -> OnTestStart(parent_);
// 开始计时
const TimeInMillis start = GetTimeInMillis();
Test * test = NULL;
__try {
// 我们的对象工厂,使用CreateTest()生成Test对象
test = factory_ -> CreateTest();
} __except( internal ::UnitTestOptions::GTestShouldProcessSEH(
GetExceptionCode())) {
AddExceptionThrownFailure(GetExceptionCode(),
" the test fixture's constructor " );
return ;
}
// 如果Test对象创建成功if (!Test::HasFatalFailure()) {
// 调用Test对象的Run()方法,执行测试案例
}
// 执行完毕,删除Test对象
impl -> os_stack_trace_getter() -> UponLeavingGTest();
delete test;
test = NULL;
// 停止计时
result_.set_elapsed_time(GetTimeInMillis() - start);
result_printer -> OnTestEnd(parent_);
}
上面看到了我们前面讲到的对象工厂fatory,通过fatory的CreateTest()方法,创建Test对象,然后执行案例又是通过Test对象的Run()方法:
if ( ! HasSameFixtureClass()) return ;
internal ::UnitTestImpl * const impl = internal ::GetUnitTestImpl();
impl -> os_stack_trace_getter() -> UponLeavingGTest();
__try {
// Yeah!每个案例的SetUp事件在这里调用
SetUp();
} __except( internal ::UnitTestOptions::GTestShouldProcessSEH(
GetExceptionCode())) {
AddExceptionThrownFailure(GetExceptionCode(), " SetUp() " );
}
// We will run the test only if SetUp() had no fatal failure.
if ( ! HasFatalFailure()) {
impl -> os_stack_trace_getter() -> UponLeavingGTest();
__try {
// 哈哈!!千辛万苦,我们定义在TEST宏里的东西终于被调用了!
TestBody();
} __except( internal ::UnitTestOptions::GTestShouldProcessSEH(
GetExceptionCode())) {
AddExceptionThrownFailure(GetExceptionCode(), " the test body " );
}
}
impl -> os_stack_trace_getter() -> UponLeavingGTest();
__try {
// 每个案例的TearDown事件在这里调用
TearDown();
} __except( internal ::UnitTestOptions::GTestShouldProcessSEH(
GetExceptionCode())) {
AddExceptionThrownFailure(GetExceptionCode(), " TearDown() " );
}
}
上面的代码里非常极其以及特别的兴奋的看到了执行测试案例的前后事件,测试案例执行TestBody()的代码。仿佛整个gtest的流程在眼前一目了然了。
四、总结
本文通过分析TEST宏和RUN_ALL_TEST宏,了解到了整个gtest运作过程,可以说整个过程简洁而优美。之前读《代码之美》,感触颇深,现在读过gtest代码,再次让我感触深刻。记得很早前,我对设计的理解是“功能越强大越好,设计越复杂越好,那样才显得牛”,渐渐得,我才发现,简单才是最好。我曾总结过自己写代码的设计原则:功能明确,设计简单。了解了gtest代码后,猛然发现gtest不就是这样吗,同时gtest也给了我很多惊喜,因此,我对gtest的评价是:功能强大,设计简单,使用方便。
总结一下gtest里的几个关键的对象:
1. UnitTest 单例,总管整个测试,包括测试环境信息,当前执行状态等等。
2. UnitTestImpl UnitTest内部具体功能的实现者。
3. Test 我们自己编写的,或通过TEST,TEST_F等宏展开后的Test对象,管理着测试案例的前后事件,具体的执行代码TestBody。
4. TestCase 测试案例对象,管理着基于TestCase的前后事件,管理内部多个TestInfo。
5. TestInfo 管理着测试案例的基本信息,包括Test对象的创建方法。
玩转Google开源C++单元测试框架Google Test系列(gtest)之八 - 打造自己的单元测试框架
一、前言
上一篇我们分析了gtest的一些内部实现,总的来说整体的流程并不复杂。本篇我们就尝试编写一个精简版本的C++单元测试框架:nancytest ,通过编写这个简单的测试框架,将有助于我们理解gtest。
二、整体设计
使用最精简的设计,我们就用两个类,够简单吧:
1. TestCase类
包含单个测试案例的信息。
2. UnitTest类
负责所有测试案例的执行,管理。
三、TestCase类
TestCase类包含一个测试案例的基本信息,包括:测试案例名称,测试案例执行结果,同时还提供了测试案例执行的方法。我们编写的测试案例都继承自TestCase类。
{
public :
TestCase( const char * case_name) : testcase_name(case_name){}
// 执行测试案例的方法
virtual void Run() = 0 ;
int nTestResult; // 测试案例的执行结果
const char * testcase_name; // 测试案例名称
};
四、UnitTest类
我们的UnitTest类和gtest的一样,是一个单件。我们的UnitTest类的逻辑非常简单:
1. 整个进程空间保存一个UnitTest 的单例。
2. 通过RegisterTestCase()将测试案例添加到测试案例集合testcases_中。
3. 执行测试案例时,调用UnitTest::Run(),遍历测试案例集合testcases_,调用案例的Run()方法
{
public :
// 获取单例
static UnitTest * GetInstance();
// 注册测试案例
TestCase * RegisterTestCase(TestCase * testcase);
// 执行单元测试
int Run();
TestCase * CurrentTestCase; // 记录当前执行的测试案例
int nTestResult; // 总的执行结果
int nPassed; // 通过案例数
int nFailed; // 失败案例数
protected :
std::vector < TestCase *> testcases_; // 案例集合
};
下面是UnitTest类的实现:
{
static UnitTest instance;
return & instance;
}
TestCase * UnitTest::RegisterTestCase(TestCase * testcase)
{
testcases_.push_back(testcase);
return testcase;
}
int UnitTest::Run()
{
nTestResult = 1 ;
for (std::vector < TestCase *> ::iterator it = testcases_.begin();
it != testcases_.end(); ++ it)
{
TestCase * testcase = * it;
CurrentTestCase = testcase;
std::cout << green << " ====================================== " << std::endl;
std::cout << green << " Run TestCase: " << testcase -> testcase_name << std::endl;
testcase -> Run();
std::cout << green << " End TestCase: " << testcase -> testcase_name << std::endl;
if (testcase -> nTestResult)
{
nPassed ++ ;
}
else
{
nFailed ++ ;
nTestResult = 0 ;
}
}
std::cout << green << " ====================================== " << std::endl;
std::cout << green << " Total TestCase : " << nPassed + nFailed << std::endl;
std::cout << green << " Passed : " << nPassed << std::endl;
std::cout << red << " Failed : " << nFailed << std::endl;
return nTestResult;
}
五、NTEST宏
接下来定一个宏NTEST,方便我们写我们的测试案例的类。
testcase_name##_TEST
#define NANCY_TEST_(testcase_name) \
class TESTCASE_NAME(testcase_name) : public TestCase \
{ \
public : \
TESTCASE_NAME(testcase_name)( const char * case_name) : TestCase(case_name){}; \
virtual void Run(); \
private : \
static TestCase * const testcase_; \
}; \
\
TestCase * const TESTCASE_NAME(testcase_name) \
::testcase_ = UnitTest::GetInstance() -> RegisterTestCase( \
new TESTCASE_NAME(testcase_name)(#testcase_name)); \
void TESTCASE_NAME(testcase_name)::Run()
#define NTEST(testcase_name) \
NANCY_TEST_(testcase_name)
六、RUN_ALL_TEST宏
然后是执行所有测试案例的一个宏:
UnitTest::GetInstance() -> Run();
七、断言的宏EXPECT_EQ
这里,我只写一个简单的EXPECT_EQ :
if (m != n) \
{ \
UnitTest::GetInstance() -> CurrentTestCase -> nTestResult = 0 ; \
std::cout << red << " Failed " << std::endl; \
std::cout << red << " Expect: " << m << std::endl; \
std::cout << red << " Actual: " << n << std::endl; \
}
八、案例Demo
够简单吧,再来看看案例怎么写:
int Foo( int a, int b)
{
return a + b;
}
NTEST(FooTest_PassDemo)
{
EXPECT_EQ( 3 , Foo( 1 , 2 ));
EXPECT_EQ( 2 , Foo( 1 , 1 ));
}
NTEST(FooTest_FailDemo)
{
EXPECT_EQ( 4 , Foo( 1 , 2 ));
EXPECT_EQ( 2 , Foo( 1 , 2 ));
}
int _tmain( int argc, _TCHAR * argv[])
{
return RUN_ALL_TESTS();
}
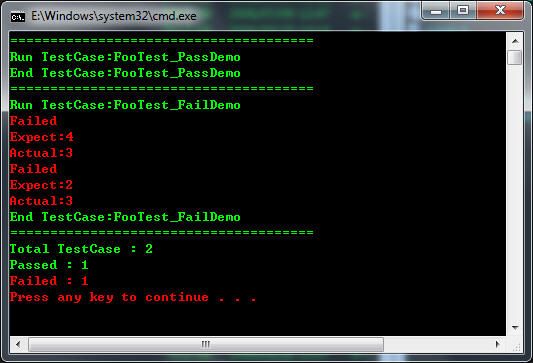
整个一山寨版gtest,呵。执行一下,看看结果怎么样:
九、总结
本篇介绍性的文字比较少,主要是我们在上一篇深入解析gtest时已经将整个流程弄清楚了,而现在编写的nancytest又是其非常的精简版本,所有直接看代码就可以完全理解。希望通过这个Demo,能够让大家对gtest有更加直观的了解。回到开篇时所说的,我们没有必要每个人都造一个轮子,因为gtest已经非常出色的为我们做好了这一切。如果我们每个人都写一个自己的框架的话,一方面我们要付出大量的维护成本,一方面,这个框架也许只能对你有用,无法让大家从中受益。
gtest正是这么一个优秀C++单元测试框架,它完全开源,允许我们一起为其贡献力量,并能让更多人从中受益。如果你在使用gtest过程中发现gtest不能满足你的需求时(或发现BUG),gtest的开发人员非常急切的想知道他们哪来没做好,或者是gtest其实有这个功能,但是很多用户都不知道。所以你可以直接联系gtest的开发人员,或者你直接在这里回帖,我会将您的意见转告给gtest的主要开发人员。
如果你是gtest的超级粉丝,原意为gtest贡献代码的话,加入他们吧。
