Appium MacOs系统搭建环境,IOS自动化测试
学习目标
1.能够搭建ios自动化测试所需要的环境
2.使用ios模拟器Simulator进行ios自动化测试
3.使用真机进行ios自动化测试
搭建环境
1.macOs电脑
版本10.13.6以上
2.Xcode
版本10.1以上
3.待测试的项目
自己拉代码,自己能够打包到手机里
4.Appium Destop
https://github.com/appium/appium-desktop/releases/download/
5.python
版本3.6.1以上
6.pycharm
编辑器,其他的也可以
7.node.js
https://npm.taobao.org/mirrors/node 网上下载
安装node库插件的,安装完后就有了npm命令
8.cnpm
npm install -g cnpm --registry=https://registry.npm.taobao.org
跟npm命令一样,但是比npm速度快
9.ios-deploy 依赖库
cnpm install -g ios-deploy
10.brew
ruby <(curl -fsSkL raw.github.com/mxcl/homebrew/go)
mac都自带,源自于ruby
11.libimobiledevice 依赖库
brew install --HEAD libimobiledevice
可能出现的问题:
报错:Requested ‘libusbmuxd >= 1.1.0’ but version of libusbmuxd is 1.0.10 解决方法:
brew update
brew uninstall --ignore-dependencies libimobiledevice
brew uninstall --ignore-dependencies usbmuxd
brew install --HEAD usbmuxd
brew unlink usbmuxd
brew link usbmuxd
brew install --HEAD libimobiledevice
12.carthage 依赖库
brew install carthage
13.WebDriverAgent
https://github.com/facebook/WebDriverAgent
点击 download zip
14.其他
1.准备个ios手机,ios12.1以上的
2.注册个appid
模拟器自动化测试
1.把待测试的包打到模拟器里
command +r 或者xcode上面选择
2.启动appium inspector
就是识别元素用的
1.打开appium
2.启动服务
3.左上角,appium-new session window
4.填入参数
platformName iOS
platformVersion 设备的系统版本
deviceName iPhone几
app bundle,也叫包名
5.启动就行了
app会启动,然后能看到UI界面
3.使用编辑器来写代码
前置代码:
from appium import webdriver
desired_caps = dict()
desired_caps['platformName'] = 'iOS'
desired_caps['platformVersion'] = '12.1'
desired_caps['deviceName'] = 'iPhone 8'
desired_caps['app'] = 'com.itcast.HMiOSTest'
driver = webdriver.Remote('http://localhost:4723/wd/hub', desired_caps)
业务代码:
根据你的需求来写,推荐只是用id和xpath来定位
比如 //*[@text=‘哈哈’] xpath定位比较准,但是相比下速度慢一点
xpath的//*是相对定位,绝对定位是界面上显示的一个特别长/的路径,不要用
滑动:
driver.execute_script(“mobile: swipe”, {“direction”: “up”})
2.driver.swipe(100, 600, 100, 30) 从(100,600)滑到(100,30)
真机来测试
1.运行ios程序到真机
- 在 Xcode 中登录自己的 Apple ID
- 配置开发者信息
- 选择将要运行的 程序 和 设备
- 快捷键 command + r 运行
- 在手机中进入 设置 - 通用 - 设备管理 - 自己Apple ID - 信任程序
- 重新 command + r 运行
2.配置WebDriverAgent
- 进入到下载的 WebDriverAgent 项目下
- 输入命令 ./Scripts/bootstrap.sh 更新
- 启动 WebDriverAgent.xcodeproj
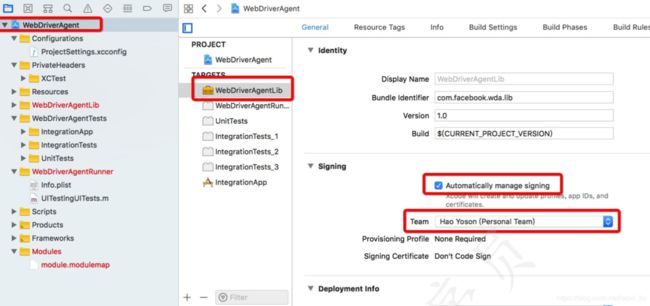
- 配置 WebDriverAgentLib 的开发者信息

- 配置 WebDriverAgentRunner 的开发者信息
- 配置 IntegrationApp 的开发者信息
- 修改 WebDriverAgentRunner 的 Product Bundle Identifier

- 修改 IntegrationApp 的 Product Bundle Identifier
- 数据线连接真机
- 选择将要运行的 WebDriverAgentRunner 和 真机设备 11. 使用 command + u 运行
稍等之后会在log中出来一个 url 地址 在浏览器中打开这个地址,如果显示一串 json 数据即为正确连接手机 并且,真机会多一个程序 - 将配置好的 WebDriverAgent 项目替换到 appium 的 WebDriverAgent 项目
打开 finder
快捷键 command + shift + g
3.运行脚本
- 修改对应的 platformVersion、deviceName
- 查看 udid 并增加为启动参数
- 运行即可
参考资料
https://gochannel.org/links/link/snapshot/4307 https://testerhome.com/topics/6962 https://blog.csdn.net/weixin_35825766/article/details/80655296 https://blog.csdn.net/yjs_13597468160/article/details/80635761 https://testerhome.com/topics/14911 https://www.jianshu.com/p/1ec36db7d551
https://github.com/appium/appium/blob/master/docs/en/writing-running-appium/touch-actions. md#bugs-and-workarounds