数据增强方法及代码
文章目录
- 参考链接
- 摘要
- 什么是数据增强
- 空间几何变换类
- 翻转(Flip)
- 裁剪(crop)
- 旋转(rotate)
- 缩放变形(scale)
- 平移变换(shift)
- 颜色变换类
- 噪声变换类
- 其他
- 图像标准化
- 遮挡
- 实例
- AlexNet
- YOLO
参考链接
【技术综述】一文道尽深度学习中的数据增强方法(上) - 简书
https://www.jianshu.com/p/99450dbdadcf
【技术综述】一文道尽深度学习中的数据增强方法(下) - 简书
https://www.jianshu.com/p/661221525139
Image Data Processing - 江冬的博客 | JD Blog
http://www.jiangdongzml.com/2018/03/16/Image_Data_Processing/
图像数据增强 - 代码片段 - 码云 Gitee.com
https://gitee.com/hamjarl/codes/yl7q9g4bhv61ej2i8pnu319
tensorflow实现数据增强(随机裁剪、翻转、对比度设置、亮度设置) - 修炼之路 - CSDN博客
https://blog.csdn.net/sinat_29957455/article/details/80629098
Data Augmentation–数据增强解决你有限的数据集 - chang_rj的博客 - CSDN博客
https://blog.csdn.net/u010801994/article/details/81914716
摘要
本文主要针对tensorflow和PIL的数据增强方法做一个总结,所有代码来源于互联网。
部分方式的代码,真的是各种没有。
如果有大量数据增强方法需求的小伙伴,可以用这个【技术综述】一文道尽深度学习中的数据增强方法(上) - 简书博客提到的插件aleju/imgaug: Image augmentation for machine learning experiments来使用更多数据增强方法,这个插件功能非常强大,在此就不赘述了。
什么是数据增强
Data Augmentation,基于有限的数据生成更多等价(同样有效)的数据,丰富训练数据的分布,使通过训练集得到的模型泛化能力更强。
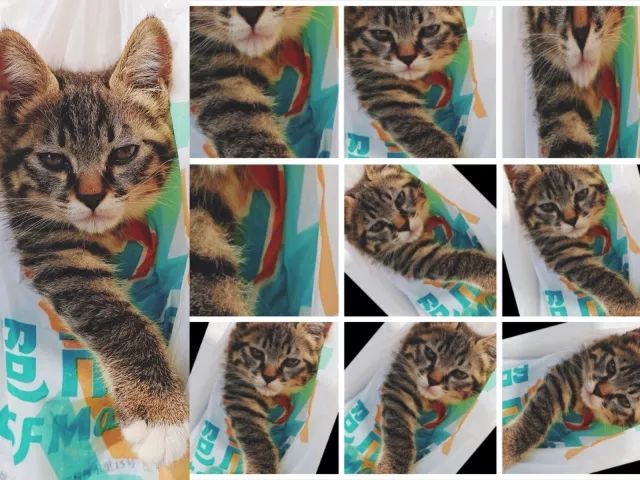
举个例子:
上面的左侧大图为原图,右侧小图是对左图做了一些随机的裁剪、缩放、旋转操作得来的。
右边的每张图对于网络来说都是不同的输入,这样就将数据扩充到10倍。
假如我们输入网络的图片的分辨率大小是256×256,若采用随机裁剪成224×224的方式,那么一张图最多可以产生32×32张图,数据量扩充将近1000倍。
但因许多图相似度太高,实际的效果并不等价。
如果再辅助其他的数据增强方法,将获得更多的数据集,这就是数据增强的本质。
空间几何变换类
import matplotlib.pyplot as plt
# tensorflow
import tensorflow as tf

image_raw_data=tf.gfile.FastGFile(img_path,'rb').read()
img_data=tf.image.decode_jpeg(image_raw_data)
# PIL
from PIL import Image,ImageChops,ImageEnhance

img_data = Image.open(img_path)
翻转(Flip)
翻转包括水平翻转、垂直翻转和对角线翻转。
with tf.Session() as sess:
    # tensorflow
    flipped1=tf.image.flip_left_right(img_data)
    flipped2=tf.image.flip_up_down(img_data)
    transpose_img=tf.image.transpose_image(img_data)
    # PIL
    flipped1=Image.FLIP_LEFT_RIGHT(img_data)
    flipped2=Image.FLIP_UP_DOWN(img_data)
    transpose_img=Image.TRANSPOSE(img_data)

    for i,img in enumerate([img_data,flipped1,flipped2,transpose_img]):
        plt.subplot(1,4,i+1)
        plt.tight_layout()
        plt.imshow(img.eval())
    plt.show()
裁剪(crop)
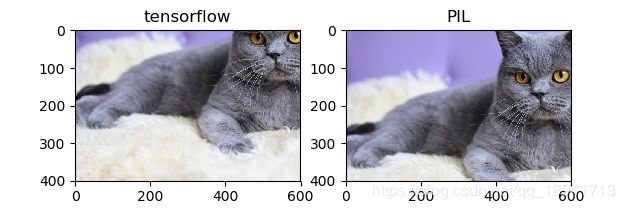
裁剪图片的感兴趣区域(ROI),通常在训练的时候,会采用随机裁剪的方法。
    # tensorflow
    img = tf.image.random_crop(img_data, [400, 600, 3])
    # tf.image.central_crop(image,0.5) 按比例裁剪

    with tf.Session() as sess:
        img = sess.run(img)
        plt.subplot(1,2,1)
        plt.imshow(img)
        plt.title("tensorflow")

    # PIL
    img = img_data.crop((200, 100, 800, 500))  # 参数为坐标左上右下
    plt.subplot(1, 2, 2)
    plt.imshow(img)
    plt.title("PIL")
    plt.show()
旋转(rotate)
对图像做一定角度的旋转操作
    # tensorflow
    img = tf.image.rot90(img_data, 1)

    with tf.Session() as sess:
        img = sess.run(img)
        plt.subplot(1,2,1)
        plt.title("tensorflow")
        plt.imshow(img)

    # PIL
    img = img_data.rotate(90)  # 逆时针旋转
    plt.subplot(1, 2, 2)
    plt.title("PIL")
    plt.imshow(img)
    plt.show()
缩放变形(scale)
随机选取图像的一部分,然后将其缩放到原图像尺度。
    # PIL
    plt.subplot(1,2,1)
    plt.title("original")
    plt.imshow(img_data)

    img = img_data.crop((200, 100, 800, 500))
    img = img.resize((1000,600),resample=Image.LANCZOS)
    plt.subplot(1,2,2)
    plt.title("scale")
    plt.imshow(img)
    plt.show()
平移变换(shift)
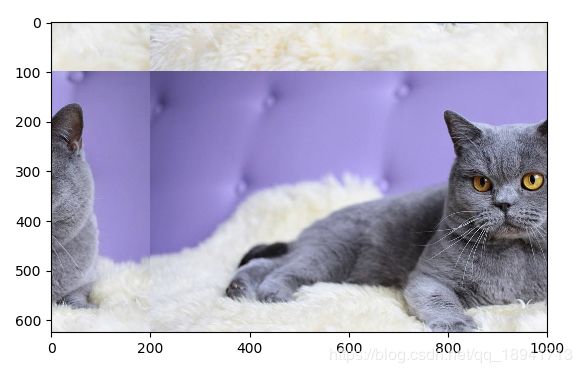
图像整体平移一段距离
	# PIL
    plt.subplot(1,2,1)
    plt.title("original")
    plt.imshow(img)

    img = ImageChops.offset(img_data,200,100)
    plt.subplot(1,2,2)
    plt.title("scale")
    plt.imshow(img)
    plt.show()
颜色变换类
    # tensorflow
    #随机设置图片的亮度
    random_brightness = tf.image.random_brightness(img_data,max_delta=30)
    #随机设置图片的对比度
    random_contrast = tf.image.random_contrast(img_data,lower=0.2,upper=1.8)
    #随机设置图片的色度
    random_hue = tf.image.random_hue(img_data,max_delta=0.3)
    #随机设置图片的饱和度
    random_satu = tf.image.random_saturation(img_data,lower=0.2,upper=1.8)
	# PIL
    # 调整图像的饱和度
    random_factor1 = np.random.randint(5, 20) / 10.  # 随机因子
    color_image = ImageEnhance.Color(img_data).enhance(random_factor1)
    # 调整图像的亮度
    random_factor2 = np.random.randint(5, 21) / 10.
    brightness_image = ImageEnhance.Brightness(img_data).enhance(random_factor2)
    # 调整图像对比度
    random_factor3 = np.random.randint(5, 20) / 10.
    contrast_image = ImageEnhance.Contrast(img_data).enhance(random_factor3)
    # 调整图像的锐度
    random_factor4 = np.random.randint(5, 20) / 10.
    sharp_image = ImageEnhance.Sharpness(img_data).enhance(random_factor4)
噪声变换类
import skimage
from PIL import Image
import matplotlib.pyplot as plt
import numpy as np

if __name__ == "__main__":

    img_data = Image.open("timg.jpg", 'r')
    img = np.array(img_data)

    plt.subplot(1, 2, 1)
    plt.title("origin")
    plt.imshow(img_data)

    img_noise = skimage.util.random_noise(img, mode="gaussian")

    plt.subplot(1, 2, 2)
    plt.title("gaussian")
    plt.imshow(img_noise)

    plt.show()
# skimage.util.random_noise函数的mode参数
mode : str, optional
        One of the following strings, selecting the type of noise to add:

        - 'gaussian'  Gaussian-distributed additive noise.
        - 'localvar'  Gaussian-distributed additive noise, with specified
                      local variance at each point of `image`.
        - 'poisson'   Poisson-distributed noise generated from the data.
        - 'salt'      Replaces random pixels with 1.
        - 'pepper'    Replaces random pixels with 0 (for unsigned images) or
                      -1 (for signed images).
        - 's&p'       Replaces random pixels with either 1 or `low_val`, where
                      `low_val` is 0 for unsigned images or -1 for signed
                      images.
        - 'speckle'   Multiplicative noise using out = image + n*image, where
                      n is uniform noise with specified mean & variance.
import numpy as np
from PIL import Image
import matplotlib.pyplot as plt
import math
import random
import cv2
import scipy.misc
import scipy.signal
import scipy.ndimage

def medium_filter(im, x, y, step):
    sum_s=[]
    for k in range(-int(step/2),int(step/2)+1):
        for m in range(-int(step/2),int(step/2)+1):
            sum_s.append(im[x+k][y+m])
    sum_s.sort()
    return sum_s[(int(step*step/2)+1)]

def mean_filter(im, x, y, step):
    sum_s = 0
    for k in range(-int(step/2),int(step/2)+1):
        for m in range(-int(step/2),int(step/2)+1):
            sum_s += im[x+k][y+m] / (step*step)
    return sum_s

def convert_2d(r):
    n = 3
    # 3*3 滤波器, 每个系数都是 1/9
    window = np.ones((n, n)) / n ** 2
    # 使用滤波器卷积图像
    # mode = same 表示输出尺寸等于输入尺寸
    # boundary 表示采用对称边界条件处理图像边缘
    s = scipy.signal.convolve2d(r, window, mode='same', boundary='symm')
    return s.astype(np.uint8)

# def convert_3d(r):
#     s_dsplit = []
#     for d in range(r.shape[2]):
#         rr = r[:, :, d]
#         ss = convert_2d(rr)
#         s_dsplit.append(ss)
#     s = np.dstack(s_dsplit)
#     return s


def add_salt_noise(img):
    rows, cols, dims = img.shape
    R = np.mat(img[:, :, 0])
    G = np.mat(img[:, :, 1])
    B = np.mat(img[:, :, 2])

    Grey_sp = R * 0.299 + G * 0.587 + B * 0.114
    Grey_gs = R * 0.299 + G * 0.587 + B * 0.114

    snr = 0.9
    mu = 0
    sigma = 0.12

    noise_num = int((1 - snr) * rows * cols)

    for i in range(noise_num):
        rand_x = random.randint(0, rows - 1)
        rand_y = random.randint(0, cols - 1)
        if random.randint(0, 1) == 0:
            Grey_sp[rand_x, rand_y] = 0
        else:
            Grey_sp[rand_x, rand_y] = 255

    Grey_gs = Grey_gs + np.random.normal(0, 48, Grey_gs.shape)
    Grey_gs = Grey_gs - np.full(Grey_gs.shape, np.min(Grey_gs))
    Grey_gs = Grey_gs * 255 / np.max(Grey_gs)
    Grey_gs = Grey_gs.astype(np.uint8)

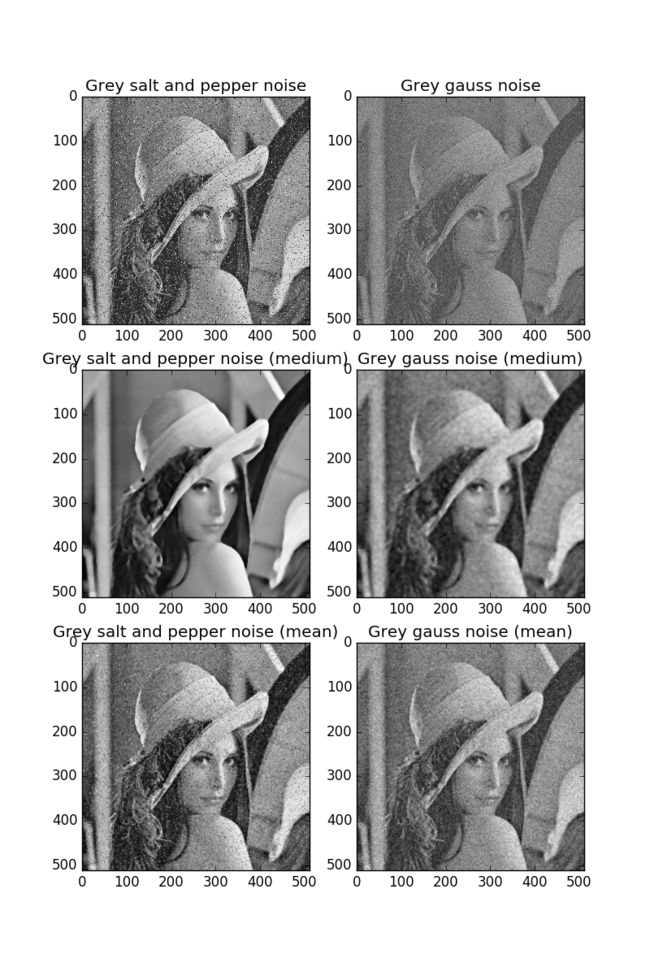
    # 中值滤波
    Grey_sp_mf = scipy.ndimage.median_filter(Grey_sp, (8, 8))
    Grey_gs_mf = scipy.ndimage.median_filter(Grey_gs, (8, 8))

    # 均值滤波
    n = 3
    window = np.ones((n, n)) / n ** 2
    Grey_sp_me = convert_2d(Grey_sp)
    Grey_gs_me = convert_2d(Grey_gs)

    plt.subplot(321)
    plt.title('Grey salt and pepper noise')
    plt.imshow(Grey_sp, cmap='gray')
    plt.subplot(322)
    plt.title('Grey gauss noise')
    plt.imshow(Grey_gs, cmap='gray')

    plt.subplot(323)
    plt.title('Grey salt and pepper noise (medium)')
    plt.imshow(Grey_sp_mf, cmap='gray')
    plt.subplot(324)
    plt.title('Grey gauss noise (medium)')
    plt.imshow(Grey_gs_mf, cmap='gray')

    plt.subplot(325)
    plt.title('Grey salt and pepper noise (mean)')
    plt.imshow(Grey_sp_me, cmap='gray')
    plt.subplot(326)
    plt.title('Grey gauss noise (mean)')
    plt.imshow(Grey_gs_me, cmap='gray')
    plt.show()


def main():
    img = np.array(Image.open('LenaRGB.bmp'))
    add_salt_noise(img)


if __name__ == '__main__':
    main()
其他
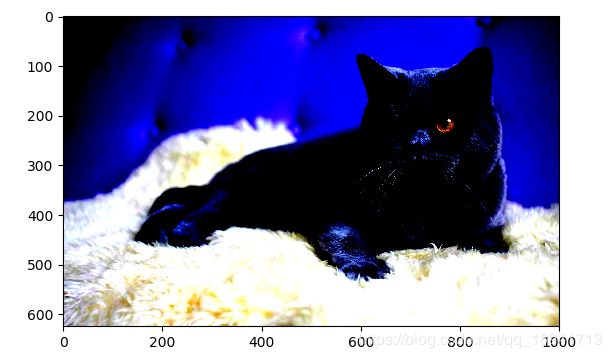
图像标准化
    # tensorflow
    # 将图像均值变为0,方差变为1
    tf.image.per_image_standardization(img_data)
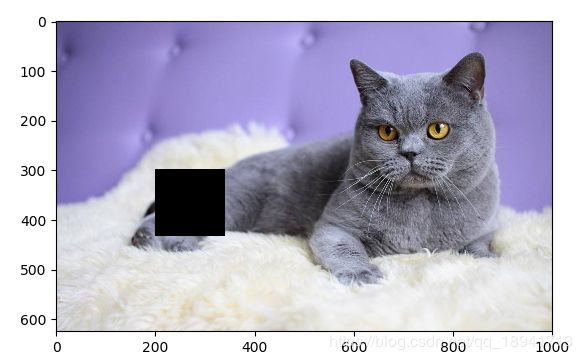
遮挡
    # PIL
    img_data.paste(paste_data,(200,300,200+paste_data.size[0],300+paste_data.size[1]))
实例
AlexNet
数据增强的第一种形式由生成图像转化和水平反射组成。
数据增强的第二种形式包含改变训练图像中RGB通道的强度。
YOLO
随机裁剪、旋转
变换颜色、变换饱和度(saturation)、变换曝光度(exposure shifts)
