Linux 安装orcl 12c
1、官网下载数据库http://www.oracle.com/technetwork/database/enterprise-edition/downloads/index.html

2、检测硬件(详细略)
3、解压安装包到指定文件 unzip linuxx64_12201_database.zip
4、检测oracle 12c所需操作系统依赖包,操作命令:rpm -q binutils compat-libstdc++ gcc gcc-c++ glibc glibc-devel ksh libaio libaio-devel libgcc libstdc++ libstdc++-devel libXext libXtst libX11 libXau libXi make sysstat
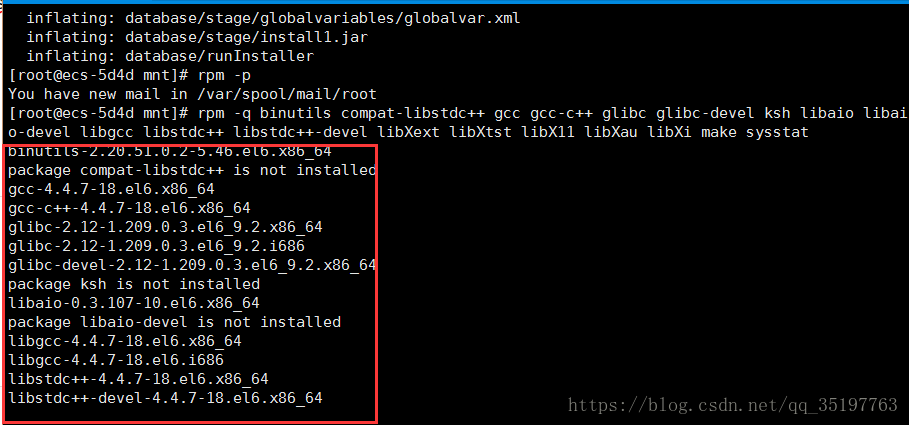
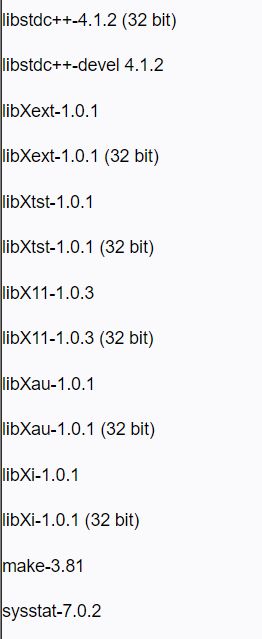
所需依赖包:
如果没有根据 rpm -ivh compat-libstdc++-33-3.2.3-61.i386.rpm 此命令进行下载
部分依赖包安装:
[root@getoraclelnx01 Server]# rpm -ivh compat-libstdc++-33-3.2.3-61.i386.rpm
warning: compat-libstdc++-33-3.2.3-61.i386.rpm: Header V3 DSA signature: NOKEY, key ID 1e5e0159
Preparing... ########################################### [100%]
package compat-libstdc++-33-3.2.3-61.i386 is already installed
[root@getoraclelnx01 Server]# rpm -ivh compat-libstdc++-33-3.2.3-61.x86_64.rpm
warning: compat-libstdc++-33-3.2.3-61.x86_64.rpm: Header V3 DSA signature: NOKEY, key ID 1e5e0159
Preparing... ########################################### [100%]
package compat-libstdc++-33-3.2.3-61.x86_64 is already installed
[root@getoraclelnx01 Server]# ls *libaio-devel*
libaio-devel-0.3.106-5.i386.rpm libaio-devel-0.3.106-5.x86_64.rpm
[root@getoraclelnx01 Server]# rpm -ivh libaio-devel-0.3.106-5.i386.rpm
warning: libaio-devel-0.3.106-5.i386.rpm: Header V3 DSA signature: NOKEY, key ID 1e5e0159
Preparing... ########################################### [100%]
1:libaio-devel ########################################### [100%]
[root@getoraclelnx01 Server]# rpm -ivh libaio-devel-0.3.106-5.x86_64.rpm
warning: libaio-devel-0.3.106-5.x86_64.rpm: Header V3 DSA signature: NOKEY, key ID 1e5e0159
Preparing... ########################################### [100%]
1:libaio-devel ########################################### [100%]
[root@getoraclelnx01 Server]#
5、系统配置
(1) 创建Oracle用户和用户组
[root@getoraclelnx01 Server]# groupadd dba
[root@getoraclelnx01 Server]# groupadd oinstall
[root@getoraclelnx01 Server]# useradd -g oinstall -G dba oracle
[root@getoraclelnx01 Server]# id oracle
uid=502(oracle) gid=503(oinstall) groups=503(oinstall),502(dba)
[root@getoraclelnx01 Server]#

创建了oracle用户以及相关用户组后,需要设置oracle用户密码。
(2) 创建安装目录
[root@getoraclelnx01 Server]#
[root@getoraclelnx01 Server]# mkdir -p /u01/app/oracle
[root@getoraclelnx01 Server]# chown -R oracle:oinstall /u01/app/oracle
[root@getoraclelnx01 Server]# chmod -R 775 /u01/app/oracle
[root@getoraclelnx01 Server]#

6、切换到oracle用户后执行解压缩文件中的runInstaller
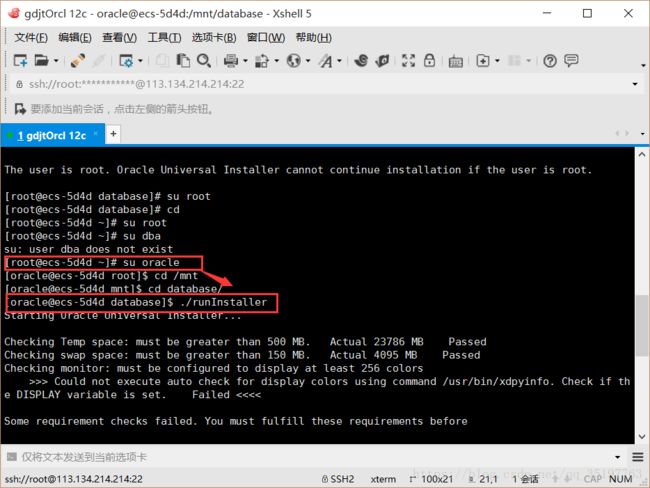
7、此时进去可视化安装界面,