本地DFS服务器搭建
最近领导让我把本来写在后台项目中的本地DFS服务单独抽成一个项目,然后我菜菜的花了一周才搞定,现在分享一下搭建的过程和一些搭建中遇到的问题。
项目中主要用到本地DFS,静态文件发布,swagger,Log日志文件
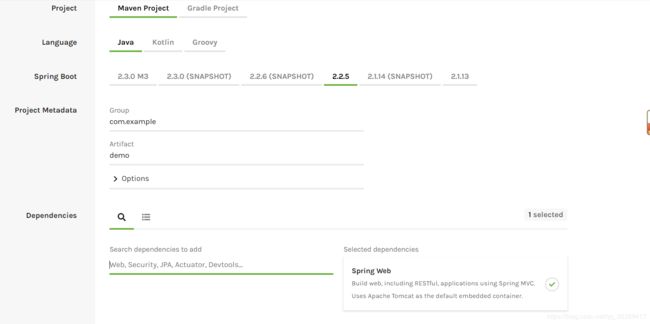
首先我是在 https://start.spring.io/ 网站中搭建的项目基本框架,其中加了Web模块。

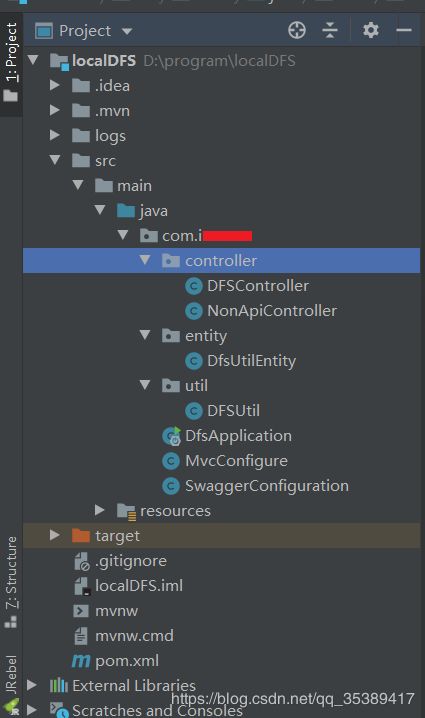
这是我整个项目的结构

其中先从controller层开始说:
首先是DFSController,文件的查看、创建和删除就是在这里面进行的。
package com.xxxxx.controller;

import com.xxxxx.entity.DfsUtilEntity;
import com.xxxxx.util.DFSUtil;
import io.swagger.annotations.Api;
import io.swagger.annotations.ApiImplicitParam;
import io.swagger.annotations.ApiImplicitParams;
import io.swagger.annotations.ApiOperation;
import org.springframework.web.bind.annotation.*;
import org.springframework.web.multipart.MultipartFile;

import java.util.List;

@RestController
@RequestMapping
@Api(tags = {"Local_DFS"}, description = "本地DFS")
public class DFSController {

    /**
     * @param path                  路径
     * @return
     */
    @ApiOperation(value = "获取文件列表",notes="获取文件列表")
    @ApiImplicitParams({
            @ApiImplicitParam(name = "path", value = "路径", paramType = "query", required = true)
    })
    @GetMapping("files")
    public List getListFiles(String path) {
        return DFSUtil.getListFiles(path);
    }

    /**
     * @param targetPath             新文件目录
     * @param file                   文件流
     * @return
     */
    @ApiOperation(value = "上传文件",notes="上传文件")
    @ApiImplicitParams({
            @ApiImplicitParam(name = "targetPath", value = "新文件目录", paramType = "query",dataType = "string" ,example = "/account/100000102/avatar", required = true),
            @ApiImplicitParam(name = "file", value = "上传文件", paramType = "form", dataType ="file", required = true )
    })
    @PostMapping
    public String upload(String targetPath, @RequestParam("file") MultipartFile file) {
        return DFSUtil.create(targetPath, file);
    }

    /**
     * 删除文件
     * @param targetUri           路径
     */
    @ApiOperation(value = "删除文件",notes="删除文件")
    @ApiImplicitParams({
            @ApiImplicitParam(name = "targetUri", value = "路径", paramType = "query",dataType = "string" ,example = "/account/100000102/avatar/1111.png", required = true)
    })
    @DeleteMapping
    public boolean delete(String targetUri) {
      return DFSUtil.delete(targetUri);
    }
}
接下来是NonApiController,主要是用于跳转到swagger页面的。加上这个你只要localhost:端口号就可以直接跳转到swagger页面。
package com.xxxxx.controller;

import org.springframework.stereotype.Controller;
import org.springframework.web.bind.annotation.RequestMapping;
import org.springframework.web.bind.annotation.RequestMethod;
import springfox.documentation.annotations.ApiIgnore;

import javax.servlet.http.HttpServletResponse;
import java.io.IOException;

@Controller
@ApiIgnore
public class NonApiController {

    @RequestMapping(value = {"", "api"}, method = RequestMethod.GET)
    public void api(HttpServletResponse response) throws IOException {
        response.sendRedirect("swagger-ui.html");
    }
}
Controller层的坑很少。
接下来是entity层,只有一个DfsUtilEntity,这个类主要是用来返回的,无坑可以自定义哦。
package com.xxxxx.entity;

public class DfsUtilEntity {
    private String name;
    private String path;

    public String getName() {
        return name;
    }

    public void setName(String name) {
        this.name = name;
    }

    public String getPath() {
        return path;
    }

    public void setPath(String path) {
        this.path = path;
    }
}
经过了两个无坑的层后,来到了util层,从这开始就很难喽。util层只有DFSUtil,这个工具类是主要实现的文件的查看、创建和删除的具体代码。
这里面的一些代码我修改了很多次,一开始主要是想要方便自己,所以写的很简单,然后我老师和我说,我这个代码是要很多人用的,所以应该方便别人使用,而不是图方便的写。
这里面主要的坑在静态方法那,其他的还好。静态方法主要是为了获取本地DFS的路径,为了以后着想,所以把path写在了config/localDFS.conf中,然后引用ResourceLoader代码获取。
package com.xxxxx.util;

import com.xxxxx.controller.DFSController;
import com.xxxxxx.entity.DfsUtilEntity;
import org.slf4j.Logger;
import org.slf4j.LoggerFactory;
import org.springframework.web.multipart.MultipartFile;

import java.io.*;
import java.net.URLDecoder;
import java.util.ArrayList;
import java.util.List;
import java.util.Properties;

public class DFSUtil {

    private static final Logger log = LoggerFactory.getLogger(DFSController.class);

    public static final String LOCAL_STORAGE_PATH;

    /**
     * @param path
     * @return
     */
    public static List getListFiles(String path) {

        if (path.subSequence(0, 1).equals("/")) {
            path = path.substring(1);
        }
        String filePath = LOCAL_STORAGE_PATH + File.separator + path;
        File file = new File(filePath);
        List filePaths = new ArrayList<>();
        if (!file.exists()) {
            return filePaths;
        }
        if (file.isDirectory()) {
            File[] files = file.listFiles();
            for (File fileIndex : files) {
                if (fileIndex.isDirectory()) {
                    getListFiles(fileIndex.getPath());
                } else {
                    DfsUtilEntity dfsUtilEntity = new DfsUtilEntity();
                    dfsUtilEntity.setName(fileIndex.getName());
                    dfsUtilEntity.setPath(path + "/" + fileIndex.getName());
                    filePaths.add(dfsUtilEntity);
                }
            }
        }
        return filePaths;
    }

    /**
     * @param targetPath 新文件目录
     * @param file       文件流
     * @return
     * @throws IOException
     */
    public static String create(String targetPath, MultipartFile file) {
        String fileDirPath;
        String filePath;
        if (targetPath == null) {
            fileDirPath = LOCAL_STORAGE_PATH;
        } else {
            if (targetPath.startsWith("/")) {
                targetPath = targetPath.substring(1);
            }
            if (targetPath.endsWith("/")) {
                targetPath = targetPath.substring(0, targetPath.length() - 1);
            }
            fileDirPath = LOCAL_STORAGE_PATH + File.separator + targetPath;
        }
        filePath = fileDirPath + File.separator + file.getOriginalFilename();

        File fileDir = new File(fileDirPath);
        if (!fileDir.exists()) {
            fileDir.mkdirs();
        }
        OutputStream outputStream = null;
        InputStream inputStream = null;
        try {
            inputStream = file.getInputStream();
            byte[] bs = new byte[1024];
            int len;

            outputStream = new FileOutputStream(filePath);
            while ((len = inputStream.read(bs)) != -1) {
                outputStream.write(bs, 0, len);
            }
        } catch (IOException e) {
            e.printStackTrace();
        } finally {
            try {
                if (outputStream != null) {
                    outputStream.close();
                }
                inputStream.close();
            } catch (IOException e) {
                e.printStackTrace();
            }
        }
        return targetPath + "/" + file.getOriginalFilename();
    }

    /**
     * 删除文件/文件夹
     *
     * @param targetUri 路径
     */
    public static boolean delete(String targetUri) {
        boolean flag = false;
        try {
            File file = new File(LOCAL_STORAGE_PATH + File.separator + targetUri);
            // 路径为文件且不为空则进行删除
            if (file.isFile() && file.exists()) {
                file.delete();
                flag = true;
            }
        } catch (Exception e) {
            log.info("删除文件异常 " + e.getMessage());
        }
        return flag;
    }

    static {
        Properties props = ResourceLoader.load(ResourceLoader.LOCAL_DFS_CONFIG_PATH);
        String classPath = DFSUtil.class.getProtectionDomain().getCodeSource().getLocation().getPath();

        //首先去掉末尾的分隔符
        classPath = classPath.substring(0, classPath.length() - 1);
        //判断开发环境还是编译环境
        boolean isJar = classPath.contains("!/BOOT-INF");
        if (isJar) {
            classPath = classPath.substring(0, classPath.indexOf("!/BOOT-INF"));
            classPath = classPath.substring(0, classPath.lastIndexOf("/"));
            classPath = classPath.replace("file:", "");
        } else {
            classPath = classPath.replace("/target/classes", "");
        }

        try {
            classPath = URLDecoder.decode(classPath, "UTF-8");
        } catch (UnsupportedEncodingException e) {
            e.printStackTrace();
        }

        LOCAL_STORAGE_PATH = classPath + File.separator + props.getProperty("basePath");

        File localStorageDir = new File(LOCAL_STORAGE_PATH);
        if (!localStorageDir.exists()) {
            localStorageDir.mkdirs();
        }
    }
}
然后还有一个ResourceLoader文件,这个文件主要是获取path中的信息
package com.xxxxx.util;

import java.io.IOException;
import java.io.InputStream;
import java.util.Properties;

public class ResourceLoader {
    public static final String LOCAL_DFS_CONFIG_PATH = "config/localDFS.conf";


    public static Properties load(String filePath) {
        Properties props = new Properties();
        InputStream resourceAsStream = null;
        try {
            resourceAsStream = Thread.currentThread().getContextClassLoader().getResourceAsStream(filePath);
            props.load(resourceAsStream);
        } catch (IOException e) {
            e.printStackTrace();
        } finally {
            if (resourceAsStream != null) {
                try {
                    resourceAsStream.close();
                } catch (IOException e) {
                    e.printStackTrace();
                }
            }
        }
        return props;
    }
}
然后就是MvcConfigure了,主要是用来发布静态资源的,但是其中也有两行代码是集成swagger用到的,我在集成swagger的时候,依赖,配置文件都写好了,但是就是显示Whitelabel Error Page,没有映射成功,后来在addResourceHandlers方法中加了这么两行代码,就成功了
        registry.addResourceHandler("/swagger-ui.html").addResourceLocations("classpath:/META-INF/resources/");
        registry.addResourceHandler("/webjars/**").addResourceLocations("classpath:/META-INF/resources/webjars/");
package com.xxxxx;

import com.xxxxx.util.DFSUtil;
import org.springframework.context.annotation.Bean;
import org.springframework.http.converter.HttpMessageConverter;
import org.springframework.http.converter.StringHttpMessageConverter;
import org.springframework.web.multipart.MultipartResolver;
import org.springframework.web.multipart.commons.CommonsMultipartResolver;
import org.springframework.web.servlet.config.annotation.EnableWebMvc;
import org.springframework.web.servlet.config.annotation.ResourceHandlerRegistry;
import org.springframework.web.servlet.config.annotation.WebMvcConfigurer;

import java.io.File;
import java.nio.charset.StandardCharsets;
import java.util.List;

@EnableWebMvc
public class MvcConfigure implements WebMvcConfigurer {

    @Override
    public void addResourceHandlers(ResourceHandlerRegistry registry) {
        registry.addResourceHandler("/swagger-ui.html").addResourceLocations("classpath:/META-INF/resources/");
        registry.addResourceHandler("/webjars/**").addResourceLocations("classpath:/META-INF/resources/webjars/");
        registry.addResourceHandler("/**")
                .addResourceLocations("classpath:/static/")
                .addResourceLocations("classpath:/public/")
                .addResourceLocations("classpath:/resources/")
                .addResourceLocations(String.format("file:%s" + File.separator, DFSUtil.LOCAL_STORAGE_PATH));
    }//最后加上file:%s 非常重要哦,如果不加会导致静态资源发布失败

    /**
     * 修改StringHttpMessageConverter默认配置
     * @param converters    httpMessageConvert
     */
    @Override
    public void configureMessageConverters(List> converters){
        converters.add(responseBodyStringConverter());
    }

    @Bean(name = "multipartResolver")
    public MultipartResolver multipartResolver() {
        CommonsMultipartResolver resolver = new CommonsMultipartResolver();
        resolver.setDefaultEncoding("UTF-8");
        //resolveLazily属性启用是为了推迟文件解析,以在在UploadAction中捕获文件大小异常
        resolver.setResolveLazily(true);
        //上传文件总大小 1G
        resolver.setMaxInMemorySize(1024 * 1024 * 1024);
        //上传文件大小 100M 5*1024*1024
        resolver.setMaxUploadSize(100 * 1024 * 1024);
        return resolver;
    }

    @Bean
    public HttpMessageConverter responseBodyStringConverter() {
        return new StringHttpMessageConverter(StandardCharsets.UTF_8);
    }
}
接下来就是swagger的配置文件啦,这里就主要说一下swagger怎么配置,首先是你需要在pom文件中加这么两个依赖:
	io.springfox
	springfox-swagger2
	2.6.1


	io.springfox
	springfox-swagger-ui
	2.6.1
然后就是配置swagger的配置文件:SwaggerConfiguration,这里我用的方法和大部分人的不一样,其中有一些信息是从配置文件中读取的
package com.xxxxx;

import com.google.common.base.Predicate;
import org.springframework.beans.factory.annotation.Value;
import org.springframework.boot.context.properties.ConfigurationProperties;
import org.springframework.context.annotation.Bean;
import org.springframework.context.annotation.Configuration;
import org.springframework.context.annotation.PropertySource;
import springfox.documentation.RequestHandler;
import springfox.documentation.builders.ApiInfoBuilder;
import springfox.documentation.builders.PathSelectors;
import springfox.documentation.builders.RequestHandlerSelectors;
import springfox.documentation.service.ApiInfo;
import springfox.documentation.spi.DocumentationType;
import springfox.documentation.spring.web.plugins.Docket;
import springfox.documentation.swagger2.annotations.EnableSwagger2;

@Configuration
@EnableSwagger2
@PropertySource(value = "classpath:config/my-web.yml")
@ConfigurationProperties(prefix = "platform")
public class SwaggerConfiguration {

    @Value("${company}")
    private String company;

    @Value("${name}")
    private String name;

    @Value("${version}")
    private String version;

    @Bean
    public Docket buildFullDocket(){
        return buildDocket(null, buildApiInfo(null), RequestHandlerSelectors.basePackage("com.inesa.controller"), PathSelectors.any());
    }


    private Docket buildDocket(String groupName, ApiInfo apiInfo, Predicate apis, Predicate paths){
        return new Docket(DocumentationType.SWAGGER_2)
                .groupName(groupName)
                .apiInfo(apiInfo)
                .forCodeGeneration(true)
                .select()
                .apis(apis)
                .paths(paths)
                .build();
    }
    private ApiInfo buildApiInfo(String description){
        return new ApiInfoBuilder()
                .title(getApiTitle())
                .description(description==null?getApiDescription():getApiDescription(description))
                .version(version)
                .build();
    }


    private String getApiTitle(){
        return String.format("%s - %s API", company, name);
    }
    private String getApiDescription(String title){
        return String.format("API manual of %s Platform. Module: %s", name, title);
    }
    private String getApiDescription(){
        return String.format("API manual of %s Platform", name);
    }
}
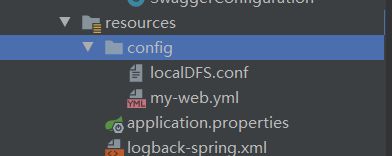
然后我们就开始看一下resources文件中都有什么吧~

其中config中的两个文件分别知识一些为了方便全局的设置:
localDFS.conf,其中的xxxxx就是你想要本地DFS根文件夹叫什么就填什么
basePath = xxxxxx
my-web.yml中的配置主要会在swagger页面上面体现到哦。这里自行get了
platform:
  company: xxxxx
  name: Local_DFS
  version: 1.0.1

cros-filter:
  mapping: /**
  origins: *
  credentials: true
  method: HEAD,GET,POST,DELETE,PUT
然后就是application.properties,其中只配置了端口号
server.port=8070
然后最后就是logback-spring.xml了,这个主要是设置log日志文件的生成和生成文件位置和名称的一些参数。
    logback


            %yellow(%d{HH:mm:ss}) [%thread] %highlight(%-5level)|%cyan(%logger:%line) - %msg%n


        true


                logs/%d{yyyy-MM-dd}/%d{yyyy-MM-dd}.log


                %d{yyyy-MM-dd HH:mm:ss} [%-5level] | %logger:%line - %msg%n
对了,还要再看一下pom文件中的依赖哦!
	4.0.0

		org.springframework.boot
		spring-boot-starter-parent
		2.0.5.RELEASE


	com.xxxxx
	localDFS
	0.0.1-SNAPSHOT
	dfs
	Demo project for Spring Boot


		1.8


			org.springframework.boot
			spring-boot-starter-web


			commons-fileupload
			commons-fileupload
			1.3.2


			commons-io
			commons-io
			2.4


			io.springfox
			springfox-swagger2
			2.6.1


			io.springfox
			springfox-swagger-ui
			2.6.1


			org.springframework.boot
			spring-boot-configuration-processor
			true


				src/main/resources


				org.apache.maven.plugins
				maven-deploy-plugin

					true


				org.springframework.boot
				spring-boot-maven-plugin

					com.inesa.DfsApplication
					JAR
					true


							repackage


				org.apache.maven.plugins
				maven-assembly-plugin
				3.1.0


						make-zip
						package

							single


								src/main/resources/assembly.xml
最后我们加上DfsApplication的代码:
package com.xxxxx;

import org.springframework.boot.SpringApplication;
import org.springframework.boot.autoconfigure.SpringBootApplication;
import org.springframework.context.annotation.ComponentScan;


@SpringBootApplication
@ComponentScan("com")
public class DfsApplication extends MvcConfigure{

	public static void main(String[] args) {
		SpringApplication.run(DfsApplication.class, args);
	}

}
这样,一个带有静态发布、swagger的本地DFS服务就弄好啦,提供给需要的小伙伴参考,当然现在的代码还是有一些小bug没有修复的,但是整体的功能还是可以很好的实现的!欢迎大家提出问题哦~