java实现滑块验证
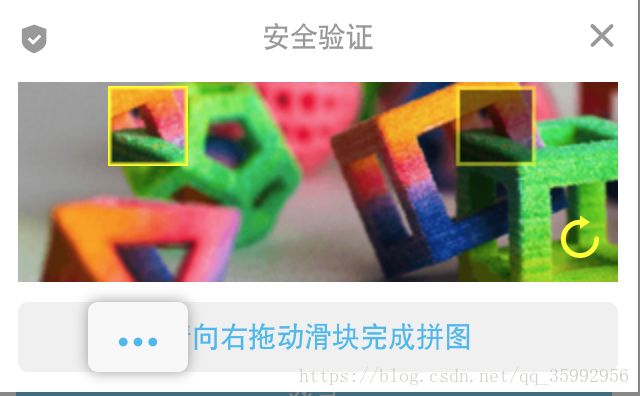
很多网站使用滑块验证码提高网站安全性,为了做到真正的验证,必须要走后台服务器。
下面是java实现滑块验证的核心步骤:
1、从服务器随机取一张图片,并对图片上的随机x,y坐标和宽高一块区域抠图;
2、根据步骤一的坐标和宽高,使用二维数组保存原图上抠图区域的像素点坐标;
3、根据步骤二的坐标点,对原图的抠图区域的颜色进行处理。
完成以上步骤之后得到三张图(原图,扣下来的方块图,带有抠图区域阴影的原图),将这三张图和抠图区域的y坐标传到前台,前端在移动方块验证时,将移动后的x坐标传递到后台与原来的x坐标作比较,如果在阈值内则验证通过。
请求验证的步骤:前台向后台发起请求,后台随机一张图片做处理将处理完的三张图片的base64,抠图y坐标和token返回给前台。
前台滑动图片将x坐标和token作为参数请求后台验证,服务器根据token取出x坐标与参数的x进行比较。
以上就是一个简单的滑块验证的大体思路,下面是代码:
一、抠图方块裁剪,得到一个用来滑动的小方块
/**
* 对图片裁剪,并把裁剪后的图片返回 。
*/
private BufferedImage getMarkImage(BufferedImage image,int x,int y,int length,int width)throws IOException {
InputStream is = null ;
ImageInputStream iis = null ;
try {
ByteArrayOutputStream os = new ByteArrayOutputStream();
ImageIO.write(image, "png", os);
is = new ByteArrayInputStream(os.toByteArray());
/*
* 返回包含所有当前已注册 ImageReader 的 Iterator,这些 ImageReader
* 声称能够解码指定格式。 参数:formatName - 包含非正式格式名称 .
*(例如 "jpeg" 或 "tiff")等 。
*/
Iterator it= ImageIO.getImageReadersByFormatName("png");
ImageReader reader = it.next();
// 获取图片流
iis = ImageIO.createImageInputStream(is);
/*
* iis:读取源.true:只向前搜索
.将它标记为 ‘只向前搜索'。
* 此设置意味着包含在输入源中的图像将只按顺序读取,可能允许 reader
* 避免缓存包含与以前已经读取的图像关联的数据的那些输入部分。
*/
reader.setInput(iis, true ) ;
/*
* 描述如何对流进行解码的类
.用于指定如何在输入时从 Java Image I/O
* 框架的上下文中的流转换一幅图像或一组图像。用于特定图像格式的插件
* 将从其 ImageReader 实现的 getDefaultReadParam 方法中返回
* ImageReadParam 的实例。
*/
ImageReadParam param = reader.getDefaultReadParam();
/*
* 图片裁剪区域。Rectangle 指定了坐标空间中的一个区域,通过 Rectangle 对象
* 的左上顶点的坐标(x,y)、宽度和高度可以定义这个区域。
*/
Rectangle rect = new Rectangle(x, y, length, width);
// 提供一个 BufferedImage,将其用作解码像素数据的目标。
param.setSourceRegion(rect);
/*
* 使用所提供的 ImageReadParam 读取通过索引 imageIndex 指定的对象,并将
* 它作为一个完整的 BufferedImage 返回。
*/
BufferedImage bi=reader.read(0,param);
return bi;
} finally {
if (is != null )
is.close() ;
if (iis != null )
iis.close();
}
}
二、获取扣图区域坐标,原理是用二维数组表示原图的所有像素坐标,通过抠图坐标和长宽确定抠图区域坐标,并将抠图区域坐标的值赋值为1,其他区域0.
 /**
     *
     * @param targetLength 原图的长度
     * @param targetWidth  原图的宽度
     * @param x            裁剪区域的x坐标
     * @param y            裁剪区域的y坐标
     * @param length        抠图的长度
     * @param width        抠图的宽度
     * @return
     */
    private int [][] getCutAreaData(int targetLength,int targetWidth,int x,int y ,int length,int width){
        int[][] data = new int[targetLength][targetWidth];
        for (int i=0;i=x&&jy){
                    data[i][j]=1;
                }else {
                    data[i][j]=0;
                }
            }
        }
        return data;
    }
三、经过以上两个步骤,我们已经获取到原图和扣下来的方块图了,下面通过二维数组坐标给原图的抠图区域做色彩处理,就可以得到带有阴影的原图。
public static void cutByTemplate(BufferedImage oriImage,int[][] templateImage){

        for (int i = 0; i < oriImage.getWidth(); i++) {
            for (int j = 0; j < oriImage.getHeight(); j++) {
                int rgb = templateImage[i][j];
                // 原图中对应位置变色处理

                int rgb_ori = oriImage.getRGB(i,  j);

                if (rgb == 1) {
                    //颜色处理
                    int r = (0xff & rgb_ori);
                    int g = (0xff & (rgb_ori >> 8));
                    int b = (0xff & (rgb_ori >> 16));
                    int Gray = (r*2 + g*5 + b*1) >> 3;


                    //原图对应位置颜色变化
                    oriImage.setRGB( i, j, Gray);
                }
            }
        }
    }
四、base64字符串和图片互转
private String imageToBase64(BufferedImage image) throws  Exception{
        byte[] imagedata = null;
        ByteArrayOutputStream bao=new ByteArrayOutputStream();
        ImageIO.write(image,"png",bao);
        imagedata=bao.toByteArray();
        BASE64Encoder encoder = new BASE64Encoder();
        String BASE64IMAGE=encoder.encodeBuffer(imagedata).trim();
        BASE64IMAGE = BASE64IMAGE.replaceAll("\n", "").replaceAll("\r", "");//删除 \r\n
        return BASE64IMAGE;
    }
    private BufferedImage base64StringToImage(String base64String) {
        try {
            BASE64Decoder decoder=new BASE64Decoder();
            byte[] bytes1 = decoder.decodeBuffer(base64String);
            ByteArrayInputStream bais = new ByteArrayInputStream(bytes1);
            return ImageIO.read(bais);
        } catch (IOException e) {
            e.printStackTrace();
        }
        return null;
    }