Pytorch深度学习实战项目回顾
1.前言
很久没有碰Pytorch了,准备以实战项目代码回顾的方式进行复习。
2.Pytorch安装
现在我又切回了ubuntu系统,里面没有Pytorch,所以顺便从Pytorch最新版安装开始讲起吧。
(1)本机配置
CUDA9.0, CUDNN7.1.2
Anaconda5.2.0
linux下查cuda,cudnn版本的方法:
① cuda
cat /usr/local/cuda/version.txt
② cudnn
cat /usr/local/cuda/include/cudnn.h | grep CUDNN_MAJOR -A 2
(2)官方安装
官方链接
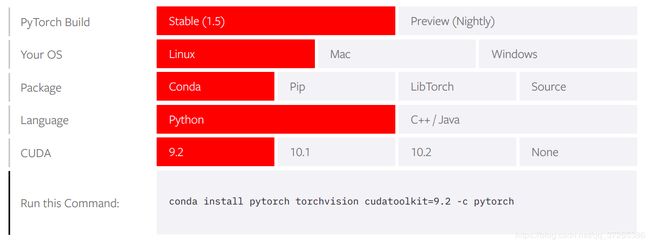
2020.5.17官网已经更新到了pytorch1.5版本了,要求是:

最新版需要cuda9.2,我的是9.0无缘了,只能安比较新的pytorch1.1.0,有anaconda的直接运行:
conda install pytorch==1.1.0 torchvision==0.3.0 cudatoolkit=9.0 -c pytorch
注意: 不用安装会很慢哦。
(3)运行测试
import torch
x = torch.rand(5, 3)
print(x)
print(torch.cuda.is_available())
输出True就是使用了GPU了,而且运行中没有tensorflow显示得那么复杂,很间接,而且能够直接输出numpy.array类型,非常pythonic。
注意: 如果你是python2.7,但还想用3.x的print语法,就在最前面加上以下的语句就ok了。
from __future__ import print_function
至此,pytorch安装完毕。
3.Pytorch项目代码回顾
这里的项目具体是:
我不不会一行一行地讲代码,而是说说一些函数用法的注意事项以及探索。废话不多说,开始吧。
1)一些常用函数的探索
(1)Tensor加法
import torch
x = torch.rand(5, 3, dtype=torch.float32)
y = torch.rand(5, 3, dtype=torch.float32)
print(x)
print(y)
y.add_(x)  # 相当于python中的y+=x
print(y)
(2)torch.empty
最开始,我以为这个就是0的生成,结果不是。这个是创建了一个未被初始化数值的tensor,换句话说就是生成的tensor里面的数是没有规律的。
(3)数据切片
完全类似于numpy。
import torch
x = torch.rand(2, 2, dtype=torch.float32)
print(x)
y = x[:, 1]
print(y, y.shape)
"""
output:
tensor([[0.1247, 0.8228],
        [0.5879, 0.0067]])
tensor([0.8228, 0.0067]) torch.Size([2])
"""
(4)view
完全类似于numpy中的reshape,并且y = x.view(4)与y = x.reshape(4)都是ok的。
import torch
x = torch.rand(2, 2, dtype=torch.float32)
print(x)
y = x.view(4)
print(y, y.shape)
"""
output:
tensor([[0.6341, 0.7080],
        [0.5801, 0.2063]])
tensor([0.6341, 0.7080, 0.5801, 0.2063]) torch.Size([4])
"""
(5)tensor与array转换
在tensorflow中,这种转换很复杂,如要构建静态图,然后在run或者eval,才可以得到array。pytorch中非常简单。
① 单一数字tensor的直接转换
import torch
x = torch.rand(1, dtype=torch.float32)
print(x)
print(x.item())
"""
output:
tensor([0.3996])
0.3996013402938843
"""
② 数组tensor的直接转换
import torch
x = torch.rand(2,2, dtype=torch.float32)
print(x)
print(x.numpy())
"""
output:
tensor([[0.7119, 0.3798],
        [0.1673, 0.0765]])
[[0.71185666 0.37983876]
 [0.16733897 0.07648808]]
"""
③ numpy转tensor
import torch
import numpy as np
x = np.ones((2, 2))
print(x)
print(torch.from_numpy(x))
"""
output:
tensor([[0.7119, 0.3798],
        [0.1673, 0.0765]])
[[0.71185666 0.37983876]
 [0.16733897 0.07648808]]
"""
注意:
1.np.ones((2, 2))写成np.ones(2, 2)是错误的。
2.一定要注意浅copy和深copy的区别,这里与python是一样的
1’浅copy:
import torch
x = torch.rand(2, 2, dtype=torch.float32)
print(x)
y = x
x += 1
print(x)
print(y)
"""
output:
tensor([[0.9920, 0.5458],
        [0.9623, 0.2851]])
tensor([[1.9920, 1.5458],
        [1.9623, 1.2851]])
tensor([[1.9920, 1.5458],
        [1.9623, 1.2851]])
"""
或者使用copy库:
import torch
import copy
x = torch.rand(2, 2, dtype=torch.float32)
print(x)
y = copy.copy(x)
x += 1
print(x)
print(y)
"""
output:
tensor([[0.9920, 0.5458],
        [0.9623, 0.2851]])
tensor([[1.9920, 1.5458],
        [1.9623, 1.2851]])
tensor([[1.9920, 1.5458],
        [1.9623, 1.2851]])
"""
1’深copy:
这里由于是对tensor操作的,并不能使用python中的.copy()哦!
import torch
import copy
x = torch.rand(2, 2, dtype=torch.float32)
print(x)
y = copy.deepcopy(x)
x += 1
print(x)
print(y)
"""
output:
tensor([[0.3382, 0.5585],
        [0.2366, 0.9174]])
tensor([[1.3382, 1.5585],
        [1.2366, 1.9174]])
tensor([[0.3382, 0.5585],
        [0.2366, 0.9174]])
"""
(6)cpu,gpu两种状态的转换需求
① 变量
import torch
if torch.cuda.is_available():
    device = torch.device('cuda')
    print(device)
    x = torch.rand(2, 2, dtype=torch.float32, device=device)
    print(x)
    # print(x.numpy())  # 会报错的,因为x变量已经放在了cuda上了,而numpy是在cpu上运行的
    # corvert cuda to cpu
    print(x.cpu().numpy())
    print(x.to('cpu').numpy())

"""
output:
tensor([[0.7047, 0.3864],
        [0.1722, 0.4075]], device='cuda:0')
[[0.70474064 0.3864395 ]
 [0.1721652  0.40747693]]
[[0.70474064 0.3864395 ]
 [0.1721652  0.40747693]]

"""
② 模型
model = model.cuda()
2)实战两层神经网络的训练
网络配置:
第一层:300
第二层:50
第三层:5
样本数:32
学习率:1e-5
迭代次数:500
以下代码已经有了详细的注解
注意:
1.dot是真正的矩阵乘法,*和multiply是逐元素的乘法。
2.一定要注意在indexing的时候,True与1意思不一样哦,True表示选择某个index,而1表示选择第二个元素,具体见下面的比较:
a = np.array([1, 2, 3, -1])
b = [False, True, False, True]
c = [0, 1, 0, 1]
out1 = a[b]
out2 = a[c]
print(out1, out2)
"""
output:
[ 2 -1] [1 2 1 2]
"""