windows10 搭建以太坊联盟链教程
我们将使用geth,在Windows10 下搭建两个节点的基础联盟链。
一、创世区块
首先创建两个文件夹a和b,分别写入创世区块文件,比如:genesis.json,文件内容如下:
{
	"config": {
		"chainId": 111,
		"homesteadBlock": 0,
		"eip155Block": 0,
		"eip158Block": 0
	},
	"alloc"      : {},
	"coinbase"   : "0x0000000000000000000000000000000000000000",
	"difficulty" : "0x400",
	"extraData"  : "",
	"gasLimit"   : "0x2fefd8",
	"nonce"      : "0x0000000000000000",
	"mixhash"    : "0x0000000000000000000000000000000000000000000000000000000000000000",
	"parentHash" : "0x0000000000000000000000000000000000000000000000000000000000000000",
	"timestamp"  : "0x00"
}
参数解释:
mixhash :与nonce配合用于挖矿,由上一个区块的一部分生成的hash。注意他和nonce的设置需要满足以太坊的Yellow paper, 4.3.4. Block Header Validity, (44)章节所描述的条件。.
nonce :nonce就是一个64位随机数,用于挖矿,注意他和mixhash的设置需要满足以太坊的Yellow paper, 4.3.4. Block Header Validity, (44)章节所描述的条件。
difficulty :设置当前区块的难度,如果难度过大,cpu挖矿就很难,这里设置较小难度
alloc : 用来预置账号以及账号的以太币数量,因为私有链挖矿比较容易,所以我们不需要预置有币的账号,需要的时候自己创建即可以。
coinbase : 矿工的账号,随便填
timestamp : 设置创世块的时间戳
parentHash : 上一个区块的hash值,因为是创世块,所以这个值是0
extraData : 附加信息,随便填,可以填你的个性信息
gasLimit : 该值设置对GAS的消耗总量限制,用来限制区块能包含的交易信息总和,因为我们是私有链,所以填最大。
win键+R 输入cmd 打开命令行工具
输入geth,如果出现下图,则geth没有配置环境变量
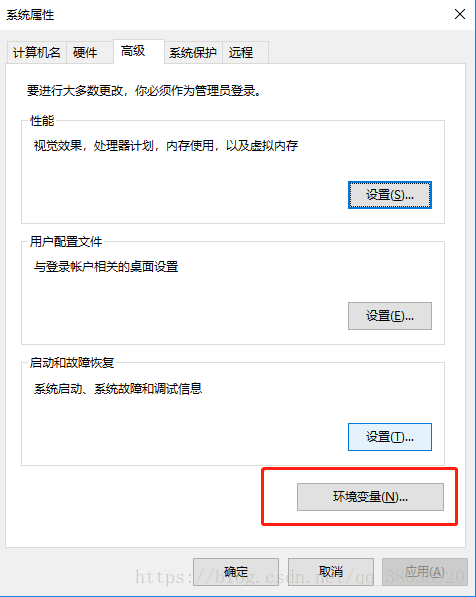
配置Geth环境变量
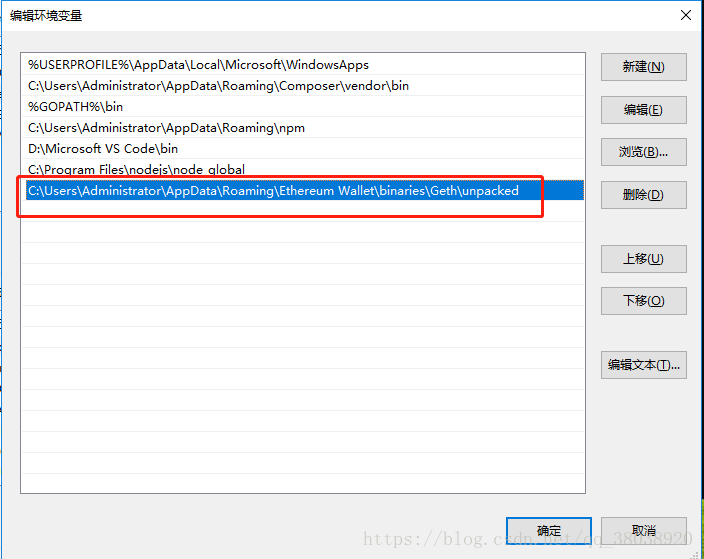
Geth客户端的默认路径为: C:\Users\Administrator\AppData\Roaming\Ethereum Wallet\binaries\Geth\unpacked”。(“Administrator”为本人电脑用户名,该处应视具体情况变更)。
需要将该路径添加到windows系统的环境变量中去,添加完后CMD窗口即可使用geth命令。
添加完后,打开CMD窗口,输入:geth -h。如果不报错或者输入:geth出现下图,即表示geth配置完成。
在命令行输入如下命令,进行初始化的操作。
D:\testgeth\a>geth --datadir ./data-init1/ init genesis.json
D:\testgeth\b>geth --datadir ./data-init1/ init genesis.json- --datadir :指定节点数据存储目录。
- init:初始化命令
命令执行完成后,会在 data-init1 文件夹下生成两个目录,一个为 geth,一个为 keystore 。
- geth:存放数据相关的信息
- keystore:存放加密过的私钥文件
执行完打印的log如下:
INFO [09-13|11:02:01] Maximum peer count ETH=25 LES=0 tota l=25
INFO [09-13|11:02:01] Allocated cache and file handles database=D:\\Ethe r\\b\\data-init1\\geth\\chaindata cache=16 handles=16 INFO [09-13|11:02:01] Writing custom genesis block
INFO [09-13|11:02:01] Persisted trie from memory database nodes=0 size=0.00 B time=0s gcnodes=0 gcsize=0.00B gctime=0s livenodes=1 livesize=0.00B
INFO [09-13|11:02:01] Successfully wrote genesis state database=chaindat a hash=a0e580…a5e82e
INFO [09-13|11:02:01] Allocated cache and file handles database=D:\\Ethe r\\b\\data-init1\\geth\\lightchaindata cache=16 handles=16
INFO [09-13|11:02:01] Writing custom genesis block
INFO [09-13|11:02:01] Persisted trie from memory database nodes=0 size=0.00 B time=0s gcnodes=0 gcsize=0.00B gctime=0s livenodes=1 livesize=0.00B
INFO [09-13|11:02:01] Successfully wrote genesis state database=lightcha indata hash=a0e580…a5e82e
二、启动控制台
开启两个窗口来启动两个节点,在第一窗口执行以下命令启动一个节点,启动之后注意不要关闭窗口。
D:\testgeth\a>geth --datadir ./data-init1/ --networkid 88 --nodiscover console- networkid 指定网路ID,确保不使用1-4,1-4系统内置使用,这里写88。
- nodiscover 此参数确保geth不去寻找peers节点,主要是为了控制联盟链接入的节点。
启动第一个节点时未指定port参数,此处采用默认的port,也就是 30303 。
如果打印的日志中显示 “Welcome to the Geth JavaScript console!” 则说明启动成功了。
下面在另外一个窗口,换一个端口,比如 30305 ,来启动第二个节点。
D:\testgeth\b>geth --datadir ./data-init1/ --port 30305 --networkid 88 --nodiscover --ipcdisable console注意:在windows中,启动第二个节点会报错:Fatal: Error starting protocol stack: Access is denied.,解决方法是添加参数:--ipcdisable。
这样,我们就顺利的启动了两个节点,进入了控制台,接下来的操作都在控制台中进行。
三、添加coinbase账户
现在我们在第一个节点上创建一个账户,具体如下:
> personal.listAccounts
[]
> personal.newAccount("123456")
"0xed0dfd1c42c18fbf71df07135950d25353a9786c"
上面的命令先是查看了节点下的地址,结果为空,然后创建了一个密码为 123456 的账号。同样我们在另外一个窗口执行同样的命令:
> personal.listAccounts
[]
> personal.newAccount("123456")
"0x18e95f783866f4404530e13b7e868169db300fdf"
两个节点就拥有了两个地址。同时,在它们的keystore目录下面生成了加密的私钥文件。
执行以下命令查看coinbase账号:
> eth.coinbase
INFO [09-13|11:44:39] Etherbase automatically configured address=0xeD0DFd1c42C18FBF71DF07135950D25353A9786C "0xed0dfd1c42c18fbf71df07135950d25353a9786c"
由于只有一个地址,因此该地址就作为了coinbase地址。如果想查看更多信息可以执行以下命令:
> personal.listWallets
[{
    accounts: [{
        address: "0xed0dfd1c42c18fbf71df07135950d25353a9786c",
        url: "keystore://D:\\Ether\\a\\data-init1\\keystore\\UTC--2018-09-13T03-44-33.438000200Z--ed0dfd1c42c18fbf71df07135950d25353a9786c"
    }],
    status: "Locked",
    url: "keystore://D:\\Ether\\a\\data-init1\\keystore\\UTC--2018-09-13T03-44-33.438000200Z--ed0dfd1c42c18fbf71df07135950d25353a9786c"
}]
这里不仅打印了账户信息,还打印出了私钥的存储位置和账户的状态等信息。
四、联盟链互通
上面分别是在两个节点上进行的操作,下面需要把两个节点之间建立连接。首先,执行以下命令查看节点的peers的情况。
> admin.peers
[]
发现节点并没有链接上任何其他节点,这是 nodiscover 参数发挥了作用。下面通过分享encode地址的方式来让两个节点建立链接。
> admin.nodeInfo.enode
"enode://0c11cb0e593b0204f65d183cccf33960a37b5a9cc2d30a7d2e186af170686997eb905853ad970af6d7 9ac47577aec21487f9f3138975851a489871a391d73a65@[::]:30305?discport=0"
通过在窗口2中输入 admin.nodeInfo.enode命令,可以获得节点2的enode信息。现在我们要告知节点1,节点2的enode信息,首先负责节点2 enode信息,在节点1的控制台输入如下命令:
> admin.addPeer("enode://0c11cb0e593b0204f65d183cccf33960a37b5a9cc2d30a7d2e186af170686997eb905 853ad970af6d79ac47577aec21487f9f3138975851a489871a391d73a65@[::]:30305?discport=0")
true
返回true,说明执行成功。我们验证一下:
> admin.peers
[{
    caps: ["eth/63"],
    id: "0c11cb0e593b0204f65d183cccf33960a37b5a9cc2d30a7d2e186af170686997eb90585 3ad970af6d79ac47577aec21487f9f3138975851a489871a391d73a65",
    name: "Geth/v1.8.4-stable-2423ae01/windows-amd64/go1.10.1",
    network: {
        inbound: false,
        localAddress: "127.0.0.1:60336",
        remoteAddress: "127.0.0.1:30305",
        static: true, trusted: false },
        protocols: {
            eth: {
                difficulty: 262144,
                head: "0xa0e580c6769ac3dd80894b2a256164a76b796839d2eb7f799ef6b9850ea5e82 e",
                version: 63
            }
    }
}]
>
发现节点1已经有一个peer了,同时我们可以看到 remoteAddress: "127.0.0.1:30305",正是我们节点2的端口信息。就这样,我们两个节点就互连成功了。
五、查询余额并挖矿
执行查看余额命令:
> eth.getBalance(eth.coinbase)
0发现两个节点的账户余额都为0。在节点1执行miner.start()进行挖矿,执行 miner.stop() 停止挖矿。我们会发现,当节点1挖矿的同时,节点2会输出这样的信息:
> INFO [09-14|15:08:57] Block synchronisation started
INFO [09-14|15:08:57] Imported new state entries count=1 elapsed=0 s processed=1 pending=0 retry=0 duplicate=0 unexpected=0 WARN [09-14|15:08:58] Discarded bad propagated block number=1 hash=56a e5a…ce9a87
INFO [09-14|15:08:58] Imported new block headers count=2 elapsed=1 .119s number=2 hash=f2f595…c1d893 ignored=0
INFO [09-14|15:08:59] Imported new chain segment blocks=2 txs=0 mg as=0.000 elapsed=1ms mgasps=0.000 number=2 hash=f2f595…c1d893 cache=348.00B
INFO [09-14|15:09:00] Fast sync complete, auto disabling
INFO [09-14|15:09:02] Imported new chain segment blocks=1 txs=0 mg as=0.000 elapsed=5ms mgasps=0.000 number=3 hash=9b8ba9…62198a cache=496.00B
INFO [09-14|15:09:03] Imported new chain segment blocks=1 txs=0 mg
这说明节点1在挖矿的同时,节点2在同步数据信息。停止节点1的挖矿,并查看coinbase的地址金额:
> miner.stop()
true
> eth.getBalance(eth.coinbase)
70000000000000000000
我们可以看到节点1的coinbase的余额,我们把节点1的地址拿到节点2去查询:
> eth.getBalance("0xed0dfd1c42c18fbf71df07135950d25353a9786c")
70000000000000000000
很显然节点2也能查询到节点1中地址的余额。以上信息说明,节点1和节点2的数据是完全同步的。
六、交易转账
交易前需要将账户解锁,执行解锁命令后,输入之前设置的密码,即可解锁。
> personal.unlockAccount("0xed0dfd1c42c18fbf71df07135950d25353a9786c")
Unlock account 0xed0dfd1c42c18fbf71df07135950d25353a9786c
Passphrase:
true
解锁完之后,就可以给其他账户进行转账操作了。
>eth.sendTransaction({from:eth.coinbase,to:'0x18e95f783866f4404530e13b7e868169db300fdf',value:100000000})
INFO [09-14|15:31:04] Submitted transaction fullhash=0xc72175
20e37896eb9421b6139ffb8d650bf933dfcb1efce42ff7ad96c3d57a5a recipient=0x18e95f783 866F4404530e13b7E868169db300fdF
"0xc7217520e37896eb9421b6139ffb8d650bf933dfcb1efce42ff7ad96c3d57a5a"
>
我们给节点2的账户转1个币,现在查看下节点2的地址内是否有余额:
> eth.getBalance("0x18e95f783866f4404530e13b7e868169db300fdf")
0
余额为0,为什么呢?因为我们虽然发起了交易,但是没有矿工挖矿打包交易。执行 miner.start() ,停止挖矿后再次查询,就会发现节点2的地址已经有余额了。
> eth.getBalance("0x18e95f783866f4404530e13b7e868169db300fdf")
100000000
通过以上操作,我们建立了一个拥有两个节点的联盟链,并执行了查询余额、挖矿、转账等操作。如果想建立更多节点的联盟链,可以此添加新的节点。
参考链接:https://www.jianshu.com/p/2647fd5efbe5


