SpringBoot整合SpringData JPA与Redis缓存
1、前言
本文主要总结了如何通过SpringBoot 整合 SpringData JPA 与 Redis 缓存,主要使用的辅助工具有idea、Redis Desktop Manager(查看redis数据库方便,非必选)、Xshell(连接虚拟机用,非必选),辅助的环境为Docker搭建的开发环境(用于运行mysql、redis容器,也可以本地安装好服务并启动), SpringBoot 为 2.1.6 版本。
2、搭建项目
1)、使用idea 工具新建一个SpringBoot工程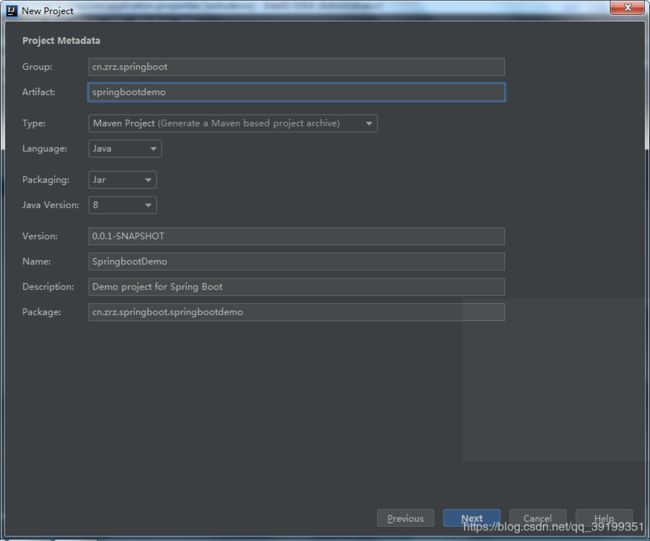
2)、选中Web模块和SQL模块以及其他自己需要使用的模块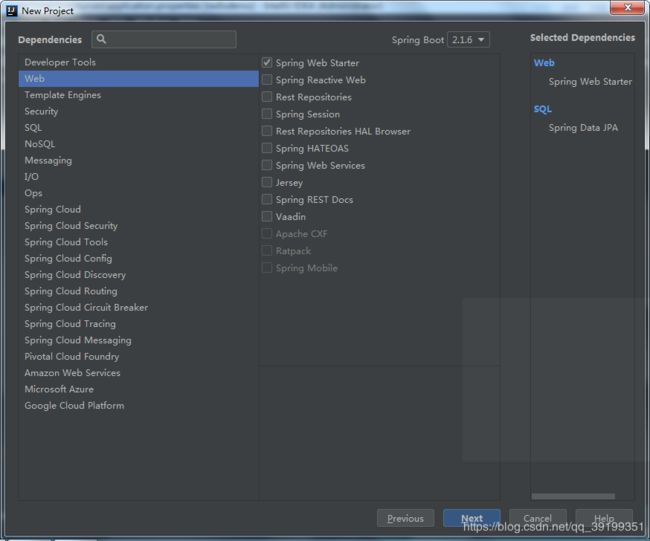
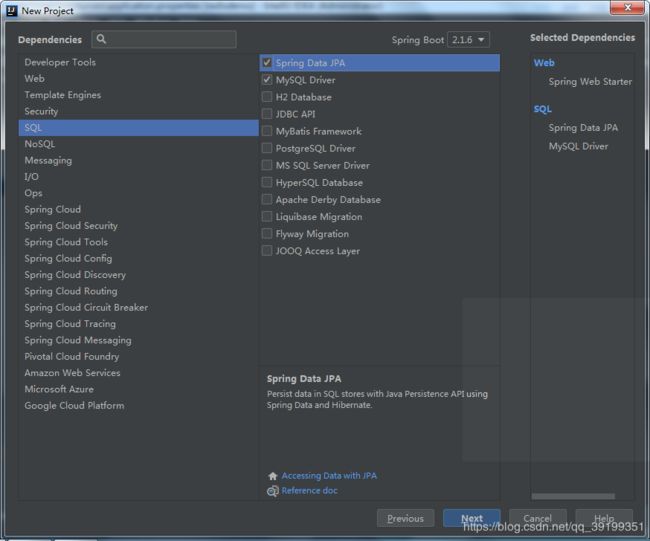
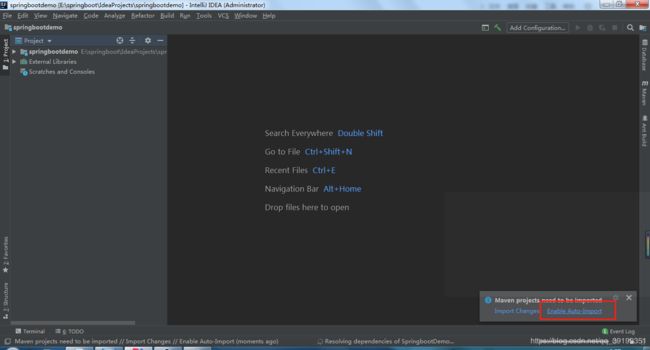
3)、新建好的项目选中idea的自动导包功能,idea将会自动为我们下载pom文件所依赖的jar包
3、准备好环境
1)、使用docker启动mysql与redis容器(也可以使用本地安装的服务)

2)、引入redis相关依赖
<dependency>
    <groupId>org.springframework.bootgroupId>
    <artifactId>spring-boot-starter-data-redisartifactId>
dependency>
3)、配置springboot的属性文件application.properties(也可以配置application.yml文件)
#开启debug模式
debug=true

#配置redis
spring.redis.host=192.168.56.101
spring.redis.port=6379

#配置数据源
spring.datasource.url=jdbc:mysql://192.168.56.101:3306/test
spring.datasource.username=root
spring.datasource.password=123456
spring.datasource.driver-class-name=com.mysql.jdbc.Driver

#jpa相关配置
##spring.jpa.hibernate.ddl-auto相关配置
###none:          默认值,什么都不做,每次运行项目都不会对数据库进行任何操作
###create:        每次运行项目,没有表会新建表,表内有数据则会被清空
###create-drop:   每次程序结束的时候会清空表
###update:        每次运行程序,没有表会新建表,表内有数据也不会被清空,只会更新表结构。
###validate:      运行程序时会校验数据与数据库的字段类型是否相同,不同则会报错
spring.jpa.hibernate.ddl-auto=update

##操作数据库时在控制台打印SQL语句
spring.jpa.show-sql=true
4、编写测试的entity(实体类)、dao、service及controller
1)实体类
package cn.zrz.springboot.springbootdemo.entity;

import javax.persistence.*;

@Entity
@Table(name = "t_user")
public class User {
    @Id
    @Column(name = "id")
    @GeneratedValue(strategy = GenerationType.IDENTITY) //主键自增
    private Integer id;

    @Column(name = "username")
    private String username;

    @Column(name = "password")
    private String password;

    public Integer getId() {
        return id;
    }

    public void setId(Integer id) {
        this.id = id;
    }

    public String getUsername() {
        return username;
    }

    public void setUsername(String username) {
        this.username = username;
    }

    public String getPassword() {
        return password;
    }

    public void setPassword(String password) {
        this.password = password;
    }
}
2)dao类
package cn.zrz.springboot.springbootdemo.dao;

import cn.zrz.springboot.springbootdemo.entity.User;
import org.springframework.data.jpa.repository.JpaRepository;
import org.springframework.stereotype.Repository;

@Repository
public interface UserDao extends JpaRepository<User, Integer> {
}
3)、service接口与实现类
注意:缓存注解需要标注于实现类方法而不是接口方法上,否则会引起缓存失效
package cn.zrz.springboot.springbootdemo.service;

import cn.zrz.springboot.springbootdemo.entity.User;

public interface UserService {
    User getUser(Integer id);
    User saveUser(User user);
    void deleteUser(Integer id);
}
package cn.zrz.springboot.springbootdemo.service.impl;

import cn.zrz.springboot.springbootdemo.dao.UserDao;
import cn.zrz.springboot.springbootdemo.entity.User;
import cn.zrz.springboot.springbootdemo.service.UserService;
import org.springframework.beans.factory.annotation.Autowired;
import org.springframework.cache.annotation.*;
import org.springframework.stereotype.Service;

@Service
@CacheConfig(cacheNames = "user")   //统一配置缓存的名字
public class UserServiceImpl implements UserService {

    @Autowired
    private UserDao userDao;

    @Override
    //缓存方法执行后的返回结果,通过key值判断,当在指定的缓存中不存在时才会执行方法并将返回结果缓存起来
    @Cacheable(key = "#id")
    public User getUser(Integer id) {
        //return userDao.findOne(id);           //springboot 1.x 写法
        return userDao.findById(id).orElse(null); //springboot 2.x 推荐写法
    }

    @Override
    //无论缓存中是否有对应的缓存都会执行方法,并将返回结果存放/更新到指定的缓存中
    @CachePut(key = "#result.id")       //以返回结果的id作为key进行缓存的存储
    public User saveUser(User user) {
        return userDao.save(user);
    }

    @Override
    /**
     * 清除缓存
     * 默认清除key对应的缓存,可以通过 @CacheEvict(allEntries = true)清空所有缓存
     * 默认在方法执行后执行清除操作,可以通过 @CacheEvict(beforeInvocation = true) 制定为方法执行前进行清除操作(可以防止由于方法内出现异常导致缓存没清除)
     */
    @CacheEvict(key = "#id")
    public void deleteUser(Integer id) {
        //userDao.deleteById(id);   //由于测试数据不多,这里不进行真实的数据库操作
        System.out.println("id为" + id + "的用户已删除!");
    }
}
4)、controller类
package cn.zrz.springboot.springbootdemo.controller;

import cn.zrz.springboot.springbootdemo.entity.User;
import cn.zrz.springboot.springbootdemo.service.UserService;
import org.springframework.beans.factory.annotation.Autowired;
import org.springframework.stereotype.Controller;
import org.springframework.web.bind.annotation.GetMapping;
import org.springframework.web.bind.annotation.PathVariable;
import org.springframework.web.bind.annotation.RequestMapping;
import org.springframework.web.bind.annotation.ResponseBody;

@Controller
@RequestMapping("/user/")
public class UserController {

    @Autowired
    private UserService userService;

    @ResponseBody
    @GetMapping("get/{id}")
    public User getUser(@PathVariable(name = "id") Integer id) {
        return userService.getUser(id);
    }

    @ResponseBody
    @GetMapping("save")
    public User saveUser(User user) {
        return userService.saveUser(user);
    }

    @ResponseBody
    @GetMapping("delete/{id}")
    public String deleteUser(@PathVariable(name = "id") Integer id) {
        userService.deleteUser(id);
        return "删除成功!";
    }
}
5、启用缓存
1)、启用缓存 : 使用 @EnableCaching 注解启用缓存功能
2)、重新设置redis缓存管理器的序列化方式(默认为jdk自带的对象序列化机制),可参考RedisCacheConfiguration(如下图的位置可以找到该类)(可选),参考自定义redis缓存配置类
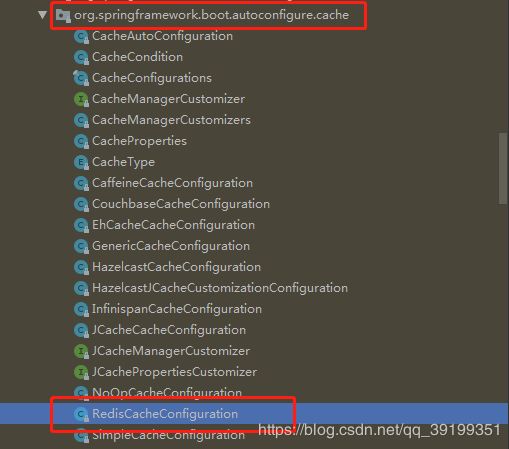
自定义redis缓存配置类
package cn.zrz.springboot.springbootdemo.config;

import cn.zrz.springboot.springbootdemo.entity.User;
import org.springframework.cache.annotation.EnableCaching;
import org.springframework.context.annotation.Bean;
import org.springframework.context.annotation.Configuration;
import org.springframework.data.redis.cache.RedisCacheConfiguration;
import org.springframework.data.redis.cache.RedisCacheManager;
import org.springframework.data.redis.connection.RedisConnectionFactory;
import org.springframework.data.redis.core.RedisTemplate;
import org.springframework.data.redis.serializer.Jackson2JsonRedisSerializer;
import org.springframework.data.redis.serializer.RedisSerializationContext;

@Configuration  //将类标注为配置类
@EnableCaching  //开启缓存
public class MyRedisCacheConfiguration {

    @Bean
    public RedisTemplate redisTemplate(RedisConnectionFactory redisConnectionFactory) {
        RedisTemplate<Object, User> redisTemplate = new RedisTemplate<>();
        redisTemplate.setConnectionFactory(redisConnectionFactory);
        //设置默认缓存序列器为json序列化器
        redisTemplate.setDefaultSerializer(new Jackson2JsonRedisSerializer<User>(User.class));
        return redisTemplate;
    }

    //springboot 1.x 创建方式
    /*@Bean
    public RedisCacheManager cacheManager(RedisTemplate myRedisTemplate) {
        RedisCacheManager cacheManager = new RedisCacheManager(myRedisTemplate);
        cacheManager.setUsePrefix(true);
        return cacheManager;
    }*/

    //springboot 2.x 创建方式
    @Bean
    public RedisCacheManager cacheManager(RedisConnectionFactory redisConnectionFactory) {
        //配置缓存管理器为json序列化器
        RedisCacheConfiguration config = RedisCacheConfiguration.defaultCacheConfig()
                .serializeValuesWith(RedisSerializationContext.SerializationPair.fromSerializer(new Jackson2JsonRedisSerializer<User>(User.class)));

        //使用自定义的配置构建缓存管理器
        RedisCacheManager cacheManager = RedisCacheManager.builder(redisConnectionFactory).cacheDefaults(config).build();

        return cacheManager;
    }
}
6、运行springboot项目测试效果
6.1、测试@Cacheable效果
1)浏览器第一次访问获取数据的链接,正常访问并返回对象结果

2)、控制台打印SQL语句,即执行了方法并查询了数据库
3)、数据也存进redis数据库中,并且以json格式存储

4)、浏览器再次访问获取数据的链接,控制台未打印SQL语句,说明没有操作数据库,即使用了缓存

总结:设置 @Cacheable 注解的方法只有在对应的缓存不存在时才执行方法,并返回结果缓存起来。
6.2 测试@CachePut效果
1)、浏览器访问修改链接并修改id=1的数据,修改成功并返回修改后的对象

2)、查看控制台,打印了调用update语句修改数据库中的数据

3)、查看redis数据库也同样发生了变化

4)、再次访问获取数据链接,控制台没有SQL,即方法执行后数据更新并将返回结果再次放入缓存中

总结:设置 @CachePut 注解的方法无论缓存是否存在,每次都会执行方法并更新缓存(不存在时则将返回结果缓存起来)。
6.3 测试@CacheEvict效果
1)、浏览器访问删除链接,删除成功

2)、控制台方法里的删除语句打印,即程序执行了该方法进行删除操作

3)、redis数据库对应id数据被删除

4)、再次访问获取数据的链接,控制台再次打印SQL语句,说明又查询了数据库,即缓存确实被删除了

总结:设置 @CacheEvict 注解的方法无论缓存是否存在,每次都会执行方法并清除缓存。
7、总结
- 配置数据源和redis主机及端口
- 让实体类对应dao继承 org.springframework.data.jpa.repository.JpaRepository 接口,即dao将具备增删查改及分页、排序等功能(具体可参考JpaRepository的继承关系树)。(此过程为SpringBoot整合SpringData JPA的基本操作)
- 开启缓存以及重新设置redis缓存的序列化器,即编写自己的缓存管理器。(此过程为SpringBoot整合Redis做缓存的基本操作)
- 在所需要使用缓存的方法上设置对应的缓存注解(@Cacheable 、@CachePut、@CacheEvit、@Caching)
有什么不对的地方,欢迎指正!
获取项目源码