用Spring Boot开发JSF应用程序(翻译)
最近要给新毕业大学生做培训,内容是Spring和JavaEE,突发奇想——能不能做基于Spring Boot的JSF开发?结果还真找到了相关的文章,在此斗胆进行尽量原滋原味的翻译,同时把内容补充完整,为需要的朋友提供参考。
先提供原文链接:Developing JSF applications with Spring Boot,急性子的朋友可以先睹为快。本翻译借助了百度翻译的强大功能,特此表示感谢!下面开始进入正题。
用Spring Boot开发JSF应用程序
Spring Boot最初考虑的是微服务应用程序。但是,由于它非常适合作为基于Spring框架的应用程序的起点,许多人已经开始考虑如何将JavaServer Faces(JSF)和Spring Boot集成。在本文中,我们将把所有移动部分放在一起,并构建一个小应用程序,使用户能够将产品列表并持久化到数据库中。
什么是JavaServer Faces(JSF)
JavaServer Faces (JSF) 是一种促进Web应用程序基于组件的用户界面开发的Java规范。JSF上的视图是通过称为视图模板的XML文件描述的,通常依靠服务器端会话来存储UI组件的状态。例如,假设我们想要显示产品的HTML表格。为此,我们需要具有以下内容的XML文件:
<html xmlns="http://www.w3.org/1999/xhtml"
      xmlns:ui="http://xmlns.jcp.org/jsf/facelets"
      xmlns:h="http://xmlns.jcp.org/jsf/html"
      xmlns:f="http://xmlns.jcp.org/jsf/core">
<ui:composition template="base-layout.xhtml">
    <ui:define name="content">
        <h:form id="form">
            <h:dataTable id="table" var="product" value="#{productListController.products}">
                <h:column>
                    <f:facet name="header">Namef:facet>
                    <h:outputText value="#{product.name}" />
                h:column>
                <h:column>
                    <f:facet name="header">Actionf:facet>
                    <h:commandButton id="delete" action="#{productListController.delete(product)}" label="Delete" />
                h:column>
            h:dataTable>
        h:form>
    ui:define>
ui:composition>
html>
在这种情况下,视图将通过使用h:dataTable组件在名为productListController的后台bean的帮助下呈现,该支持bean将为请求者生成HTML响应。呈现网页之后,JSF将保留服务器端视图的状态,以允许将来的交互。
JSF与Spring Boot的集成
对于初学者,我们将fork并clone为本文专门创建的GitHub repo。我们还可以使用Spring Initilizr网页,它简单直观。但是,由于我们将要构建的应用程序将具有一些其他的依赖项(如HSQLDB和Flyway),所以从fork开始会更容易。
JSF依赖项
在fork存储库之后,打开您首选的IDE(Eclipse、IntelliJ IDEA、Netbeans等),并将初始项目作为Maven项目导入。在IDE上正确导入应用程序之后,我们首先要做的是添加一些依赖项。让我们打开pom.xml文件并添加嵌套在
<dependency>
    <groupId>org.apache.myfaces.coregroupId>
    <artifactId>myfaces-implartifactId>
    <version>2.2.12version>
dependency>
<dependency>
    <groupId>org.apache.myfaces.coregroupId>
    <artifactId>myfaces-apiartifactId>
    <version>2.2.12version>
dependency>
<dependency>
    <groupId>org.apache.tomcat.embedgroupId>
    <artifactId>tomcat-embed-jasperartifactId>
dependency>
<dependency>
    <groupId>org.ocpsoft.rewritegroupId>
    <artifactId>rewrite-servletartifactId>
    <version>3.4.1.Finalversion>
dependency>
<dependency>
    <groupId>org.ocpsoft.rewritegroupId>
    <artifactId>rewrite-integration-facesartifactId>
    <version>3.4.1.Finalversion>
dependency>
<dependency>
    <groupId>org.ocpsoft.rewritegroupId>
    <artifactId>rewrite-config-prettyfacesartifactId>
    <version>3.4.1.Finalversion>
dependency>
<dependency>
    <groupId>org.primefacesgroupId>
    <artifactId>primefacesartifactId>
    <version>6.1version>
dependency>
从头到尾,让我们澄清这些依赖关系是什么。前两个依赖项myfaces-api和myfaces-impl是JSF接口规范(-api)和实现(-impl)。第三个依赖项是tomcat-embed-jasper,因此JVM可以在运行时解析和执行JSF视图。
之后,有三个依赖项,其中org.ocpsoft.rewrite作为groupId的值。这些依赖关系与Rewrite,一个Servlet和Java Web框架的开源路由和URL重写解决方案相关。在没有像Rewrite这样的工具的情况下使用JSF将导致使用大量查询参数进行导航的丑陋的和非RESTful友好的URL。因此,我们将使用Rewrite来实现直观、可书签和漂亮的URL。
最后添加的依赖项primefaces是用于JSF的开源UI框架,它具有一百多个组件,如数据表、拖放、覆盖对话框等。这个框架将帮助我们轻松创建漂亮的用户界面。
让我们打开pom.xml文件,通过添加以下行来更改构建过程:
<build>
  <outputDirectory>src/main/webapp/WEB-INF/classesoutputDirectory>

build>
这种配置很重要,因为Rewrite不准备扫描非经典web应用程序(例如,Spring Boot等嵌入式应用程序)上的配置。因此,我们需要稍微调整一下构建过程,以帮助Rewrite实现其目标。
JSF配置
接下来,我们将创建两个XML文件。第一个叫做web.xml,在老练的Java Web开发人员中非常流行。通常,在常规的Spring Boot应用程序中,我们不需要这个文件。但是,因为我们要使用JSF,所以需要配置FacesServlet servlet和几个侦听器。让我们在一个名为src/main/webapp/WEB-INF/的新目录下创建该文件,并添加以下内容:
<web-app xmlns="http://xmlns.jcp.org/xml/ns/javaee" version="3.1">
    <servlet>
        <servlet-name>Faces Servletservlet-name>
        <servlet-class>javax.faces.webapp.FacesServletservlet-class>
        <load-on-startup>1load-on-startup>
    servlet>
    <servlet-mapping>
        <servlet-name>Faces Servletservlet-name>
        <url-pattern>*.jsfurl-pattern>
    servlet-mapping>
    <listener>
        <listener-class>org.springframework.web.context.ContextLoaderListenerlistener-class>
    listener>
    <listener>
        <listener-class>org.springframework.web.context.request.RequestContextListenerlistener-class>
    listener>
web-app>
该文件中的前两个元素负责设置和配置FacesServlet。servlet-mapping元素指示这个servlet处理对*.jsfURL的请求,并在JSF的上下文中处理这些请求。最后两个元素,即listener元素,负责将JSF集成到Spring上下文中。
我们需要的第二个XML文件称为faces-config.xml。让我们在src/main/webapp/WEB-INF/文件夹下创建此文件,其内容如下:
<faces-config xmlns="http://xmlns.jcp.org/xml/ns/javaee"
              xmlns:xsi="http://www.w3.org/2001/XMLSchema-instance"
              xsi:schemaLocation="http://xmlns.jcp.org/xml/ns/javaee
        http://xmlns.jcp.org/xml/ns/javaee/web-facesconfig_2_2.xsd"
              version="2.2">
    <application>
        <el-resolver>org.springframework.web.jsf.el.SpringBeanFacesELResolverel-resolver>
    application>
faces-config>
这个文件所做的全部工作就是注册一个ELResolver(即表达式语言解析器),它把解析名称引用的责任委托给Spring的WebApplicationContext上下文。有了它,我们可以在JSF上下文中使用Spring托管bean。
作为使用Spring Boot配置JSF的最后一步,我们需要更新项目的Application类,以创建另外两个bean。这是通过如下配置这个类来实现的:
package com.auth0.samples.bootfaces;

import org.ocpsoft.rewrite.servlet.RewriteFilter;
import org.springframework.boot.SpringApplication;
import org.springframework.boot.autoconfigure.EnableAutoConfiguration;
import org.springframework.boot.web.servlet.FilterRegistrationBean;
import org.springframework.boot.web.servlet.ServletRegistrationBean;
import org.springframework.boot.web.support.SpringBootServletInitializer;
import org.springframework.context.annotation.Bean;
import org.springframework.context.annotation.ComponentScan;

import javax.faces.webapp.FacesServlet;
import javax.servlet.DispatcherType;
import java.util.EnumSet;

@EnableAutoConfiguration
@ComponentScan({"com.auth0.samples.bootfaces"})
public class Application extends SpringBootServletInitializer {

    public static void main(String[] args) {
        SpringApplication.run(Application.class, args);
    }

    @Bean
    public ServletRegistrationBean servletRegistrationBean() {
        FacesServlet servlet = new FacesServlet();
        return new ServletRegistrationBean(servlet, "*.jsf");
    }

    @Bean
    public FilterRegistrationBean rewriteFilter() {
        FilterRegistrationBean rwFilter = new FilterRegistrationBean(new RewriteFilter());
        rwFilter.setDispatcherTypes(EnumSet.of(DispatcherType.FORWARD, DispatcherType.REQUEST,
                DispatcherType.ASYNC, DispatcherType.ERROR));
        rwFilter.addUrlPatterns("/*");
        return rwFilter;
    }
}
创建XML文件、正确导入依赖项和配置Application类之后,我们就可以在Spring Boot上开始开发JSF应用程序了。
在Spring Boot上创建一个JSF应用程序
由于我们将开发一个列出并保存产品的简单应用程序,因此我们将首先创建Product实体。首先,在com.auth0.samples.bootfaces包中创建Product.java文件。该实体将具有以下代码:
package com.auth0.samples.bootfaces;

import lombok.Data;

import javax.persistence.Column;
import javax.persistence.Entity;
import javax.persistence.GeneratedValue;
import javax.persistence.GenerationType;
import javax.persistence.Id;
import java.math.BigDecimal;

@Data
@Entity
public class Product {
    @Id
    @GeneratedValue(strategy = GenerationType.AUTO)
    private Long id;

    @Column
    private String name;

    @Column
    private BigDecimal price;

    protected Product() {
    }

    public Product(String name, BigDecimal price) {
        this.name = name;
        this.price = price;
    }
}
这是一个非常简单的Product实体,只有三个属性:
id,它保存实体的主键name,它保存产品的名称price,它保持价格
您可能注意到您的IDE开始抱怨@Data注解。这个注解来自lombok库,我们仍然需要将其导入应用程序。Lombok项目旨在减少Java应用程序的许多部分中重复的样板代码,如getters和setters。在上面的实体中,我们使用@Data来消除为实体的属性定义许多访问器方法的负担。Lombok还带来了许多其他特性,看看它的文档。
要导入它,在pom.xml文件中添加以下元素作为dependencies的子元素:
<dependency>
    <groupId>org.projectlombokgroupId>
    <artifactId>lombokartifactId>
    <version>1.16.16version>
dependency>
现在,我们将创建Spring Boot使用的application.properties文件来配置HSQLDB连接字符串,以及Spring Data来禁用Hibernate的自动创建特性。注意,Hibernate是Spring Data的传递依赖项,默认情况下,它读取用Entity注解的类,并尝试为它们创建表。但是,如前所述,在我们的应用程序中,我们将使用Flyway。必须在具有以下内容的src/main/webapp/文件夹中创建application.properties文件:
spring.datasource.url=jdbc:hsqldb:file:data/products
spring.jpa.hibernate.ddl-auto=none
第一个属性配置HSQLDB以将数据持久化到应用程序的根目录的data文件夹,第二个属性禁用Hibernate自动创建特性。由于我们已经禁用了这个特性,我们现在需要添加一个Flyway脚本来创建product表。让我们在src/main/resources/db/migration/文件夹中创建一个名为V1__products.sql的文件。该文件将包含以下脚本:
create table product (
  id identity not null,
  name varchar (255) not null,
  price double not null
);
现在我们已经完成了定义Product实体和一个表,以便在HSQLDB上持久化它,现在我们可以扩展JpaRepositorySpring Boot接口以提供一个托管bean来与数据库通信。为了实现这一点,让我们在com.auth0.samples.bootfaces包中创建一个名为ProductRepository的接口,其内容如下:
package com.auth0.samples.bootfaces;

import org.springframework.data.jpa.repository.JpaRepository;

public interface ProductRepository extends JpaRepository<Product, Long> {
}
有人可能会问,上面的代码是正确的还是有用的?答案是肯定的!JpaRepository接口附带了一些预定义的方法,允许开发人员findAll一个实体的所有实例(在这种情况下为Product)、根据其idgetOne实体、delete实体和save新的实例。所有这些都不需要在扩展这个方法的接口上定义一个方法。
现在我们已经准备好处理前端代码。为了使用户能够通过我们的应用程序创建产品,我们需要创建三个元素:
- 包含JSF应用程序的基本布局的模板。
- 包含用于创建新产品的表单的JSF接口(
xhtml文件)。 - Spring控制器用作表单接口的后台bean。Spring控制器用作表单接口的后台bean。
构建用于创建产品的JSF接口
首先,让我们创建应用程序的模板。这个模板将非常简单。首先,在src/main/webapp/文件夹中创建一个名为layout.xhtml的文件,然后向其中添加以下代码:
<html xmlns="http://www.w3.org/1999/xhtml"
      xmlns:h="http://xmlns.jcp.org/jsf/html"
      xmlns:ui="http://xmlns.jcp.org/jsf/facelets"
      xmlns:f="http://xmlns.jcp.org/jsf/core"
      xmlns:p="http://primefaces.org/ui">
<f:view>
    <h:head>
        <meta charset="utf-8" />
        <meta http-equiv="X-UA-Compatible" content="IE=edge" />
        <meta name="viewport" content="width=device-width, initial-scale=1" />
        <title>Producttitle>
    h:head>
    <h:body>
        <div class="ui-g">
            <div class="ui-g-12">
                <p:toolbar>
                    <f:facet name="left">
                        <p:button href="/" value="List of Products" />
                        <p:button href="/product" value="New Product" />
                    f:facet>
                p:toolbar>
            div>
            <div class="ui-g-12">
                <ui:insert name="content" />
            div>
        div>
    h:body>
f:view>
html>
在JSF上定义视图几乎就像定义一个普通的HTML文件,但是使用几个不同的元素,正如我们在上面看到的。这些元素来自JSF和相关框架(如PrimeFaces)上定义的命名空间。上述布局中最重要的元素是p:toolbar元素和ui:insert元素。第一个是由PrimeFaces提供的组件,我们使用它在模板中定义导航菜单。此菜单将使用户能够转到允许他们创建产品的视图,以及允许他们列出已经创建的产品的另一视图。
第二个元素ui:insert定义了允许子视图定义其内容的模板的确切位置。模板可以有多个ui:insert元素,如果它们用不同的名称定义,但是我们的模板只有一个。
注意,JSF使用一种名为Facelets的技术来定义模板。您可以在Oracle网站上的JavaEE 7教程中阅读所有相关内容。
在定义模板之后,让我们创建Spring控制器,它支持接下来要创建的接口。让我们在com.auth0.samples.bootfaces包中创建一个名为ProductController的类,并添加以下代码:
package com.auth0.samples.bootfaces;

import org.ocpsoft.rewrite.annotation.Join;
import org.ocpsoft.rewrite.el.ELBeanName;
import org.springframework.beans.factory.annotation.Autowired;
import org.springframework.context.annotation.Scope;
import org.springframework.stereotype.Component;

@Scope(value = "session")
@Component(value = "productController")
@ELBeanName(value = "productController")
@Join(path = "/product", to = "/product-form.jsf")
public class ProductController {
    @Autowired
    private ProductRepository productRepository;

    private Product product = new Product();

    public String save() {
        productRepository.save(product);
        product = new Product();
        return "/product-list.xhtml?faces-redirect=true";
    }

    public Product getProduct() {
        return product;
    }
}
这个类只有两个方法:save,JSF按钮将调用它来保存新产品;getProduct,接口将使用它将表单上的输入绑定到Product的实例。这个实例是在ProductController实例的同时创建的,并且在用户保存新产品之后立即创建新的实例。还要注意,save方法重定向到product-list.xhtml,该接口列出了我们数据库中持久存在的产品。
更重要的是,要讨论的是这个类具有的四个注解:
@Scope是一个Spring注解,它定义每个用户将存在此类的单个实例。@Component将该类定义为Spring组件,并将其命名为将在表单的接口中使用的productController名称。@ELBeanName是Rewrite提供的一个注解,用于在其作用域上配置bean的名称。@Join——Rewrite提供的另一个注解——配置/productURL以响应product-form.xhtml的内容。
最后,让我们创建将使用上述控制器的表单。我们将在src/main/webapp/文件夹中创建一个名为product-form.xhtml的文件,其内容如下:
<?xml version="1.0" encoding="UTF-8"?>
<!DOCTYPE html PUBLIC "-//W3C//DTD XHTML 1.0 Transitional//EN"
        "http://www.w3.org/TR/xhtml1/DTD/xhtml1-transitional.dtd">
<html xmlns="http://www.w3.org/1999/xhtml"
      xmlns:h="http://xmlns.jcp.org/jsf/html"
      xmlns:ui="http://xmlns.jcp.org/jsf/facelets" xmlns:p="http://primefaces.org/ui">
<ui:composition template="layout.xhtml">
    <ui:define name="content">
        <h:form id="productForm">
            <p:panel header="Product Details">
                <h:panelGrid columns="1">
                    <p:outputLabel for="name" value="Name: " />
                    <p:inputText id="name" value="#{productController.product.name}" />
                    <p:outputLabel for="price" value="Price: " />
                    <p:inputNumber id="price" value="#{productController.product.price}" />
                    <h:commandButton value="Save" action="#{productController.save}" />
                </h:panelGrid>
            </p:panel>
        </h:form>
    </ui:define>
</ui:composition>
</html>
该文件使用ui:composition元素显式地定义layout.xhtml作为此视图的模板。之后,它使用ui:define通知必须在模板的content区域中呈现该视图。然后它开始定义创建新产品的表单。这个表单由一个p:inputText和一个p:inputNumber元素组成,用户可以定义产品的名称,p:inputNumber元素用户可以定义新产品的价格。最后一个元素专门用于处理数字属性,因为它阻塞非数字字符并向输入添加掩码。
最后,视图定义了一个h:commandButton,它在视图中呈现一个HTML按钮,触发ProductController组件的保存方法。在这个视图中,我们可以看到,我们通过productController名称将新产品和在ProductController组件中定义的行为联系在一起,这个名称是在这个组件的@Component和@ELBeanName注解中定义的。
如果我们现在通过IDE或mvn spring-boot:run命令运行我们的应用程序,我们将能够在一个浏览器中到达它,该浏览器将指向http://localhost:8080/product。我们还可以通过显示给我们的表单创建新产品,但是无法列出创建的产品。现在让我们来处理该特性。
为产品列表构建JSF接口
为了使用户能够看到创建的产品列表,我们将首先定义一个后台bean,该bean将处理接口背后的逻辑。这个后台bean将被称为ProductListController,我们将在com.auth0.samples.bootfaces包中用以下代码创建它:
package com.auth0.samples.bootfaces;

import org.ocpsoft.rewrite.annotation.Join;
import org.ocpsoft.rewrite.annotation.RequestAction;
import org.ocpsoft.rewrite.el.ELBeanName;
import org.ocpsoft.rewrite.faces.annotation.Deferred;
import org.ocpsoft.rewrite.faces.annotation.IgnorePostback;
import org.springframework.beans.factory.annotation.Autowired;
import org.springframework.context.annotation.Scope;
import org.springframework.stereotype.Component;

import java.util.List;

@Scope (value = "session")
@Component (value = "productList")
@ELBeanName(value = "productList")
@Join(path = "/", to = "/product-list.jsf")
public class ProductListController {
    @Autowired
    private ProductRepository productRepository;

    private List<Product> products;

    @Deferred
    @RequestAction
    @IgnorePostback
    public void loadData() {
        products = productRepository.findAll();
    }

    public List<Product> getProducts() {
        return products;
    }
}
类似于ProductController,这个类具有四个注解:
@Scope(value="session")定义每个用户将只有一个此类实例。@Component将该类定义为Spring组件,并将其命名为productList。@ELBeanName在重写范围上配置bean的名称。@Join配置/URL将使用/product-list.jsf接口进行响应。
注意,这个控制器有一个名为loadData的方法,它用@Deferred、@RequestAction和@IgnorePostback注解。在呈现接口之前,需要这些注解来加载产品集合。我们还可以在getProducts中加载这个集合,但是这会使呈现过程变慢,因为在JSF生命周期中会多次调用此方法。
最后,作为上面定义的后台bean的伙伴,我们将创建列出产品的接口。此接口将驻留在product-list.xhtml文件中,位于src/main/webapp/文件夹中,并将包含以下代码:
<html xmlns="http://www.w3.org/1999/xhtml"
      xmlns:ui="http://xmlns.jcp.org/jsf/facelets"
      xmlns:h="http://xmlns.jcp.org/jsf/html"
      xmlns:f="http://xmlns.jcp.org/jsf/core"
      xmlns:p="http://primefaces.org/ui">
<ui:composition template="layout.xhtml">
    <ui:define name="content">
        <h:form id="form">
            <p:panel header="Products List">
                <p:dataTable id="table" var="product" value="#{productList.products}">
                    <p:column>
                        <f:facet name="header"># Idf:facet>
                        <h:outputText value="#{product.id}" />
                    p:column>

                    <p:column>
                        <f:facet name="header">Namef:facet>
                        <h:outputText value="#{product.name}" />
                    p:column>

                    <p:column>
                        <f:facet name="header">Pricef:facet>
                        <h:outputText value="#{product.price}">
                            <f:convertNumber type="currency" currencySymbol="$ " />
                        h:outputText>
                    p:column>
                p:dataTable>
            p:panel>
        h:form>
    ui:define>
ui:composition>
html>
上面创建的接口在PrimeFaces提供的p:dataTable件的帮助下呈现产品集合。此组件通过value属性从后台bean(本例中为ProductListController)接收对象集合,并在其上迭代创建HTML表的行。这个表的列是用p:column元素定义的,PrimeFaces也提供了这个元素。注意,在这个接口中,我们使用了一个名为f:convertNumber的元素来适当地格式化产品的价格。
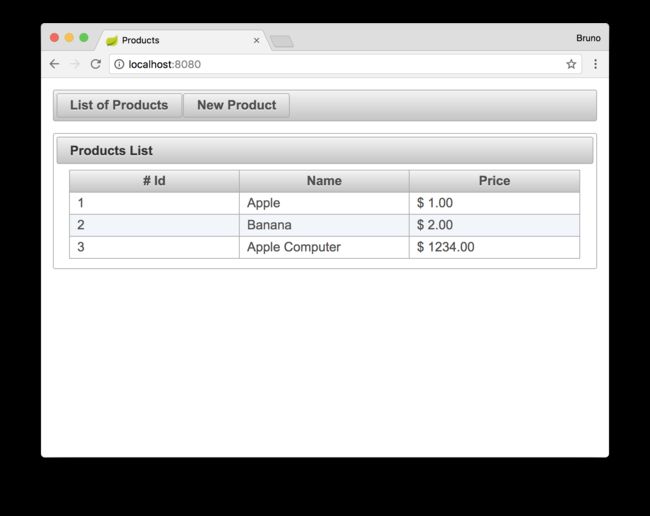
运行应用程序并访问http://localhost:8080URL将显示以下屏幕。

题外话:使用Auth0保护SpringAPI
使用Auth0保护SpringBootAPI很容易,并且为表带来了很多很棒的特性。使用Auth0,我们只需要编写几行代码就可以获得可靠的身份管理解决方案、单点登录、对社交身份提供者(如Facebook、GitHub、Twitter等)的支持,以及对企业身份提供者(如Active Directory、LDAP、SAML、定制等)的支持。
在下面的小节中,我们将学习如何使用Auth0来保护用Spring Boot编写的API。
创建API
首先,我们需要在我们的免费Auth0帐户上创建一个API。为此,我们必须转到管理仪表板的API部分,并点击“创建API”。在出现的对话框中,我们可以将API命名为“Contacts API”(名称并不重要),并将其标识为https://contacts.blog-samples.com(稍后我们将使用这个值)。
注册Auth0依赖项
第二步是导入一个名为auth0-spring-security-api的依赖项。在Maven项目中,可以通过将下列配置包含到pom.xml(在Gradle、Ivy等上进行此操作并不困难)来实现:
<project ...>

    <dependencies>

        <dependency>
            <groupId>com.auth0groupId>
            <artifactId>auth0-spring-security-apiartifactId>
            <version>1.0.0-rc.3version>
        dependency>
    dependencies>
project>
将Auth0与Spring安全集成
第三步包括扩展WebSecurityConfigurerAdapter类。在这个扩展中,我们使用JwtWebSecurityConfigurer来集成Auth0和Spring Security:
package com.auth0.samples.secure;

import com.auth0.spring.security.api.JwtWebSecurityConfigurer;
import org.springframework.beans.factory.annotation.Value;
import org.springframework.context.annotation.Configuration;
import org.springframework.security.config.annotation.method.configuration.EnableGlobalMethodSecurity;
import org.springframework.security.config.annotation.web.builders.HttpSecurity;
import org.springframework.security.config.annotation.web.configuration.EnableWebSecurity;
import org.springframework.security.config.annotation.web.configuration.WebSecurityConfigurerAdapter;

@Configuration
@EnableWebSecurity
@EnableGlobalMethodSecurity(prePostEnabled = true)
public class SecurityConfig extends WebSecurityConfigurerAdapter {
    @Value(value = "${auth0.apiAudience}")
    private String apiAudience;
    @Value(value = "${auth0.issuer}")
    private String issuer;

    @Override
    protected void configure(HttpSecurity http) throws Exception {
        JwtWebSecurityConfigurer
                .forRS256(apiAudience, issuer)
                .configure(http)
                .cors().and().csrf().disable().authorizeRequests()
                .anyRequest().permitAll();
    }
}
由于我们不想硬编码代码中的凭据,因此我们使SecurityConfig依赖于两个环境属性:
auth0.apiAudience:这是我们设置为Auth0上创建的API的标识符的值(https://contacts.blog-samples.com)。auth0.issuer:这是我们Auth0的域,包括HTTP协议。例如:https://blog-samples.auth0.com/。
让我们在Spring应用程序的属性文件(例如,application.properties)中设置它们:
auth0.issuer:https://blog-samples.auth0.com/
auth0.apiAudience:https://contacts.blog-samples.com/
用Auth0保护端点
在集成Auth0和Spring Security之后,我们可以使用Spring Security注解轻松地保护端点:
package com.auth0.samples.secure;

import com.google.common.collect.Lists;
import org.springframework.security.access.prepost.PreAuthorize;
import org.springframework.web.bind.annotation.GetMapping;
import org.springframework.web.bind.annotation.PostMapping;
import org.springframework.web.bind.annotation.RequestBody;
import org.springframework.web.bind.annotation.RequestMapping;
import org.springframework.web.bind.annotation.RestController;

import java.util.List;

@RestController
@RequestMapping(value = "/contacts/")
public class ContactController {
    private static final List<Contact> contacts = Lists.newArrayList(
            Contact.builder().name("Bruno Krebs").phone("+5551987654321").build(),
            Contact.builder().name("John Doe").phone("+5551888884444").build()
    );

    @GetMapping
    public List<Contact> getContacts() {
        return contacts;
    }

    @PostMapping
    public void addContact(@RequestBody Contact contact) {
        contacts.add(contact);
    }
}
现在,为了能够与我们的端点交互,我们必须从Auth0获得访问令牌。有多种方法可以做到这一点,我们将使用的策略取决于我们正在开发的客户端应用程序的类型。例如,如果我们正在开发单页应用程序(SPA),我们将使用所谓的隐式授权。如果我们正在开发一个移动应用程序,我们将使用授权代码授予流与PKCE。8月0日还有其他流量可用。然而,对于像这样的简单测试,我们可以使用Auth0仪表板来获得一个。
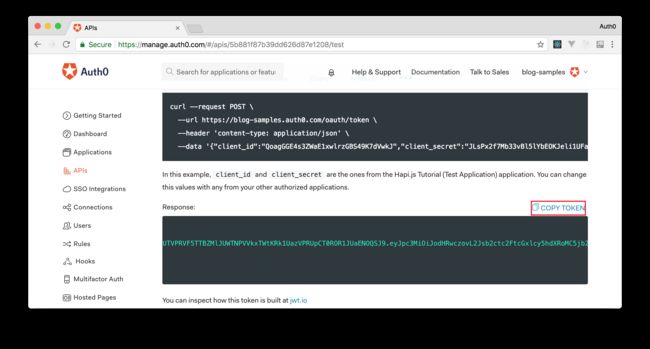
因此,我们可以回到Auth0仪表板中的API部分,单击之前创建的API,然后单击这个API的测试部分。在那里,我们将找到名为Copy Token的按钮。让我们单击这个按钮,将访问令牌复制到剪贴板。

复制此令牌后,可以打开终端并发出以下命令:
# create a variable with our token
ACCESS_TOKEN=<OUR_ACCESS_TOKEN>

# use this variable to fetch contacts
curl -H 'Authorization: Bearer '$ACCESS_TOKEN http://localhost:8080/contacts/
注意:我们必须用从仪表板复制的令牌替换
。
由于我们现在正在对发送到API的请求使用访问令牌,因此我们将设法再次获得联系人列表。
这就是我们如何保护Node.js后端API的方法。容易,对吧?
结论
Spring Boot使开发人员能够通过约定而不是配置来高效地工作。在本文中,我们展示了将这种框架与JSF结合起来是容易的,并且增强了开发人员的能力,使他们更有效率。JSF已经存在很多年了,并且有一个非常好的社区以及许多在Web上编写的内容,可以帮助企业应用程序的开发。
但是,经常困扰开发人员的一个问题是可伸缩性。由于JSF应用程序通常严重依赖于服务器端会话,因此开发人员很难正确地扩展这些应用程序。在下一篇文章中,我将通过使用Spring Session来解决这个问题,Spring Session是一个帮助管理用户会话信息的Spring模块。