Sendmail
简单配置(3)
RHEL5.1
基本网络配置
一、
1
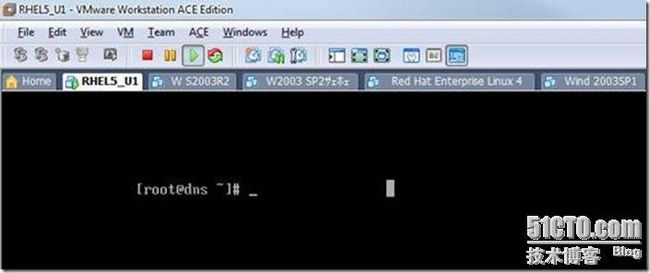
、RHEL5 U1:如图1
(如图1)
2
、#hostname //查看当前主机的主机名:如图2
(如图2)
3
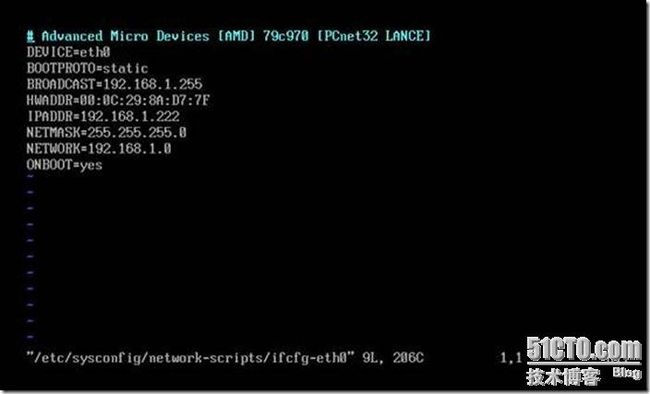
、#vi /etc/sysconfig/network-scripts/ifcfg-eth0 编辑指定网络接口配置文件:如图3
(如图3)
4
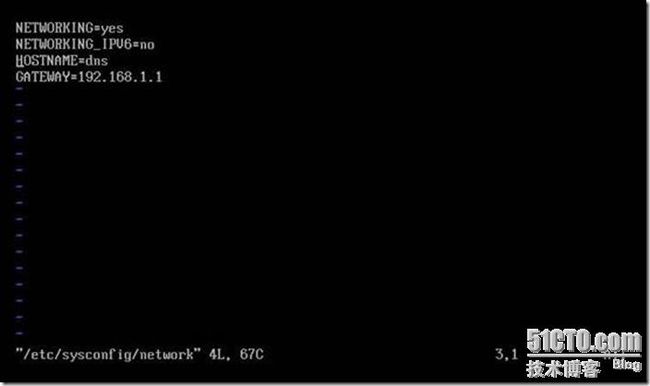
、#vi /etc/sysconfig/network 通过配置文件修改主机名:如图4
(如图4)
5
、在终端字符界面修改其字体和中文字体大小:如图5
(如图5)
6
、挂载光盘:如图6
(如图6)
7
、查看OpenSSH是否安装:如图7
(如图7)
8
、
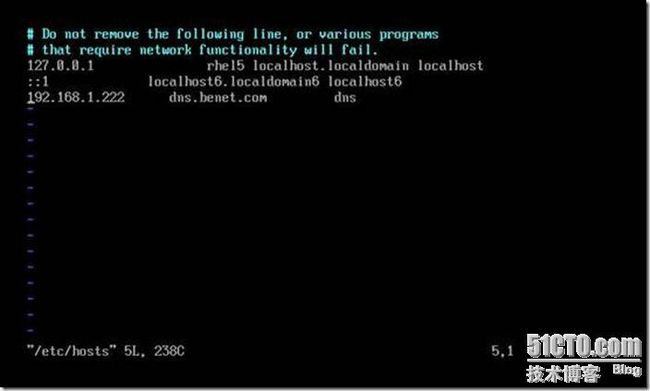
#vi /etc/hosts
设置本地
DNS
解析文件:
如图8
(如图8)
9
、
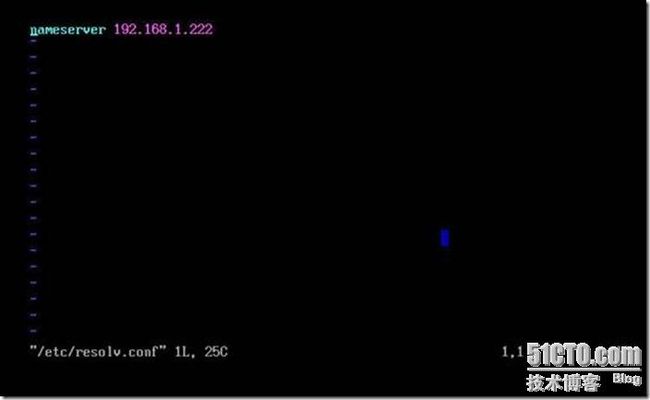
#vi /etc/resolv.conf
指定当前主机的
DNS
服务器,最多可指定三个:
如图9
(如图9)
10
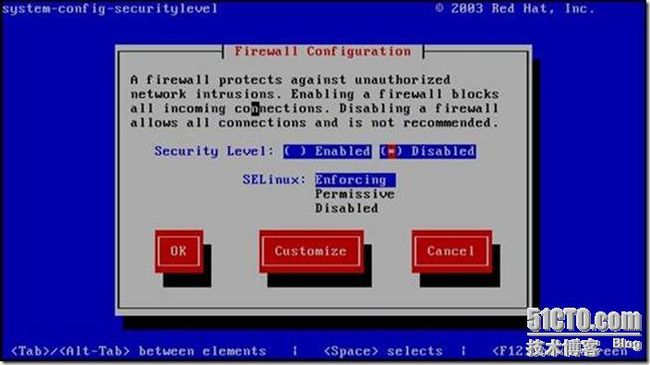
、关闭iptables防火墙:如图10
(如图10)
二、DNS简单配置
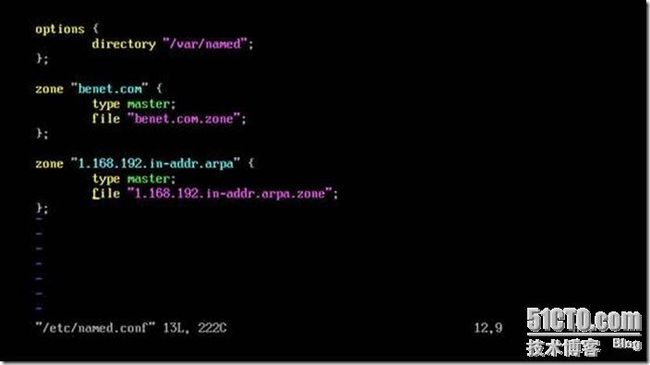
1
、vim /etc/named.conf
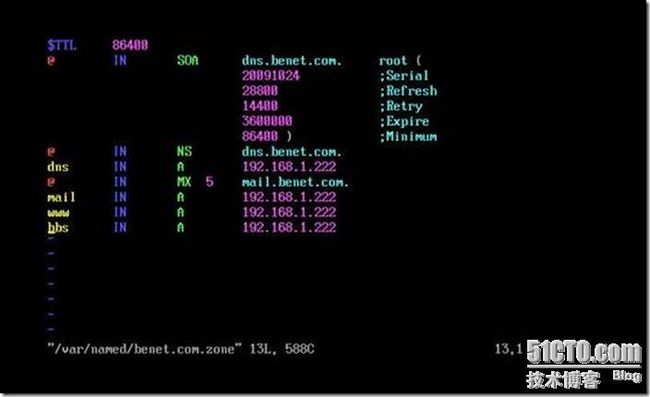
2
、vim /var/named/benet.com.zone
3
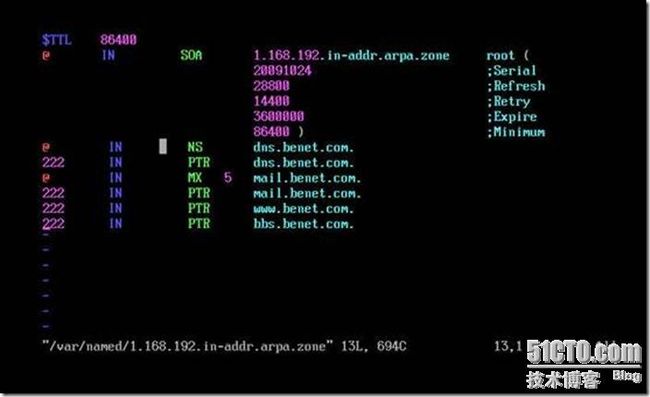
、vim /var/named/1.168.192.in-addr.arpa.zone
4
、重启named服务
[root@dns ~]# service named restart
停止 named: [失败]
启动 named: [确定]
[root@dns ~]# chkconfig --list named
named 0:关闭 1:关闭 2:关闭 3:关闭 4:关闭 5:关闭 6:关闭
[root@dns ~]# chkconfig --level 2345 named on
[root@dns ~]# chkconfig --list named
named 0:关闭 1:关闭 2:启用 3:启用 4:启用 5:启用 6:关闭
5
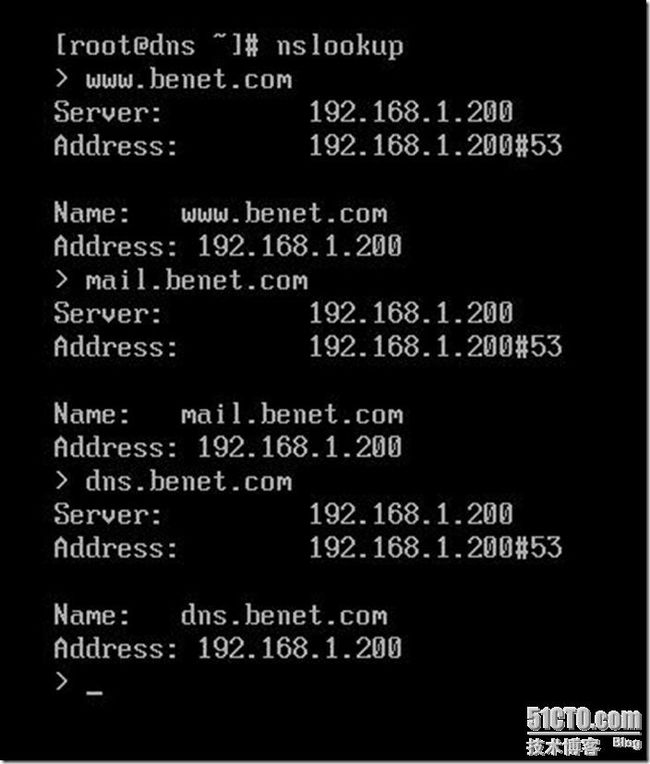
、nslookup查看
三、sendmail简单配置
1
、
修改
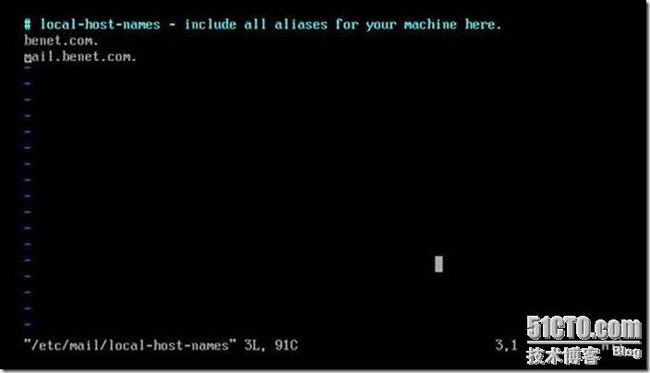
local-host-names
文件添加域名及主机名
vim /etc/mail/local-host-names
[root@dns Server]# m4 /etc/mail/sendmail.mc > /etc/mail/sendmail.cf
[root@dns Server]# vim /etc/mail/local-host-names
# local-host-names - include all aliases for your machine here.
benet.com.
mail.benet.com.
~
~
~
"/etc/mail/local-host-names" 3L, 91C 已写入
[root@dns Server]#
2
、确保
sasl
库已经安装
[root@dns Server]# rpm -qa | grep cyrus-sasl
cyrus-sasl-lib-2.1.22-4
cyrus-sasl-2.1.22-4
cyrus-sasl-plain-2.1.22-4
cyrus-sasl-devel-2.1.22-4
[root@dns Server]# rpm -qa cyrus-sasl
cyrus-sasl-2.1.22-4
[root@dns Server]# rpm -qa cyrus-sasl-lib
cyrus-sasl-lib-2.1.22-4
3
、安装sendmail
root@dns ~]# mount /dev/hdc /mnt/dvd/
mount: block device /dev/hdc is write-protected, mounting read-only
[root@dns ~]# cd /mnt/dvd/Server/
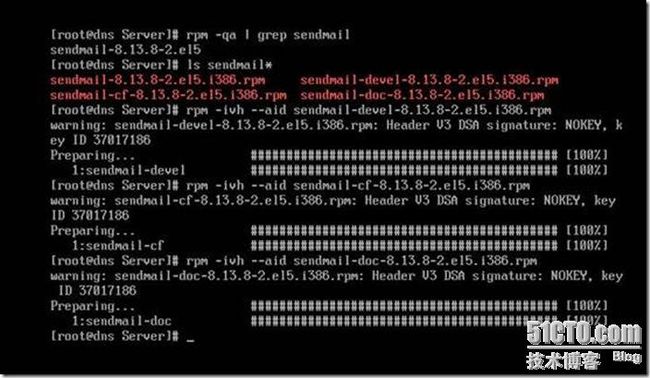
[root@dns Server]# rpm -qa | grep sendmail
sendmail-8.13.8-2.el5
[root@dns Server]# ls sendmail*
sendmail-8.13.8-2.el5.i386.rpm sendmail-devel-8.13.8-2.el5.i386.rpm
sendmail-cf-8.13.8-2.el5.i386.rpm sendmail-doc-8.13.8-2.el5.i386.rpm
[root@dns Server]# rpm -ivh --aid sendmail-cf-8.13.8-2.el5.i386.rpm
warning: sendmail-cf-8.13.8-2.el5.i386.rpm: Header V3 DSA signature: NOKEY, key ID 37017186
Preparing... ########################################### [100%]
1:sendmail-cf ########################################### [100%]
[root@dns Server]# rpm -ivh --aid sendmail-devel-8.13.8-2.el5.i386.rpm
warning: sendmail-devel-8.13.8-2.el5.i386.rpm: Header V3 DSA signature: NOKEY, key ID 37017186
Preparing... ########################################### [100%]
1:sendmail-devel ########################################### [100%]
[root@dns Server]# rpm -ivh --aid sendmail-doc-8.13.8-2.el5.i386.rpm
warning: sendmail-doc-8.13.8-2.el5.i386.rpm: Header V3 DSA signature: NOKEY, key ID 37017186
Preparing... ########################################### [100%]
1:sendmail-doc ########################################### [100%]
[root@dns Server]#
[root@dns Server]# rpm -qa | grep sendmail
sendmail-devel-8.13.8-2.el5
sendmail-doc-8.13.8-2.el5
sendmail-cf-8.13.8-2.el5
sendmail-8.13.8-2.el5
[root@dns Server]# rpm -qa | grep m4
m4-1.4.5-3.el5.1
4
、修改
开启sendmai认证
(
vim /etc/mail/sendmail.mc
)
去掉以下三行的
dnl字段开启sendmail认证功能
52行
TRUST_AUTH_MECH(`EXTERNAL DIGEST-MD5 CRAM-MD5 LOGIN PLAIN')dnl
53行 define(`confAUTH_MECHANISMS', `EXTERNAL GSSAPI DIGEST-MD5 CRAM-MD5 LOGIN PLAIN')dnl
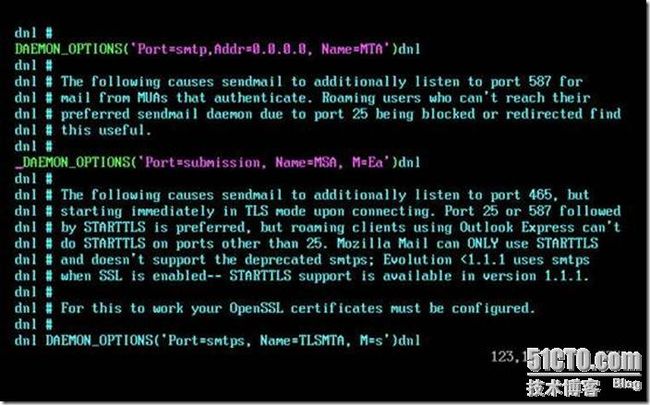
123行 DAEMON_OPTIONS(`Port=submission, Name=MSA, M=Ea')dnl
53行 define(`confAUTH_MECHANISMS', `EXTERNAL GSSAPI DIGEST-MD5 CRAM-MD5 LOGIN PLAIN')dnl
123行 DAEMON_OPTIONS(`Port=submission, Name=MSA, M=Ea')dnl
修改
52
行和
53
行
修改
123
行
5
、修改
116
行
第
116行
将smtp侦听范围从127.0.0.1改为0.0.0.0
6
、修改第
155
行
第
155行修改成自己域:
LOCAL_DOMAIN(`benet.com')dnl
7
、默认
175
行
8
、
设置用户用户邮件的大小限制(
187
行)
在sendmail.mc中没有这个选项,这个要在sendmail.cf中设置
vim /etc/mail/sendmail.cf
默认不限制:
# maximum message size
#O MaxMessageSize=0
#O MaxMessageSize=0
我们可以设置成邮件最大不超过20MB
# maximum message size
O MaxMessageSize=20971520
O MaxMessageSize=20971520
意思为每次收发邮件最大为20MB,任何超过这个值的邮件将被拒绝。
9
、
使用
m4
命令生成
sendmail.cf
文件
m4 /etc/mail/sendmail.mc > /etc/mail/sendmail.cf
10
、邮件用户账户的设置
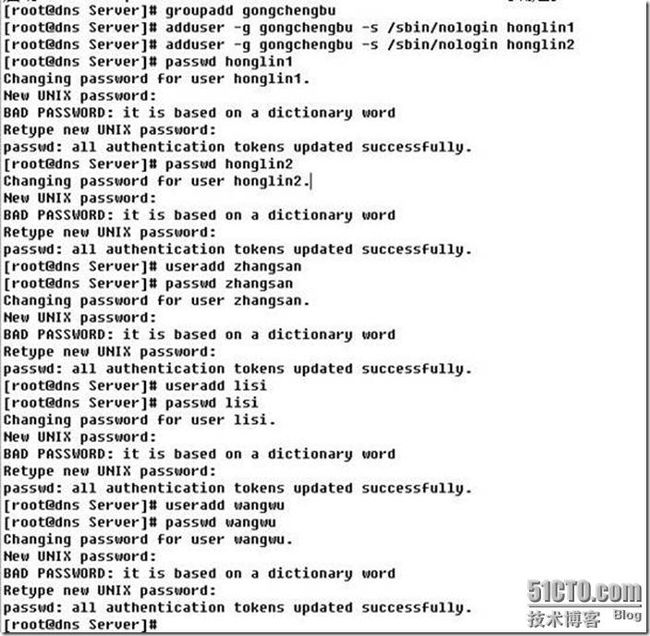
[root@dns Server]# groupadd gongchengbu
[root@dns Server]# adduser -g gongchengbu -s /sbin/nologin honglin1
[root@dns Server]# adduser -g gongchengbu -s /sbin/nologin honglin2
[root@dns Server]# passwd honglin1
Changing password for user honglin1.
New UNIX password:
BAD PASSWORD: it is based on a dictionary word
Retype new UNIX password:
passwd: all authentication tokens updated successfully.
[root@dns Server]# passwd honglin2
Changing password for user honglin2.
New UNIX password:
BAD PASSWORD: it is based on a dictionary word
Retype new UNIX password:
passwd: all authentication tokens updated successfully.
[root@dns Server]# useradd zhangsan
[root@dns Server]# passwd zhangsan
Changing password for user zhangsan.
New UNIX password:
BAD PASSWORD: it is based on a dictionary word
Retype new UNIX password:
passwd: all authentication tokens updated successfully.
[root@dns Server]# useradd lisi
[root@dns Server]# passwd lisi
Changing password for user lisi.
New UNIX password:
BAD PASSWORD: it is based on a dictionary word
Retype new UNIX password:
passwd: all authentication tokens updated successfully.
[root@dns Server]# useradd wangwu
[root@dns Server]# passwd wangwu
Changing password for user wangwu.
New UNIX password:
BAD PASSWORD: it is based on a dictionary word
Retype new UNIX password:
passwd: all authentication tokens updated successfully.
11
、设置邮件别名和邮件群发功能
[root@dns Server]# ls /etc/aliases
/etc/aliases
[root@dns Server]# ls /etc/aliases*
/etc/aliases /etc/aliases.db
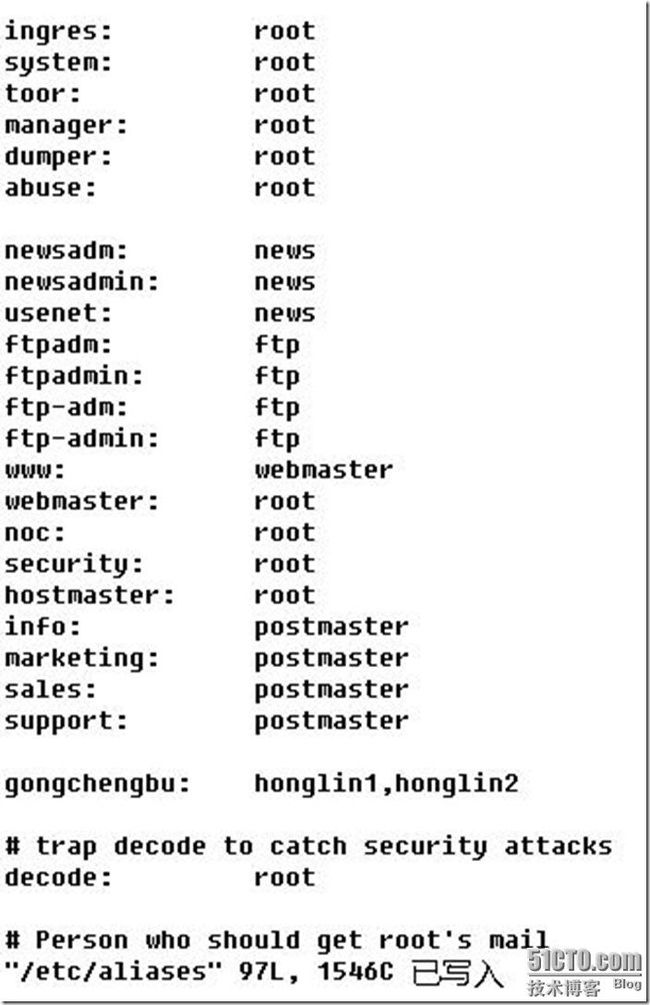
[root@dns Server]# vim /etc/aliases
ftp-admin: ftp
www: webmaster
webmaster: root
noc: root
security: root
hostmaster: root
info: postmaster
marketing: postmaster
sales: postmaster
support: postmaster
gongchengbu: honglin1,honglin2
# trap decode to catch security attacks
decode: root
# Person who should get root's mail
"/etc/aliases" 97L, 1546C 已写入
[root@dns Server]#
12
、通过
newaliases
生成
aliases.db
文件
[root@dns Server]# newaliases
/etc/aliases: 77 aliases, longest 17 bytes, 793 bytes total
13
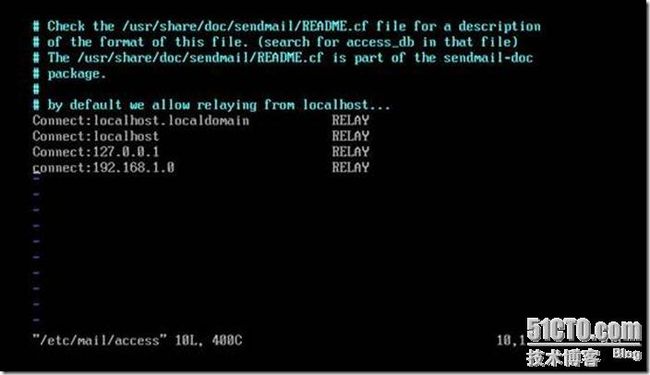
、修改
vim /etc/mail/access
14
、通过
“makemap hash access.db < access”
生成数据库文件
[root@dns Server]# makemap hash /etc/mail/access.db < /etc/mail/access
[root@dns Server]#
[root@dns Server]# service sendmail restart
关闭 sm-client: [确定]
关闭 sendmail: [确定]
启动 sendmail: [确定]
启动 sm-client: [确定]
四、配置磁盘配额
1
、
vim /etc/fstab
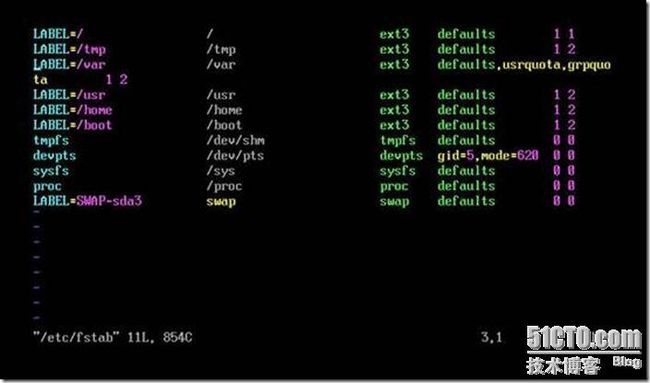
添加/var文件系统参数
LABEL=/var /var ext3 defaults,usrquota,grpquota 1 2
usrquota
为用户的配额参数,
grpquota
为组的配额参数
[root@dns Server]# vim /etc/fstab
LABEL=/ / ext3 defaults 1 1
LABEL=/tmp /tmp ext3 defaults 1 2
LABEL=/var /var ext3 defaults,usrquota,grpquota 1
2
LABEL=/usr /usr ext3 defaults 1 2
LABEL=/home /home ext3 defaults 1 2
LABEL=/boot /boot ext3 defaults 1 2
tmpfs /dev/shm tmpfs defaults 0 0
devpts /dev/pts devpts gid=5,mode=620 0 0
sysfs /sys sysfs defaults 0 0
proc /proc proc defaults 0 0
LABEL=SWAP-sda3 swap swap defaults 0 0
~
~
"/etc/fstab" 11L, 854C 已写入
2
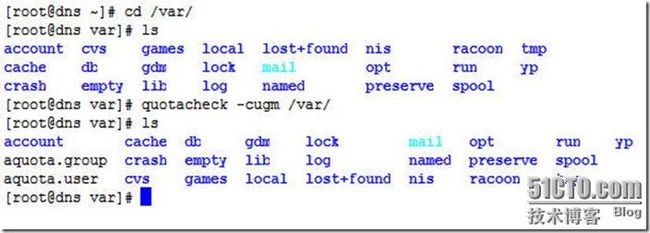
、创建配额文件
因为存放邮件信息的/var目录在独立的分区哈~所以我们使用
quotachek命令在/var目录下分别为用户和组创建配额文件
quotacheck -cugm /var
3
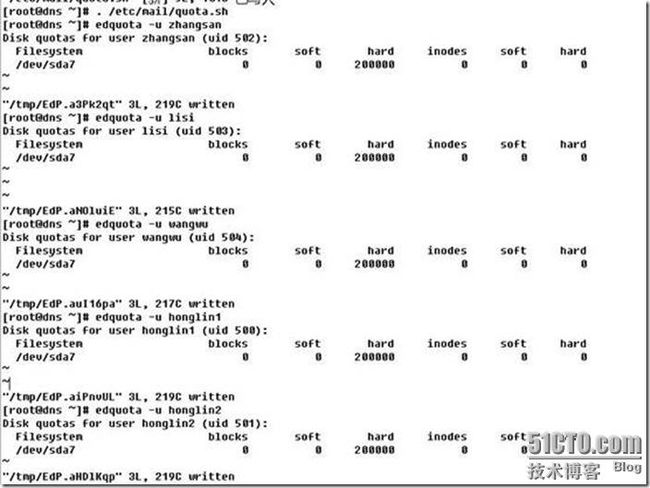
、设置磁盘配额
为用户和组设置详细的配额限制,我们可以使用
edquota命令进行磁盘配额的设置哈~
edquota
命令格式:
edquota -u
用户名
edquota -g
组名
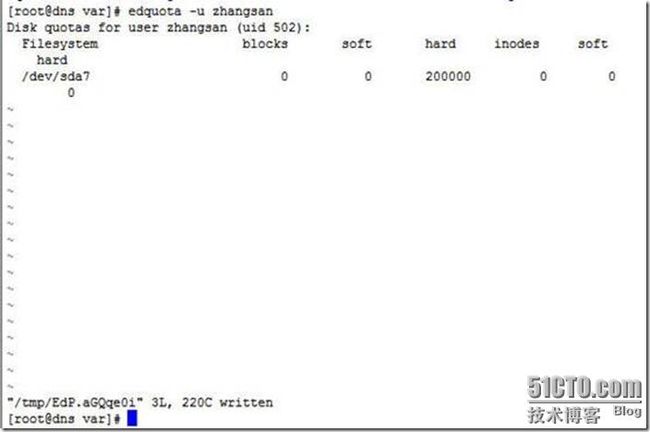
比如为用户
zhangsan配置磁盘配额限制,执行
edquota命令,打开用户配额配置文件
edquota -u zhangsan
4
、使磁盘配额生效
命令:
quotaon -augv
目录名
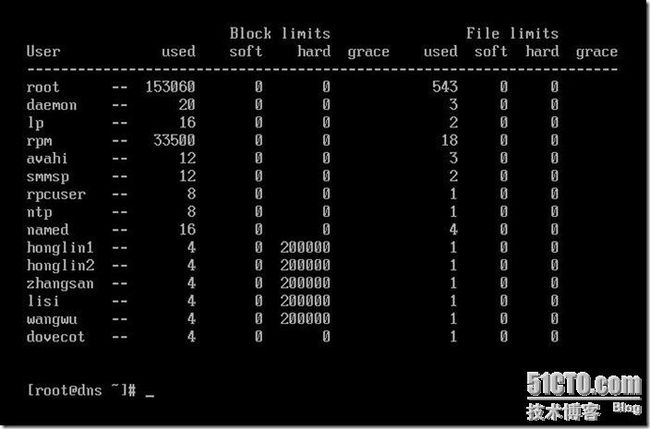
参数:
-a 开启在/ect/fstab文件里,有加入quota设置的分区的空间限制。
-g 开启群组的磁盘空间限制。
-u 开启用户的磁盘空间限制。
-v 显示指令指令执行过程。
-a 开启在/ect/fstab文件里,有加入quota设置的分区的空间限制。
-g 开启群组的磁盘空间限制。
-u 开启用户的磁盘空间限制。
-v 显示指令指令执行过程。
quotaon -av
5、
查看磁盘配额状态
Repquota -a
6
、
注意:
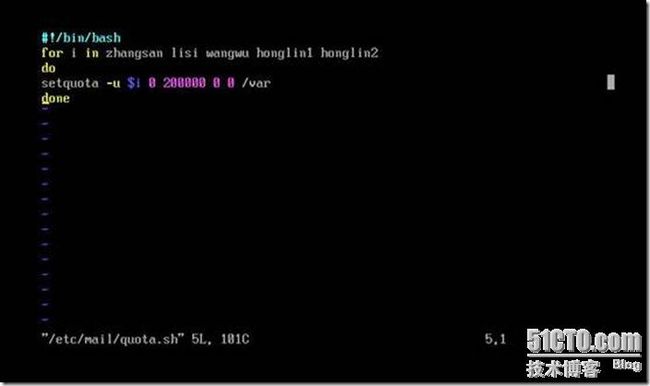
如果企业员工较多,那么像这样一个个为每个员工单独配置磁盘配额将会增加我们管理的难度哈~这里我们可以建立一个样简单的脚本,将所有用户的磁盘空间科学硬限制为200MB。
在/etc/mail/目录下创建一个quota.sh磁盘配额脚本文件
vim /etc/mail/quota.sh
[root@dns ~]#
vim /etc/mail/quota.sh
#!/bin/bash
for i in zhangsan lisi wangwu honglin1 honglin2
do
setquota -u $i 0 200000 0 0 /var
done
~
~
~
"/etc/mail/quota.sh" [新] 5L, 101C 已写入
[root@dns ~]#
. /etc/mail/quota.sh
7、
. /etc/mail/quota.sh执行此脚本并查看
8、执行
quotaoff -av后执行
quotaon -av使设置的磁盘配额生效
五、安装
Dovecot
软件包(
POP3
和
IMAP
)
1
、安装
dovecot
[root@dns Server]# rpm -ivh --aid mysql-5.0.45-7.el5.i386.rpm
warning: mysql-5.0.45-7.el5.i386.rpm: Header V3 DSA signature: NOKEY, key ID 37017186
error: Failed dependencies:
perl(DBI) is needed by mysql-5.0.45-7.el5.i386
[root@dns Server]# rpm -ivh --aid perl-DBI-1.52-2.el5.i386.rpm
warning: perl-DBI-1.52-2.el5.i386.rpm: Header V3 DSA signature: NOKEY, key ID 37017186
Preparing... ########################################### [100%]
1:perl-DBI ########################################### [100%]
[root@dns Server]# rpm -ivh --aid mysql-5.0.45-7.el5.i386.rpm
warning: mysql-5.0.45-7.el5.i386.rpm: Header V3 DSA signature: NOKEY, key ID 37017186
Preparing... ########################################### [100%]
1:mysql ########################################### [100%]
[root@dns Server]# rpm -ivh --aid dovecot-1.0.7-7.el5.i386.rpm
warning: dovecot-1.0.7-7.el5.i386.rpm: Header V3 DSA signature: NOKEY, key ID 37017186
Preparing... ########################################### [100%]
1:dovecot ########################################### [100%]
2
、生成私钥和自签名证书
Mail服务器会使用私钥加密邮件,客户端在收取邮件时,则使用Mail服务器证书中的公钥对邮件进行解密,这样才能正常读取邮件哈~,
/etc/pki/tls/certs/Makefile文件保存着生成密钥和证书的脚本设置,这里使用make命令制作
dovecot.pem文件,其保存邮件服务器的私钥和公钥信息。
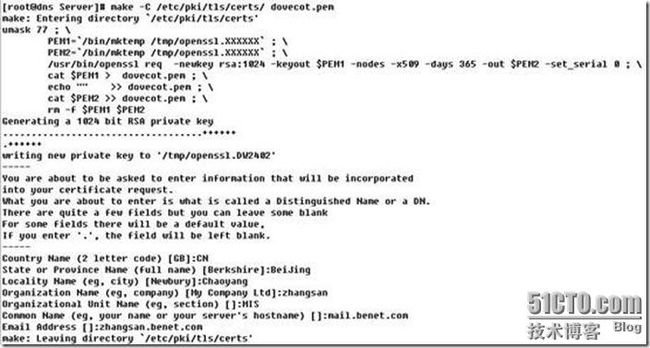
make -C /etc/pki/tls/certs/ dovecot.pem
生成证书时,按要求依次填写国家、省份、城市等等信息
[root@dns Server]# make -C /etc/pki/tls/certs/ dovecot.pem
make: Entering directory `/etc/pki/tls/certs'
umask 77 ; \
PEM1=`/bin/mktemp /tmp/openssl.XXXXXX` ; \
PEM2=`/bin/mktemp /tmp/openssl.XXXXXX` ; \
/usr/bin/openssl req -newkey rsa:1024 -keyout $PEM1 -nodes -x509 -days 365 -out $PEM2 -set_serial 0 ; \
cat $PEM1 > dovecot.pem ; \
echo "" >> dovecot.pem ; \
cat $PEM2 >> dovecot.pem ; \
rm -f $PEM1 $PEM2
Generating a 1024 bit RSA private key
...................................++++++
.++++++
writing new private key to '/tmp/openssl.DW2402'
-----
You are about to be asked to enter information that will be incorporated
into your certificate request.
What you are about to enter is what is called a Distinguished Name or a DN.
There are quite a few fields but you can leave some blank
For some fields there will be a default value,
If you enter '.', the field will be left blank.
-----
Country Name (2 letter code) [GB]:CN
State or Province Name (full name) [Berkshire]:BeiJing
Locality Name (eg, city) [Newbury]:Chaoyang
Organization Name (eg, company) [My Company Ltd]:zhangsan
Organizational Unit Name (eg, section) []:MIS
Common Name (eg, your name or your server's hostname) []:mail.benet.com
Email Address []:zhangsan.benet.com
make: Leaving directory `/etc/pki/tls/certs'
3
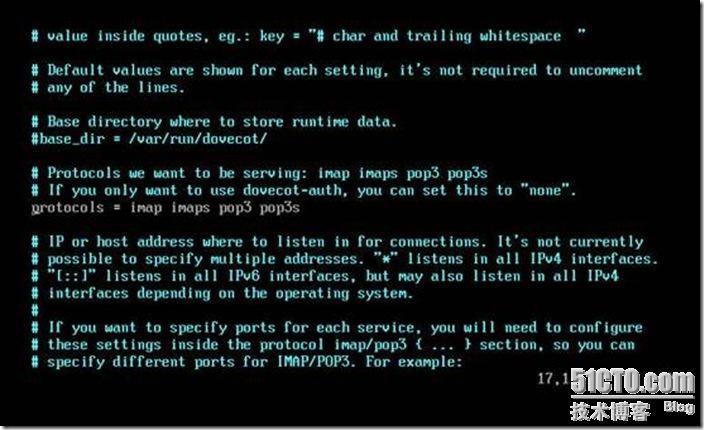
、修改
dovecot.conf
配置文件
1
)、修改
17
行,去掉前面
#
2
)、修改
87-88
行,去掉前面
#
,并修改
88
行内容
3
)、重启
sendmail
、
dovecot
、
saslauthd
服务
[root@dns Server]# service sendmail restart
关闭 sm-client: [确定]
关闭 sendmail: [确定]
启动 sendmail: [确定]
启动 sm-client: [确定]
[root@dns Server]# service dovecot restart
停止 Dovecot Imap: [失败]
启动 Dovecot Imap: [确定]
[root@dns Server]# service saslauthd restart
停止 saslauthd: [失败]
启动 saslauthd: [确定]
[root@dns Server]# chkconfig --list sendmail
sendmail 0:关闭 1:关闭 2:启用 3:启用 4:启用 5:启用 6:关闭
[root@dns Server]# chkconfig --list dovecot
dovecot 0:关闭 1:关闭 2:关闭 3:关闭 4:关闭 5:关闭 6:关闭
[root@dns Server]# chkconfig --level 2345 dovecot on
[root@dns Server]# chkconfig --list dovecot
dovecot 0:关闭 1:关闭 2:启用 3:启用 4:启用 5:启用 6:关闭
[root@dns Server]# chkconfig --list saslauthd
saslauthd 0:关闭 1:关闭 2:关闭 3:关闭 4:关闭 5:关闭 6:关闭
[root@dns Server]# chkconfig --level 2345 saslauthd on
[root@dns Server]# chkconfig --list saslauthd
saslauthd 0:关闭 1:关闭 2:启用 3:启用 4:启用 5:启用 6:关闭
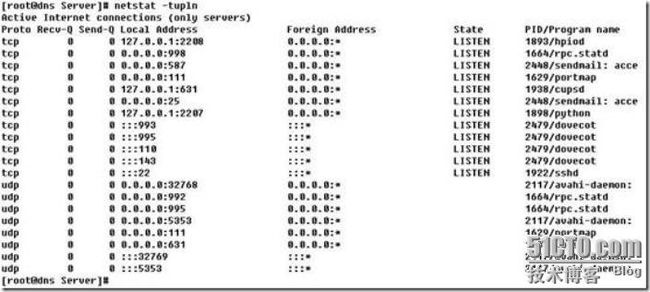
4
)、查看端口状态
[root@dns Server]# netstat -tupln
Active Internet connections (only servers)
Proto Recv-Q Send-Q Local Address Foreign Address State PID/Program name
tcp 0 0 127.0.0.1:2208 0.0.0.0:* LISTEN 1893/hpiod
tcp 0 0 0.0.0.0:998 0.0.0.0:* LISTEN 1664/rpc.statd
tcp 0 0 0.0.0.0:587 0.0.0.0:* LISTEN 2448/sendmail: acce
tcp 0 0 0.0.0.0:111 0.0.0.0:* LISTEN 1629/portmap
tcp 0 0 127.0.0.1:631 0.0.0.0:* LISTEN 1938/cupsd
tcp 0 0 0.0.0.0:25 0.0.0.0:* LISTEN 2448/sendmail: acce
tcp 0 0 127.0.0.1:2207 0.0.0.0:* LISTEN 1898/python
tcp 0 0 :::993 LISTEN 2479/dovecot
tcp 0 0 :::995 LISTEN 2479/dovecot
tcp 0 0 :::110 LISTEN 2479/dovecot
tcp 0 0 :::143 LISTEN 2479/dovecot
tcp 0 0 :::22 LISTEN 1922/sshd
udp 0 0 0.0.0.0:32768 0.0.0.0:* 2117/avahi-daemon:
udp 0 0 0.0.0.0:992 0.0.0.0:* 1664/rpc.statd
udp 0 0 0.0.0.0:995 0.0.0.0:* 1664/rpc.statd
udp 0 0 0.0.0.0:5353 0.0.0.0:* 2117/avahi-daemon:
udp 0 0 0.0.0.0:111 0.0.0.0:* 1629/portmap
udp 0 0 0.0.0.0:631 0.0.0.0:* 1938/cupsd
udp 0 0 :::32769 2117/avahi-daemon:
udp 0 0 :::5353 2117/avahi-daemon:
[root@dns Server]#
六、测试
1
、服务器状态
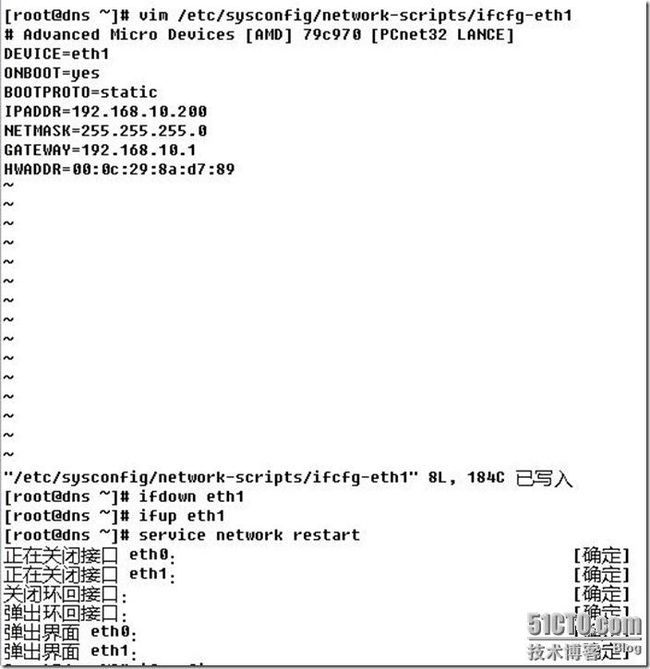
eth1网卡192.168.10.200
2
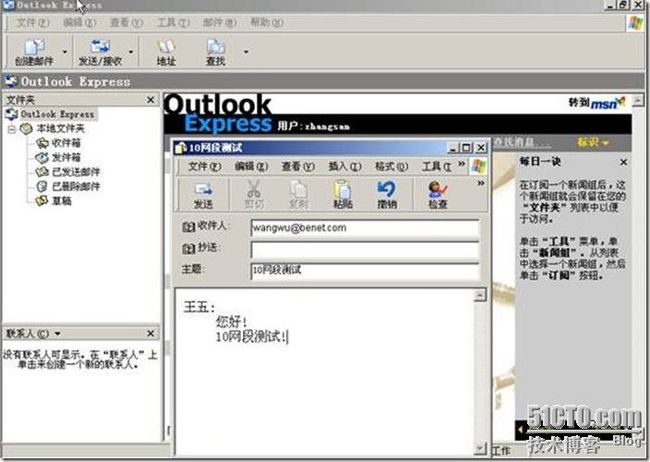
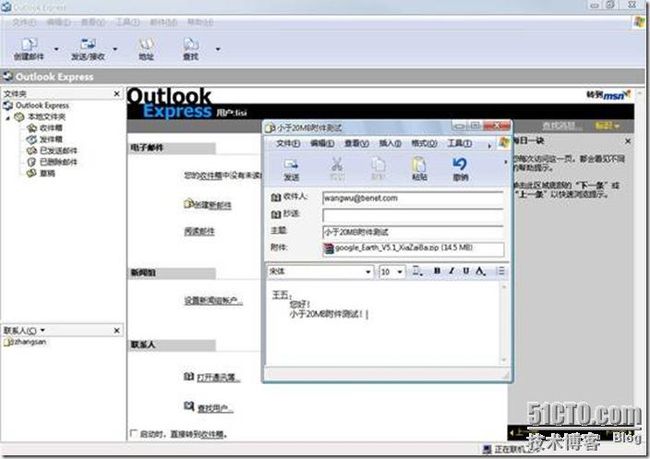
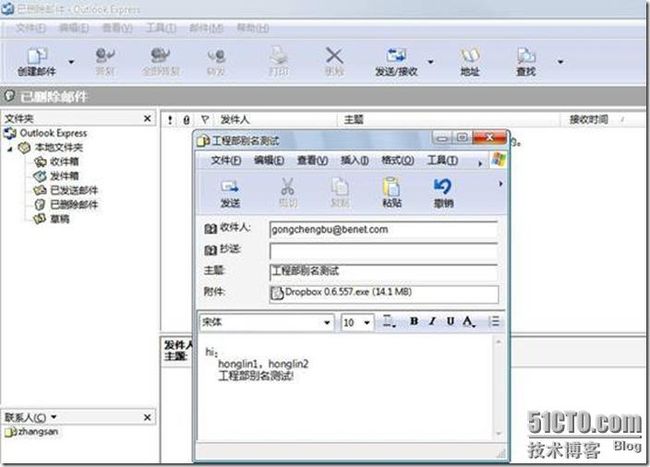
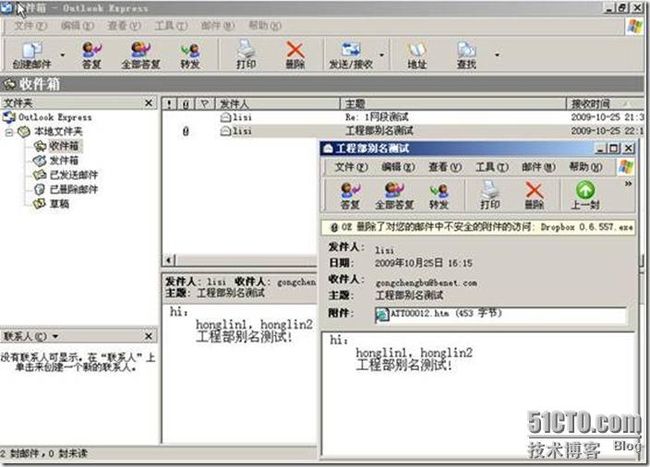
、客户端测试
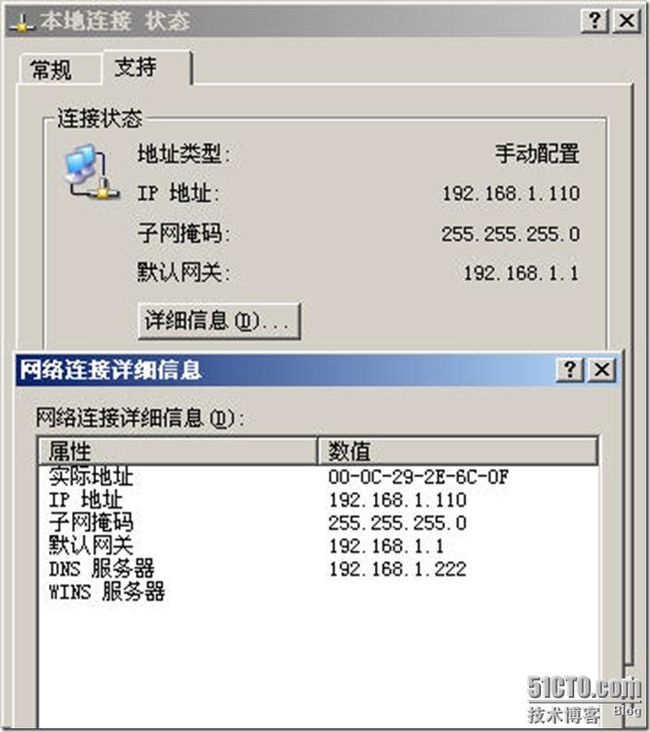
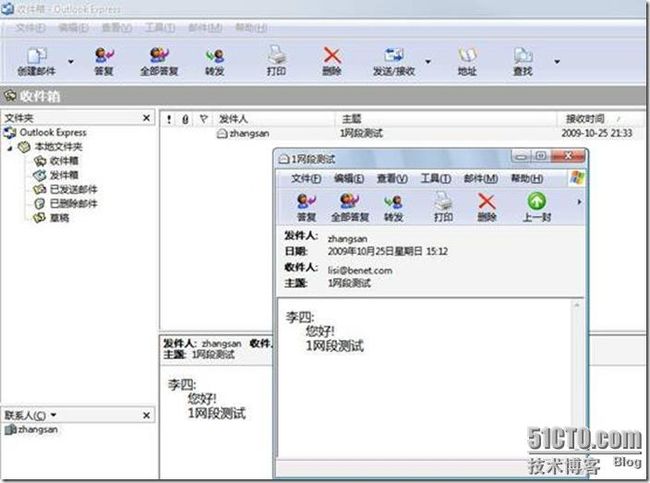
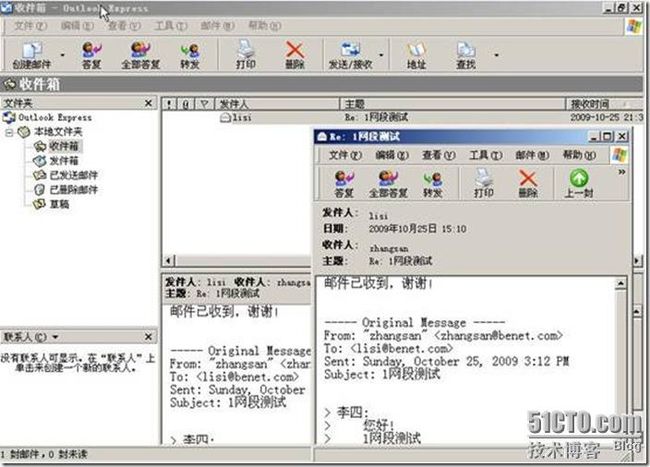
1
)、
192.168.1.0/24
位测试
2
)、
192.168.1.0/24
和
192.168.10.0/24
网段测试
3
)、小于
20MB
附件测试
4
)、别名邮件测试
5
)、大于
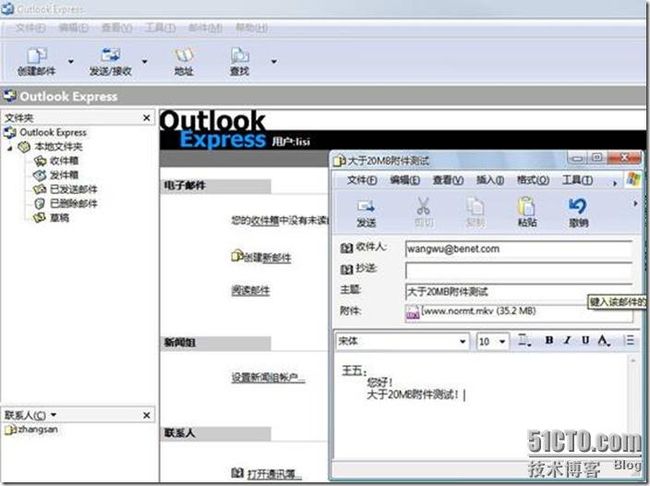
20MB
附件测试
6)、repquota –a 查看
配置文件在附件里面:
如有不懂的地方,请call我!qq:357714938 mail:[email protected]
