2019独角兽企业重金招聘Python工程师标准>>> 
运维工作中通常会遇到需要安装软件,需要在多台主机上安装同一个软件,如果是一台一台去安装配置,这样既耗精力又要花费大量时间,因此,为了减少这些重复性工作。我们都会使用不同的方法来实现自动化,自动在多台主机上实现软件的安装及配置。在开源界也提供了大量这样的工具,或者如果自己使用不爽,也可以自己写一个。这里不展开介绍多种开源自动化运维工具,由于个人对ansible使用比较熟悉,所以这里就用ansible来实现部分系统的配置和tomcat的安装及简单配置。
ansible简单介绍
ansible是基于模块工作的,它的每种功能都依赖于模块,ansible自身只是一个框架,它能够指挥着远程主机做某些操作,但是每一个特定操作都需要模块来实现,比如依赖yum模块,可以让远程工具用yum源的方式安装应用程序或者卸载应用程序,可以基于command模块让远程主机执行命令等。
如果需要让远程主机同时运行多个任务,此时就需要多项配置,这多项配置可以定义在一个文本文件中,让ansible通过读取这个文件一次性把任务都执行完,而此文件就叫playbook,playbook是yaml格式的
架构(architecture)
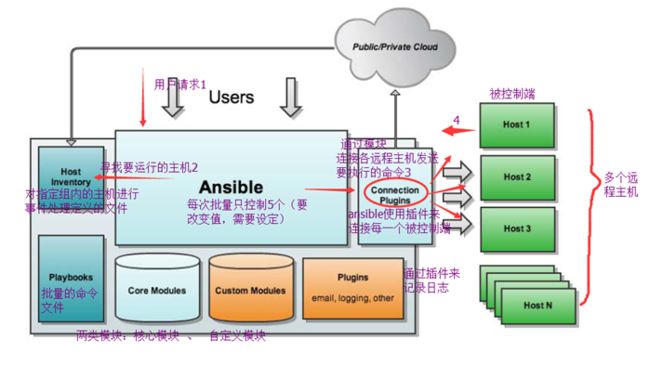
ansible是通过指挥着多个远程主机来完成运维工作,hostX是远程主机(被指挥端),ansible连接每一个被指挥端让其能够工作时,是使用连接插件(Connection Plugins)向每一个被控制端发起连接请求,这个连接请求是ssh的,ansible需要读取配置文件,在配置文件中事先定义好有主机组,这些主机组都是分别做不同的功用的,就要依赖于(Host Inventory),这个文件可以静态的(手动编写好)也可以动态生成,这个文件中把事先分好组,而后使用ansible指挥操作时,ansible会自动读取那个配置文件,去获取指定组名下都有哪些主机而后仅去连接所指定的组名下的主机,在默认情况ansible只控制5台节点,5个完成后就接着去执行下面的5个,一批一批去执行,要改变其值可以自己设定,ansible模块有两类:核心模块、自定义模块(可以使用多种语言开发属于自己的模块),【工作过程:用户指定主机,ansible读取Inventory获取主机,然后去连接主机,并且借助模块,通过Connection Plugins向主机发送指令,每一个节点运行指令,并返回结果】,要使用其他什么功能都可以通过加载对应的插件来实现。
开始之前,首先是准备工作,看自己的需求,我这里是要实现时间同步和禁用ipv6功能、安装及简单配置tomcat。这里不去介绍ansible的使用。
把各需求细分:
1.common
配置好时间同步 > /dev/null中
禁用ipv6
2.app中
1.复制jdk过去
2.安装jdk
3.配置好环境变量
执行环境变量文件
4.复制tomcat过去,解压即可
5.创建软连接
6.配置好环境变量
执行环境变量文件
启动脚本需要提供
7.设置触发器,修改配置文件
8传送过去
这里我使用两个roles,一个common、一个app。在common中实现通用的功能配置时间同步和禁用ipv6,在app中实现tomcat的安装。如果是要实现多个不同主机进行多种不同的操作,可以通过setup模块获取各主机的信息,通过指定不同主机的标识来进行不同的操作。如:
tasks:
- name: "shutdown Debian flavored systems"
command: /sbin/shutdown -h now
when: ansible_os_family == "Debian"
当主机的操作系统为D耳边时,会执行关机动作
ansible all –m setup 获取远程主机信息
官网https://www.ansible.com/ 是基于Python研发,python-jinja2是模板语言,ansible基于 agent less依赖于python-paramiko程序。
环境及配置
# cat /etc/redhat-release
CentOS release 6.8 (Final)
2G内存 2核
使用的主机
test1 test5 test6
192.168.40.101 192.168.40.105 192.168.40.106
A.准备工作
在test1上安装ansible
安装ansible,先配置好yum源
把
[epel]
name=Epel package install
baseurl=https://mirrors.aliyun.com/epel/6/x86_64/
enabled=1
gpgcheck=0
添加到/etc/yum.repos.d/CentOS-Base.repo文件中
yum install –y ansible 即可安装ansible
rpm –ql ansible
/etc/ansible/ansible.cfg 主配置文件
/etc/ansible/hosts 主机分组定义的文件
/usr/bin/ansible-playbook 运行定义好的playbook程序
/usr/bin/ansible-doc ansible帮助信息的程序
/usr/bin/ansible-vault 程序是把playbook文件加密存放的,读取时可以通过vault解密之后去执行playbook文件
/usr/bin/ansible-pull 工作在推送模式
。。。。。。。。
ansible –h 查看帮助
命令格式: -m 模块名称 -a 模块参数
# ansible
常用模块
模块:
command 这里不能执行管道
user
copy
cron
file
filesystem
group
hostname
ping
yum
service
shell 可以执行管道
script
获取模块使用帮助
ansible-doc –l 显示所有可用模块
ansible-doc MODULE_NAME
使用密钥实现单向信任
ssh-keygen –t rsa –P ‘’
ssh-copy-id –i .ssh/id_rsa.pub 192.168.40.105
# ssh 192.168.40.105 'hostname'
test5 输出不用输入密码说明OK了
ssh-copy-id –i .ssh/id_rsa.pub 192.168.40.106
# ssh 192.168.40.106 'hostname'
test6
用ansible模块实现密钥认证
用ansible提供的模块方式,来自动实现公用的远程传送,ansible提供了authorized_key模块,可以实现本地公钥复制到多个远程主机上,并且放到对应用户家目录的.ssh/authorized_keys文件中,并且权限也不需要修改,从而实现密钥的认证。但是需要在/etc/ansible/hosts文件中提供远程用户的密码。
实现方式:
/etc/ansible/hosts文件内容如下:
[test]
192.168.40.105 ansible_ssh_pass=123456
192.168.40.106 ansible_ssh_pass=123456
authorized_key模块的使用可用ansible-doc authorized_key查看
新增yml文件,内容如下:
# cat autho.yml
---
- name: authorized
hosts: test
tasks:
- name: authorized remote
authorized_key: user=root key="{{ lookup('file', lookup('env','HOME') + '/.ssh/id_rsa.pub') }}"
检查一下语法
# ansible-playbook autho.yml --syntax-check
playbook: autho.yml
执行yml文件
# ansible-playbook autho.yml
PLAY [authorized] **************************************************************
TASK [setup] *******************************************************************
ok: [192.168.40.106]
ok: [192.168.40.105]
TASK [authorized remote] *******************************************************
changed: [192.168.40.105]
changed: [192.168.40.106]
PLAY RECAP *********************************************************************
192.168.40.105 : ok=2 changed=1 unreachable=0 failed=0
192.168.40.106 : ok=2 changed=1 unreachable=0 failed=0
查看authorized_keys文件是否创建成功
# ansible all -m command -a 'ls /root/.ssh/'
192.168.40.105 | SUCCESS | rc=0 >>
authorized_keys
192.168.40.106 | SUCCESS | rc=0 >>
authorized_keys
对比公钥内容是否一致
# cat .ssh/id_rsa.pub
ssh-rsa AAAAB3NzaC1yc2EAAAABIwAAAQEAlq0JFI60Wu/tKid/a3O5i8+EbxSAgOcn9icELNF7iN8DC4hEOOtCr2Y4xd3LUw0pp4bRU1NyM8YSrXPCBk4VpaZ6s3A4+a/KEorsoKRCeVx6h5KsQUJO54LsRglMDsZf12/GAqqEpCO4uu2UCx7bTaL5r997UCLr2Y2aDvuvRDTWhCYlq3kiGpQLUMbf8pPbONBoswBYmKVJ3KDFk4qO296hcNBjDQlURNulxvTiR3rT/AkhgJezyIGix/9wQXIowWgDwDd1l0iPyMcxpxHW35QNmvA9OvDetLa7hup2GAK997sCkPS1pGpEjGr4j4svJxmVjQt3qE2pv8WYW+6CTw== root@test1
# ansible all -m command -a 'cat /root/.ssh/authorized_keys'
192.168.40.105 | SUCCESS | rc=0 >>
ssh-rsa AAAAB3NzaC1yc2EAAAABIwAAAQEAlq0JFI60Wu/tKid/a3O5i8+EbxSAgOcn9icELNF7iN8DC4hEOOtCr2Y4xd3LUw0pp4bRU1NyM8YSrXPCBk4VpaZ6s3A4+a/KEorsoKRCeVx6h5KsQUJO54LsRglMDsZf12/GAqqEpCO4uu2UCx7bTaL5r997UCLr2Y2aDvuvRDTWhCYlq3kiGpQLUMbf8pPbONBoswBYmKVJ3KDFk4qO296hcNBjDQlURNulxvTiR3rT/AkhgJezyIGix/9wQXIowWgDwDd1l0iPyMcxpxHW35QNmvA9OvDetLa7hup2GAK997sCkPS1pGpEjGr4j4svJxmVjQt3qE2pv8WYW+6CTw== root@test1
192.168.40.106 | SUCCESS | rc=0 >>
ssh-rsa AAAAB3NzaC1yc2EAAAABIwAAAQEAlq0JFI60Wu/tKid/a3O5i8+EbxSAgOcn9icELNF7iN8DC4hEOOtCr2Y4xd3LUw0pp4bRU1NyM8YSrXPCBk4VpaZ6s3A4+a/KEorsoKRCeVx6h5KsQUJO54LsRglMDsZf12/GAqqEpCO4uu2UCx7bTaL5r997UCLr2Y2aDvuvRDTWhCYlq3kiGpQLUMbf8pPbONBoswBYmKVJ3KDFk4qO296hcNBjDQlURNulxvTiR3rT/AkhgJezyIGix/9wQXIowWgDwDd1l0iPyMcxpxHW35QNmvA9OvDetLa7hup2GAK997sCkPS1pGpEjGr4j4svJxmVjQt3qE2pv8WYW+6CTw== root@test1
修改/etc/ansible/hosts
[test]
192.168.40.105
192.168.40.106
测试执行yml文件是否需要输入密码
# ansible all -m command -a 'hostname'
192.168.40.106 | SUCCESS | rc=0 >>
test6
192.168.40.105 | SUCCESS | rc=0 >>
test5
不需要输入密码了,一切都OK
把需要的软件包都放到/usr/local/src目录下
apache-tomcat-7.0.42.tar.gz jdk-7u67-linux-x64.rpm
B.配置主机组
编辑/etc/ansible/hosts时,先备份
cp /etc/ansible/hosts /etc/ansible/hosts_$(date +%F_%H:%M)
cat /etc/ansible/hosts
[test]
192.168.40.105
192.168.40.106
测试是否OK
# ansible test -m ping
192.168.40.105 | SUCCESS => {
"changed": false,
"ping": "pong"
}
192.168.40.106 | SUCCESS => {
"changed": false,
"ping": "pong"
}
说明都OK
C.写roles和playbook
根据需求写两个roles
1.common
配置好时间同步 > /dev/null中
禁用ipv6
2.app中
1.复制jdk过去
2.安装jdk
3.配置好环境变量
执行环境变量文件
4.复制tomcat过去,解压即可
5.创建软连接
6.配置好环境变量
执行环境变量文件
启动脚本需要提供
7.设置触发器,修改配置文件
8传送过去
创建好目录
mkdir /usr/local/src/roles/{common/{tasks,handlers,files},{app/{tasks,handlers,files}}}
把apache-tomcat-7.0.42.tar.gz、jdk-7u67-linux-x64.rpm、jdk.sh、server.xml、tomcat、tomcat.sh
jdk.sh是添加环境变量的
# cat roles/app/files/jdk.sh
#!/bin/bash
#
#
PATH_DIR=/usr/local/src
PROPATH=/etc/profile.d
cat > ${PROPATH}/java.sh << EOF
export JAVA_HOME=/usr/java/jdk1.7.0_67
export PATH=/usr/java/jdk1.7.0_67/bin:\${PATH}
EOF
source ${PROPATH}/java.sh
server.xml是tomcat的主配置文件这个文件根据需求自己改
tomcat是启动脚本
#!/bin/sh
# Tomcat init script for linux.
#
#chkconfig: 2345 98 12
# descriptioin: The Apache Tomcat servlet/JSP container.
#
JAVA_HOME=/usr/java/latest
CATALINA_HOME=/usr/local/tomcat
export JAVA_HOME CATALINA_HOME
case $1 in
start)
exec $CATALINA_HOME/bin/catalina.sh start;;
stop)
exec $CATALINA_HOME/bin/catalina.sh stop;;
restart)
exec $CATALINA_HOME/bin/catalina.sh stop
sleep 2
exec $CATALINA_HOME/bin/catalina.sh start;;
configtest)
exec $CATALINA_HOME/bin/catalina.sh configtest;;
*)
echo "Usage: 'basename $0' {start|stop|restart|configtest}"
exit 1
;;
esac
tomcat.sh是添加环境变量和简单配置主配置文件的
#!/bin/bash
#
#
PATH_DIR=/usr/local/src
PROPATH=/etc/profile.d
DEST_DIR=/usr/local
TOMCAT_VERSION=apache-tomcat-7.0.55
CONF=/usr/local/tomcat/conf/server.xml
#for file in $(ls ${PATH_DIR})
#do
# if [ "${file}" == "${TOMCAT_VERSION}.tar.gz" ];then
# tar xf ${PATH_DIR}/${TOMCAT_VERSION}.tar.gz -C ${DEST_DIR}
# ln -sv ${DEST_DIR}/${TOMCAT_VERSION} ${DEST_DIR}/tomcat
# break
# fi
#done
cat > ${PROPATH}/tomcat.sh << EOF
export CATALINA_HOME=${DEST_DIR}/tomcat
export PATH=${DEST_DIR}/tomcat/bin:\${PATH}
EOF
source ${PROPATH}/tomcat.sh
#AJP protocal comments
#
#
sed -i 's@
# modified tomcat configuration file character utf-8
#
# redirectPort="8443" />
#
# redirectPort="8443" URIEncoding="UTF-8" useBodyEncodingForURI="true" />
sed -i ':a;N;$!ba;s@redirectPort="8443" />@redirectPort="8443" URIEncoding="UTF-8" useBodyEncodingForURI="true" />@' ${CONF}
在/usr/local/src/目录下创建app.yml,内容如何
---
- name: tomcat install
hosts: test
roles:
- common
- app
1.common
配置好时间同步 > /dev/null中
禁用ipv6
# cat roles/common/tasks/main.yml
---
- name: setting datetime sync
cron: name="datatime sync" minute="*/5" job="/usr/sbin/ntpdate time.windows.com > /dev/null"
- name: disable ipv6 all
sysctl: name="net.ipv6.conf.all.disable_ipv6" value=1 sysctl_set=yes state=present reload=yes
- name: disable ipv6 default
sysctl: name="net.ipv6.conf.default.disable_ipv6" value=1 sysctl_set=yes state=present reload=yes
- name: disable ipv6 lo
sysctl: name="net.ipv6.conf.lo.disable_ipv6" value=1 sysctl_set=yes state=present reload=yes
2.app中
1.复制jdk过去
2.安装jdk
3.配置好环境变量
执行环境变量文件
4.复制tomcat过去,解压即可
5.创建软连接
6.配置好环境变量
执行环境变量文件
启动脚本需要提供
7.设置触发器,修改配置文件
8传送过去
# cat roles/app/handlers/main.yml
---
- name: restart tomcat
service: name=tomcat state=restarted
# cat roles/app/tasks/main.yml
---
- name: copy jdk to remote host
copy: src=jdk-7u67-linux-x64.rpm dest=/usr/local/src
- name: install jdk
yum: name=/usr/local/src/jdk-7u67-linux-x64.rpm state=present
- name: config jdk env
script: /usr/local/src/roles/app/files/jdk.sh
- name: copy unarchive tomcat to remote host
unarchive: src=/usr/local/src/roles/app/files/apache-tomcat-7.0.42.tar.gz dest=/usr/local copy=yes
- name: create soft link
file: src=/usr/local/apache-tomcat-7.0.42 dest=/usr/local/tomcat state=link
- name: copy tomcat init script for linux
copy: src=tomcat dest=/etc/rc.d/init.d/ mode='a+x'
- name: install tomcat
script: /usr/local/src/roles/app/files/tomcat.sh
- name: configuration file
copy: src=server.xml dest=/usr/local/tomcat/conf/server.xml
notify: restart tomcat
- name: start tomcat
service: name=tomcat enabled=yes state=started
最终的目录结构为:
# pwd
/usr/local/src
# tree .
.
├── apache-tomcat-7.0.42.tar.gz
├── app.yml
├── jdk-7u67-linux-x64.rpm
├── roles
│ ├── app
│ │ ├── files
│ │ │ ├── apache-tomcat-7.0.42.tar.gz
│ │ │ ├── jdk-7u67-linux-x64.rpm
│ │ │ ├── jdk.sh
│ │ │ ├── server.xml
│ │ │ ├── tomcat
│ │ │ └── tomcat.sh
│ │ ├── handlers
│ │ │ └── main.yml
│ │ └── tasks
│ │ └── main.yml
│ └── common
│ ├── files
│ ├── handlers
│ └── tasks
│ └── main.yml
└── tengine-2.0.1.tar.gz
D.执行playbook
# ansible test -m command -a 'crontab –l' 远程主机无crontab
192.168.40.106 | FAILED | rc=1 >>
no crontab for root
192.168.40.105 | FAILED | rc=1 >>
no crontab for root
# ansible test -m command -a 'ifconfig eth0' 远程主机ipv6未禁用
192.168.40.105 | SUCCESS | rc=0 >>
eth0 Link encap:Ethernet HWaddr 00:0C:29:56:9C:E1
inet addr:192.168.40.105 Bcast:192.168.40.255 Mask:255.255.255.0
inet6 addr: fe80::20c:29ff:fe56:9ce1/64 Scope:Link
UP BROADCAST RUNNING MULTICAST MTU:1500 Metric:1
RX packets:16873 errors:0 dropped:0 overruns:0 frame:0
TX packets:9864 errors:0 dropped:0 overruns:0 carrier:0
collisions:0 txqueuelen:1000
RX bytes:19181636 (18.2 MiB) TX bytes:716948 (700.1 KiB)
192.168.40.106 | SUCCESS | rc=0 >>
eth0 Link encap:Ethernet HWaddr 00:0C:29:4A:CB:A1
inet addr:192.168.40.106 Bcast:192.168.40.255 Mask:255.255.255.0
inet6 addr: fe80::20c:29ff:fe4a:cba1/64 Scope:Link
UP BROADCAST RUNNING MULTICAST MTU:1500 Metric:1
RX packets:23568 errors:0 dropped:0 overruns:0 frame:0
TX packets:14044 errors:0 dropped:0 overruns:0 carrier:0
collisions:0 txqueuelen:1000
RX bytes:29443133 (28.0 MiB) TX bytes:1011683 (987.9 KiB)
# ansible test -m command -a 'ls /usr/local/' 远程主机没有tomcat
192.168.40.105 | SUCCESS | rc=0 >>
bin
etc
games
include
lib
lib64
libexec
sbin
share
src
192.168.40.106 | SUCCESS | rc=0 >>
bin
etc
games
include
lib
lib64
libexec
sbin
share
src
检查是否yaml写的是否有语法错误
# ansible-playbook app.yml --syntax-check
playbook: app.yml
执行yaml
# ansible-playbook app.yml
PLAY [tomcat install] **********************************************************
TASK [setup] *******************************************************************
ok: [192.168.40.106]
ok: [192.168.40.105]
TASK [common : setting datetime sync] ******************************************
changed: [192.168.40.105]
changed: [192.168.40.106]
TASK [common : disable ipv6 all] ***********************************************
changed: [192.168.40.105]
changed: [192.168.40.106]
TASK [common : disable ipv6 default] *******************************************
changed: [192.168.40.105]
changed: [192.168.40.106]
TASK [common : disable ipv6 lo] ************************************************
changed: [192.168.40.105]
changed: [192.168.40.106]
TASK [app : copy jdk to remote host] *******************************************
changed: [192.168.40.106]
changed: [192.168.40.105]
TASK [app : install jdk] *******************************************************
changed: [192.168.40.106]
changed: [192.168.40.105]
TASK [app : config jdk env] ****************************************************
changed: [192.168.40.105]
changed: [192.168.40.106]
TASK [app : copy unarchive tomcat to remote host] ******************************
changed: [192.168.40.105]
changed: [192.168.40.106]
TASK [app : create soft link] **************************************************
changed: [192.168.40.106]
changed: [192.168.40.105]
TASK [app : copy tomcat init script for linux] *********************************
changed: [192.168.40.106]
changed: [192.168.40.105]
TASK [app : install tomcat] ****************************************************
changed: [192.168.40.105]
changed: [192.168.40.106]
TASK [app : configuration file] ************************************************ 配置文件没有改,这里是ok状态
ok: [192.168.40.105]
ok: [192.168.40.106]
TASK [app : start tomcat] ******************************************************
changed: [192.168.40.105]
changed: [192.168.40.106]
PLAY RECAP *********************************************************************
192.168.40.105 : ok=14 changed=9 unreachable=0 failed=0
192.168.40.106 : ok=14 changed=9 unreachable=0 failed=0
远程主机时间同步添加检测
# ansible test -m command -a 'crontab -l'
192.168.40.106 | SUCCESS | rc=0 >>
#Ansible: datatime sync
*/5 * * * * /usr/sbin/ntpdate time.windows.com > /dev/null
192.168.40.105 | SUCCESS | rc=0 >>
#Ansible: datatime sync
*/5 * * * * /usr/sbin/ntpdate time.windows.com > /dev/null
远程主机ipv6禁用检查
# ansible test -m command -a 'ifconfig eth0'
192.168.40.106 | SUCCESS | rc=0 >>
eth0 Link encap:Ethernet HWaddr 00:0C:29:4A:CB:A1
inet addr:192.168.40.106 Bcast:192.168.40.255 Mask:255.255.255.0
UP BROADCAST RUNNING MULTICAST MTU:1500 Metric:1
RX packets:224726 errors:0 dropped:0 overruns:0 frame:0
TX packets:46631 errors:0 dropped:0 overruns:0 carrier:0
collisions:0 txqueuelen:1000
RX bytes:318132245 (303.3 MiB) TX bytes:3707341 (3.5 MiB)
192.168.40.105 | SUCCESS | rc=0 >>
eth0 Link encap:Ethernet HWaddr 00:0C:29:56:9C:E1
inet addr:192.168.40.105 Bcast:192.168.40.255 Mask:255.255.255.0
UP BROADCAST RUNNING MULTICAST MTU:1500 Metric:1
RX packets:221974 errors:0 dropped:0 overruns:0 frame:0
TX packets:42693 errors:0 dropped:0 overruns:0 carrier:0
collisions:0 txqueuelen:1000
RX bytes:313230389 (298.7 MiB) TX bytes:3438676 (3.2 MiB)
# ansible test -m command -a 'ls /usr/local/'
192.168.40.106 | SUCCESS | rc=0 >>
apache-tomcat-7.0.42
bin
etc
games
include
lib
lib64
libexec
sbin
share
src
tomcat
192.168.40.105 | SUCCESS | rc=0 >>
apache-tomcat-7.0.42
bin
etc
games
include
lib
lib64
libexec
sbin
share
src
tomcat
服务也已经启动了
# ansible test -m command -a 'netstat -tnlp'
192.168.40.105 | SUCCESS | rc=0 >>
Active Internet connections (only servers)
Proto Recv-Q Send-Q Local Address Foreign Address State PID/Program name
tcp 0 0 0.0.0.0:22 0.0.0.0:* LISTEN 5777/sshd
tcp 0 0 127.0.0.1:25 0.0.0.0:* LISTEN 5858/master
tcp 0 0 ::ffff:127.0.0.1:8005 :::* LISTEN 7086/java
tcp 0 0 :::8080 :::* LISTEN 7086/java
tcp 0 0 :::22 :::* LISTEN 5777/sshd
tcp 0 0 ::1:25 :::* LISTEN 5858/master
192.168.40.106 | SUCCESS | rc=0 >>
Active Internet connections (only servers)
Proto Recv-Q Send-Q Local Address Foreign Address State PID/Program name
tcp 0 0 0.0.0.0:22 0.0.0.0:* LISTEN 5777/sshd
tcp 0 0 127.0.0.1:25 0.0.0.0:* LISTEN 5858/master
tcp 0 0 ::ffff:127.0.0.1:8005 :::* LISTEN 7080/java
tcp 0 0 :::8080 :::* LISTEN 7080/java
tcp 0 0 :::22 :::* LISTEN 5777/sshd
tcp 0 0 ::1:25 :::* LISTEN 5858/master
刚开始解压和创建软连接都是在shell脚本中实现的,执行时发现有问题
改为用tasks了
错误信息如下:
执行报错,输出详细信息:加-vvv
fatal: [192.168.40.105]: FAILED! => {
"changed": true,
"failed": true,
"invocation": {
"module_args": {
"_raw_params": "/usr/local/src/roles/app/files/tomcat.sh"
},
"module_name": "script"
},
"rc": 2,
"stderr": "Shared connection to 192.168.40.105 closed.\r\n",
"stdout": "sed: can't read /usr/local/tomcat/conf/server.xml: No such file or directory\r\nsed: can't read /usr/local/tomcat/conf/server.xml: No such file or directory\r\n",
"stdout_lines": [
"sed: can't read /usr/local/tomcat/conf/server.xml: No such file or directory",
"sed: can't read /usr/local/tomcat/conf/server.xml: No such file or directory"
]
}
fatal: [192.168.40.106]: FAILED! => {
"changed": true,
"failed": true,
"invocation": {
"module_args": {
"_raw_params": "/usr/local/src/roles/app/files/tomcat.sh"
},
"module_name": "script"
},
"rc": 2,
"stderr": "Shared connection to 192.168.40.106 closed.\r\n",
"stdout": "sed: can't read /usr/local/tomcat/conf/server.xml: No such file or directory\r\nsed: can't read /usr/local/tomcat/conf/server.xml: No such file or directory\r\n",
"stdout_lines": [
"sed: can't read /usr/local/tomcat/conf/server.xml: No such file or directory",
"sed: can't read /usr/local/tomcat/conf/server.xml: No such file or directory"
]
}
to retry, use: --limit @/usr/local/src/app.retry
PLAY RECAP *********************************************************************
192.168.40.105 : ok=10 changed=1 unreachable=0 failed=1
192.168.40.106 : ok=10 changed=1 unreachable=0 failed=1
解决方法:
拆解脚本,把tomcat解压和软连接通过yaml来实现
roles/app/files/tomcat.sh
文件中注释下面内容
#for file in $(ls ${PATH_DIR})
#do
# if [ "${file}" == "${TOMCAT_VERSION}.tar.gz" ];then
# tar xf ${PATH_DIR}/${TOMCAT_VERSION}.tar.gz -C ${DEST_DIR}
# ln -sv ${DEST_DIR}/${TOMCAT_VERSION} ${DEST_DIR}/tomcat
# break
# fi
#done
roles/app/tasks/main.yml 添加了
- name: copy unarchive tomcat to remote host
unarchive: src=/usr/local/src/roles/app/files/apache-tomcat-7.0.42.tar.gz dest=/usr/local copy=yes
- name: create soft link
file: src=/usr/local/apache-tomcat-7.0.42 dest=/usr/local/tomcat state=link
参考链接:
https://my.oschina.net/u/2456754/blog/505626
ansible的使用介绍链接:
http://wdllife.blog.51cto.com/6615958/d-6