使用ASP.NET Identity 实现WebAPI接口的Oauth身份验证
目前WEB 前后端分离的开发模式比较流行,之前做过的几个小项目也都是前后分离的模式,后端使用asp.net webapi 提供restful风格的数据接口;前端主要使用angularjs等框架。在这种前后分离的模式中如何保护我们的数据接口不被非法调用,这就可要考虑到后台接口的身份验证。我们常用采用的身份验证有http基本认证(结合https)、http摘要认证、oauth认证等等。本次我们讨论的是Oauth认证。
Oauth(Open Authorization)认证:oauth协议为用户资源的授权提供了一个安全的、开放而又简易的标准。与以往的授权方式不同之处是OAUTH的授权不会使第三方触及到用户的帐号信息(如用户名与密码)。
相关学习资料:https://oauth.net/2/
http://blog.jobbole.com/49211/
http://kb.cnblogs.com/page/189153/
OWIN (open web interface for .net) :基于.net平台的开放web接口。OWIN 在 .NET Web 服务器和 .NET Web 应用之间定义了一套标准的接口, 其目的是为了实现服务器与应用之间的解耦。
相关学习资料:http://owin.org/
http://www.cnblogs.com/zergcom/tag/OWIN/
http://www.nmtree.net/2014/06/13/getting-started-with-owin-and-katana.html
ASP.NET Identity: asp.net身份验证框架,微软在MVC 5.0(.NET Framework4.5)中新引入,类似mumbership。
相关学习资料:https://www.asp.net/identity
http://www.cnblogs.com/liuhaorain/p/3776467.html
http://www.cnblogs.com/shanyou/p/3918178.html
http://www.cnblogs.com/vxchin/p/introduction-to-aspnet-identity.html
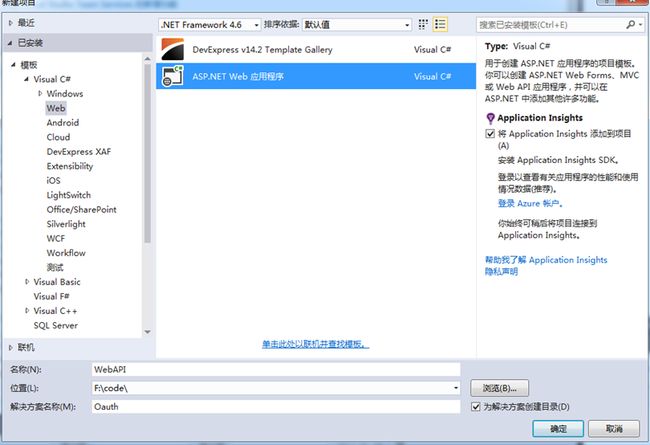
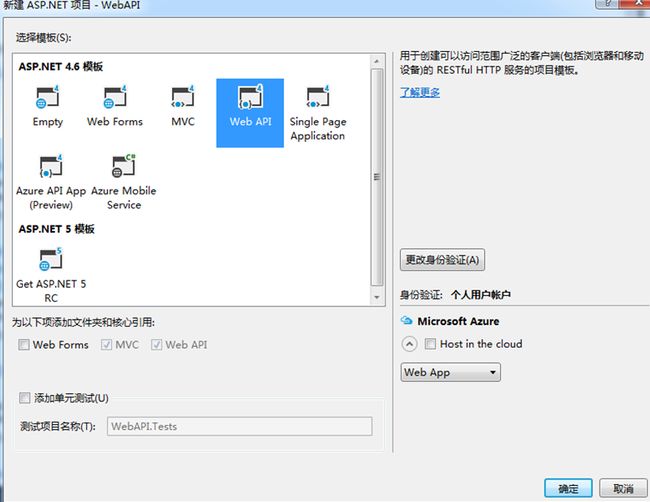
一、用VS2015新建一个项目,项目类型选择“ASP.NET web应用程序”点击“确定”(图1),选择“Web API”作为模板,点击“确定”(图2)。
图1
图2
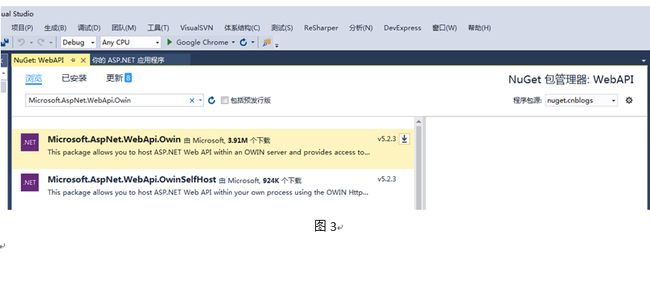
二、使用Nuget安装:Microsoft.AspNet.WebApi.Owin(图3)、Microsoft.Owin.Host.SystemWeb(图4)
图3
图4
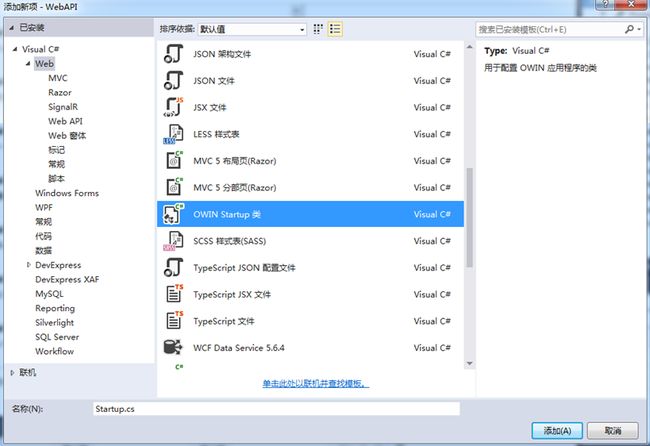
三、添加Owin启动类(图5):
设置Startup类代码如下:
using System.Web.Http;
using Microsoft.Owin;
using Owin;
[assembly: OwinStartup(typeof(WebAPI.Startup))]
namespace WebAPI
{
public class Startup
{
public void Configuration(IAppBuilder app)
{
HttpConfiguration config = new HttpConfiguration();
WebApiConfig.Register(config);
app.UseWebApi(config);
}
}
}
图5
四、删除Global.asax
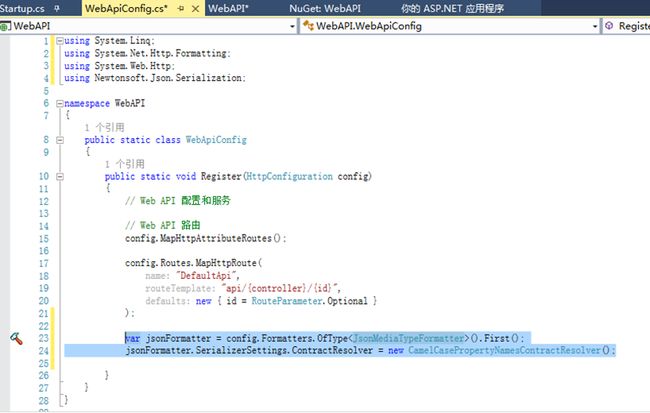
五、修改App_Start文件夹中的WebApiConfig.cs文件,实现api数据通过json格式返回(图6):
var jsonFormatter = config.Formatters.OfType
jsonFormatter.SerializerSettings.ContractResolver = new CamelCasePropertyNamesContractResolver();
图6
六、安装Microsoft.AspNet.Identity.Owin、Microsoft.AspNet.Identity.EntityFramework
图7
图8
七、创建AuthContext.cs:
using Microsoft.AspNet.Identity.EntityFramework;
namespace WebAPI
{
public class AuthContext: IdentityDbContext
{
public AuthContext() : base("AuthDataBase")
{ }
}
}
Web.config中增加connectionString:
八、在Models文件夹中创建UserModel.cs
using System.ComponentModel.DataAnnotations;
namespace WebApp.Models
{
public class UserModel
{
[Required]
[Display(Name = "User Name")]
public string UserName { get; set; }
[Required]
[DataType(DataType.Password)]
[StringLength(100, ErrorMessage = "The {0} must be at least {2} characters long", MinimumLength = 6)]
public string Password { get; set; }
}
}
九、添加AuthRepository.cs:
using System;
using System.Threading.Tasks;
using Microsoft.AspNet.Identity;
using Microsoft.AspNet.Identity.EntityFramework;
using WebAPI.Models;
namespace WebAPI
{
public class AuthRepository : IDisposable
{
private AuthContext _ctx;
private UserManager
public AuthRepository()
{
_ctx = new AuthContext();
_userManager = new UserManager
}
public async Task
{
IdentityUser user = new IdentityUser()
{
UserName = model.UserName
};
IdentityResult result = await _userManager.CreateAsync(user, model.Password);
return result;
}
public async Task
{
IdentityUser user = await _userManager.FindAsync(model.UserName, model.Password);
return user;
}
public async Task
{
IdentityUser user = await _userManager.FindByNameAsync(username);
return user;
}
public void Dispose()
{
_ctx.Dispose();
_userManager.Dispose();
}
}
}
十、添加AccountController.cs
using System.Threading.Tasks;
using System.Web.Http;
using Microsoft.AspNet.Identity;
using WebAPI.Models;
namespace WebAPI.Controllers
{
[Authorize]
[RoutePrefix("api/Account")]
public class AccountController : ApiController
{
private AuthRepository _authRepo;
public AccountController()
{
_authRepo = new AuthRepository();
}
[AllowAnonymous]
[Route("Register")]
public async Task
{
if (!ModelState.IsValid)
{
return BadRequest(ModelState);
}
IdentityResult result = await _authRepo.Register(model);
IHttpActionResult errorResult = GetError(result);
if (errorResult != null)
{
return errorResult;
}
return Ok();
}
private IHttpActionResult GetError(IdentityResult result)
{
if (result == null)
{
return InternalServerError();
}
if (!result.Succeeded)
{
foreach (string err in result.Errors)
{
ModelState.AddModelError("", err);
}
if (ModelState.IsValid)
{
return BadRequest();
}
return BadRequest(ModelState);
}
return null;
}
}
}
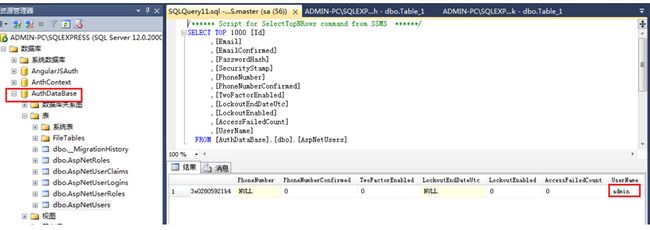
十一、使用Fiddler调用接口http://localhost:17933/api/account/register(图9)。调用成功后会生成数据库AuthDataBase和用户相关表(图10)
POST http://localhost:17933/api/account/register
Header:
Content-Type: application/x-www-form-urlencoded
Request Body:
UserName=admin&Password=111111
图9
图10
十二、添加OrderController.cs:
using System;
using System.Collections.Generic;
using System.Web.Http;
namespace WebAPI.Controllers
{
public class OrderController : ApiController
{
[Authorize]
[RoutePrefix("api/orders")]
public class OrdersController : ApiController
{
[Route]
public IHttpActionResult Get()
{
return Ok(Order.CreateOrders());
}
}
public class Order
{
public int OrderID { get; set; }
public string CustomerName { get; set; }
public string ShipperCity { get; set; }
public Boolean IsShipped { get; set; }
public static List
{
List
{
new Order {OrderID = 10248, CustomerName = "Taiseer Joudeh", ShipperCity = "Amman", IsShipped = true },
new Order {OrderID = 10249, CustomerName = "Ahmad Hasan", ShipperCity = "Dubai", IsShipped = false},
new Order {OrderID = 10250,CustomerName = "Tamer Yaser", ShipperCity = "Jeddah", IsShipped = false },
new Order {OrderID = 10251,CustomerName = "Lina Majed", ShipperCity = "Abu Dhabi", IsShipped = false},
new Order {OrderID = 10252,CustomerName = "Yasmeen Rami", ShipperCity = "Kuwait", IsShipped = true}
};
return OrderList;
}
}
}
}
十三、安装Microsoft.Owin.Security.OAuth(OAuth Bearer Token支持类库 )(图11)
图11
十四、添加Providers文件夹,在文件夹中创建AuthorizationServerProvider.cs
using System.Security.Claims;
using System.Threading.Tasks;
using Microsoft.AspNet.Identity.EntityFramework;
using Microsoft.Owin.Security.OAuth;
using WebAPI.Models;
namespace WebAPI.Providers
{
public class AuthorizationServerProvider : OAuthAuthorizationServerProvider
{
public override async Task ValidateClientAuthentication(OAuthValidateClientAuthenticationContext context)
{
context.Validated();
}
public override async Task GrantResourceOwnerCredentials(OAuthGrantResourceOwnerCredentialsContext context)
{
context.OwinContext.Response.Headers.Add("Access-Control-Allow-Origin", new[] { "*" });
using (AuthRepository _repo = new AuthRepository())
{
IdentityUser user = await _repo.FindUser(
new UserModel() { UserName = context.UserName, Password = context.Password });
if (user == null)
{
context.SetError("invalid_grant", "The username or password is incorrect");
return;
}
}
var identity = new ClaimsIdentity(context.Options.AuthenticationType);
identity.AddClaim(new Claim("sub", context.UserName));
identity.AddClaim(new Claim("role", "user"));
context.Validated(identity);
}
}
}
安装:Microsoft.Owin.Cors (跨域)(图12)
图12
修改Startup.cs:
using System;
using System.Web.Http;
using Microsoft.Owin;
using Microsoft.Owin.Cors;
using Microsoft.Owin.Security.OAuth;
using Owin;
using WebAPI.Providers;
[assembly: OwinStartup(typeof(WebAPI.Startup))]
namespace WebAPI
{
public class Startup
{
public void Configuration(IAppBuilder app)
{
HttpConfiguration config = new HttpConfiguration();
ConfigAuth(app);
WebApiConfig.Register(config);
app.UseCors(CorsOptions.AllowAll);
app.UseWebApi(config);
}
public void ConfigAuth(IAppBuilder app)
{
OAuthAuthorizationServerOptions option = new OAuthAuthorizationServerOptions()
{
AllowInsecureHttp = true,
TokenEndpointPath = new PathString("/token"),
AccessTokenExpireTimeSpan = TimeSpan.FromDays(1),
Provider = new AuthorizationServerProvider()
};
app.UseOAuthAuthorizationServer(option);
app.UseOAuthBearerAuthentication(new OAuthBearerAuthenticationOptions());
}
}
}
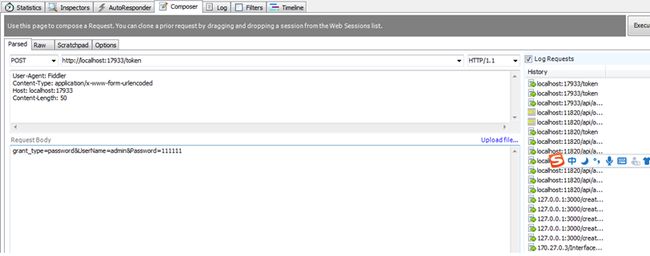
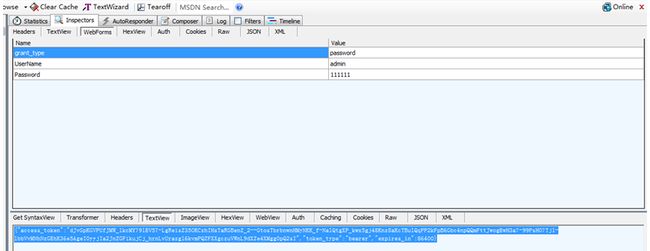
十五、使用fiddler调用:http://localhost:17933/token(图13),调用成功后生成token(图14)
POST http://localhost:17933/token
Header:
Content-Type: application/x-www-form-urlencoded
Request Body:
grant_type=password&UserName=admin&Password=111111
图13
图14
十六、使用上一步骤生成的token请求order数据(图15),请求成功后返回Order数据(图16):
GET http://localhost:17933/api/orders
Header:
Authorization: bearer dJvGpKGVPUfJMW_lkcMY79lEV57-LgRe1sZ35OKCzhIHsTaRGBenZ_2--GtosTbrbnwnHMyNKK_f-NalQtgXP_kwx5gj48KnzSaKcTBulQqPP2kFpB6Gbc4npQQmFttJwogEwH3a7-99PsH07Tjl-lbbVvMNhNzGEhK36e5AgeI0yyjIa2JnZGF1kujCj_hrnLvUrazgl6kvmPQZFXXgczuVWnL9dXZe4XMgg0pQ2sI
图15
图16
